
Bamboo is a continuous integration (CI for short) and continuous deployment (CD) tool that ties automated building and testing, as well as releases, together in a single workflow, making software development easier and faster as a result. It was created by the Atlassian company and it’s fully integrated with Jira and Bitbucket.
In my project at Pretius, Bamboo is employed to install changes to environments with just a few mouse clicks, using pre-configured parameters defined by the installation process.
It’s worth mentioning that Bamboo isn’t free (although a free 30-day trial is available). To use the software you have to pay for agents, which can also be called “process managers”. The cost of one agent is $1200 per year. The number of agents determines how many processes can be executed at the same time, and therefore how big the final price is. More on the costs of Bamboo can be found here.
There are many advantages of using CI/CD in terms of automating the development and deployment process. In my opinion, the following are the most important reasons to use the Bamboo CI/CD tool in Oracle APEX development:
A well-configured process in Bamboo allows you to install database changes, as well as changes in the APEX application, with just a few mouse clicks. You don’t have to separately, manually install database and application changes. This makes the installation process less time-consuming and easier to control based on pre-configured parameters.
Bamboo gives you access to installation logs so that you can easily see who installed the changes. You also know when and on which database schema they were installed, and whether the installation was successful. Additionally, other developers are aware of the installed changes and can check these things at any point in time.
Due to the fact that the process is executed by remote Bamboo agents, it’s independent of the developer’s operating system, local configuration, and directory structure. It doesn’t matter who’s installing the changes – the process always looks the same.
Before going to the section below – one that will familiarize you with the definitions used in Bamboo CI/CD and help you prepare your first process – there are a few prerequisites that need to be met. In this part of the article, I’ll also define some basic assumptions about the project (as they were in my case, which will be used as an example).
First of all, you must create your own GIT repository containing the APEX application code and database scripts in such a format that you can install it using Liquibase. If you do not know how to manage database scripts with the Liquibase tool, you should read Rafał Grzegorczyk’s Liquibase tutorial and adjust your repository.
Another very important thing is that the Bamboo CI/CD tool should be configured and integrated with the Bitbucket code repository as well as with Jira. In my case, the Bamboo Remote Agents are using Windows (according to the documentation, they can also run on Linux, and MacOS / OSX), so that’s the example I’ll base the article on. With all of this, the environment is ready to be used.
In my case, initially the code repository looks like this.
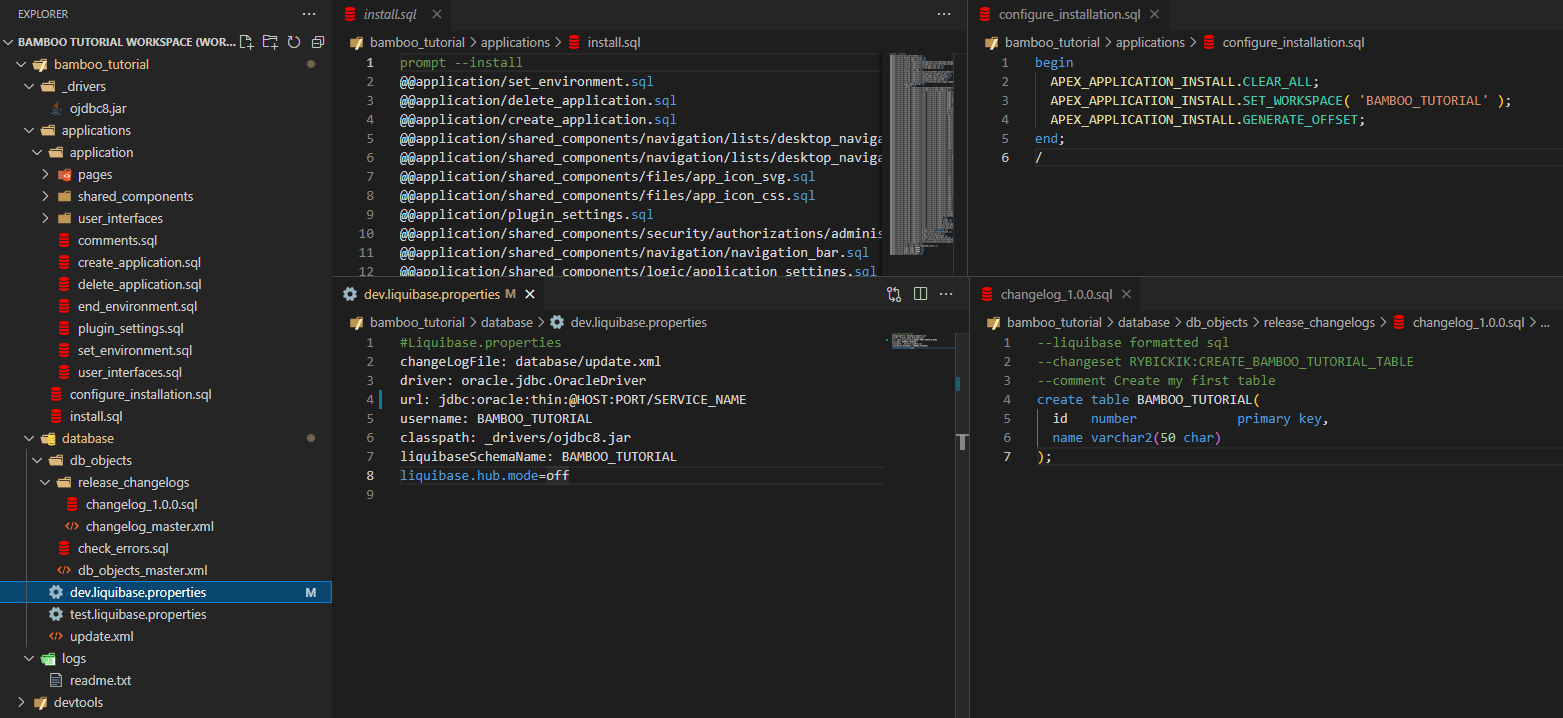
My code repository contains four main directories:
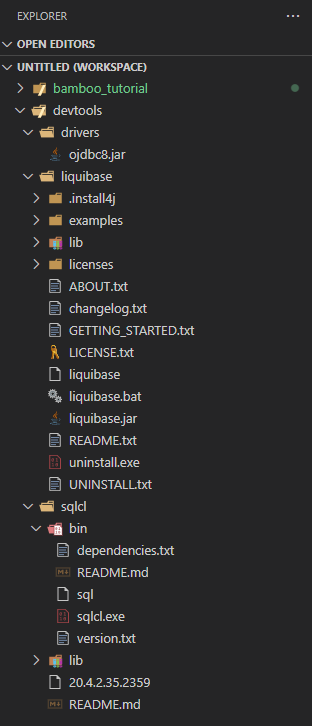
Additionally, I have a separate repository for tools such as Liquibase and SQL Command Line, which I will use to install changes on the database side, as well as in the APEX application itself. These tools could be downloaded as dependencies if I used Gradle or Maven scripts in my process. In this case, I decided to prepare batch scripts that the agents – running on the Windows operating system – can run with the Command Prompt. These will use tools that will be downloaded from the repository. Note that in my case the Command Line’s SQL executable file is named sqlcl.exe instead of sql.exe.
That’s it for the prerequisites. Now let’s go over some basic assumptions. In my project they are as follows:
Before I outline the plan on the basis of which the installation process will work, I want to introduce you to the most important definitions that will appear in the rest of this article. You need to know the following terms:
“Plan” defines everything about your build process. Each “plan” has a default “job” when it is created. Each “plan” has its own name, key, and repositories it links to. In the plan configuration we can set the following:
Jobs are defined within a stage and each job holds a list of tasks. Jobs run concurrently, provided you have enough agents to execute them;
A task is a piece of work that is being executed as part of the build. The execution of a script, a shell command, an Ant Task, or a Maven goal are only a few examples of tasks.
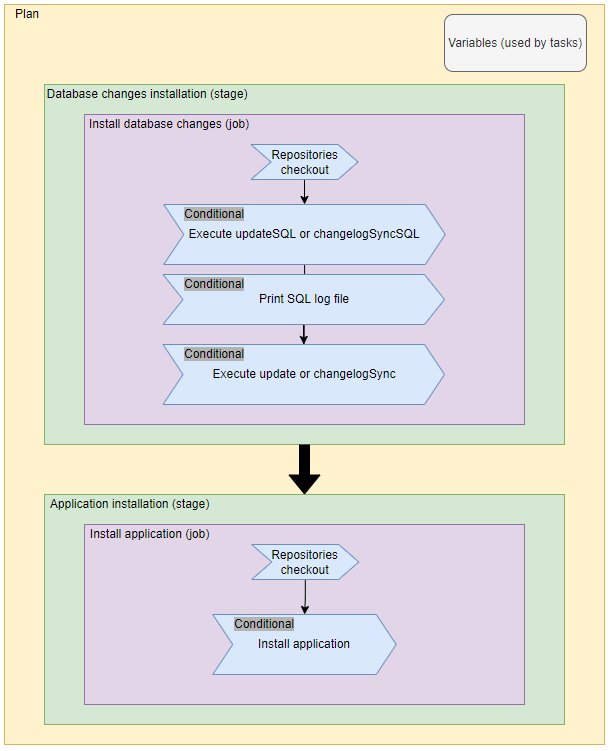
Finally, I can start planning my build process. Going from the general to the specific, I want to have one plan for my application, which will consist of two stages: one for installing the changes on the database side using Liquibase, and the other for installing the APEX application (but only if the installation of the changes on the database side succeeds – remember that the stages are executed one after the other). I will also have variables within one plan that will be used by the tasks.
In each stage, there will be only one job with several tasks. The stage during which the installation of changes on the database will take place will consist of the following tasks (blue blocks on the diagram above):
As for the stage used to install the application, the number of tasks is smaller:
Do you want to join a great team of Oracle APEX developers and work among real low-code enthusiasts? 🔥 If so, write at pstaniszewski@pretius.com and send us your resume!
Finally, I can move on to creating a plan and preparing the missing batch scripts that will be added to my code repository and run by the tasks contained in the jobs.
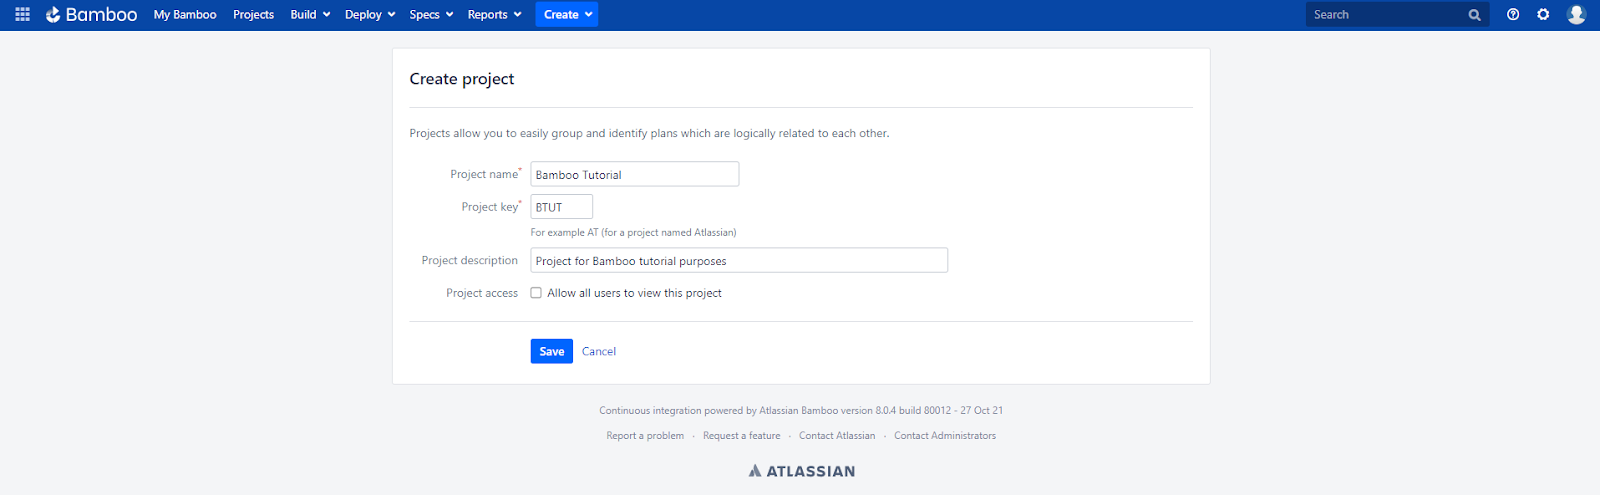
The first step is to start a new project within which I will create my plan. From the home page in Bamboo, I click the Create button on the top navigation bar, then Create project. I enter the project name, project key, and project description and click Save. Once the project is created, I am redirected to my project screen.
In the next step, I want to create a new plan, so I click the Create plan button located on the home screen of my project (or on the navigation bar after clicking Create). On the screen that appears, I select Project: Bamboo Tutorial, enter the Plan Name: Bamboo Tutorial First App and Plan key, and Plan description. Finally, I click the Create button.
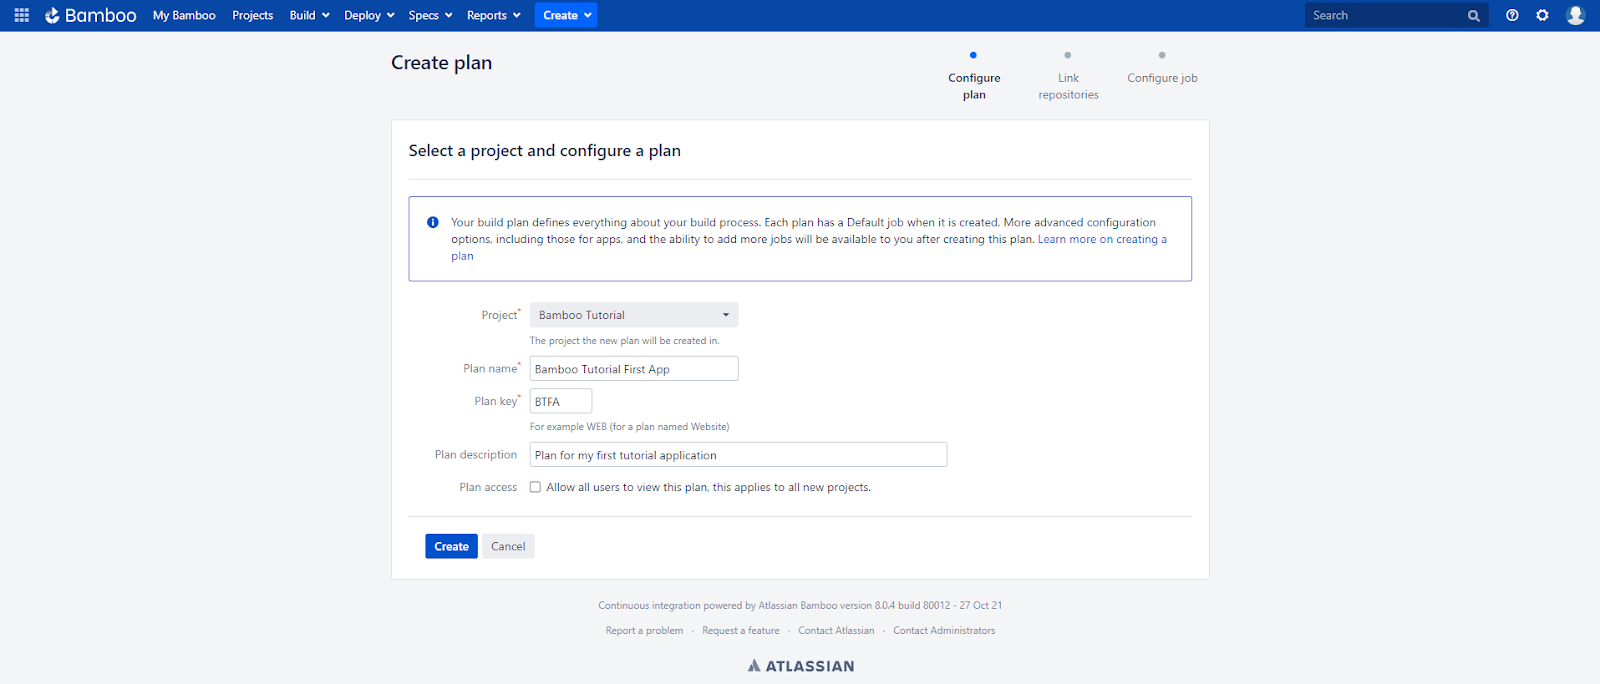
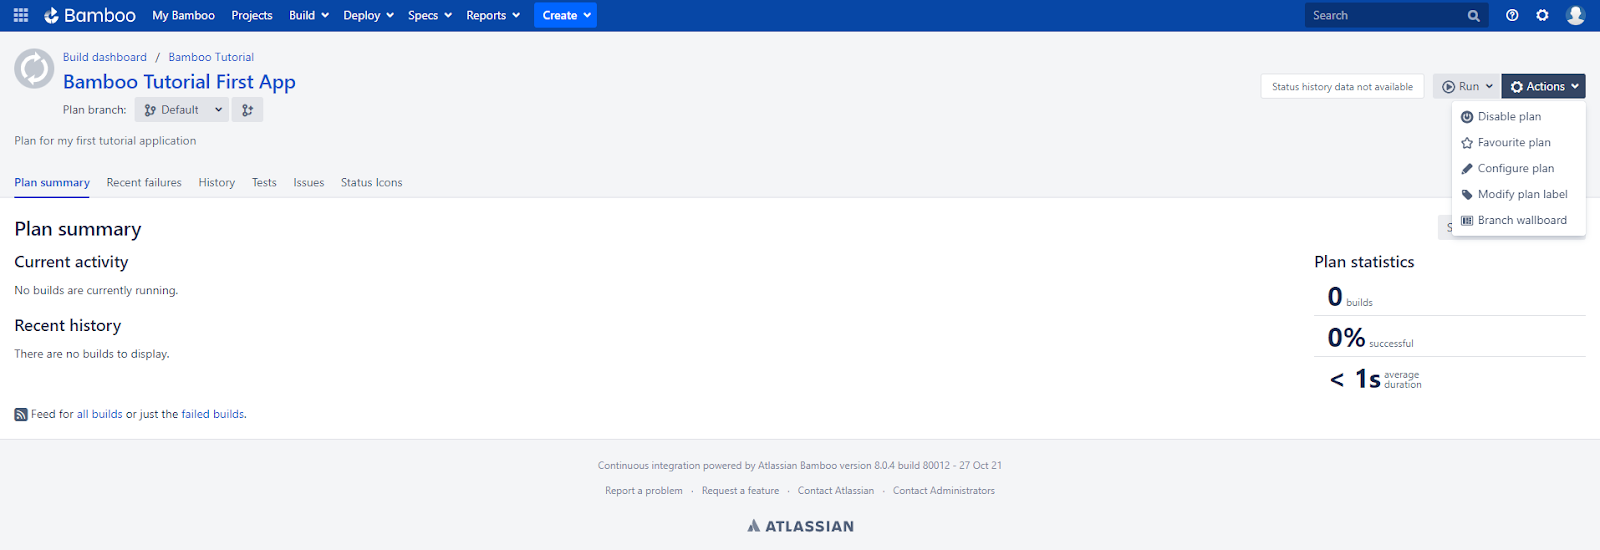
On the next screen (Link repositories), I select None, and click Save and continue. Finally, on the Configure job screen I select the Agent environment option for the Run this job in field. This option means that the build will be executed in the native operating system of the agent that will execute the job. I click Create button to finish the initial plan configuration. After clicking the button I am redirected to the main page of my plan.
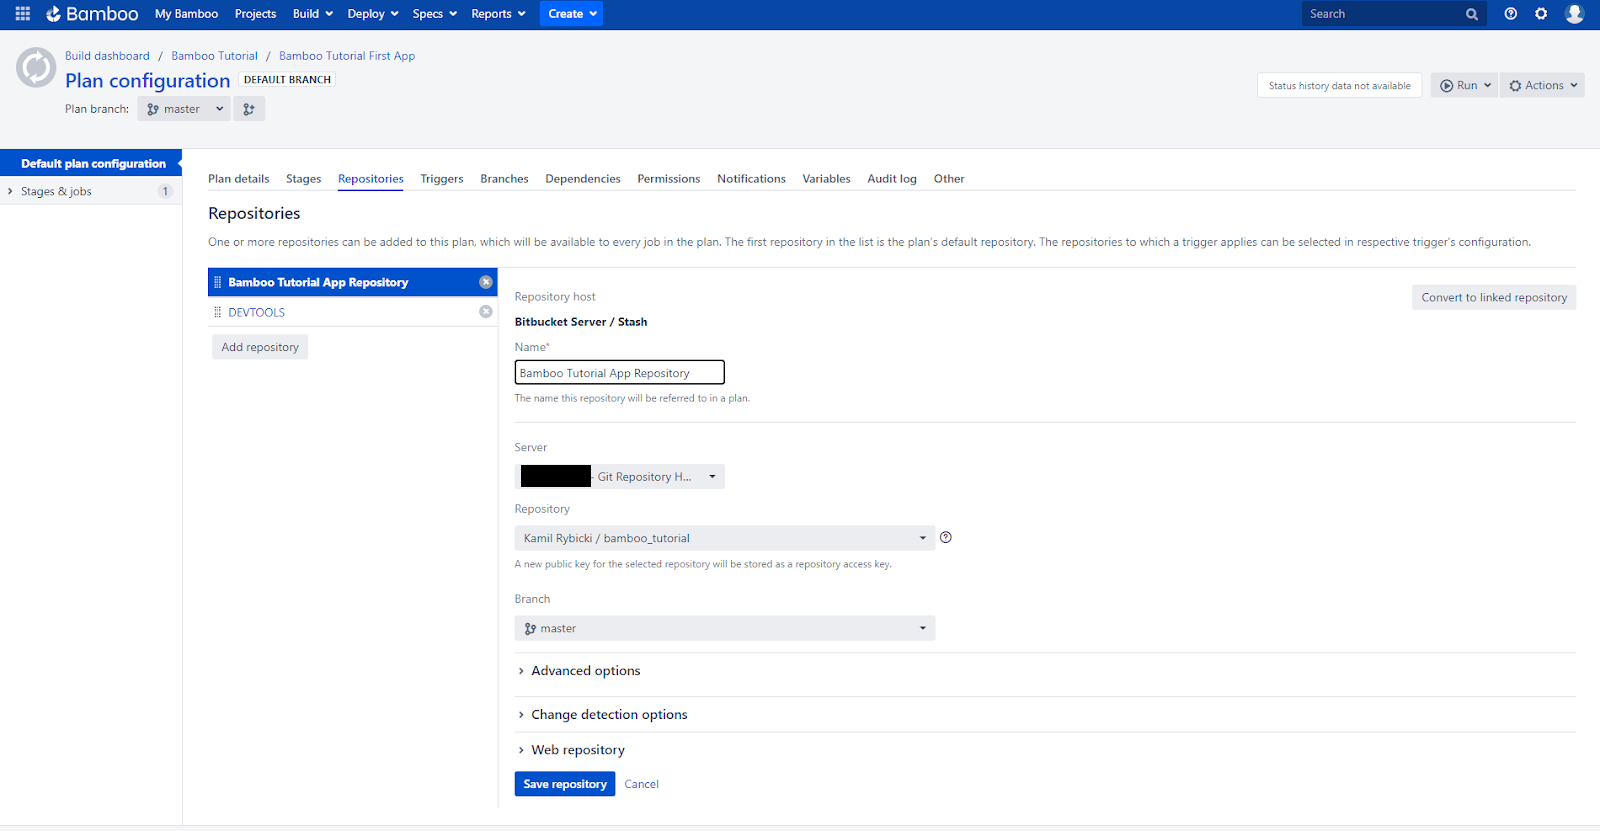
During the next steps, I need to take care of configuring my plan: adding links to the repository, creating variables, stages, jobs, and tasks. To do this, I click on the Actions button on the right side of the screen, and then the Configure plan option. The configuration screen shows the tabs I mentioned in the definitions section.
I’ll start the configuration by adding the required repositories, i.e. code repository and devtools repository. I click on the Repositories tab, then on Add repository. As a repository host, I choose Bitbucket Server / Stash in the Create new tab because my code repository is on Bitbucket.
Then I enter the name of the repository in the Name field and authenticate myself (if it’s required) on the Git Repository Hosting server by clicking Login & approve, so I can see the available repositories. I choose my code repository with the name bamboo_tutorial and the master branch (for the purpose of this tutorial I have only one of those). I leave other configuration options unchanged. After that, I add the devtools repository using exactly the same method. Now, I have two repositories that will be used within the plan.
The Triggers tab gives you the ability to run the build automatically depending on the circumstances. For example, you can run the build every time a change is pushed to your branch. I’m skipping this tab for now because I want to run the build of my plan manually.
The Branches tab, on the other hand, allows you to create new plans when, for example, a new branch is created in the repository. You can also fully configure when the new plans should be triggered and after how long they should be removed. The Branches tab will not be needed in this tutorial so we can skip it.
The Dependencies tab (used to add dependencies between plans) and Permissions tab (for managing permissions of users and user groups accessing the plan and project) can also be omitted.
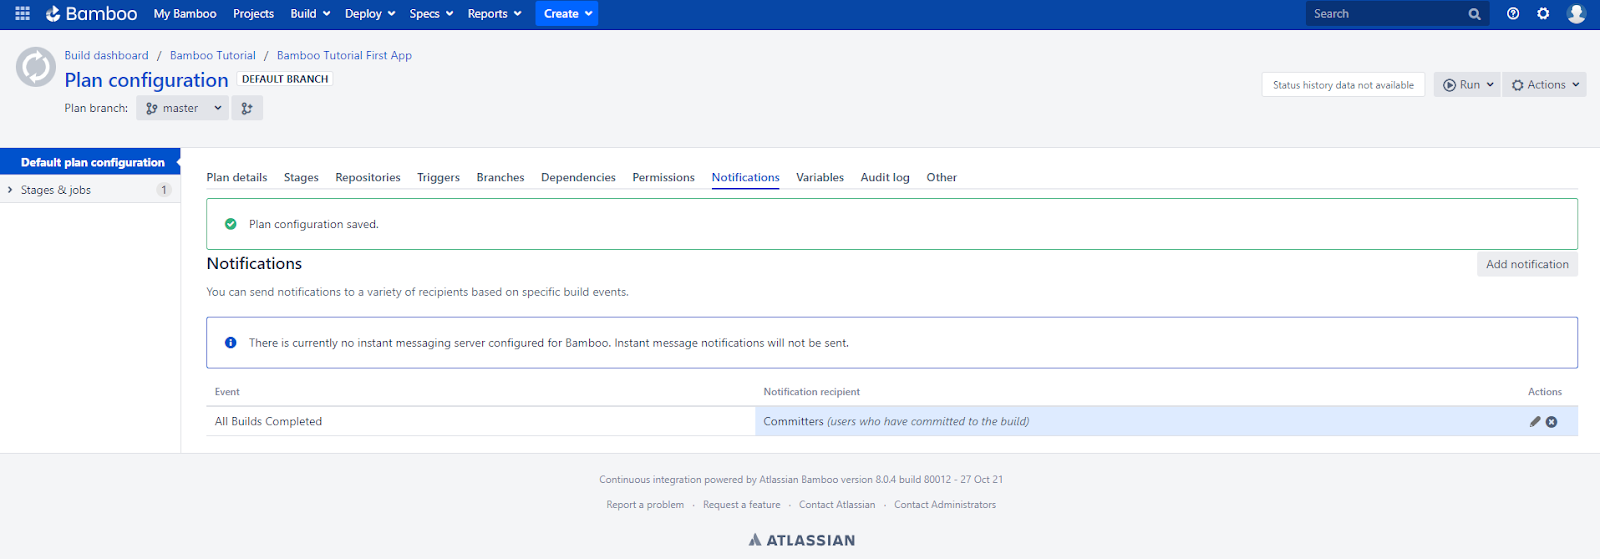
Going further, we have the Notifications tab which is used to configure notifications about the build status. I want to be informed about whether the build executed correctly so I add a notification by clicking the Add notification button. Then I specify the events and recipient types – I choose Event: All Build Completed and Recipient type: Committers and click the Add button.
Variables is yet another tab – I’ll come back to this one later, after creating my tasks, when I’ll define what variables I need to make the process work as I planned. When it comes to the last two tabs, Audit log contains logs related to plan editing and creation and the Other tab contains the rest of the configuration options, which aren’t important in the context of this article.
With most of the tabs described, I can now go back to the Stages tab I left out and start preparing the stages, jobs, and tasks that my plan will perform. According to the plan outline, I will have two Stages. The first (default, automatically created) will be renamed and the second will be added using the Create stage button. To rename the default stage, I click the gear icon located on the right side of the Default Stage. Then, I enter the name Database changes installation in the Stage name field and click Save. After that, I add a new stage using the Create stage button and enter the name Application installation. And with this, the stages are ready.
Now, it’s time to create jobs and tasks. I click on the job name created automatically (Default Job) and I am redirected to the detailed job configuration screen. In the Job details tab, I change the job name to Install database changes and check the Job enabled box. I’m skipping the Docker tab because my job will run in the agent’s operating environment.
Now, all I have to do is to create tasks that will be executed by the job. In the Tasks tab, I click the Add task button and add the following tasks one by one:
Source Code Checkout is a task used to retrieve the contents of the code and devtools repositories I added earlier.

Command #1 is the task used to execute the command in the command terminal.
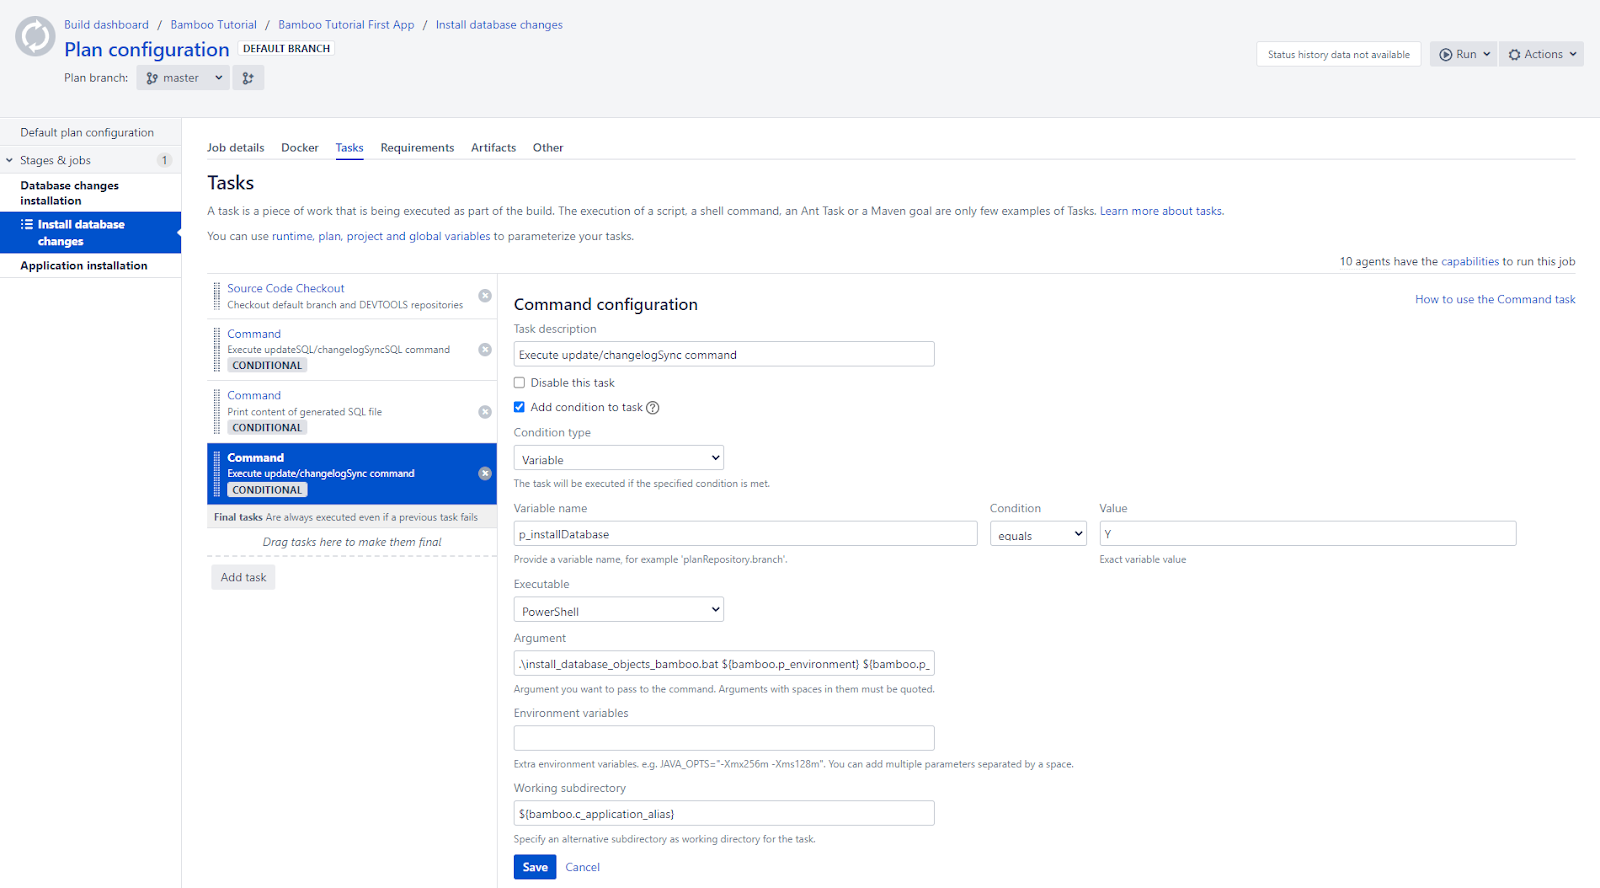
Command #2 is yet another task executing a command.
And, finally, the Command #3 task.
In the end, I have a job with four tasks: Source Code Checkout and three Command tasks (generating a SQL file, displaying its contents, and executing the script through Liquibase), as shown in the screenshot below.
It’s time to prepare a job for application installation. I’m going back to the Stages tab on the plan configuration page, then on Application Installation stage, I click the Add job button, and then Create a new job. I name the job Install application and choose to run the job in the Agent environment. Finally, click the Create job button. Next, I click on the job name which will take me to job configuration.
Now, all I have to do is to create the tasks that will be executed by the job. In the Tasks tab, I click Add task button and add the following tasks one by one:
Source Code Checkout – I configure this task in the same way as I configured the job responsible for installing changes on the database side.
When it comes to the Command task:
The penultimate step is to create the variables I used when creating the tasks and give these variables default values. To do this, I go back to the plan configuration page and click on the Variables tab. I’ve divided my variables into two categories: constants (starting with c_ prefix, for which I’ll always use default value) and parameters (starting with p_ prefix, these variables may be editable). I will need the following variables with default values:
I add variables by entering a variable name into the Variable name field, a default value into Value field, and then clicking the Add button. In the end, my list of variables looks as follows:

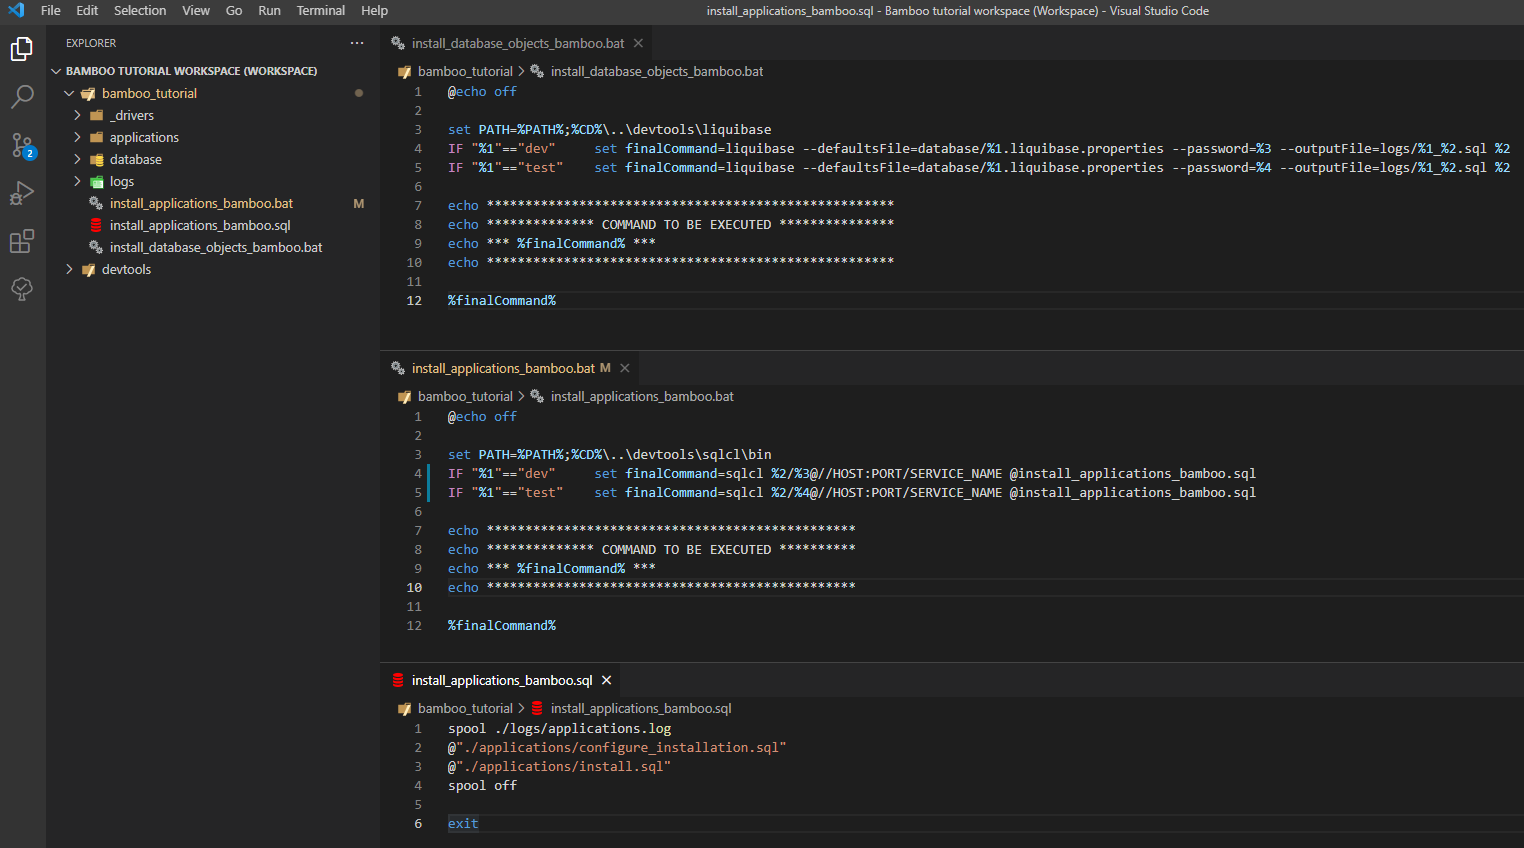
The final step is to prepare the batch scripts that will be executed by the Bamboo schema task (as a reminder, these will be Windows scripts). Paths to the development tools such as Liquibase and SQLCL will be added to the PATH environment variable.
The first script is called install_database_objects_bamboo.bat and contains the following code:
@echo off

set PATH=%PATH%;%CD%\..\devtools\liquibase
IF "%1"=="dev"     set finalCommand=liquibase --defaultsFile=database/%1.liquibase.properties --password=%3 --outputFile=logs/%1_%2.sql %2
IF "%1"=="test"    set finalCommand=liquibase --defaultsFile=database/%1.liquibase.properties --password=%4 --outputFile=logs/%1_%2.sql %2

echo *****************************************************
echo ************** COMMAND TO BE EXECUTED ***************
echo *** %finalCommand% ***
echo *****************************************************

%finalCommand%
According to what I specified in the Bamboo task, the first parameter will be environment name (in my case: dev or test), then the Liquibase command (updateSQL or changelogSyncSQL), then database schema password on dev environment, and finally test environment password (parameter number 4).
The second script I need is install_applications_bamboo.bat. Its code looks like this (note that in my case the SQL Command Line executable is sqlcl instead of sql):
@echo off

set PATH=%PATH%;%CD%\..\devtools\sqlcl\bin
IF "%1"=="dev"     set finalCommand=sqlcl %2/%3@//HOST:PORT/SERVICE_NAME @install_applications_bamboo.sql
IF "%1"=="test"    set finalCommand=sqlcl %2/%4@//HOST:PORT/SERVICE_NAME @install_applications_bamboo.sql

echo ************************************************
echo ************** COMMAND TO BE EXECUTED **********
echo *** %finalCommand% ***
echo ************************************************

%finalCommand%
As above, the first parameter is the environment name, then the database schema name (used to connect to the database schema), and then the environment passwords (parameters 3 and 4).
The last script is an SQL script named install_applications_bamboo.sql. It’s responsible for setting up and running the installation of APEX applications after connecting to the database schema. Its code is presented as follows:
spool ./logs/applications.log
@"./applications/configure_installation.sql"
@"./applications/install.sql"
spool off

exit
The above scripts should be added to the repository at the same level as the logs, database (etc.) directories. In the end, the files look like this:
I have reached the end! I have a plan, within the plan I have created stages, jobs, and tasks. I’ve also prepared variables used by these tasks and batch scripts which I’ve added to the repository.
It’s time to install my changes on the test environment! As a reminder, my changelog contains one changeset which will create a BAMBOO_TUTORIAL table with two columns: ID and NAME. As for the application, my application is named Bamboo tutorial and it has two pages – login and Home – without any region (default application was exported right after its creation).
In order to install the changes (which have already been pushed to the code repository), I return to my plan’s home page, then click the Run button on the right side of the screen, then click Run plan. Clicking the button will start the installation using the default parameters. After several seconds, my installation is complete and a green bar tells me it was successful.
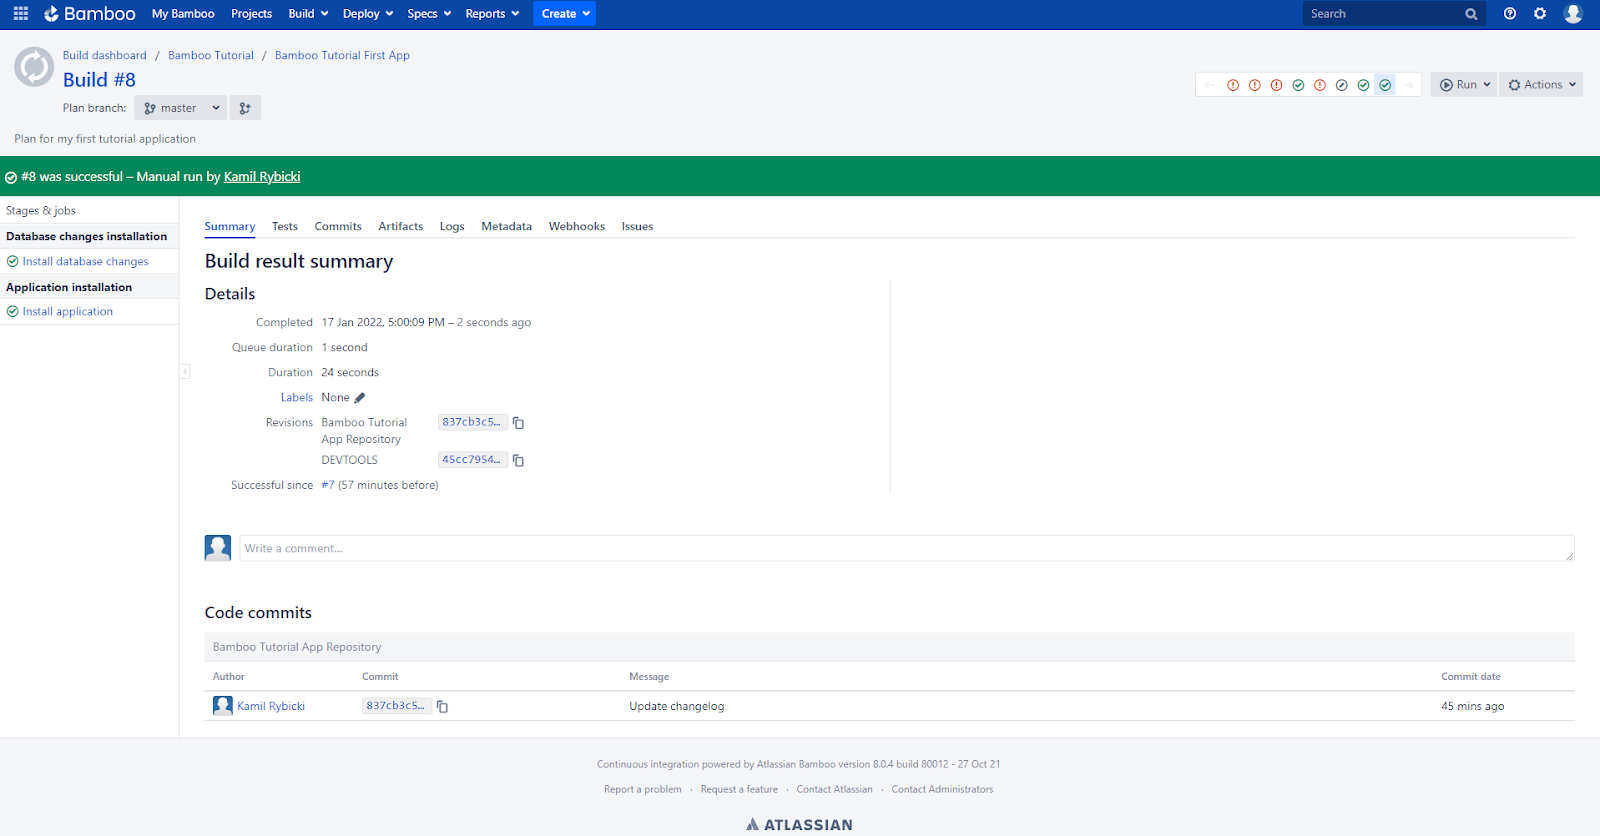
If I want to check the installation details, I can click on the Logs tab and then click on a job. This will take me to the view with detailed installation logs where I can, among other things, check what changes were installed on the database side (in my case it’s just a created table named BAMBOO_TUTORIAL).
If I want to run the installation with my own parameters (variables), I can do it by clicking Run and then Run customized. In this situation, I can overwrite all the parameters by duplicating clicks on the Override a variable button in the dialog box that will be displayed. Once the variables are overwritten, all I have to do is click Run to run the plan.
Bamboo CI/CD is a powerful tool, which can make your work a lot easier. You’ll build and test faster, and release management will be much less of a problem. Although the information presented in this article is only a base to get you acquainted with Bamboo and it may seem that the process prepared by me is very limited, nothing stops you from modifying the plan by adding additional variables like application alias or its ID. It’s also entirely possible to prepare complex rules on the PL/SQL side. Depending on variables created by the developer, as well as those provided by Bamboo itself (like information about the branch name from which the plan is launched), these will be able to dynamically influence the configuration of the installation.
I plan to write another article in the future – one that’ll focus on the Bamboo + Bitbucket + Jira integration. So be on the lookout! Also, you can find other APEX-related articles on our blog:
At Pretius we have a deep understanding of low-code platforms, and Oracle APEX is our specialty. If you’re interested in a powerful app or system developed using this technology, drop us a line at hello@pretius.com or use the contact form below. We’ll get back to you in 48 hours.


