
A while ago, I published a detailed article on the use of the Google API Client Library for JavaScript in APEX applications: How to integrate Google Workspace with Oracle APEX and Oracle Database: The ultimate guide. This library enables integration with the Google API on the JavaScript side, allowing you to take advantage of the possibilities the Google ecosystem offers.
However, a significant change is on the horizon, which was announced on the official Google pages. The library mentioned above will soon be replaced with a new one called Google Identity Services for Web, and the old solution will be fully retired on March 31, 2023. This creates some problems for the solutions I’ve presented in my previous article, so I’ve decided to write a follow-up to address them.
In this blog post, I will present a simple example of using the new library in an APEX application along with my idea to solve the Access Token expiration problem and avoid logging in to Google every time. The main issue is that the library has been simplified to the point where – if the integration with Google is to be successful – each site refresh requires you to log in once again. As you can imagine, this isn’t very convenient, so I’ve come up with an idea to improve on what Google offers by default.
The following tutorial can be successfully implemented in existing integrations with Google, which were based on the withdrawn library.
But first, let’s take a step back and look at the benefits of using the Google API Client Library. I rate its usefulness very highly, mainly due to the convenience of use and built-in modules for cooperation with, for example, Google Sheets.
The library has several functionalities, including two that are very important:
According to Google, the new library will bring improvements in terms of user visibility and trust, and help reduce friction during sign-in, in addition to the previously offered authentication and authorization functionalities. If you want to know more about Google Identity Services, check out the official documentation:
Google has also published instructions for migrating to the new library, describing the differences between them and how to replace the individual modules of the old library.
Now, I’ll show you how to avoid problems with Access Token expiration and the need to log in to Google constantly when using the new library.
I’ll use a sample application to present my approach, so let’s start with its description. There are a couple of things you need to set up in the page-level settings.
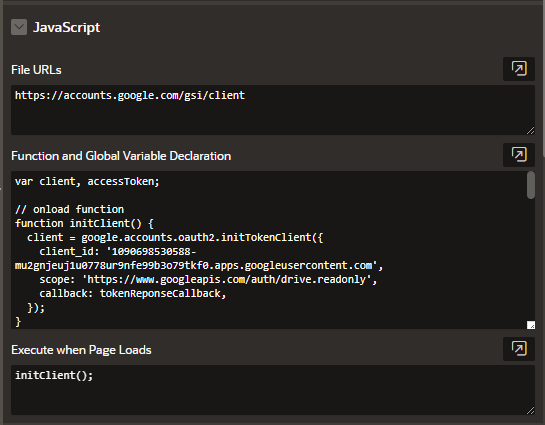
In the JavaScript section, you need to perform the following steps:
var client, accessToken;

// onload function
function initClient() {
  client = google.accounts.oauth2.initTokenClient({
    client_id: 'YOUR_CLIENT_ID',
    scope: 'https://www.googleapis.com/auth/drive.readonly',
    callback: tokenReponseCallback,
  });
}

async function tokenReponseCallback(tokenResponse) {
  await apex.server.process('AJAX | Save access token', {x01: tokenResponse.token_type + ' ' + tokenResponse.access_token});

  // start working with API - put render function here

  var x = await callAPI();
}

async function getCurrentToken() {
    var result = await apex.server.process('AJAX | Get access token');

    if(result.token_exists) {
      accessToken = result.access_token;
    } else {
      client.requestAccessToken();
    }
}

async function callAPI() {

  // add this before each promise chain, like fetching gDrive data or creating folder
  await getCurrentToken();

  var result;

  try {
    result = await $.ajax({
      headers: {
        'Authorization': accessToken
      },
      url: 'YOUR_GOOGLE_API_ENDPOINT',
      type: 'GET'
    });

    console.log(result);

    return result;
  } catch(e) {
      if(e.readyState === 4 && e.status === 401) {
        client.requestAccessToken();
      }
  }
}
Here’s how it should look:
The code shown above describes 4 functions that are written in the async/await approach:
Overall, the above is a significant improvement and an attempt to build on what the old library offered out of the box. The new way reduces the number of annoying Google logins, which – without any improvements – comes down to having to do it every time.
In principle, the method I presented can also be used in other programming languages or platforms. It’s important to ensure that the stored data is secure.
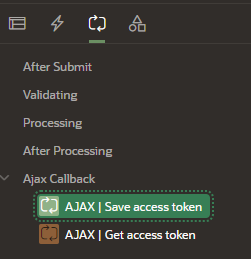
Now, let’s talk a bit about the Ajax callback function, which is used to create asynchronous web applications. To use it, you have to create a new Ajax Callback type process called “AJAX | Save access token”. Here’s the code you can use to do this:
declare
  c_coll_google_access_token constant varchar2(50) := 'GOOGLE_ACCESS_TOKEN';
begin
  apex_collection.create_collection(p_collection_name    => c_coll_google_access_token,
                                    p_truncate_if_exists => 'YES');

  apex_collection.add_member(p_collection_name => c_coll_google_access_token,
                             /* save access token */
                             p_c001            => apex_application.g_x01,
                             p_d001            => sysdate);

  apex_json.open_object;
  apex_json.close_object;
end;
This will do the following:
Next, you have to create a new process “AJAX | Get access token” as an Ajax Callback process. The code is as follows:
declare
  c_coll_google_access_token constant varchar2(50)    := 'GOOGLE_ACCESS_TOKEN';
  c_seconds_in_one_day                number          := 24 * 60 * 60;
  c_token_valid_period                number          := 3600;
  l_access_token                      varchar2(4000);
  l_insert_date                       date;
  l_token_exists                      boolean         := false;
  l_seconds_to_expiration             number          := 0;
begin
    select c001 as access_token,
           d001 as insert_date
      into l_access_token,
           l_insert_date
      from apex_collections
     where collection_name = c_coll_google_access_token;

    l_token_exists := true;
    l_seconds_to_expiration := c_token_valid_period - ((sysdate - l_insert_date) * c_seconds_in_one_day);

  apex_json.open_object;
    apex_json.write('token_exists', l_token_exists);
    apex_json.write('access_token', l_access_token);
    apex_json.write('seconds_to_expiration', l_seconds_to_expiration);
  apex_json.close_object;

exception
  when no_data_found then
    apex_json.open_object;
      apex_json.write('token_exists', l_token_exists);
    apex_json.close_object;
end;
This process does the following:
Now, the tokens should be ready and available, like this:
Your first attempts to work with asynchronous calls and control their ordering may lead to Promise() approach. In my opinion, in simple flows, when one asynchronous operation is to happen after the previous one, the Promise-based approach shouldn’t be a problem. The situation gets more complicated when your business process is a series of API calls, which you then want to send to the database, and so on. It is very easy to get nested then, and it is difficult to analyze and maintain code written in this way.
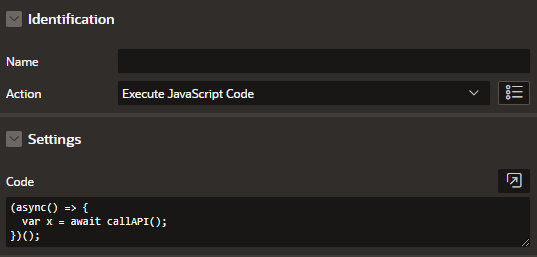
Using the async/wait approach proposed in this article is a better way. You don’t need to nest your code to tell which operation should happen next. And, finally, I also want to give you a hint on how to call your callAPI() function from the level of a dynamic action on a button in the application. Simply use the following code in the action’s identification:
(async() => {
  var x = await callAPI();
})();
The result should look like this:
And that’s it for this blog post. If you need more information about async/await and its advantages over Promise(), you can easily find it on the Internet. For example, here are some sources to check out:
Finally, there are many other APEX-related articles on the Pretius blog, so check them out:


