
[Disclaimer] This article was originally published in March 2021, but in February 2024, it has been updated with new content – largely rewritten from scratch.
This tutorial focuses on configuring Liquibase for the Oracle Database, but the process and file organization are similar in the case of all other databases supported by Liquibase.
Here’s a GitHub repository where you can find the files that I’m using in the examples below.
Are you manually executing scripts to your database? Or maybe you’re wasting time validating database scripts received from your team?
After that, are you merging scripts into one file and executing them in every environment? How about deployment errors? Have you ever spent hours looking at who and why changed what in the database?
You can streamline all of the above using Liquibase.
But what if you can’t have an entire CI/CD process right now, or company policy doesn’t allow you to run scripts on specific environments? That’s not a problem for Liquibase, either.
By using Liquibase, you can:
Thanks to this, you will have:
In a series of articles, I’ll show you how we automated our database change process at Pretius using Liquibase and GIT – let’s start with this basic Liquibase tutorial.
Liquibase is an open-source tool written in Java. It makes defining database changes easy in a format that’s familiar and comfortable to each user. Then, it automatically generates database-specific SQL for you.
Database changes (every change is called a changeset) are managed in files called changelogs. My examples will be based on changesets written in SQL – it’s the easiest way to start automating your Oracle Database change process.
Now, let’s go through some basic terms and details that will help you understand how Liquibase operates and what it does.
Liquibase uses changelog files (in SQL, XML, YAML or JSON formats) to list database changes in sequential order. Here’s an example of a changelog:
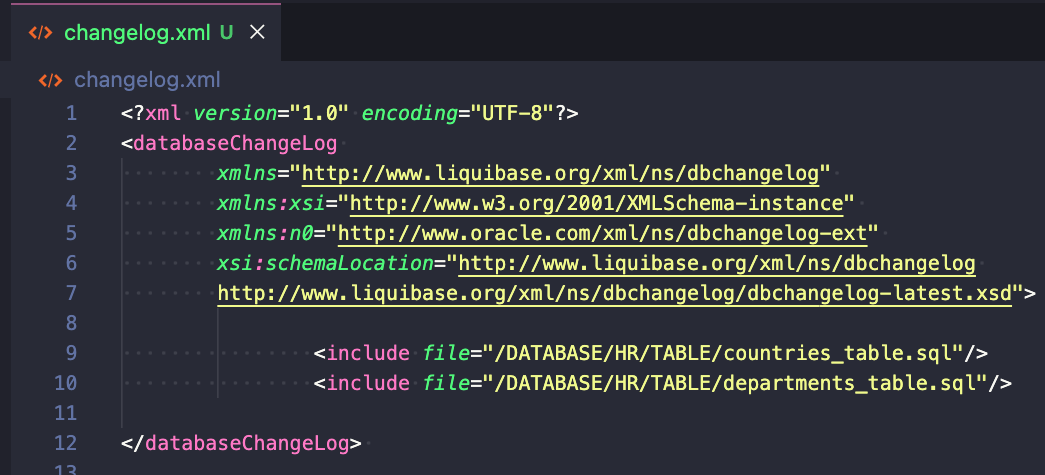
The above example includes a path to two other changelogs (countries and departments tables).
Database change is called a changeset. There can be many changeset types to apply to a database, such as creating a table, adding a primary key or creating a package.
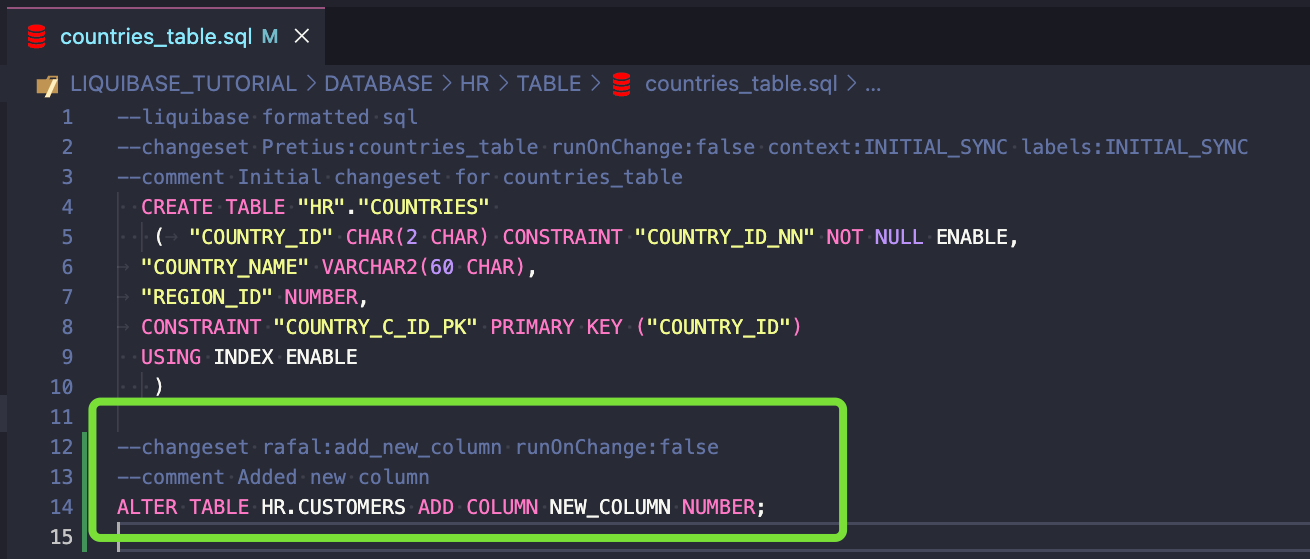
File departments_table.sql is a changelog that contains two changesets:
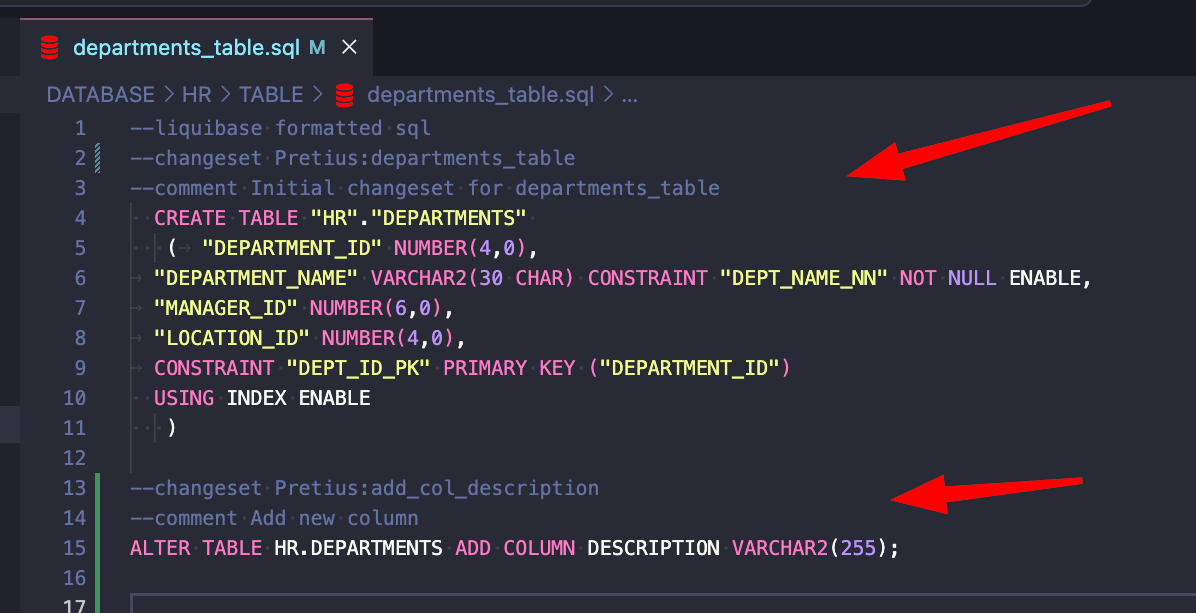
Legend:
A changeset is uniquely identified by both the author and id attributes and the changelog file path.
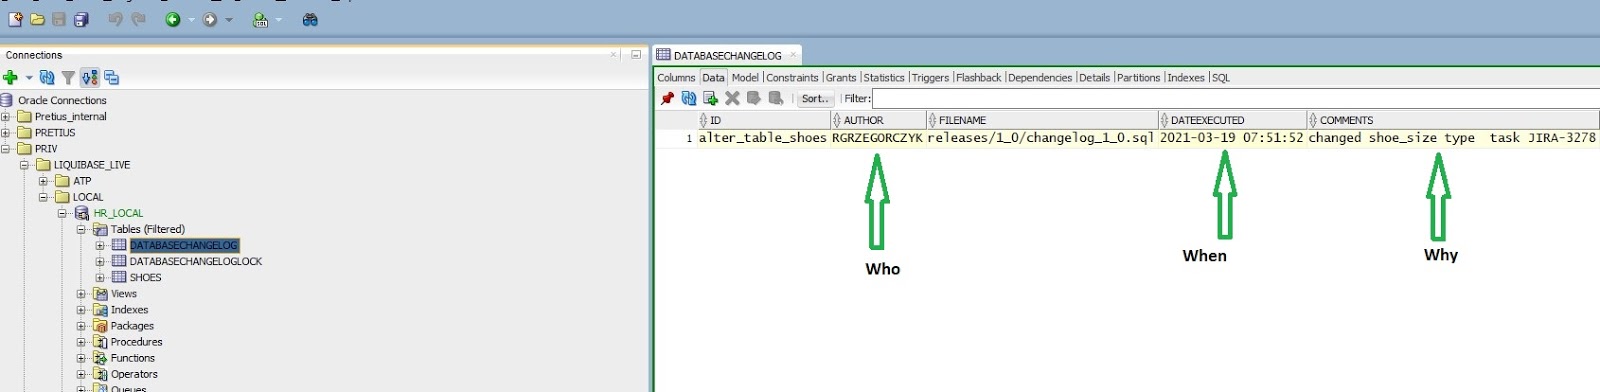
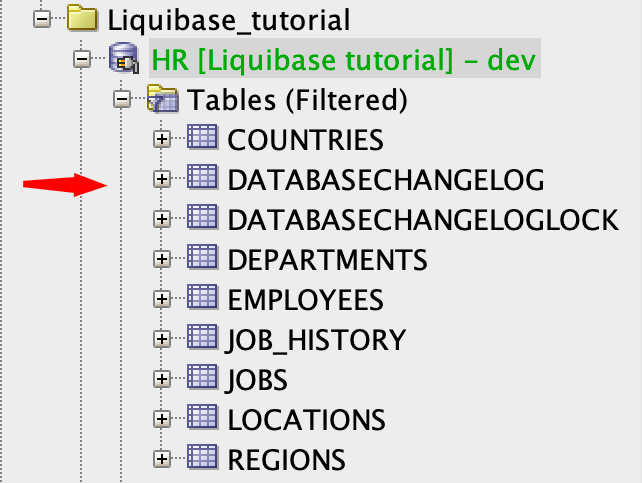
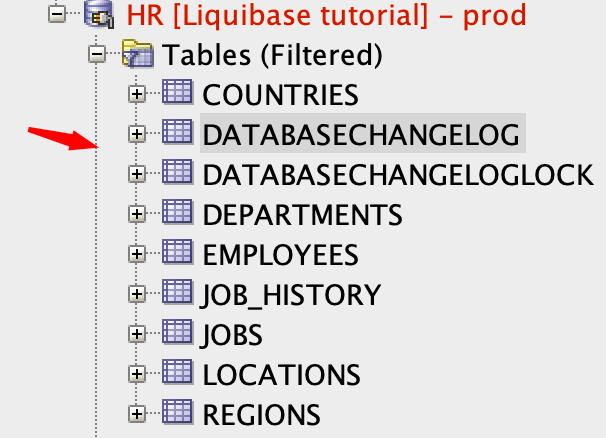
Liquibase uses the DATABASECHANGELOG table to track which changesets have been run. If the table does not exist in the database, Liquibase creates one automatically.
Liquibase will also create the DATABASECHANGELOGLOCK table. It will be used to create locks to avoid simultaneous runs of Liquibase to your database.
That’s all when it comes to the basics. You will learn more by reading this tutorial and the examples shown.
[post_frame text=”Schedule a call” link=”#contact”]Do you need database experts? [/post_frame]
The initial installation process is pretty straightforward. I won’t take you through it in this article, but I have several posts on my Hashnode blog that’ll take you through it step-by-step:
Now, I’ll show you how to configure everything for your existing project. There are a couple of steps you’ll need to take.
It is recommended that your environments are equal before using Liquibase. There are two ways I usually recommend doing this.
If you think that differences between your databases are huge and out of control, you should use the Oracle Data Pump:
Or, if you suppose the databases are quite equal and it won’t take much of your time, you can just do everything manually.
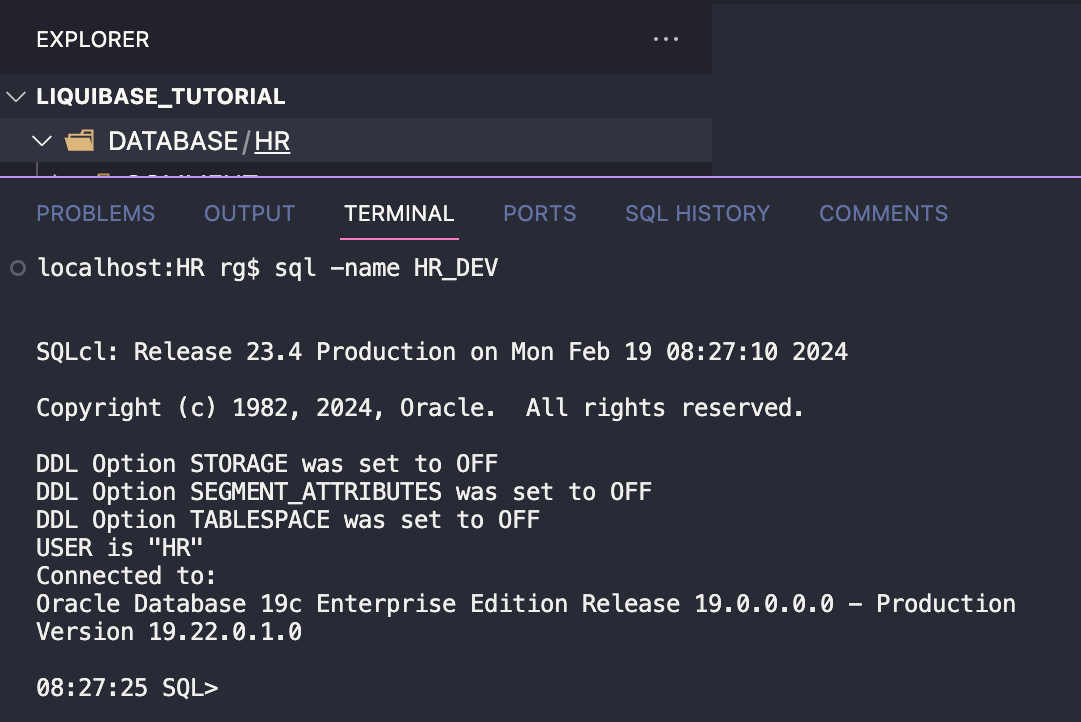
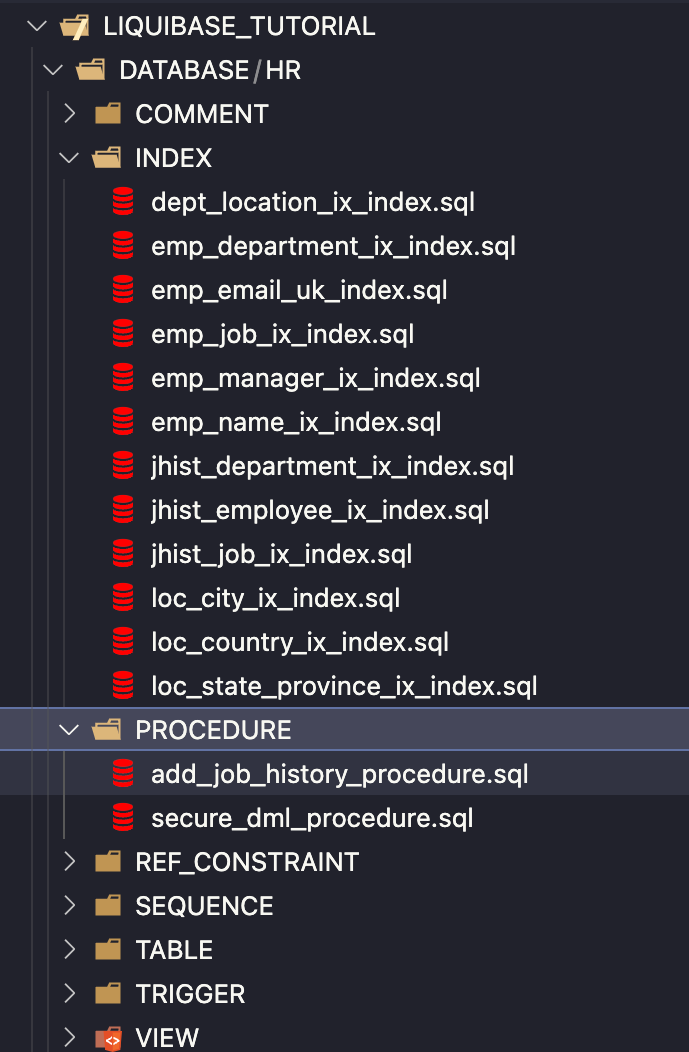
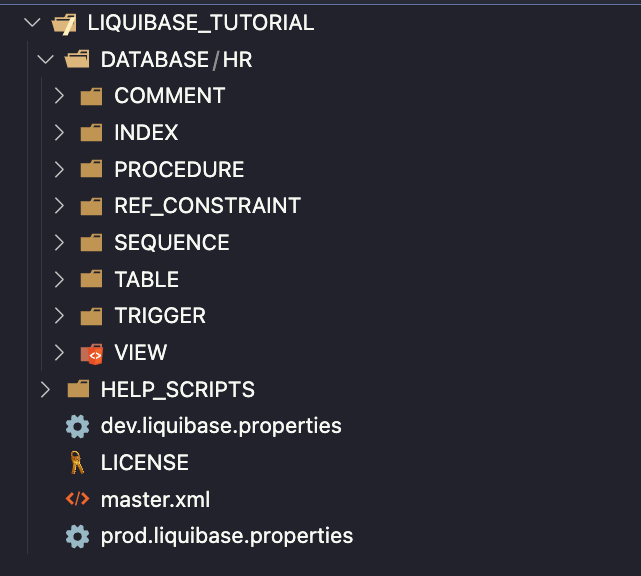
I created a folder DATABASE/HR/, which I will use to capture my current schema from my HR_DEV environment. I will use SQLcl Liquibase for that.
Go to [YOUR_REPOSITORY_ROOT]/DATABASE/HR/ folder. In my example, it is LIQUIBASE_TUTORIAL/DATABASE/HR/. Connect to HR_DEV database.
To capture all my HR schema objects, you can use the generate-schema command:
liquibase generate-schema -split -sql
Depending on the size of your database, it may take from a few minutes to up to 1-4 hours.
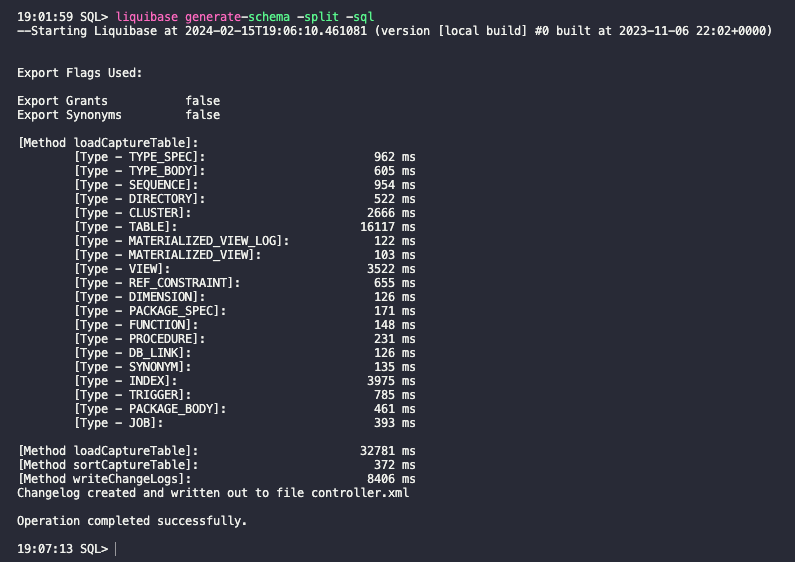
SQLcl Liquibase automatically generated all my schema objects in separate folders. Files were generated in XML and SQL formats.
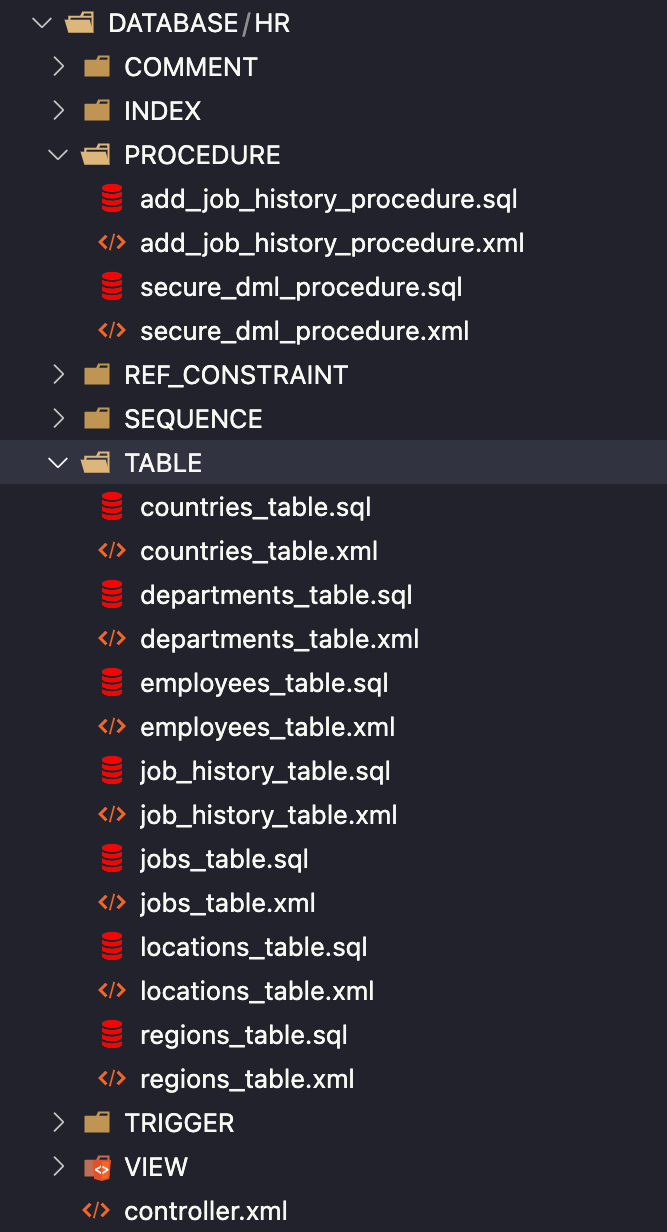
XML format is great and gives many more Liquibase functionalities – but I will not use it in this tutorial (read more about XML formats in the documentation). That’s why I need to remove all generated XML files. There are two ways to do this.
Once again, if you don’t have many files, you can do everything manually. Alternatively, you can use the attached power shell script that will do it for you if your database is big:
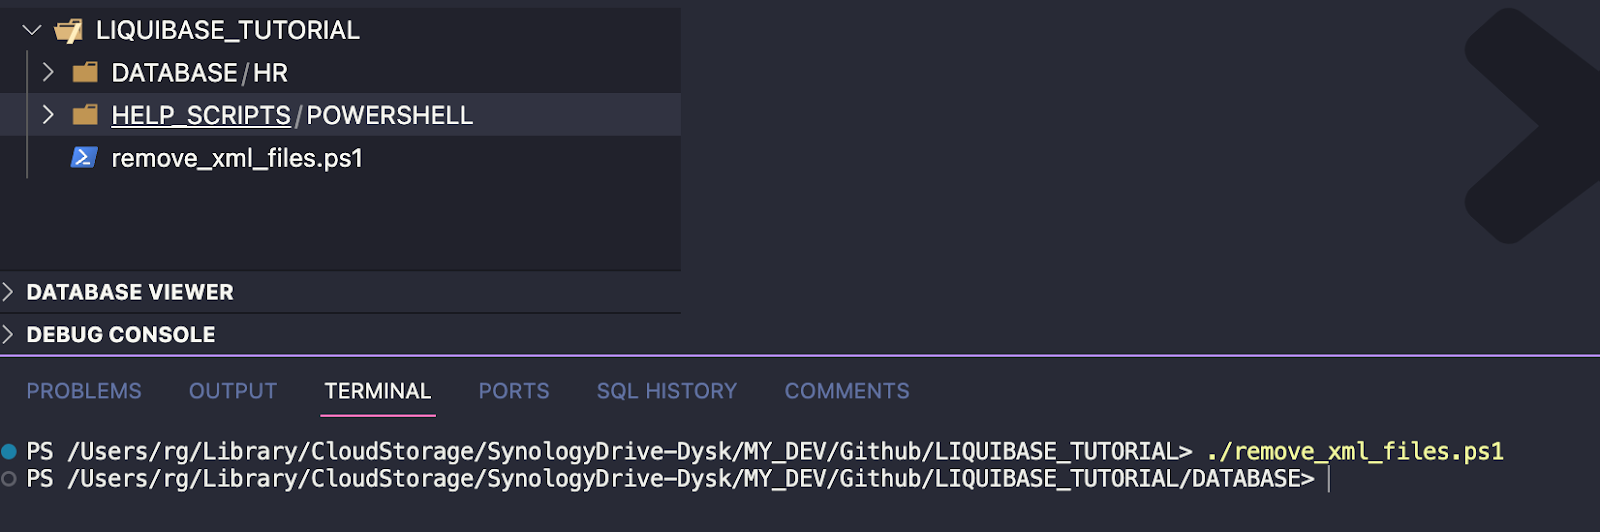
As a result I have only SQL files in separate folders.
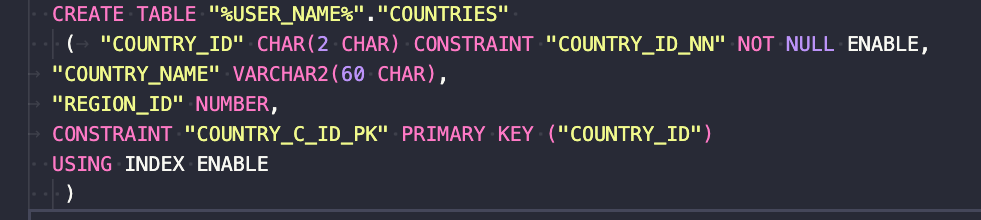
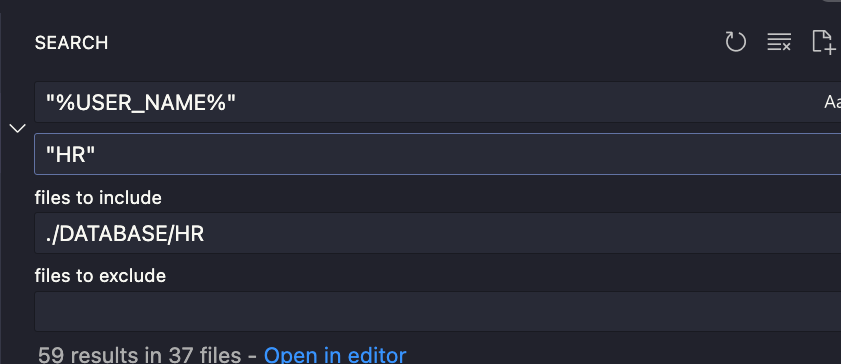
Adjust auto-generated SQL files for further usage with Liquibase – remove the “%USER_NAME%” string (it’s probably an issue in SQLcl 23.4 – to be confirmed) from all SQL files and replace it with your schema name.
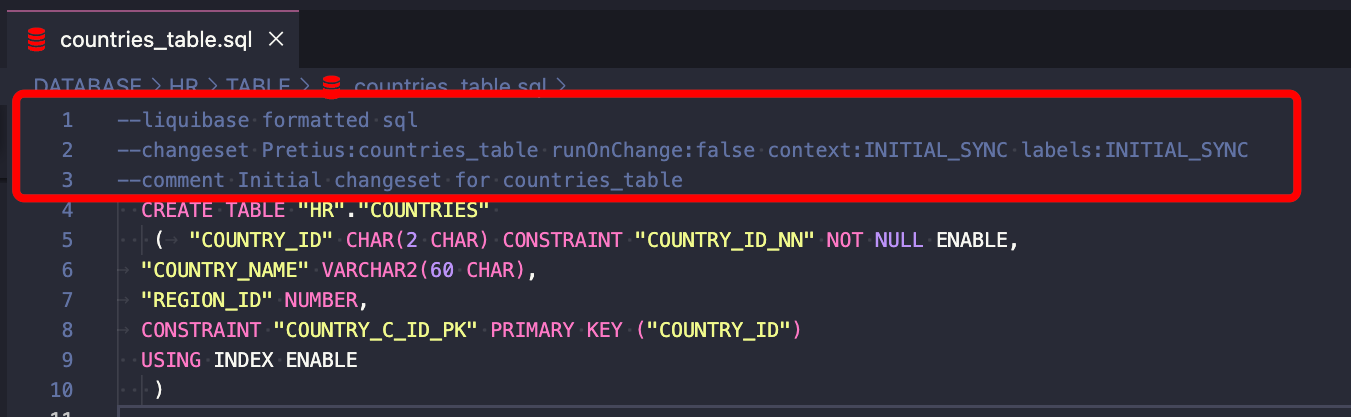
If you work with an existing project, you must add Liquibase syntax to all auto-generated SQL files. You can do it manually or use my power shell script to do it for you.
![]()
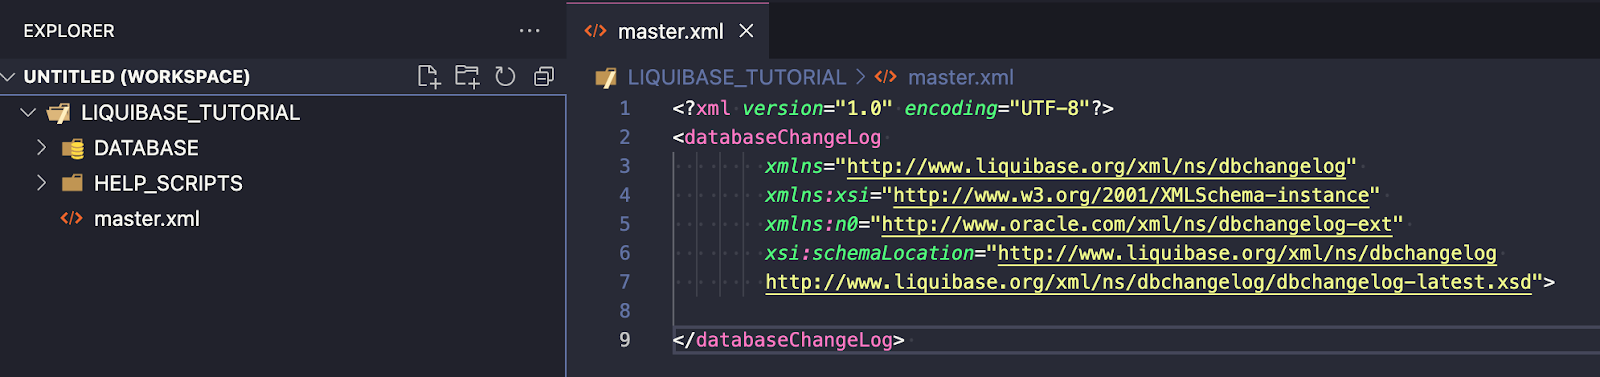
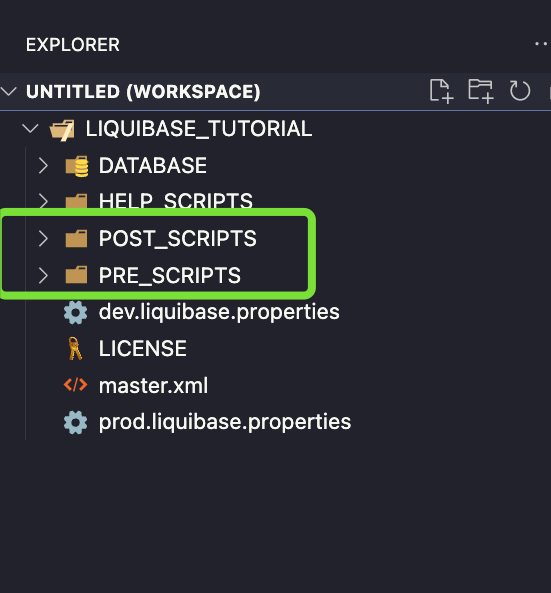
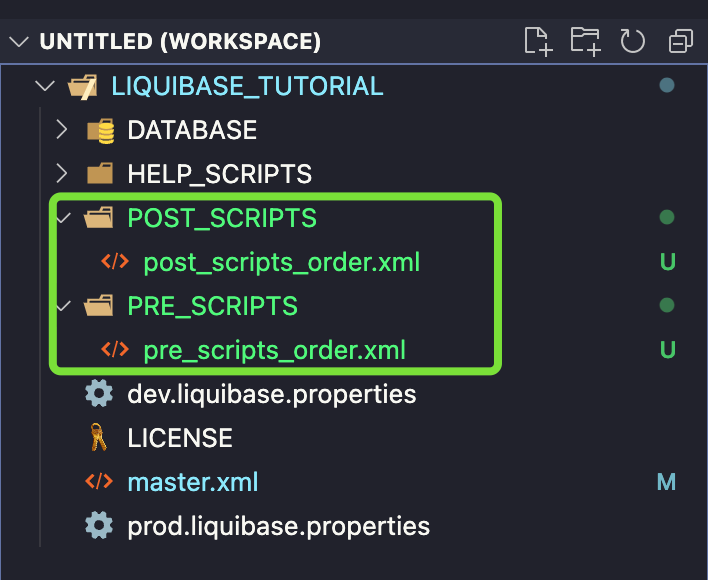
Now, let’s create changelogs to control your object repository. This step is necessary for both existing and new projects.
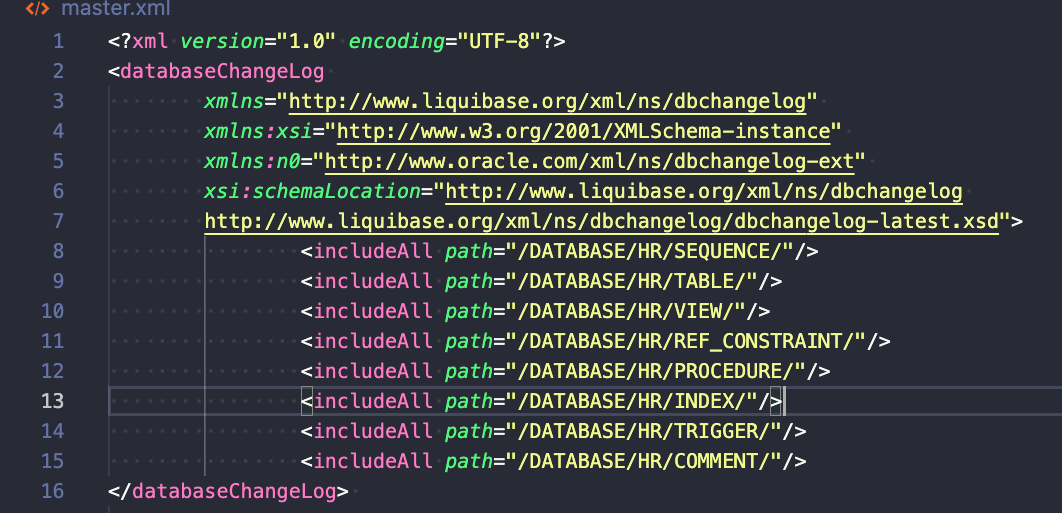
Legend:
To show you how to use includeFile, I prepared an example for all my procedures inside the /DATABASE/HR/PROCEDURE/ folder:
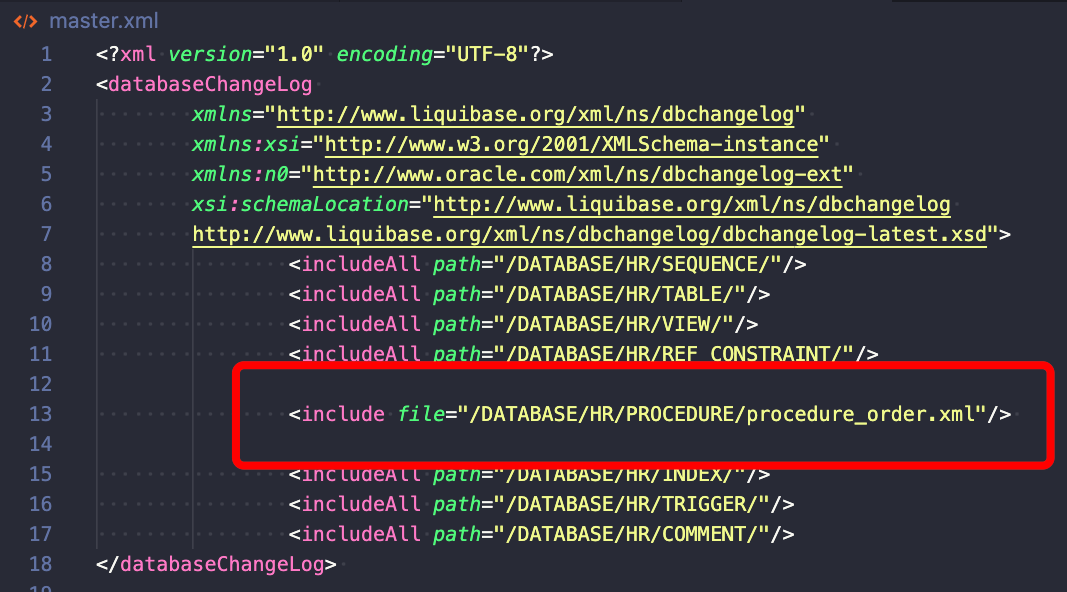
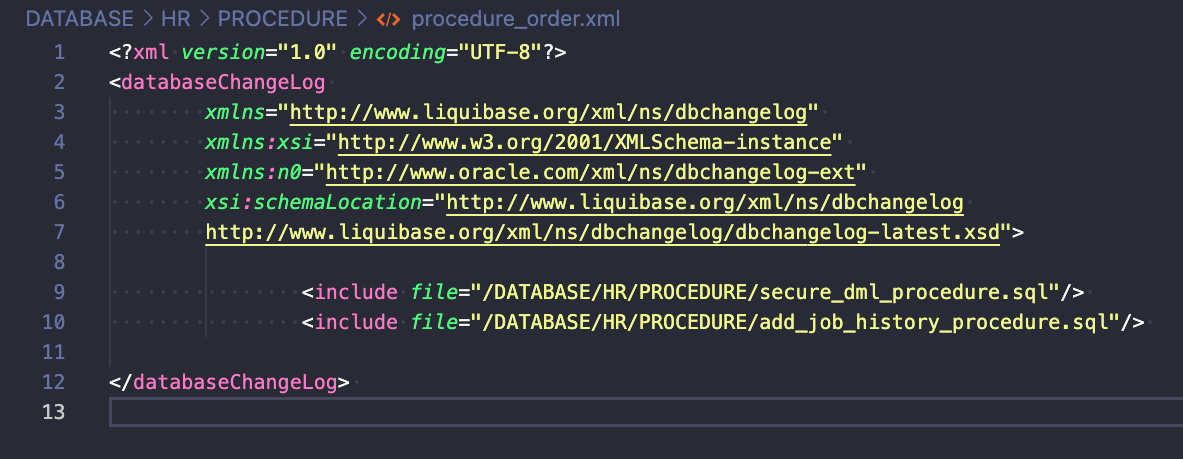
In this example, I am explicitly saying what file should be executed in which order.
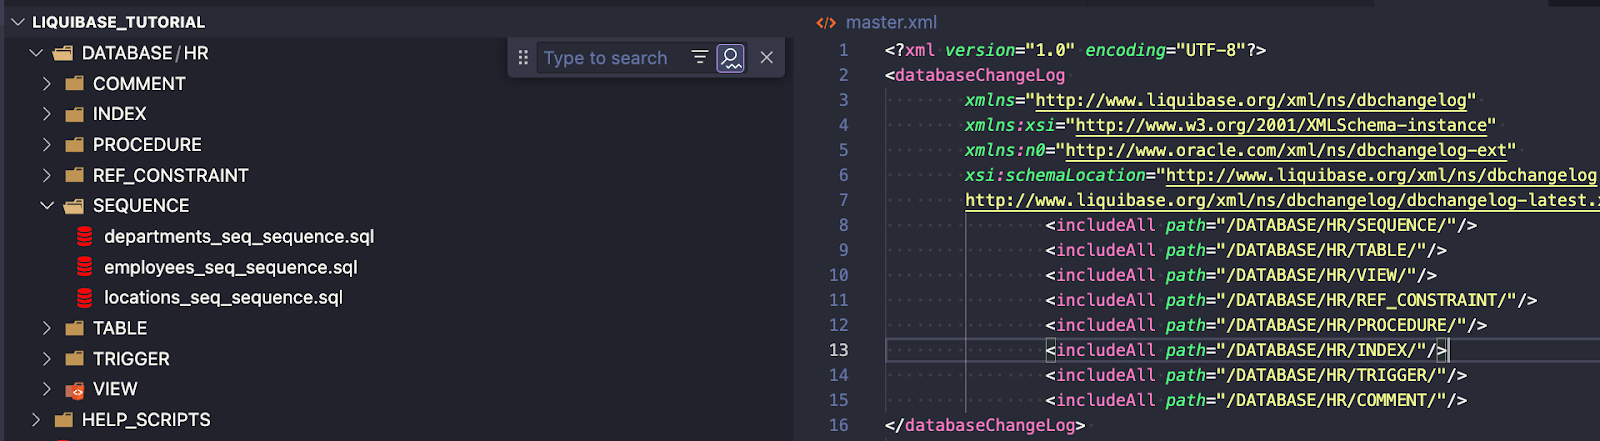
You can create such changelogs for all your folders and use as many changelogs as you want.
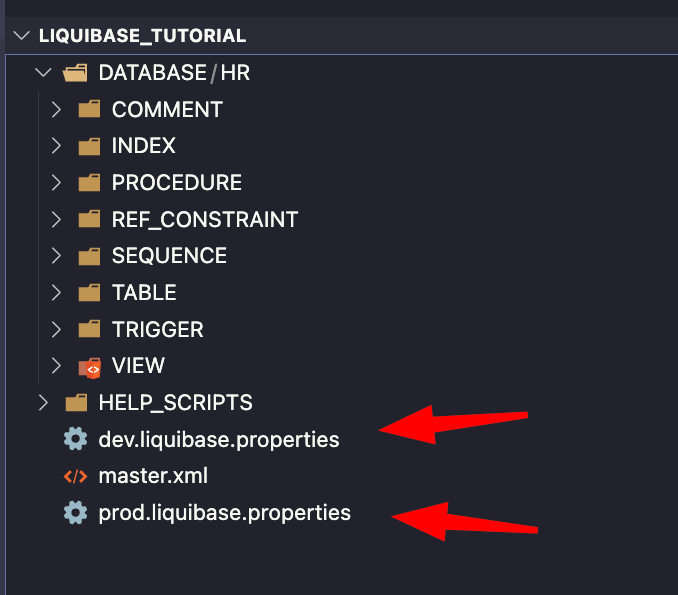
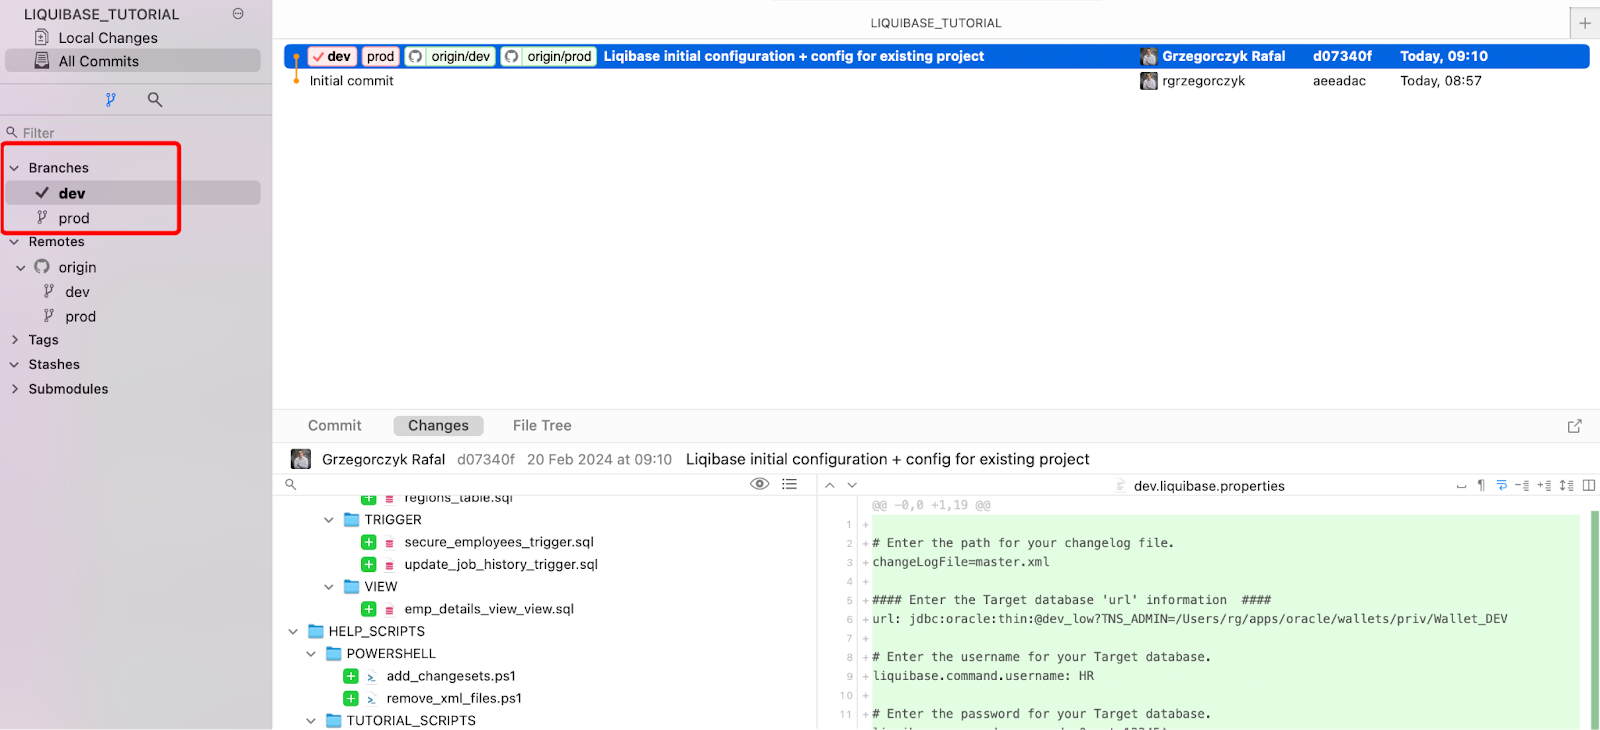
I have created two connections using the installation tutorial from the beginning of this guide. One for DEV and one for the PROD environment.
The next step is to synchronize your existing database with Liquibase – of course, this will only be necessary in the case of existing projects. This aims to “tell” Liquibase that all files in your repository already exist in your database, and those files should not be executed until someone changes something in the code.
My two environments DEV and PROD are now equal, so I need to synchronize them – it’s only one-time step when you start using Liquibase in your existing project.
The changelog-sync command marks all changes in your changelog as executed in your database (read more in the Liquibase documentation).
liquibase --defaults-file=dev.liquibase.properties --changelog-sync-sql
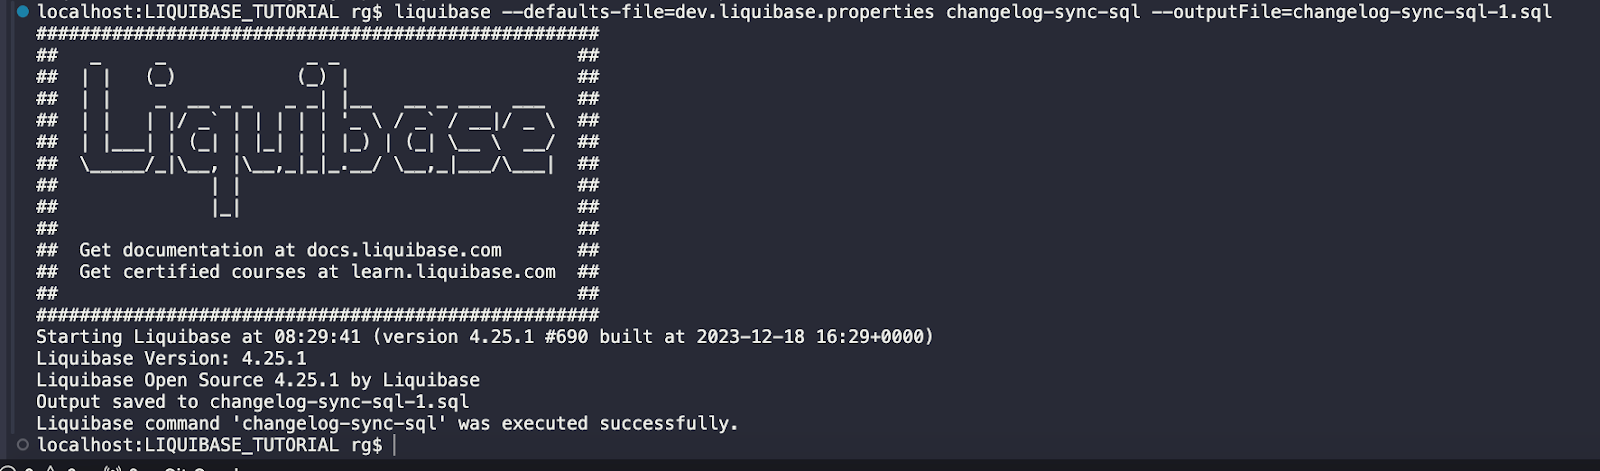
I used the changelog-sync-sql command first to generate an SQL file and verify what would be executed when running the changelog-sync command.
I did not use filtering by labels, e.g., –label-filter=INITIAL_SYNC, because, at this moment, I want to capture all my changes.
However, if my command was like this, the result and the output file would be the same:
liquibase --defaults-file=dev.liquibase.properties --changelog-sync-sql -label-filter=INITIAL_SYNC
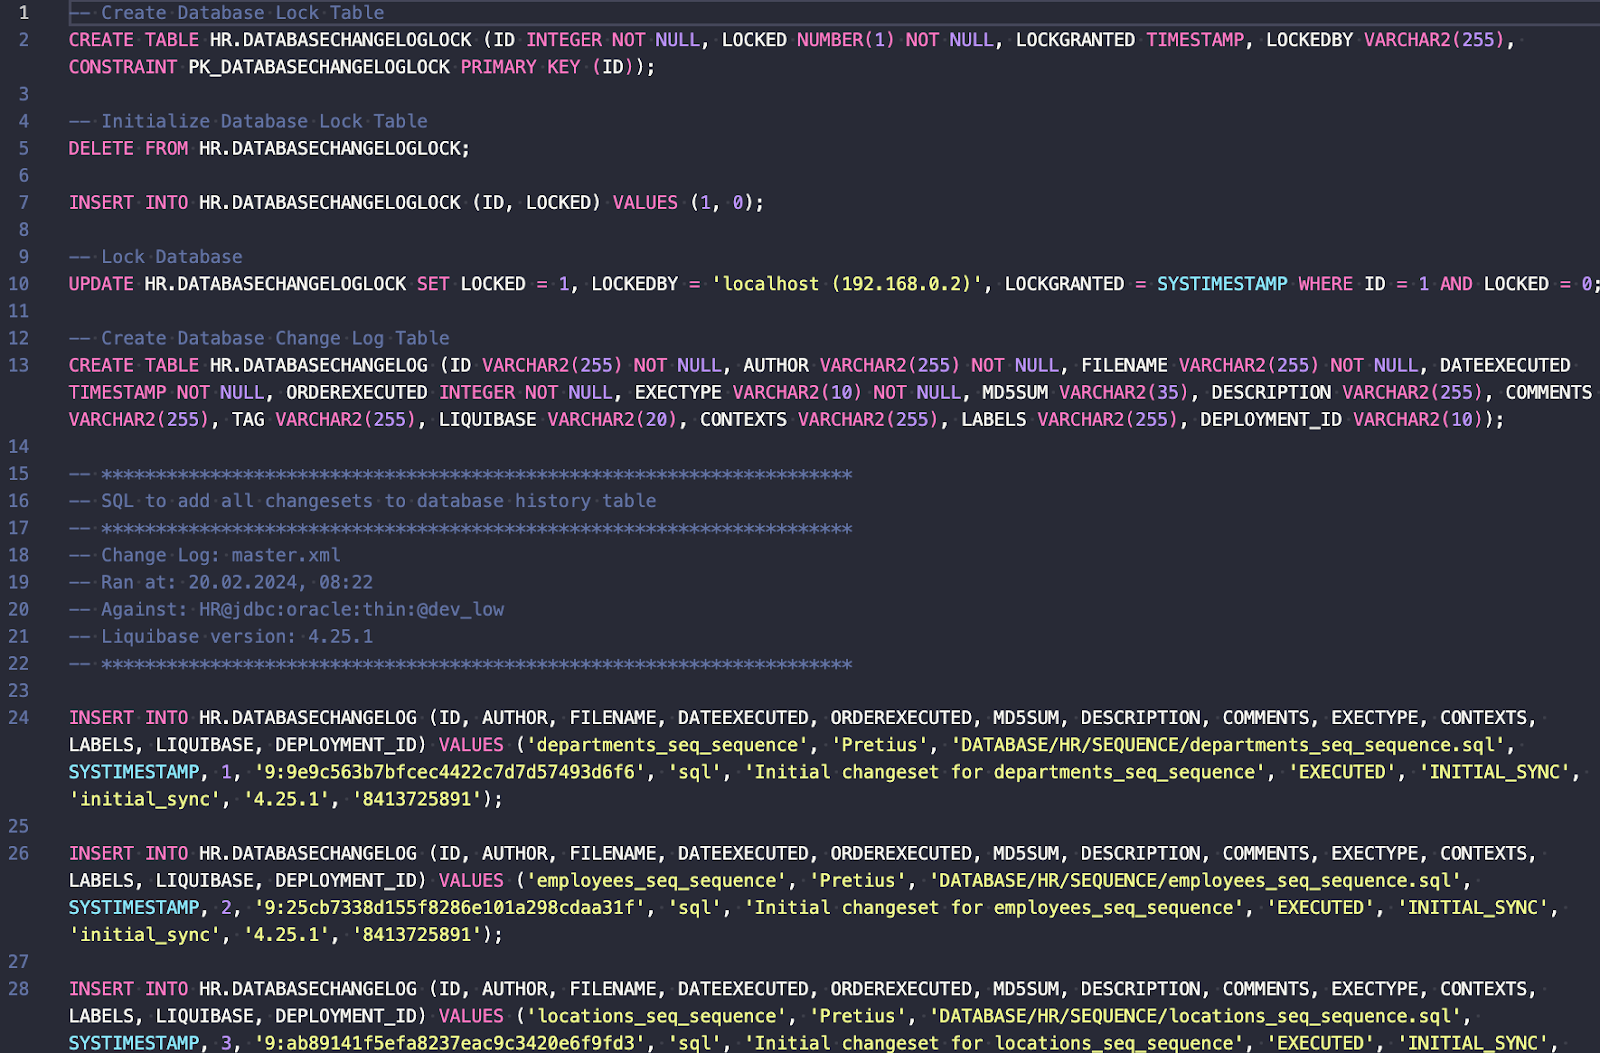
As you can see, Liquibase will create DATABASECHANGELOGLOCK and DATABASECHANGELOG tables – because it’s the first Liquibase run.
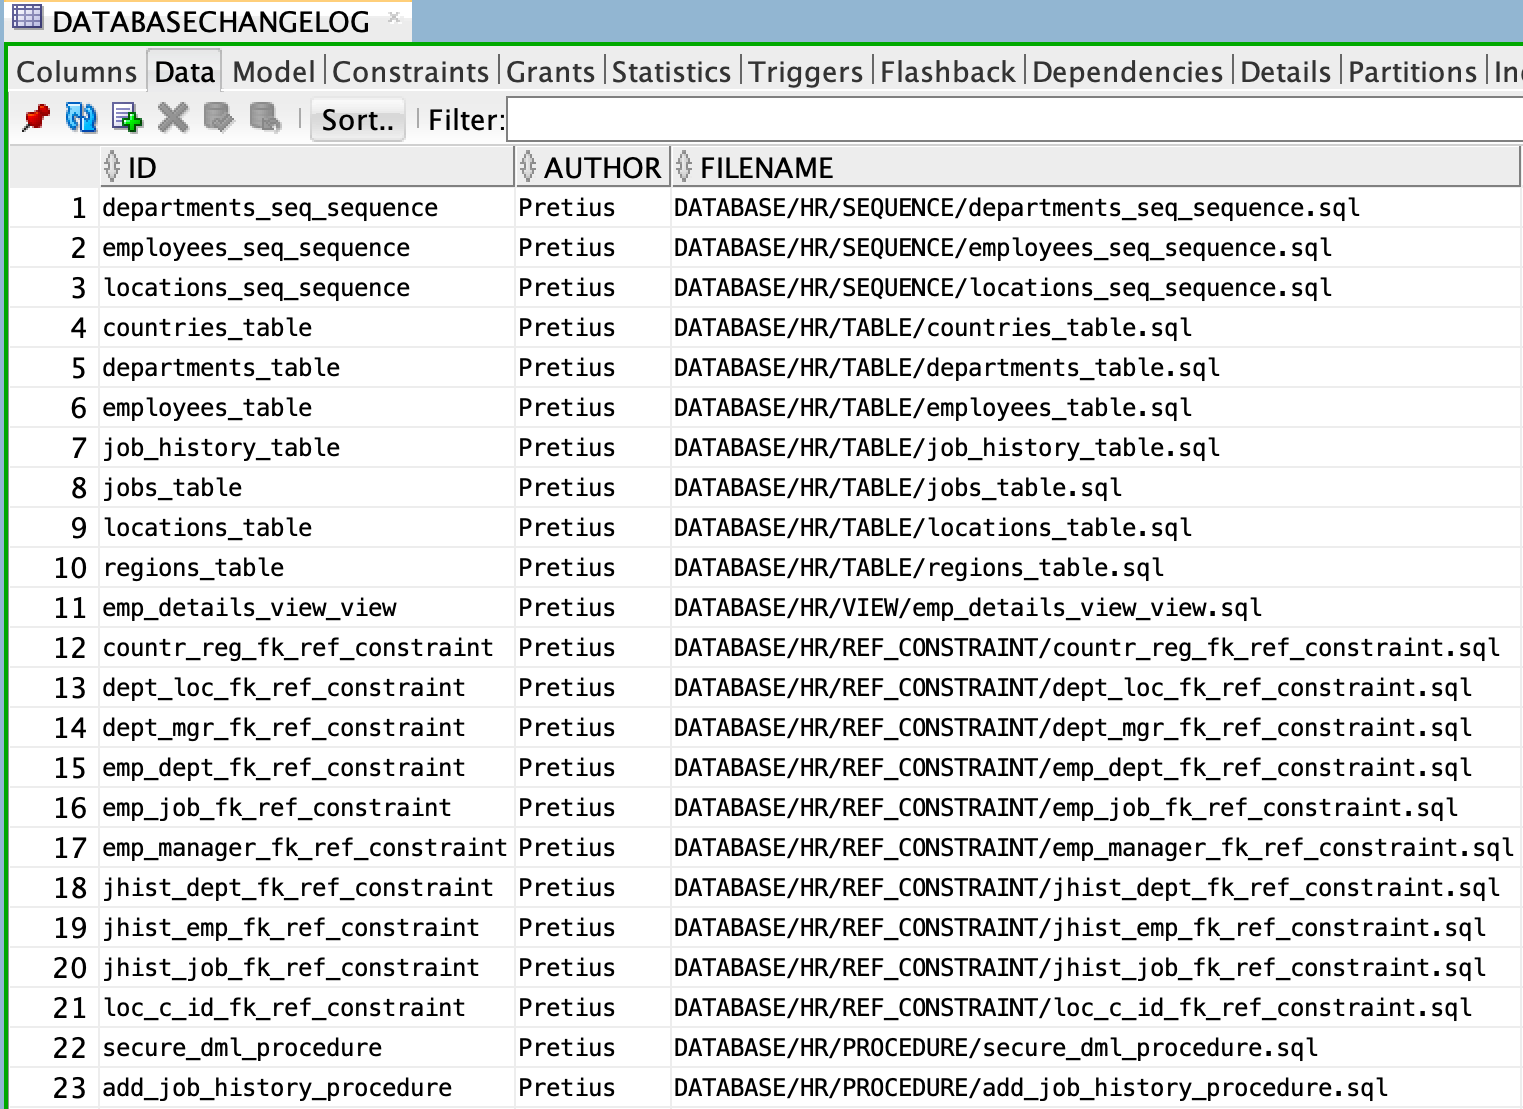
Moreover, many rows will be inserted into the DATABASECHANGELOG table, marking all the changesets as already executed.
No other database code will be executed – no changes to existing objects yet. You can see the full script generated here.
It’s a good habit to run commands with -sql first and preview what happens first instead of executing unintended code.
Now, I will execute the changelog-sync command.
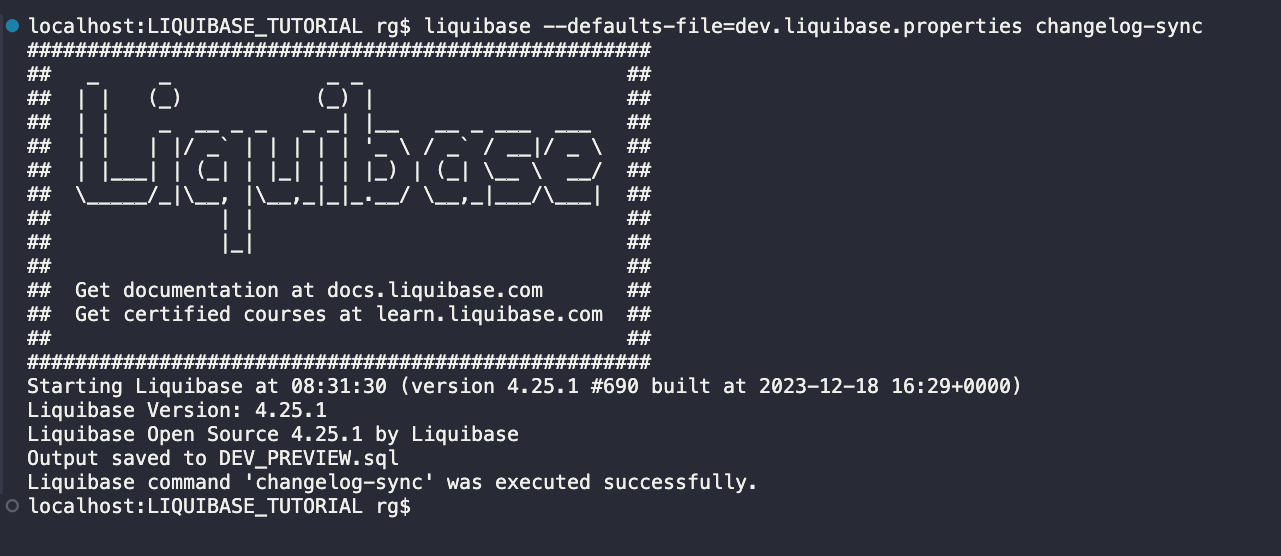
Two tables were created and rows into DATABASECHANGELOG were inserted.
Before repeating the steps, remember to change your connection file.
liquibase --defaults-file=prod.liquibase.properties --changelog-sync-sql
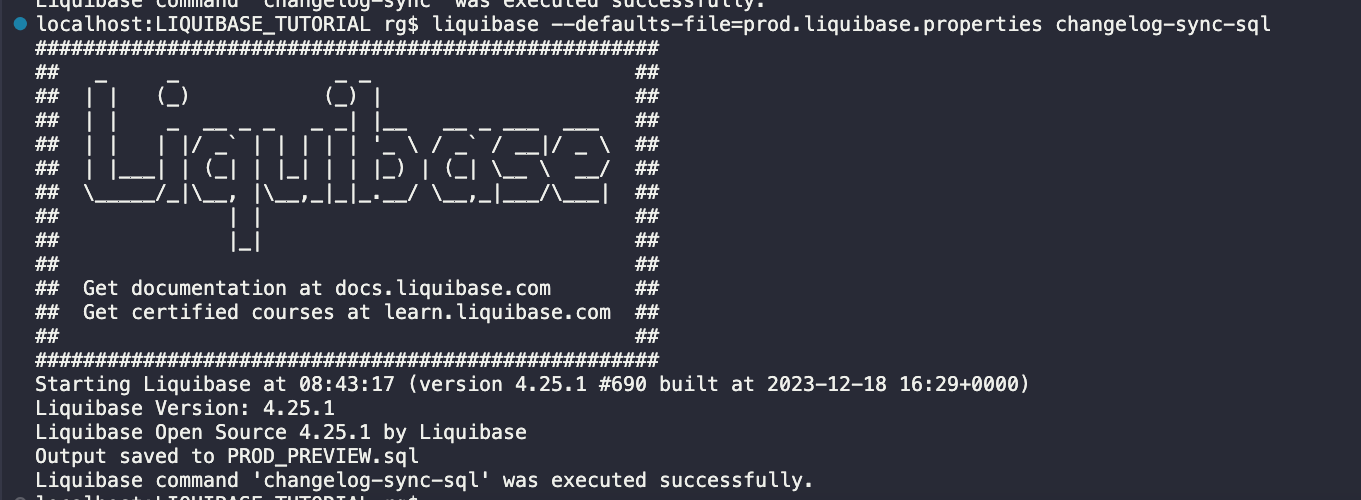
The preview file was ok, so I will execute changelog-sync.
liquibase --defaults-file=prod.liquibase.properties --changelog-sync
The result ist be the same as on DEV – two tables were created, and rows into DATABASECHANGELOG were inserted. Your existing project is ready for further work with Liquibase.
To sum up, what we did:
When it comes to GIT:
Okay, you have your GIT repository and database configured for usage with Liquibase. From now on, all your changes to the database will be tracked.
Because of this, you SHOULD NOT change any of your database objects directly in your database (whether it’s by SQLcl, SQL Developer or any other tool). Every change should go through a change in the SQL file in your repository and execution of the proper Liquibase command.
In the next part of this tutorial, I will make different changes to my database to show you how to create changesets and write appropriate syntax. All files and changes I will make are available in the public repository created for this tutorial.
All changes will be created and executed in the DEV database first. After successful tests, changes will be released to PROD.
Quick reminder: a changeset is a change type to your database, e.g., creating a table, altering a table, creating a package, etc.
To deploy changes, I will use the UPDATE command. It’s a really good practice to specify only one type of change per changeset. It avoids auto-commit statements leaving the database in an unexpected state. When running the UPDATE command, each changeset either succeeds or fails. If it fails, you can easily fix it and deploy it again. You should also add comments to your changesets to explain their importance.
But first, let’s define what the UPDATE command really does. It deploys any changes in the changelog file that have not been deployed to your database yet.
It’s worth mentioning that Liquibase doesn’t check anything in your database objects. It won’t check if your table, column or package exists. It won’t check what version of the object resides in your database. However, if you try to create a table that exists, Oracle will throw an error during Liquibase execution. So how does Liquibase know what should be deployed?
When you run the UPDATE command, Liquibase sequentially reads changesets in the changelog file, then compares the unique identifiers – id, author, and filename path – to the values in the DATABASECHANGELOG table. There are at least 3 possible scenarios that may happen after running the UPDATE command:
If you add this to the existing changeset, it will fail:
This is fine:
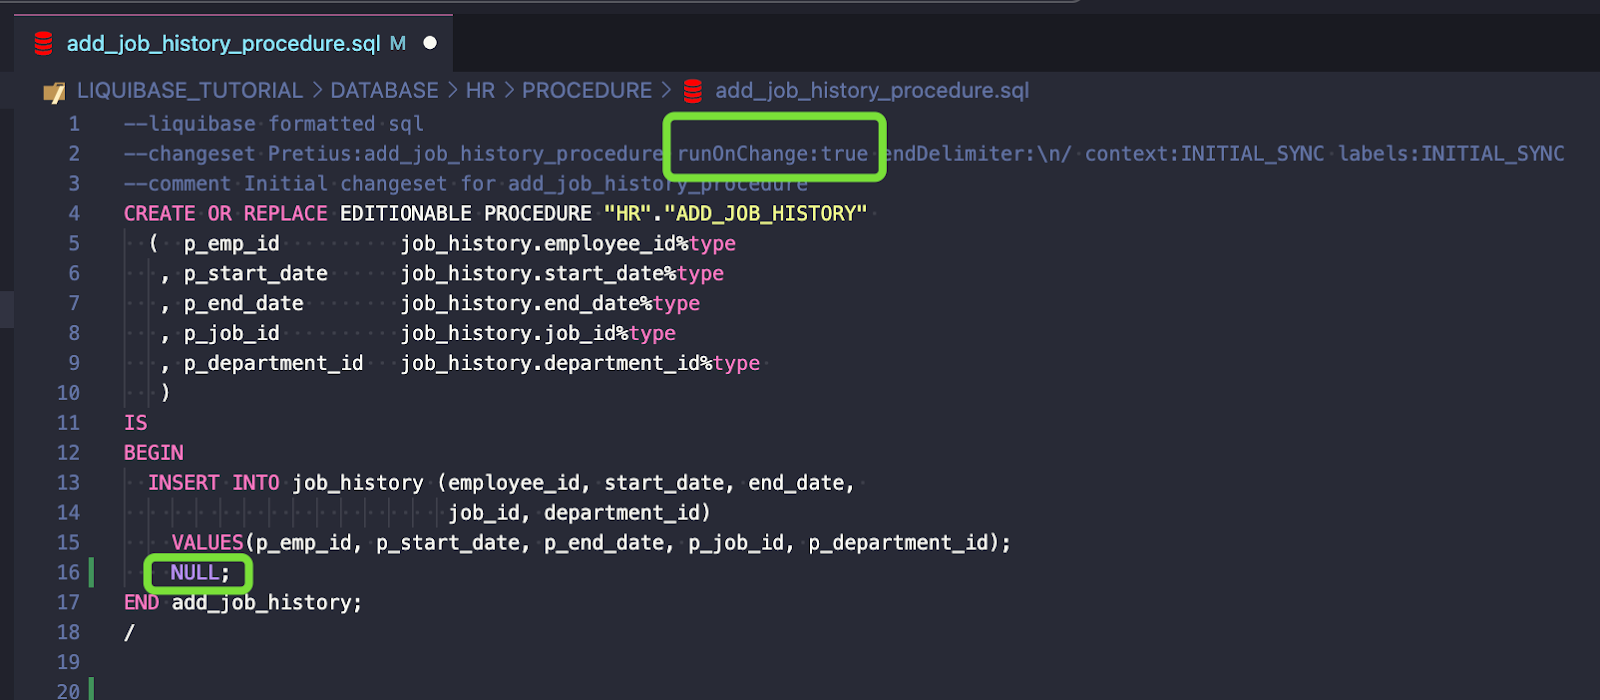
However, if runOnChange is set to TRUE, Liquibase will re-apply the changeset.
Remember that this param should be set to TRUE only for objects that can be replaced, like views, packages, procedures, functions, etc.
Now, let’s start making and tracking changes in our database. To make things simple, I’ll specify requirements and steps that you need to carry out to implement each of them.
My examples will show changes made by two developers, RAFAL and JOHN, who work with the same DEV database. They are also using GIT and Visual Studio Code.
NO CHANGES are done directly in the database. Everything must go through SQL files and Liquibase.
This is a red font rule that all developers must obey. Otherwise, using Liquibase doesn’t make sense.
Now, let’s go through the necessary steps.
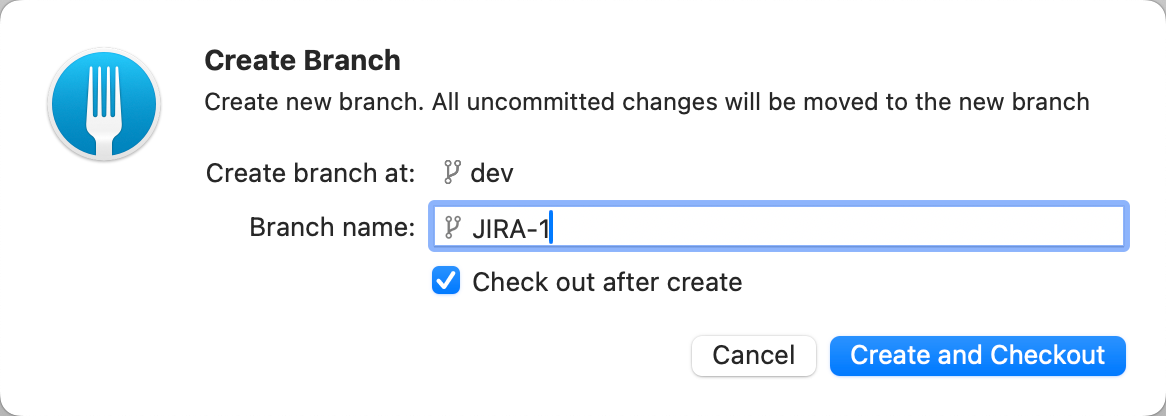
Steps:
Legend:
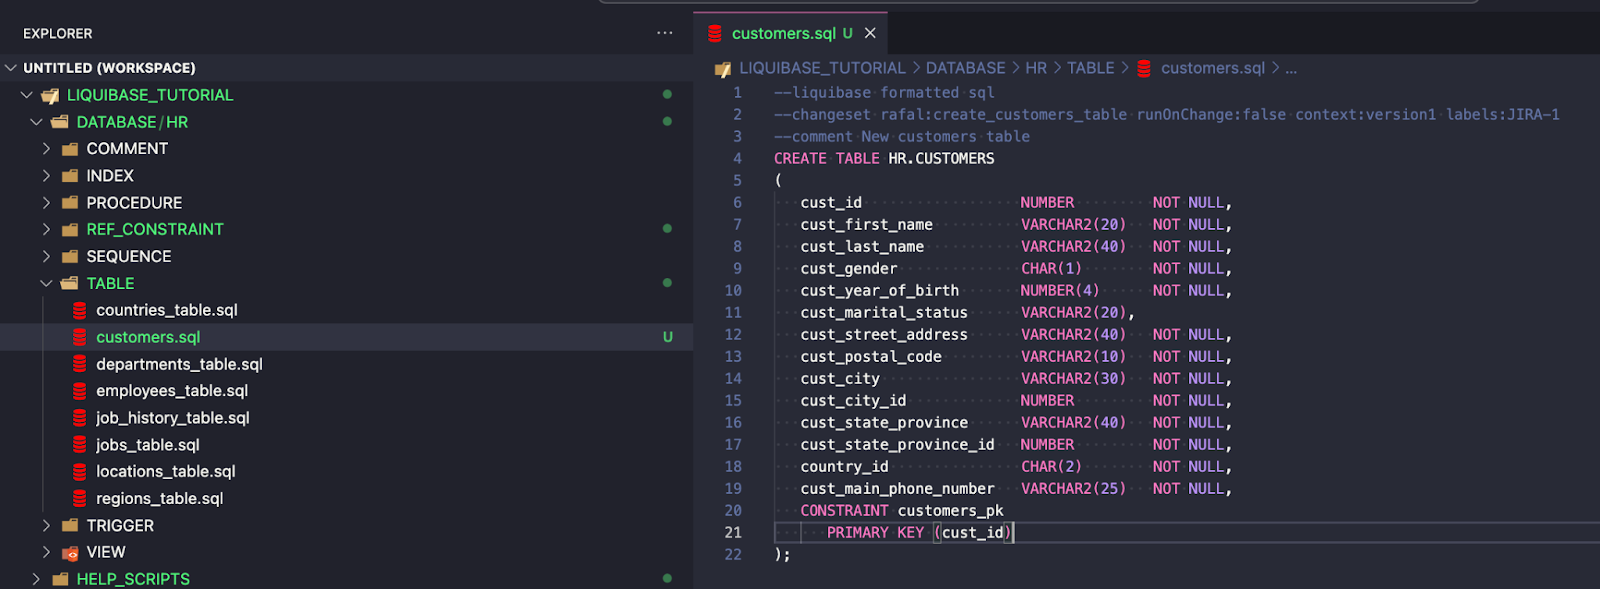
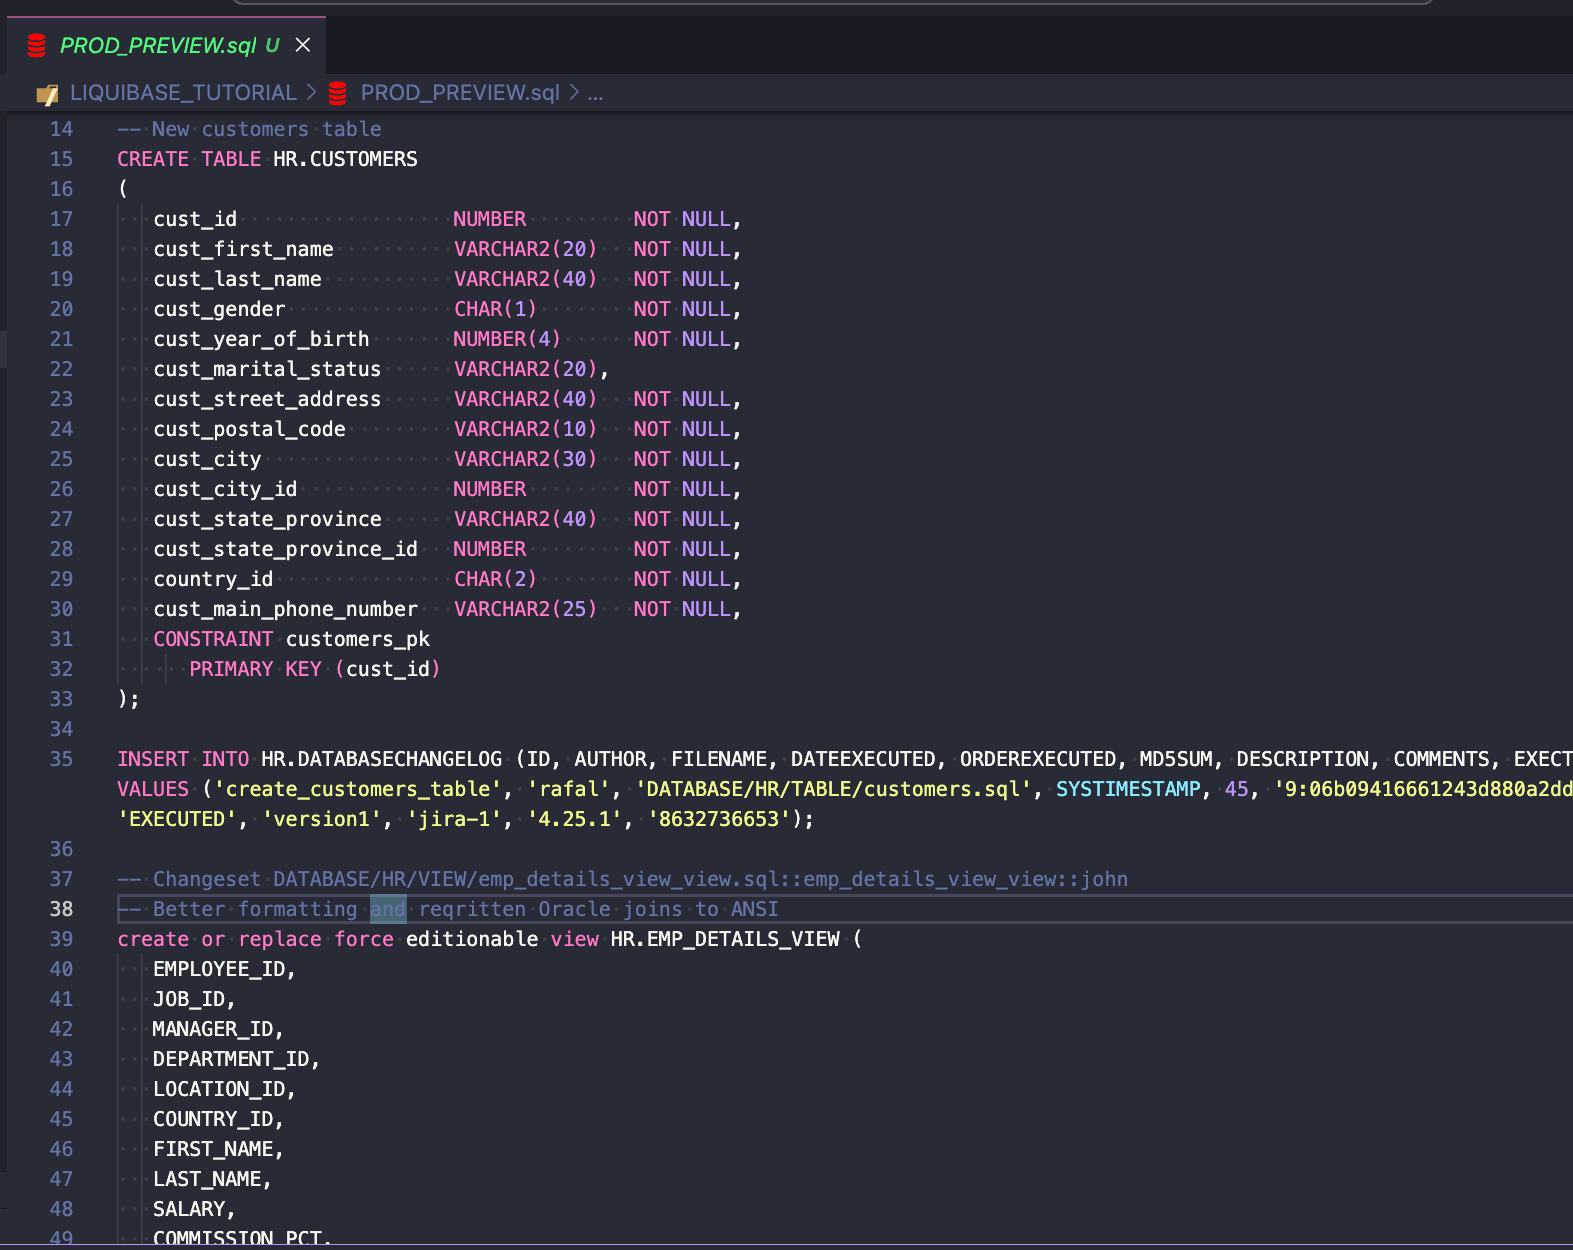
--liquibase formatted sql
--changeset rafal:create_customers_table runOnChange:false context:version1 labels:JIRA-1
--comment New customers table
CREATE TABLE HR.CUSTOMERS
(

   cust_id                  NUMBER         NOT NULL,
   cust_first_name          VARCHAR2(20)   NOT NULL,
   cust_last_name           VARCHAR2(40)   NOT NULL,
   cust_gender              CHAR(1)        NOT NULL,
   cust_year_of_birth       NUMBER(4)      NOT NULL,
   cust_marital_status      VARCHAR2(20),
   cust_street_address      VARCHAR2(40)   NOT NULL,
   cust_postal_code         VARCHAR2(10)   NOT NULL,
   cust_city                VARCHAR2(30)   NOT NULL,
   cust_city_id             NUMBER         NOT NULL,
   cust_state_province      VARCHAR2(40)   NOT NULL,
   cust_state_province_id   NUMBER         NOT NULL,
   country_id               CHAR(2)        NOT NULL,
   cust_main_phone_number   VARCHAR2(25)   NOT NULL,
   CONSTRAINT customers_pk
      PRIMARY KEY (cust_id)
);
Steps:

--liquibase formatted sql
--changeset rafal:customers_country_fk  context:version1 labels:JIRA-1
--comment Foreign key customers ->countries
alter table customers add CONSTRAINT customers_country_fk FOREIGN KEY (country_id) REFERENCES countries (country_id);
Just to be clear: currently, neither the CUSTOMERS table nor the Foreign key exists in my DEV database. It’s just a code in my SQL files. I need to use the Liquibase UPDATE command explained earlier to deploy changes.
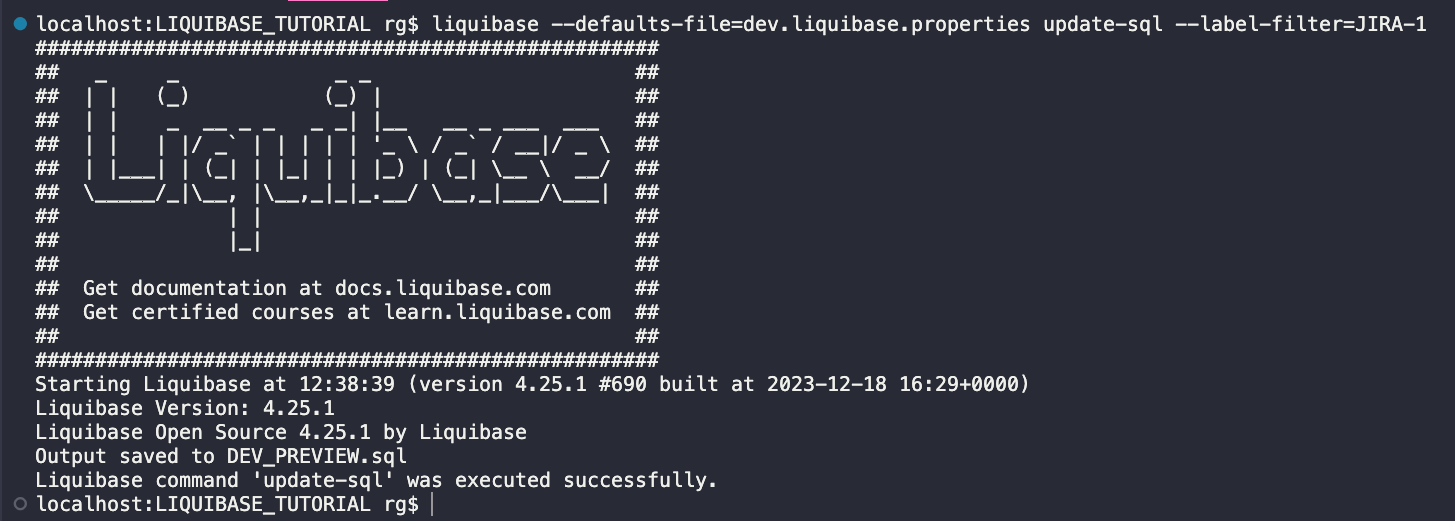
However, before executing the UPDATE command, it’s highly recommended to run the UPDATE-SQL command first. It will generate an SQL file to show you what would be executed if you run the UPDATE command later.
liquibase --defaults-file=dev.liquibase.properties update-sql --label-filter=JIRA-1
Legend:
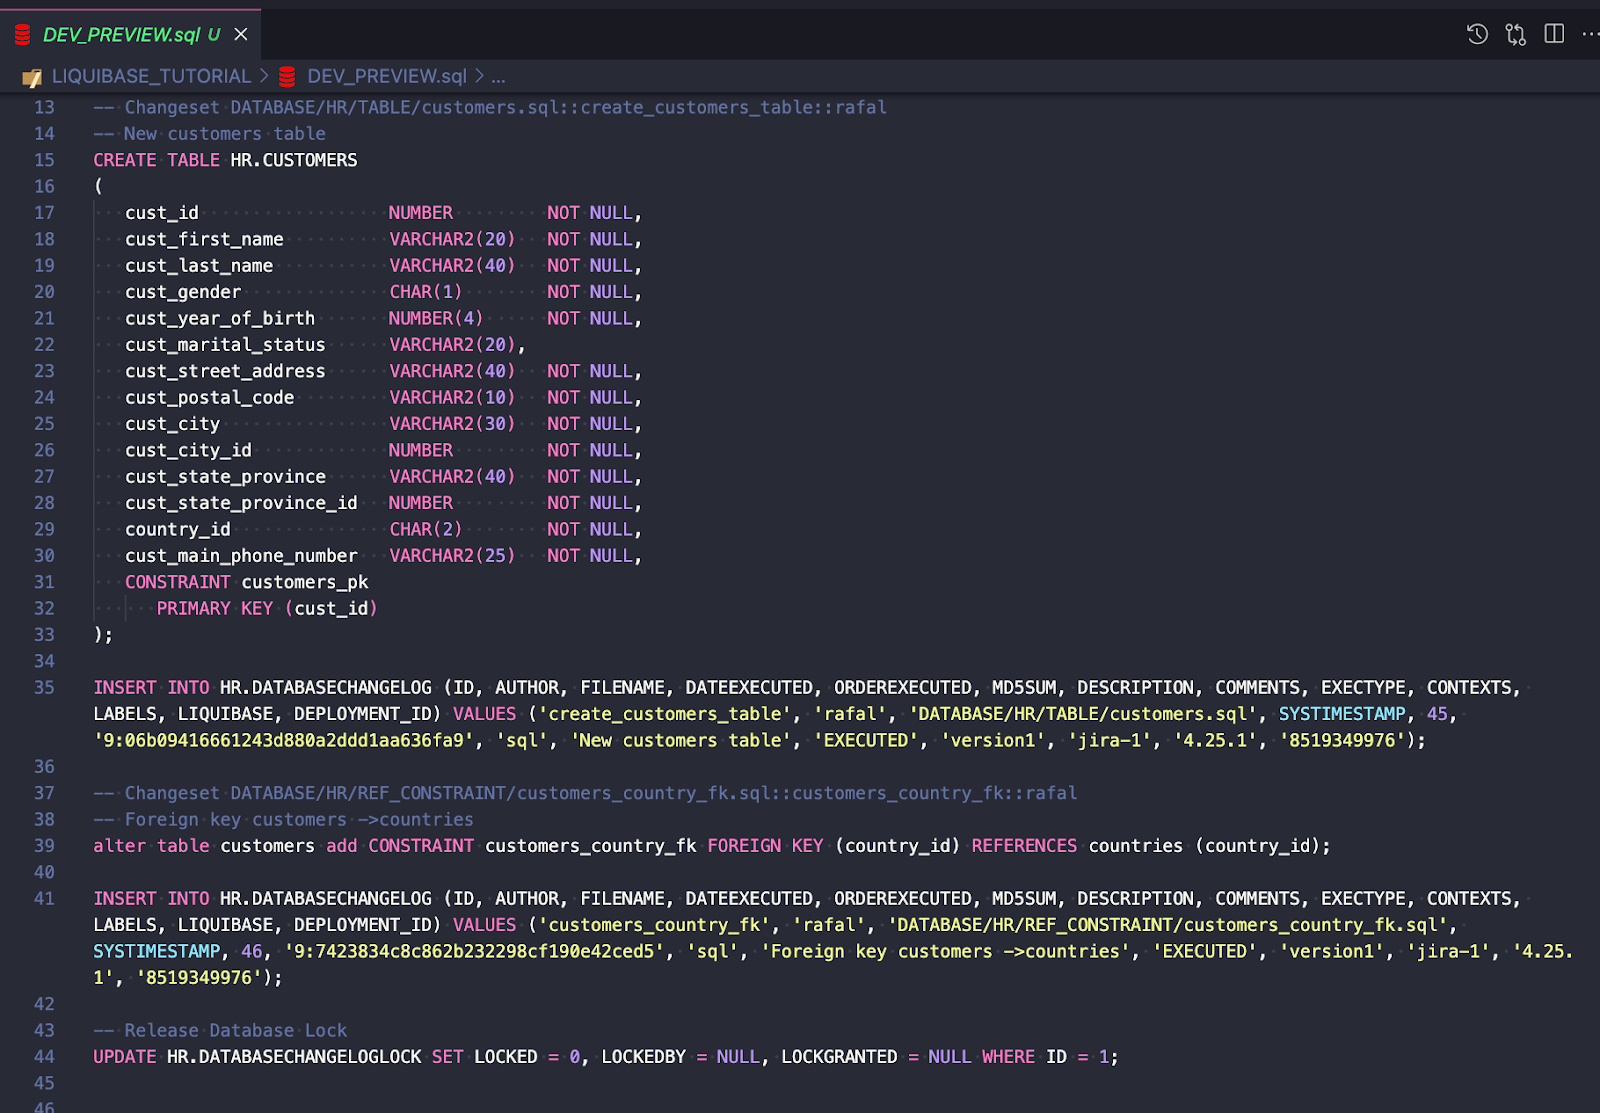
The script looks good (the full script is available here), so I’m ready to deploy my changes using the UPDATE command.
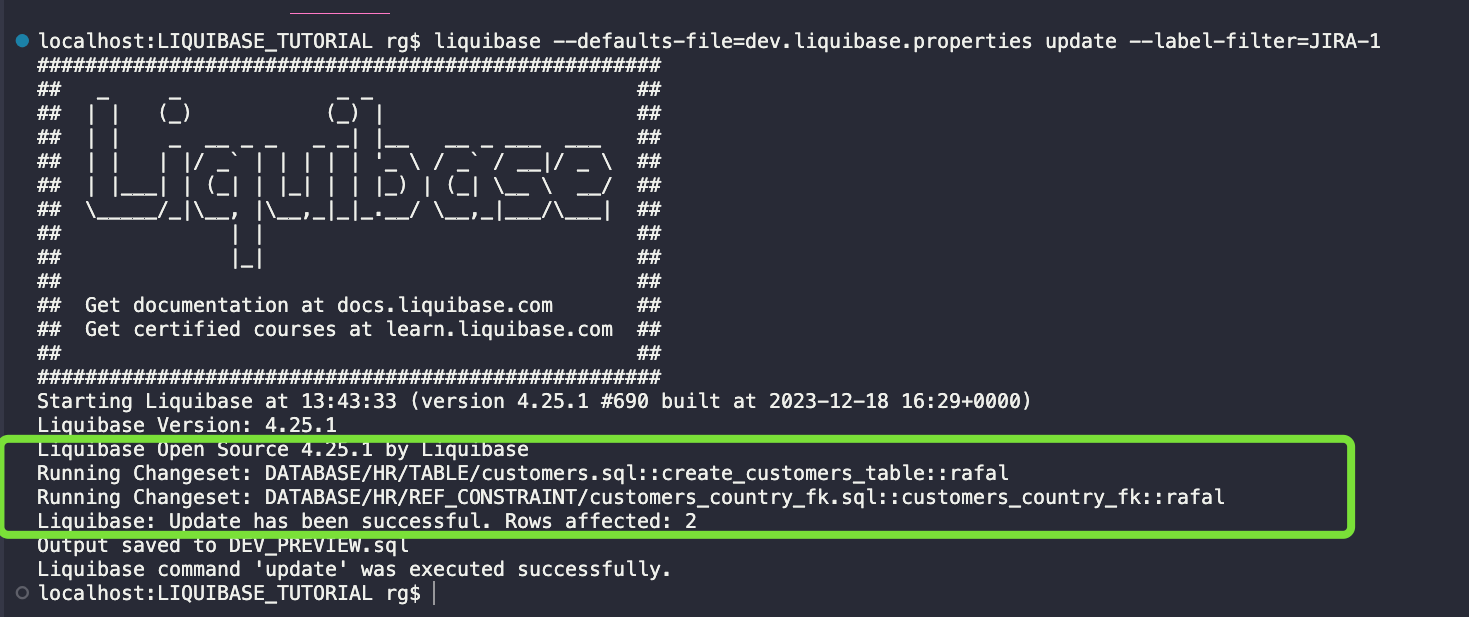
liquibase --defaults-file=dev.liquibase.properties update --label-filter=JIRA-1
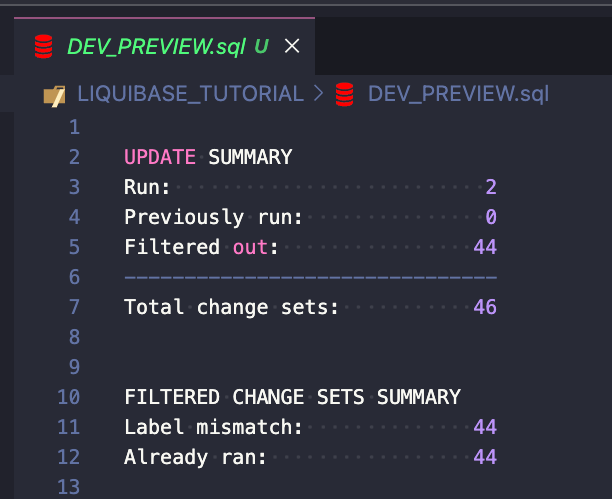
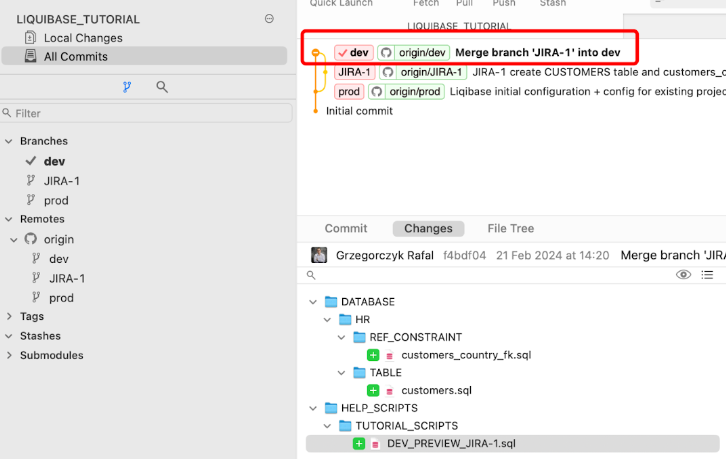
Nice info in the DEV_PREVIEW.sql file.
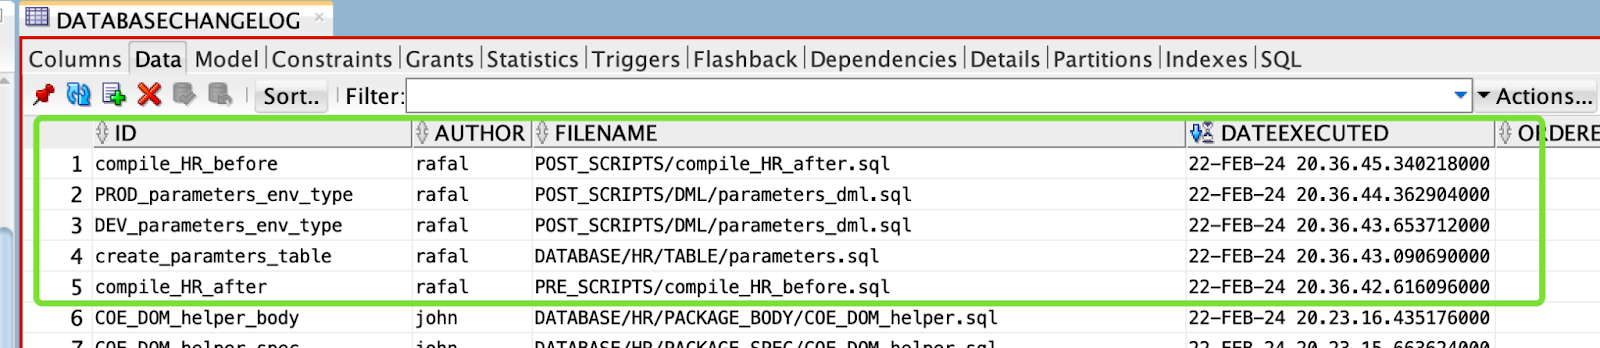
And two new rows were inserted into the DATABASECHANGELOG table:

There are also two new columns:

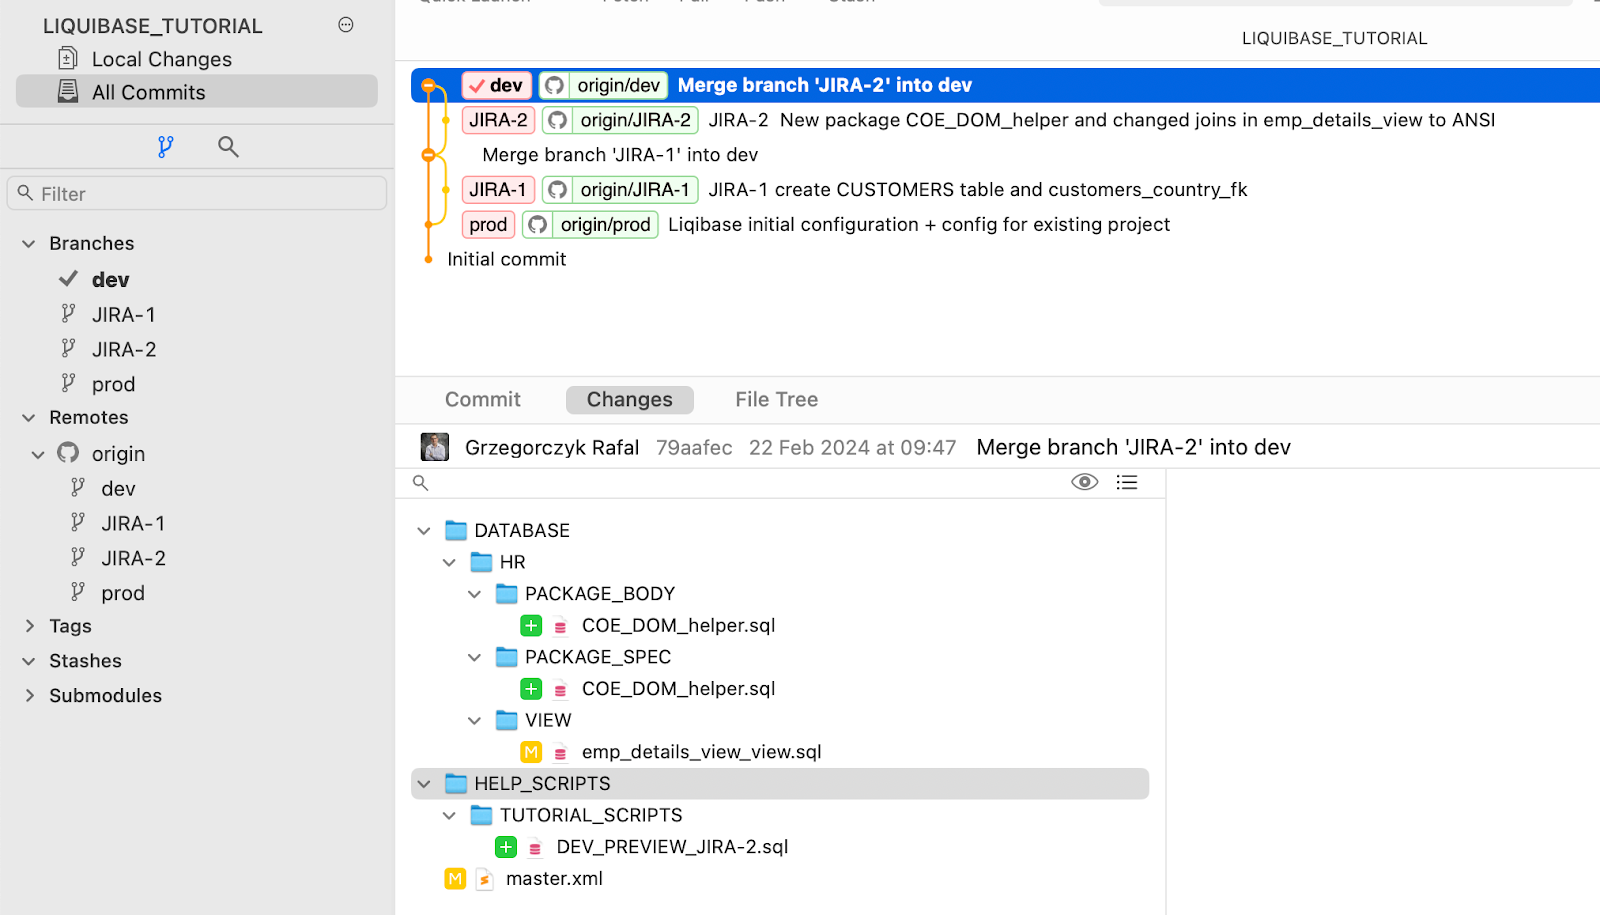
My changes regarding JIRA-1 task were successfully deployed to the DEV database. I can merge my changes to the DEV branch.
Let’s go through the steps.
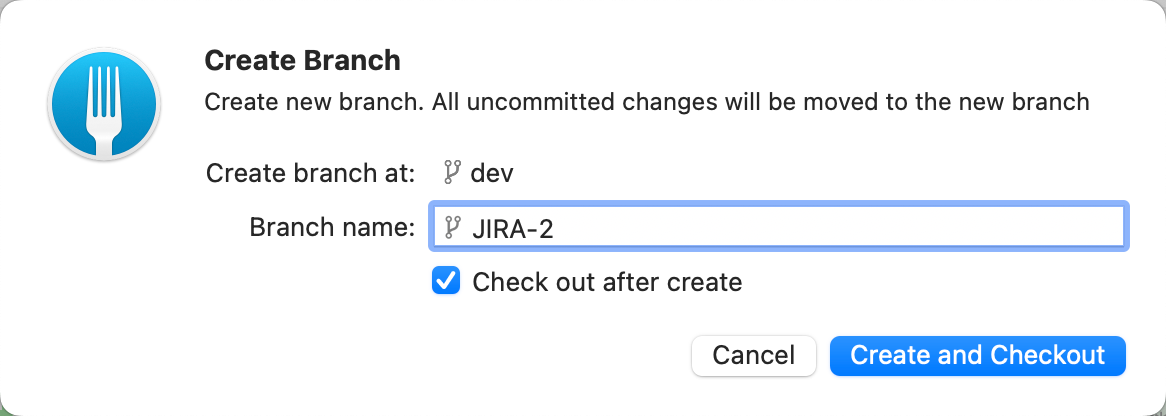
Steps:
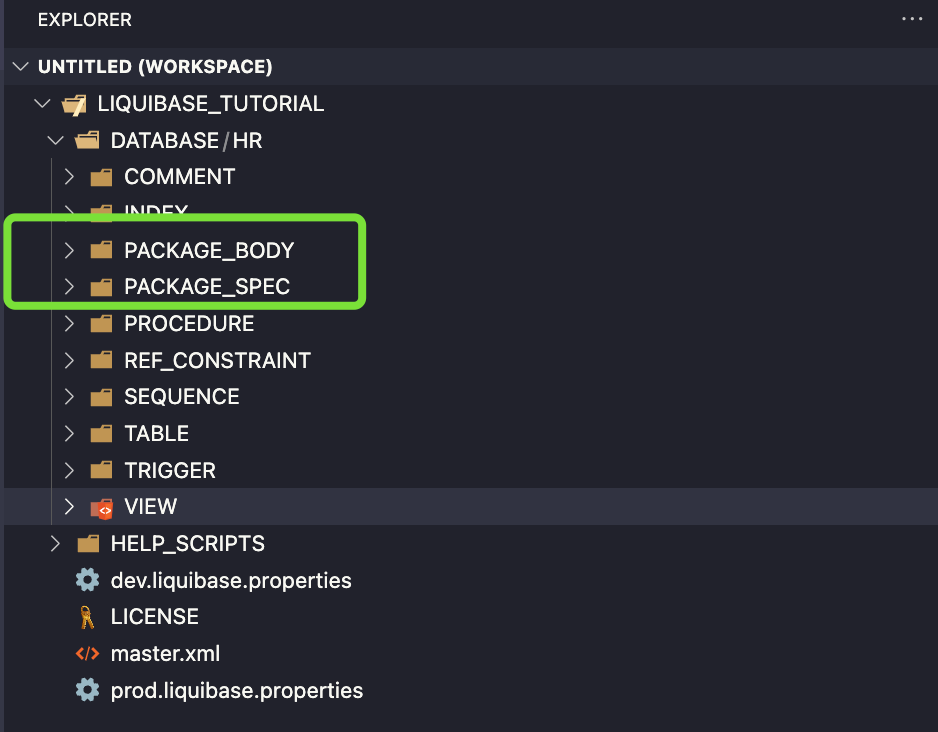

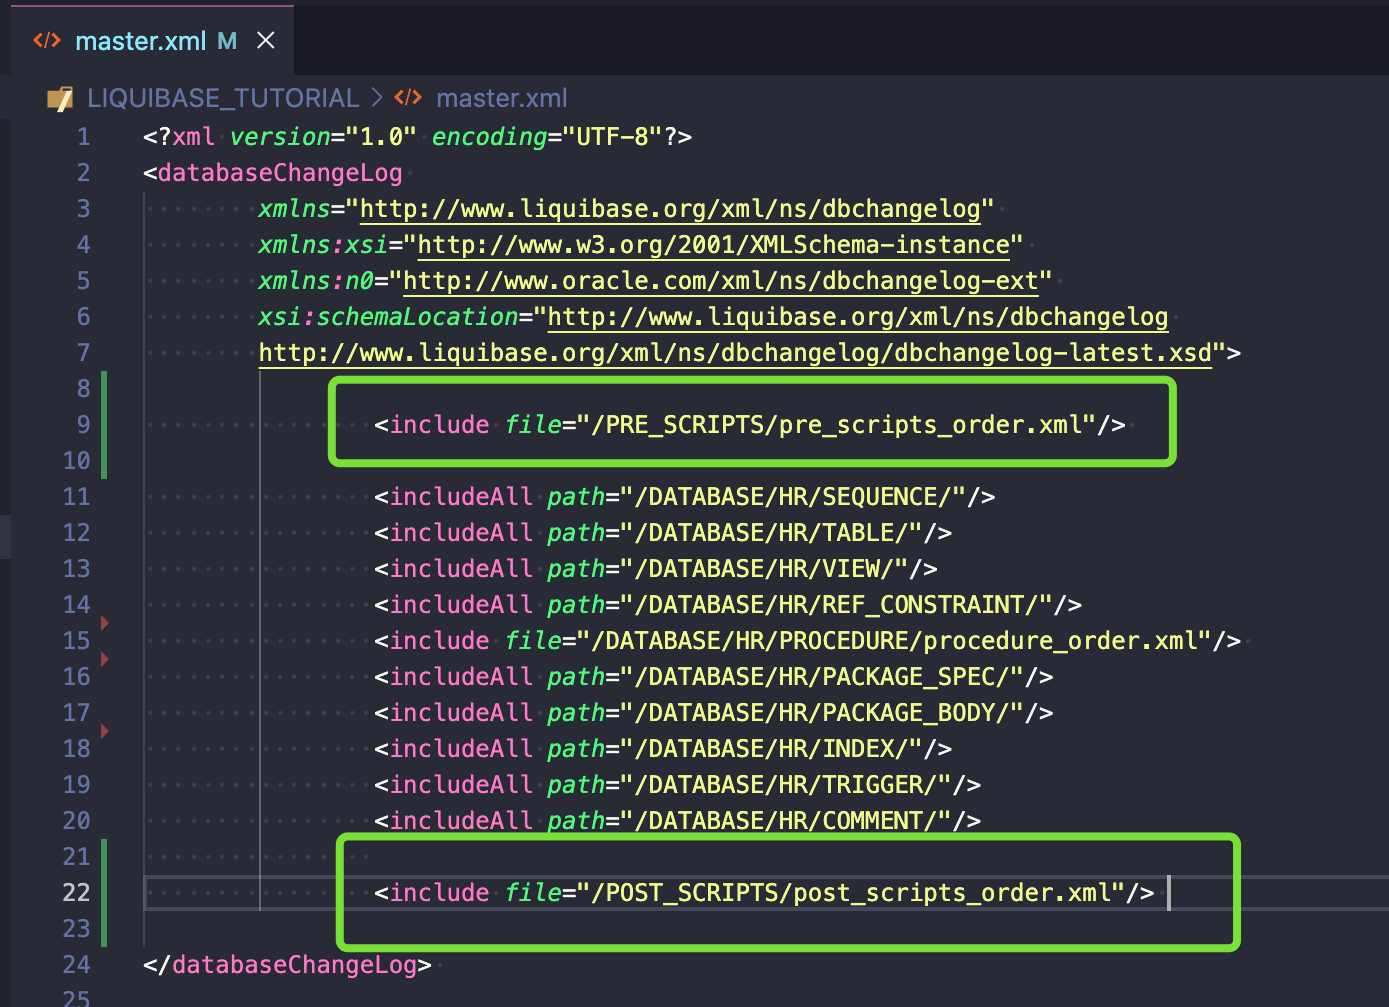
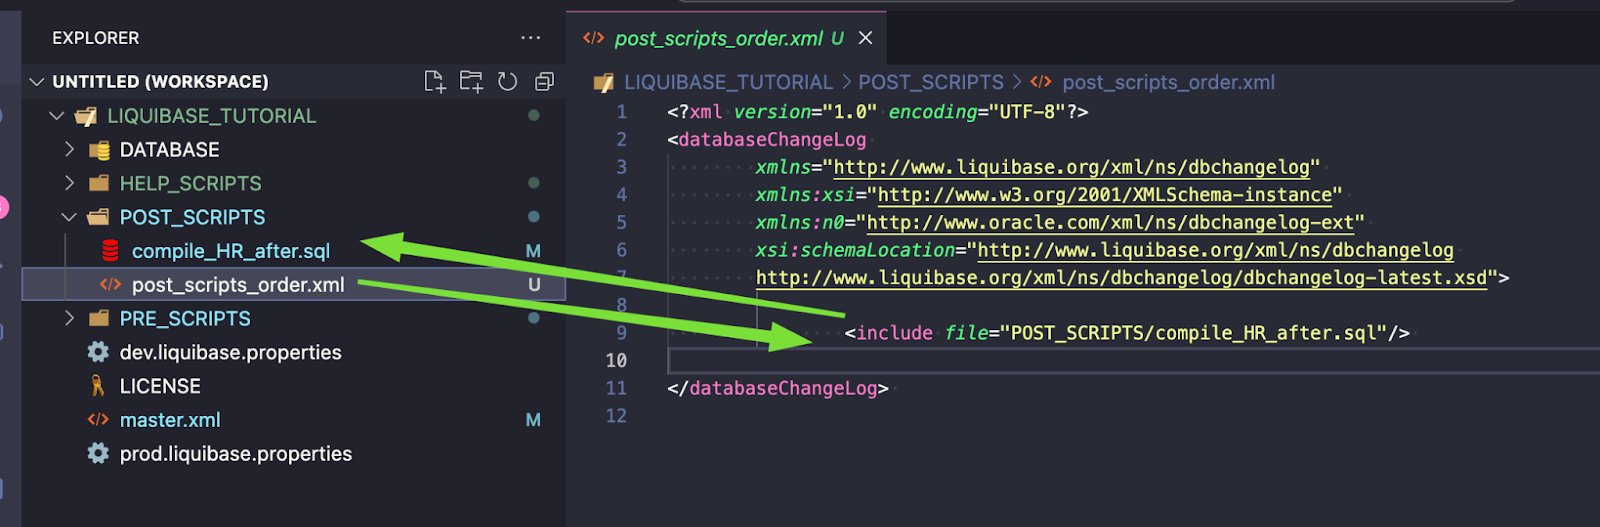
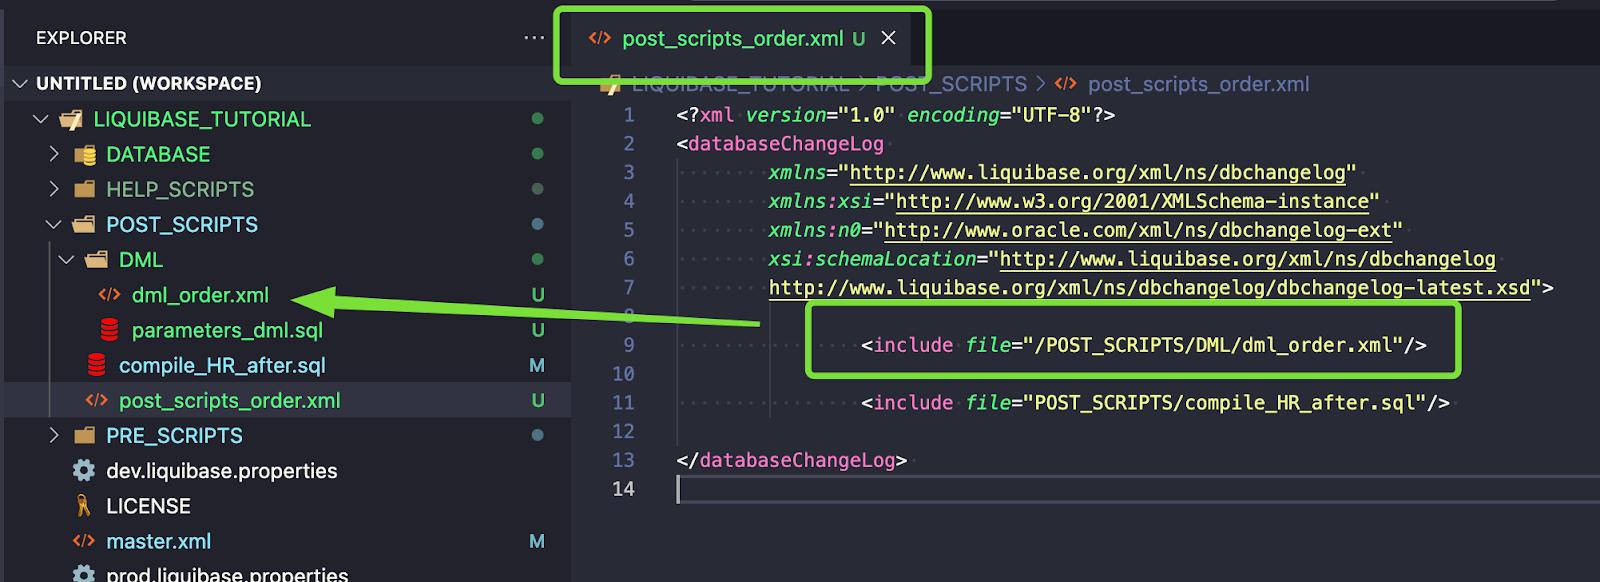
I used includeAll which means that all SQL files I create in those folders will be executed alphabetically. If you want more control use the include file tag, as I did in the line above (blue box).
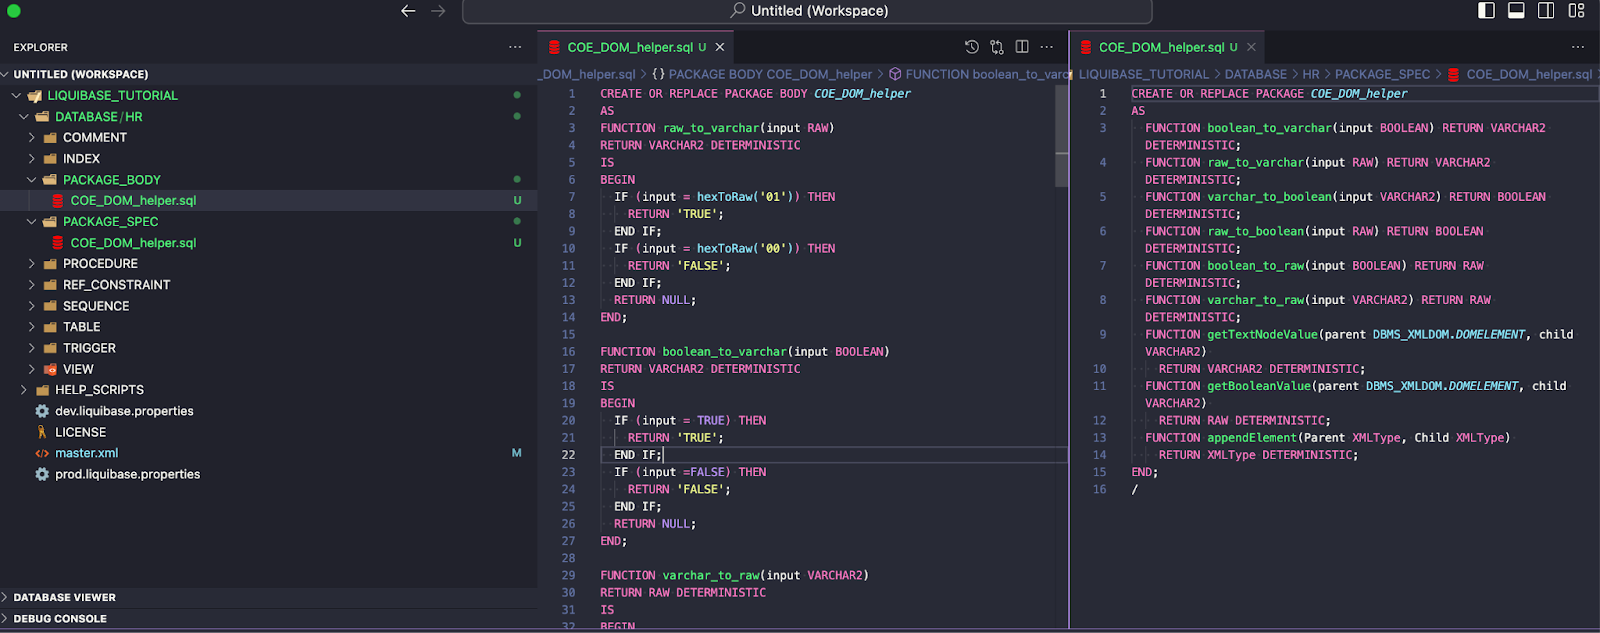
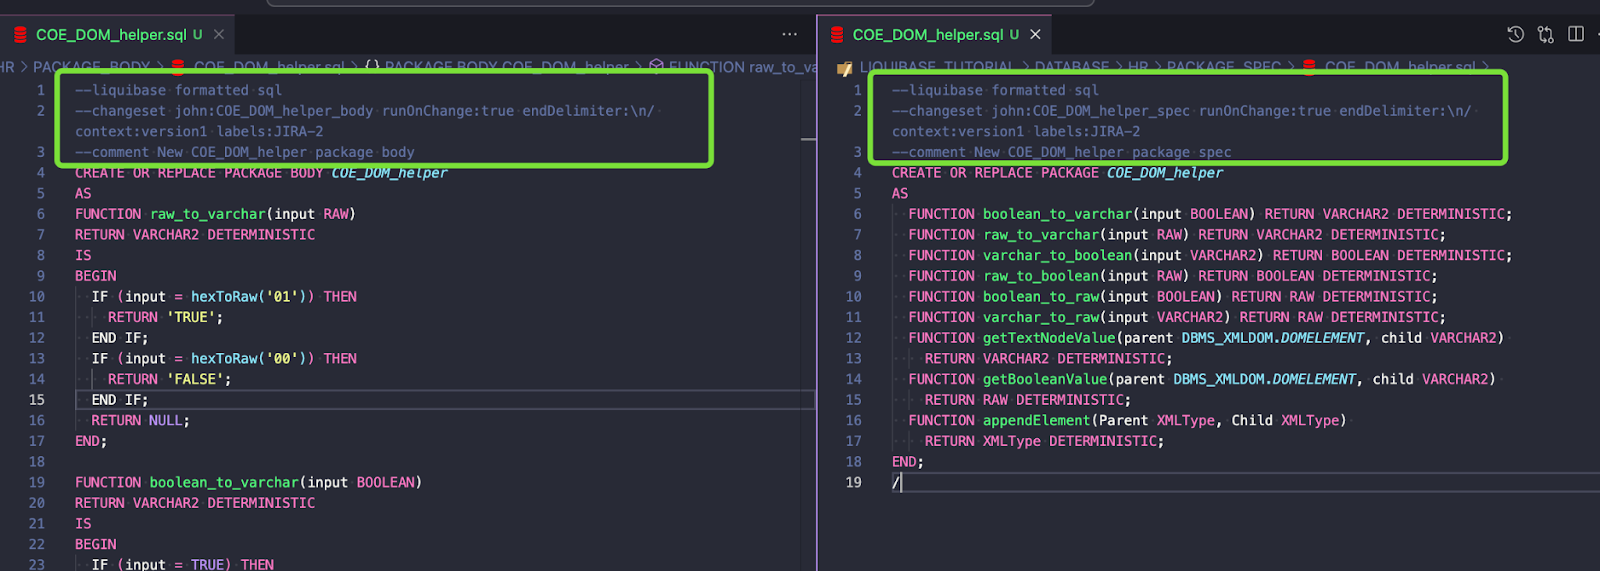
Lines to add to the package body:
--liquibase formatted sql
--changeset john:COE_DOM_helper_body runOnChange:true endDelimiter:\n/ context:version1 labels:JIRA-2
--comment New COE_DOM_helper package body
Add these lines to package spec:
--liquibase formatted sql
--changeset john:COE_DOM_helper_spec runOnChange:true endDelimiter:\n/ context:version1 labels:JIRA-2
--comment New COE_DOM_helper package spec
Legend:
Steps:
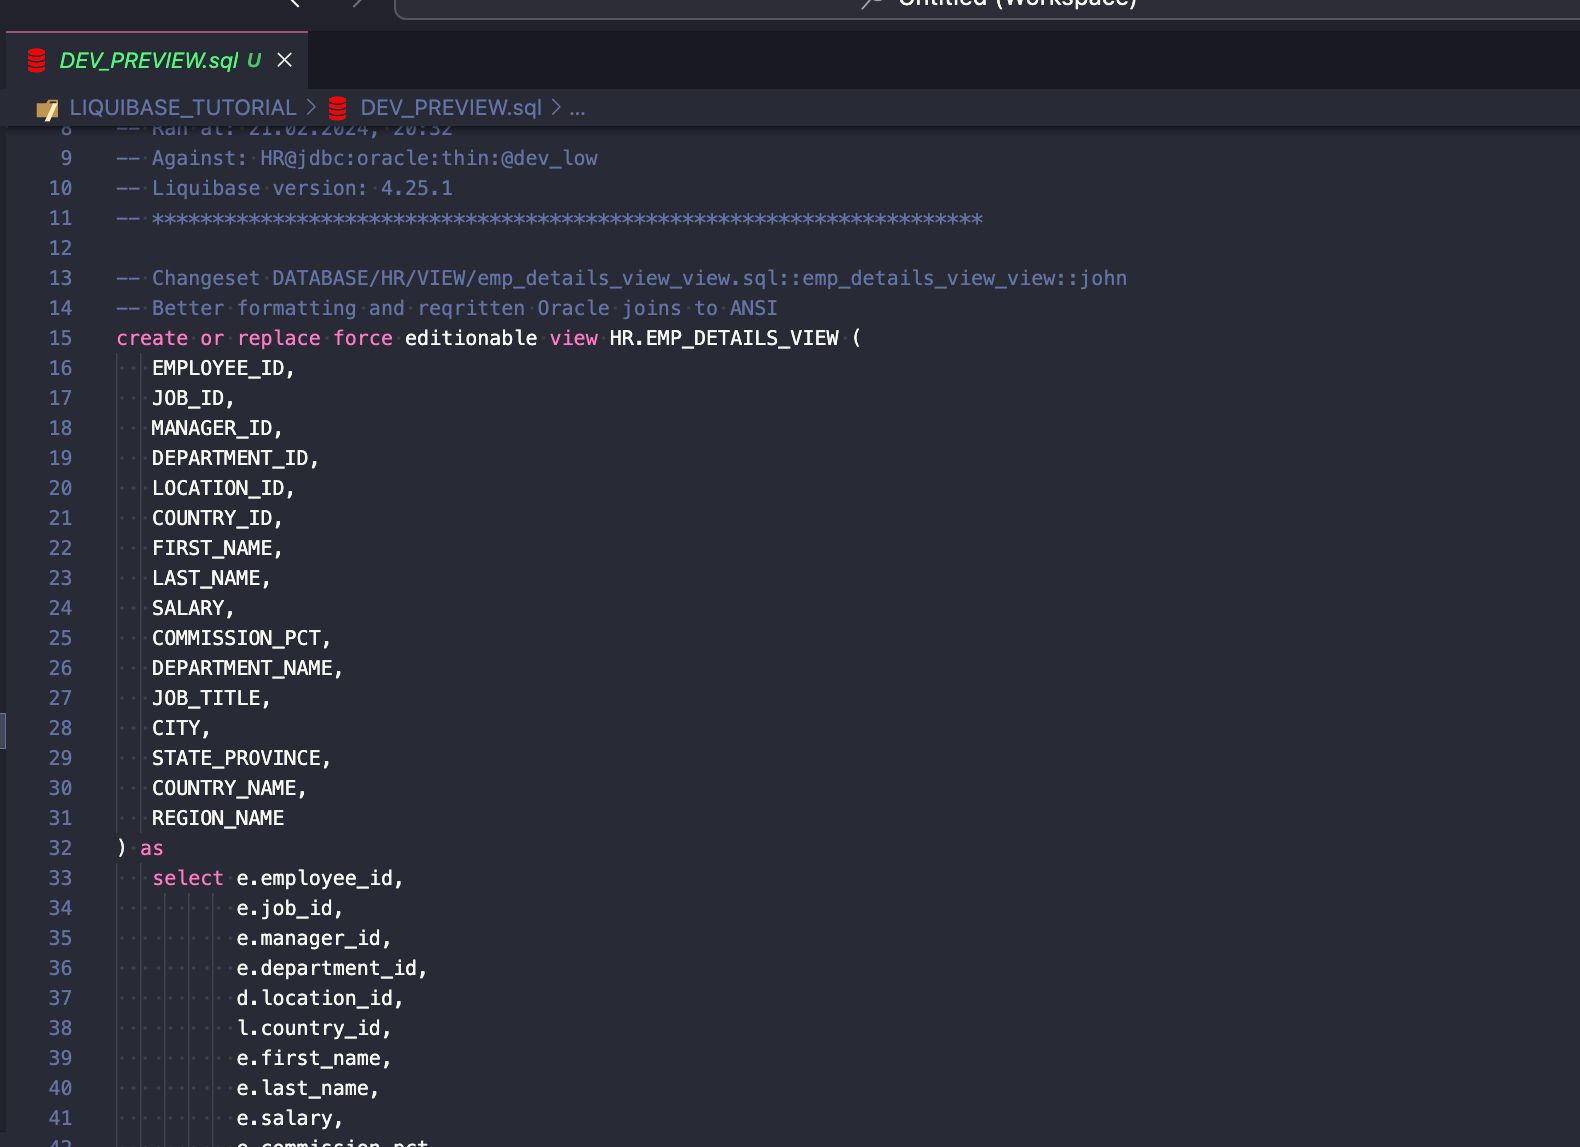
Preview what will be deployed via this command:
liquibase --defaults-file=dev.liquibase.properties update-sql --label-filter=JIRA-2
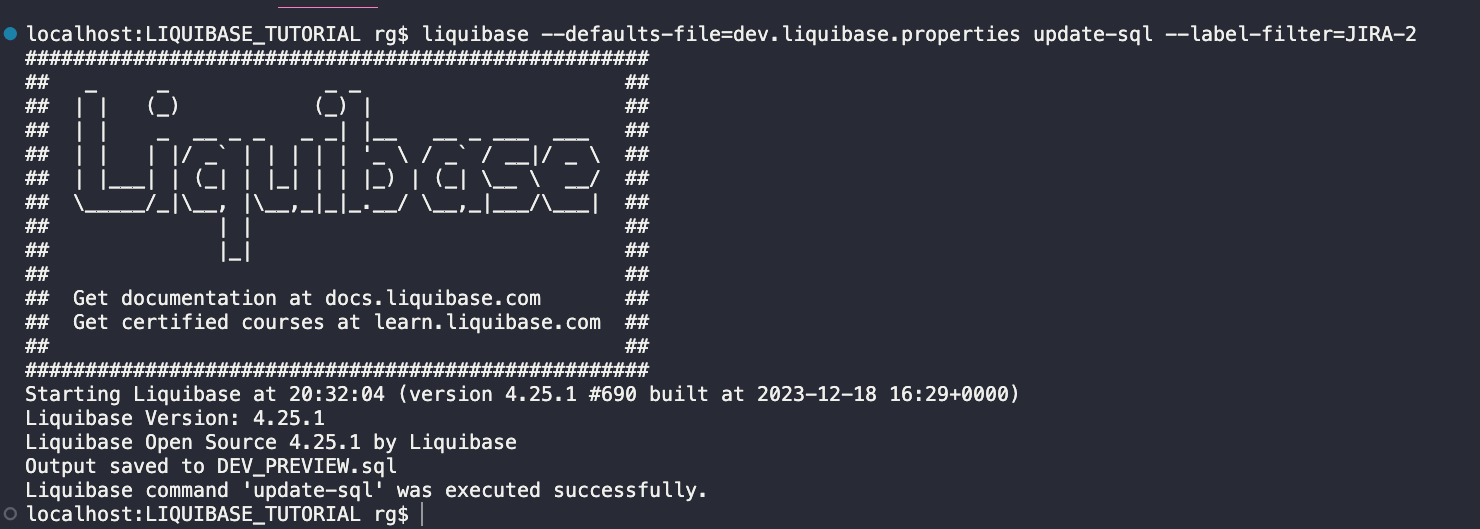
Looks good (preview the full file here).
Execute Liquibase UPDATE command to deploy those 3 new changes:
liquibase --defaults-file=dev.liquibase.properties update --label-filter=JIRA-2
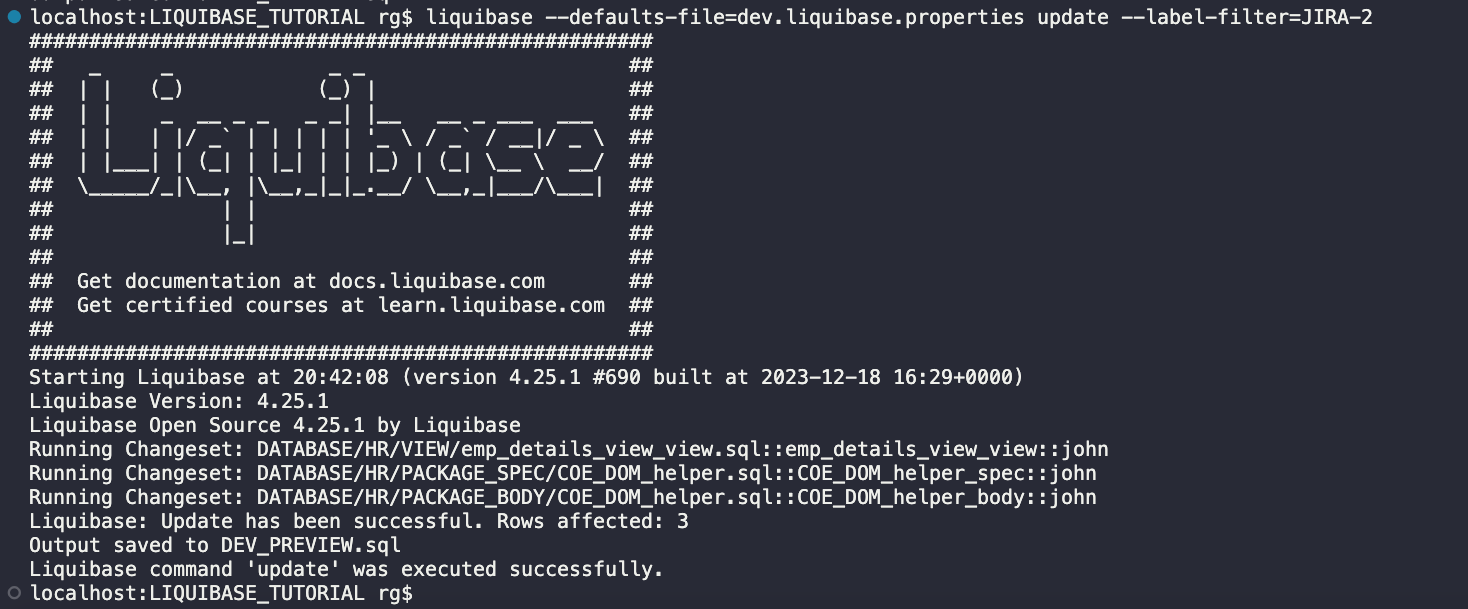
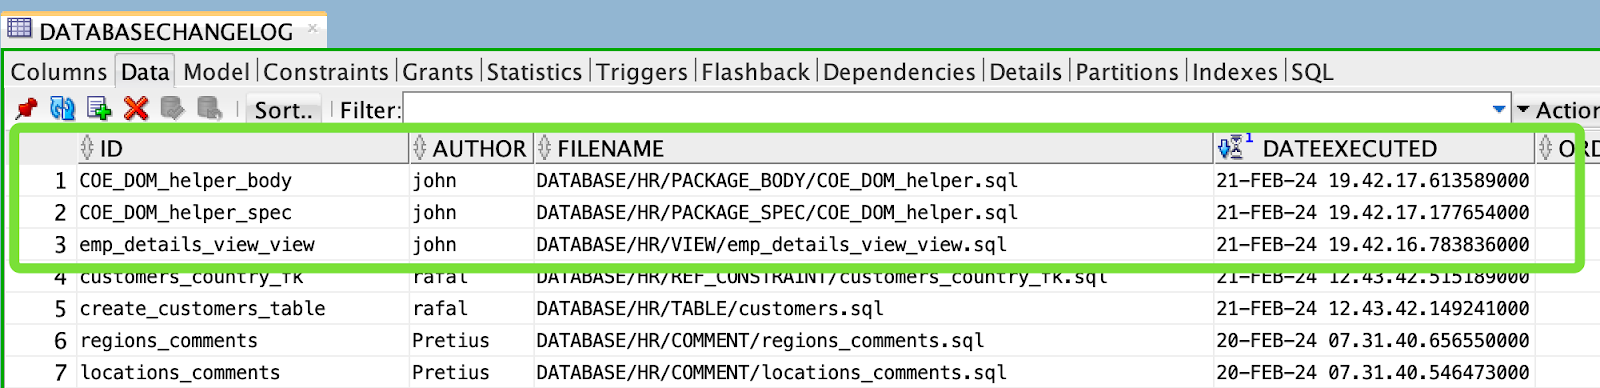
Changes were deployed to my DEV database, and there are 3 new rows in the DATABASECHANGELOG table:
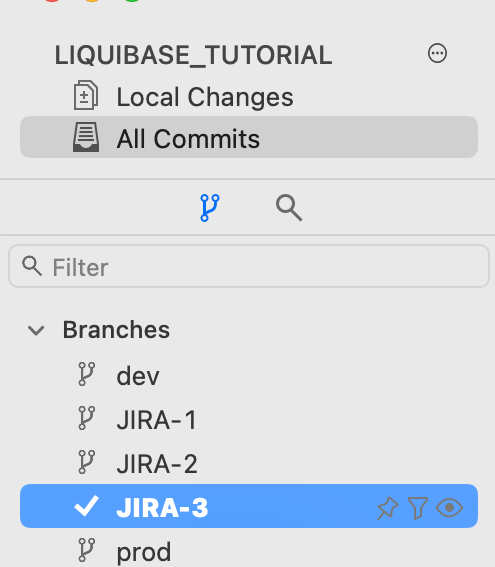
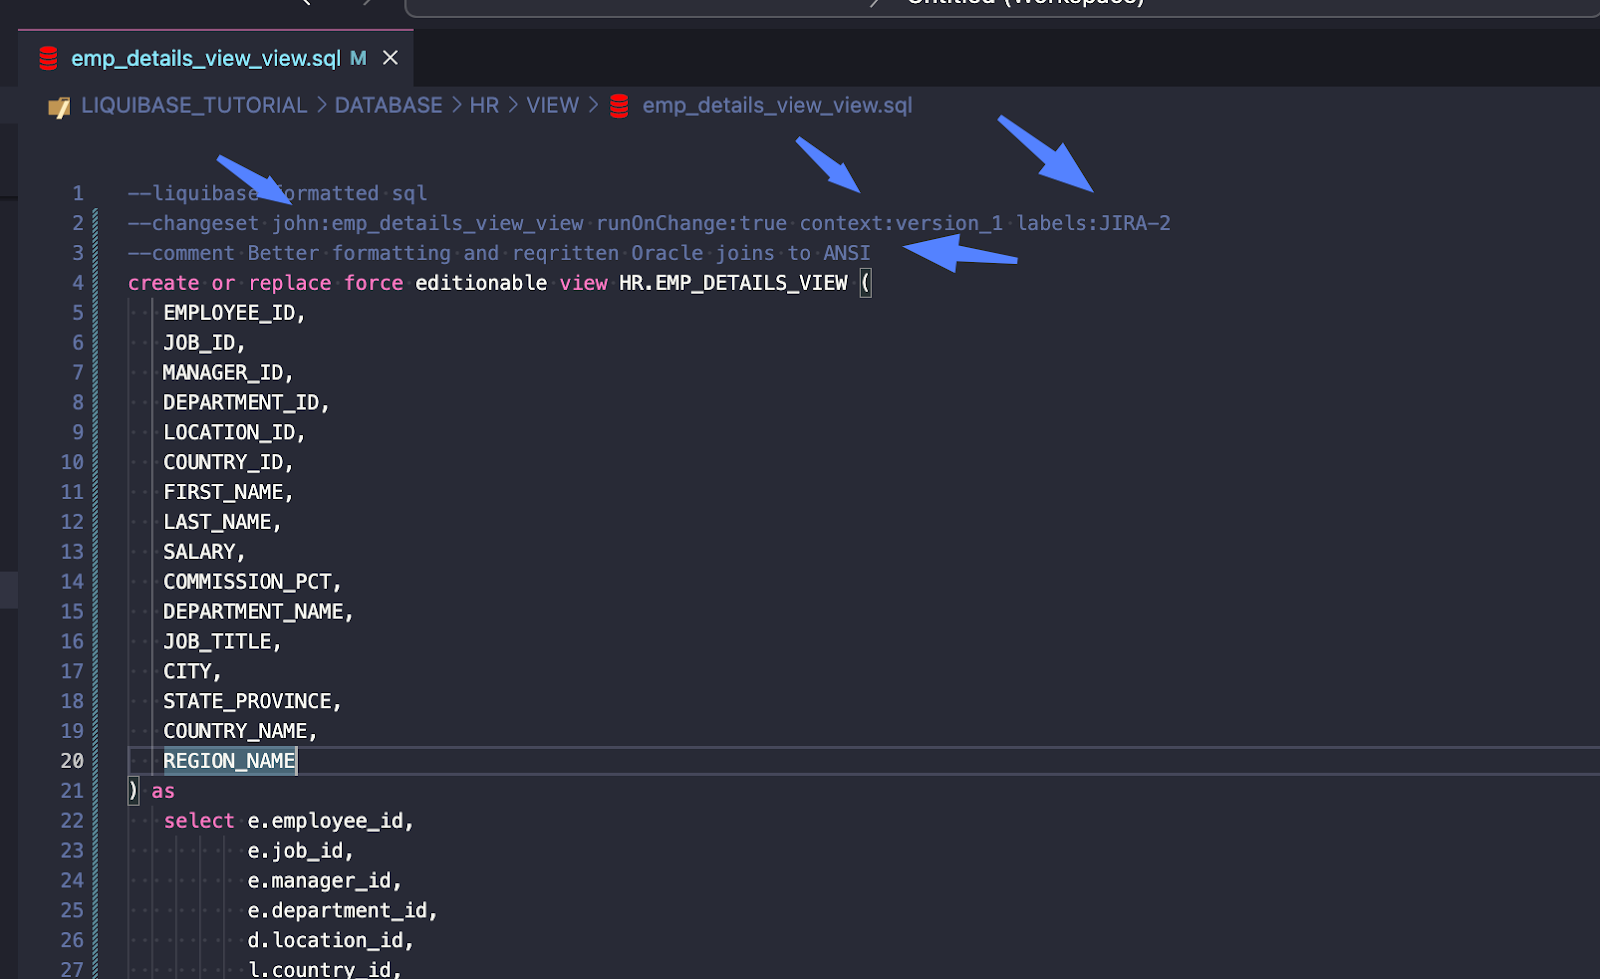
Steps:

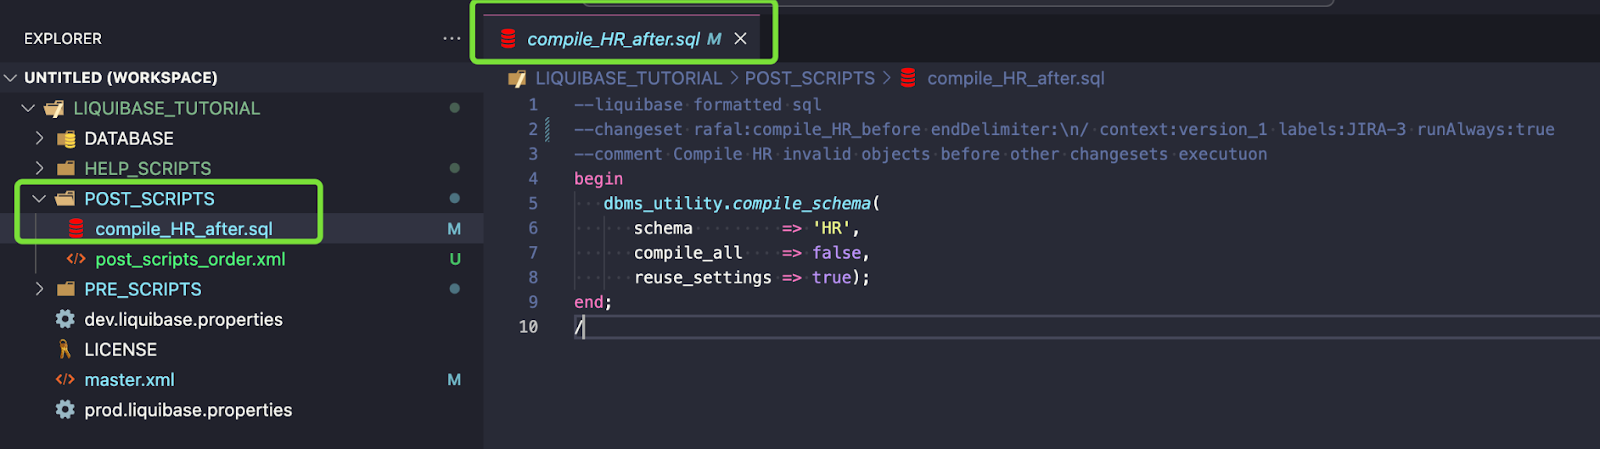
Full changeset code:
--liquibase formatted sql
--changeset rafal:compile_HR_after endDelimiter:\n/ context:version_1 labels:JIRA-3 runAlways:true
--comment Compile HR invalid objects after other changesets executuon
begin
   dbms_utility.compile_schema(
      schema         => 'HR',
      compile_all    => false,
      reuse_settings => true);
end;
/
There’s something new in the above syntax – runAlways:true. Thanks to this parameter, Liquibase will execute this changeset every time you will run the UPDATE command.
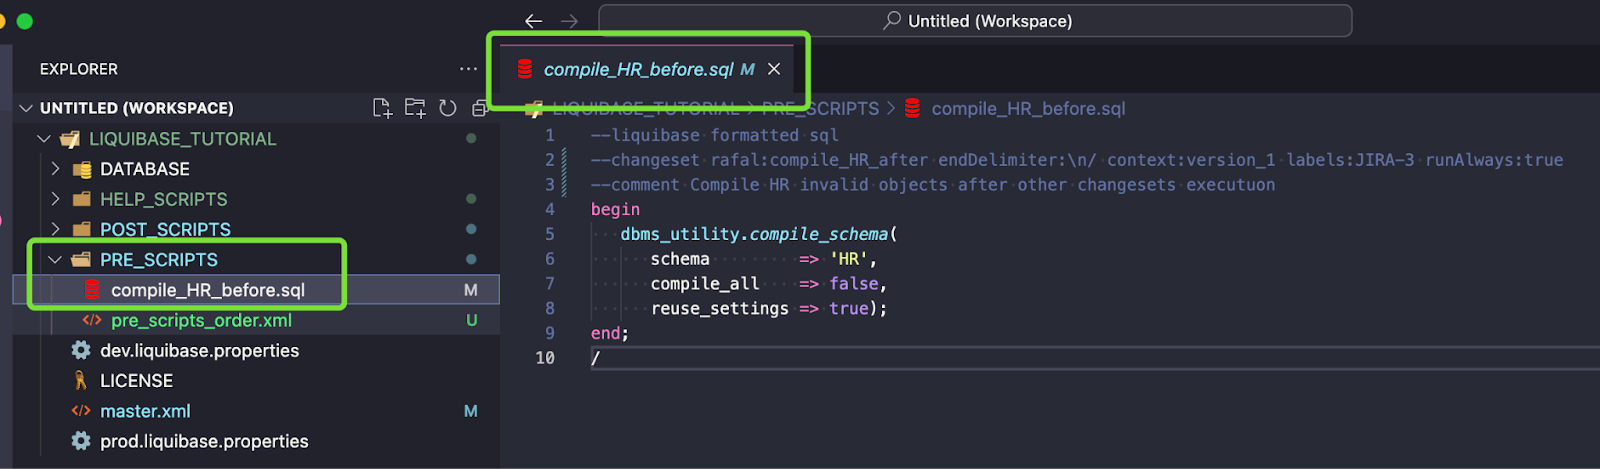
Full changeset code:
--liquibase formatted sql
--changeset rafal:compile_HR_before endDelimiter:\n/ context:version_1 labels:JIRA-3 runAlways:true
--comment Compile HR invalid objects before other changesets executuon
begin
   dbms_utility.compile_schema(
      schema         => 'HR',
      compile_all    => false,
      reuse_settings => true);
end;
/
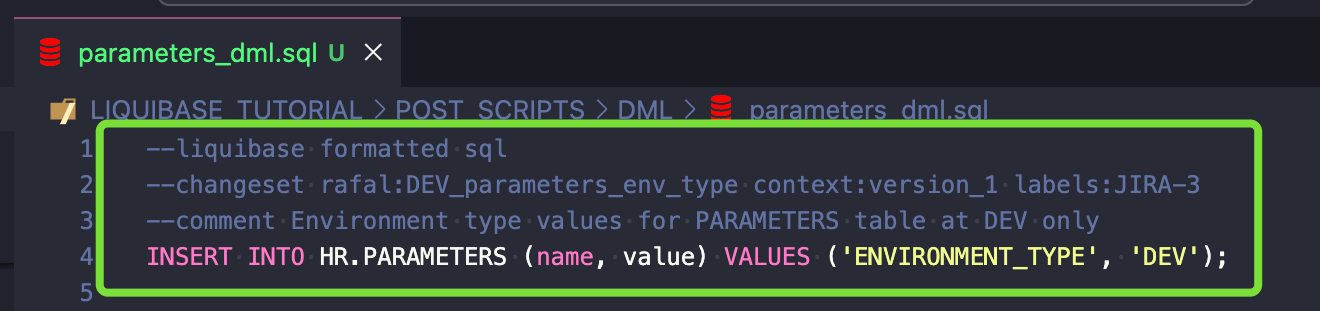
Steps:
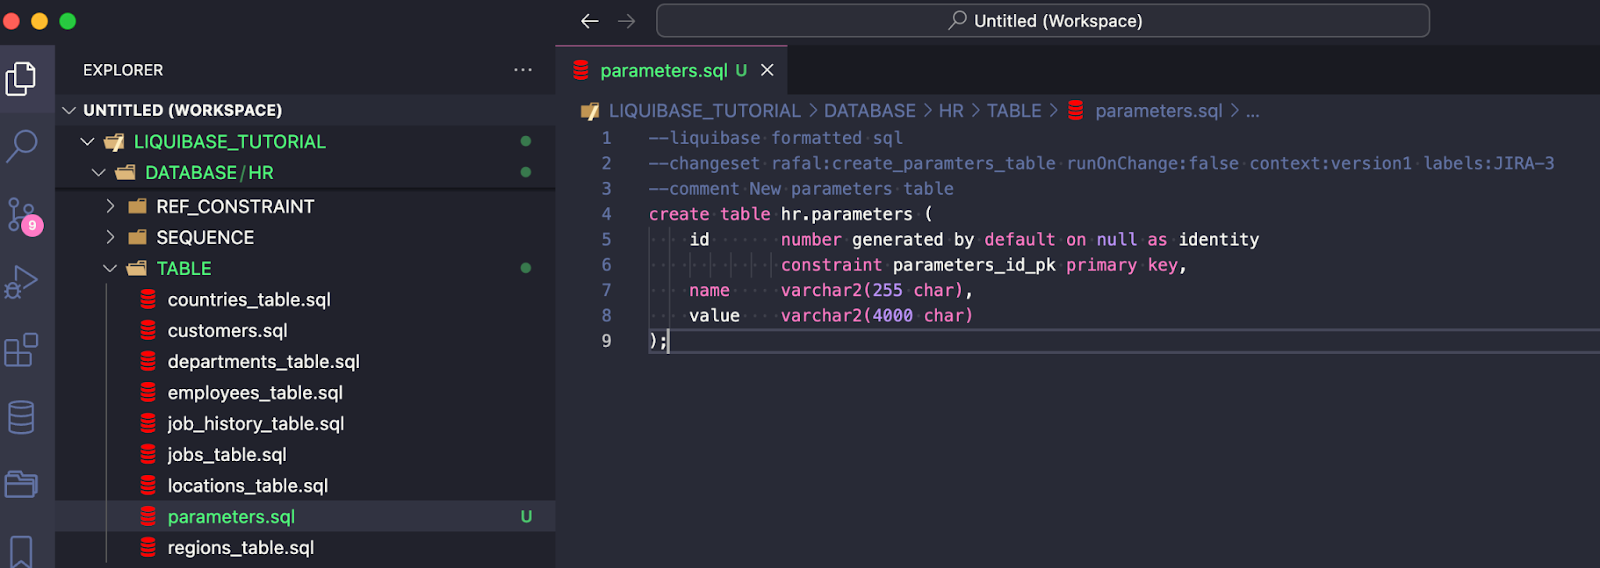
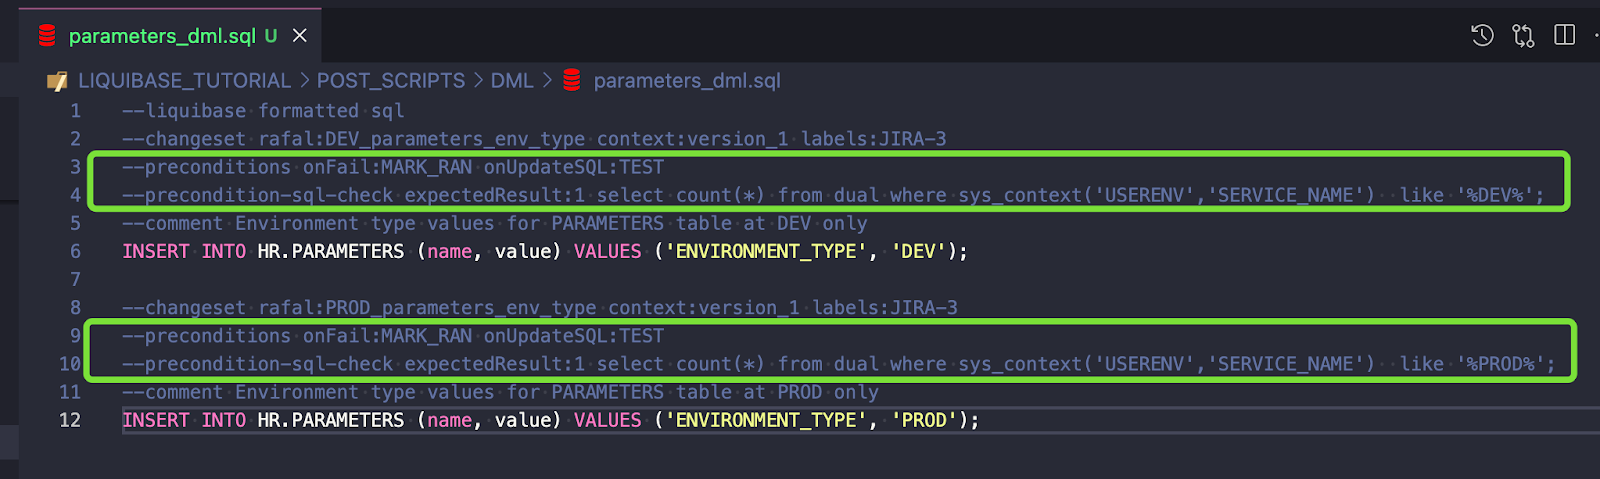
--liquibase formatted sql
--changeset rafal:create_paramters_table runOnChange:false context:version1 labels:JIRA-3
--comment New parameters table
create table hr.parameters (
    id       number generated by default on null as identity
             constraint parameters_id_pk primary key,
    name     varchar2(255 char),
    value    varchar2(4000 char)
);
Steps:

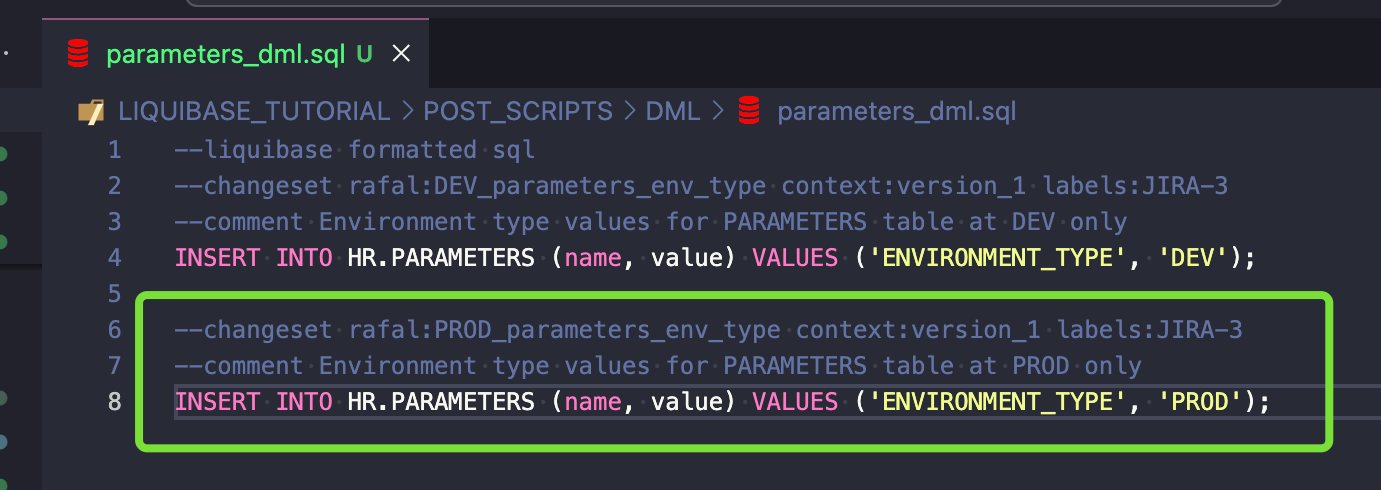
However, this won’t be enough because changesets defined this way will be executed at every environment. You’ll need to use Liquibase preConditions.
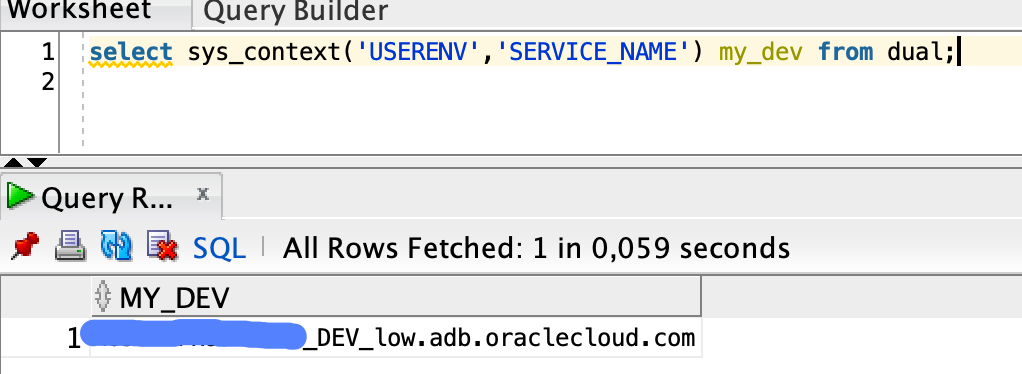
How will you know if your Autonomous Database is DEV or PROD? Your service_name parameter will contain either DEV or PROD value. This query should be enough:
Changes are prepared. Run UPDATE-SQL to check what will be executed at DEV:
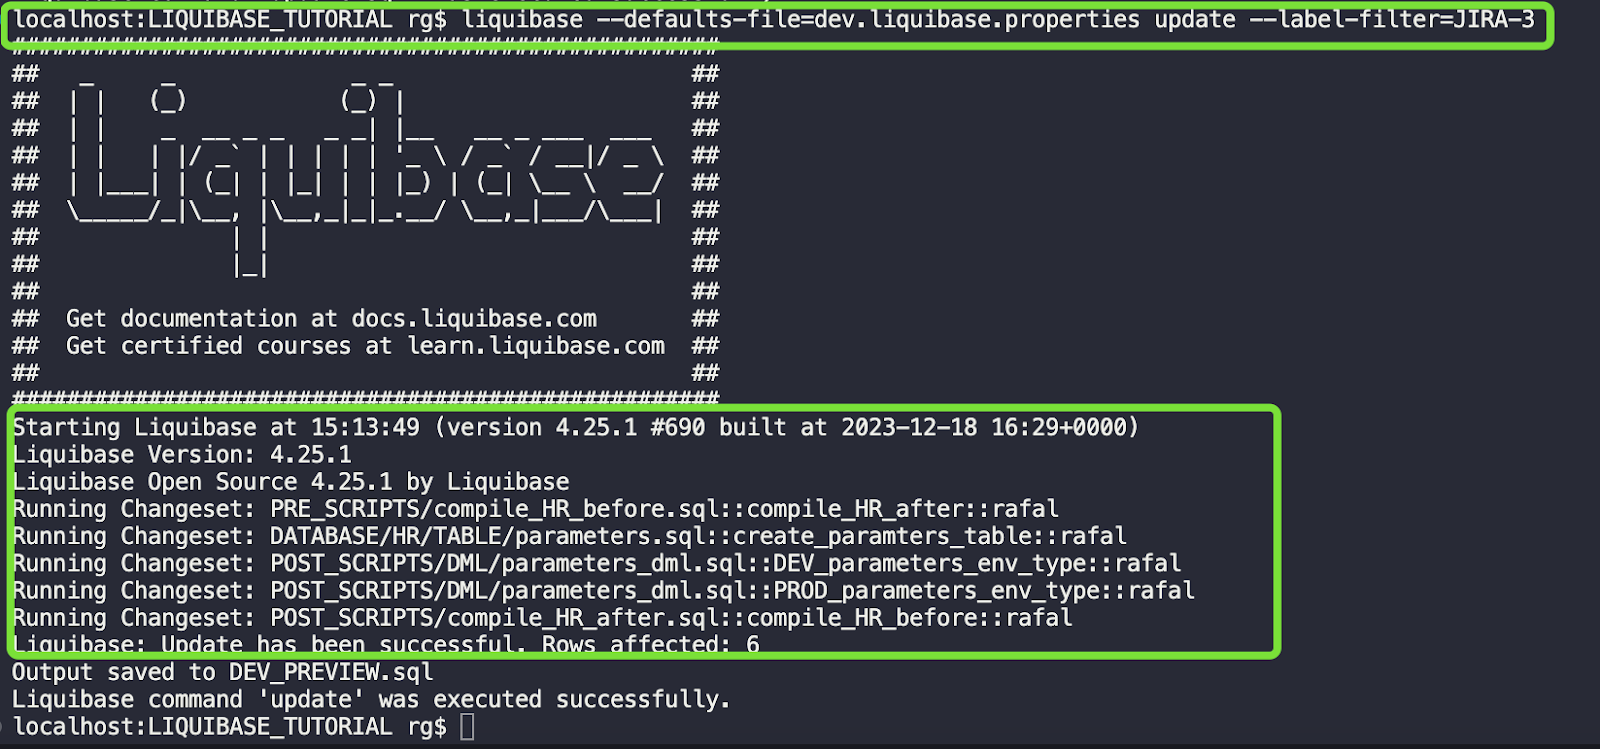
liquibase --defaults-file=dev.liquibase.properties update-sql --label-filter=JIRA-3
My preview script is below and in the repo here, and all is as I expected. What will happen:
Preview script:
-- Lock Database
UPDATE HR.DATABASECHANGELOGLOCK SET LOCKED = 1, LOCKEDBY = 'localhost (192.168.0.2)', LOCKGRANTED = SYSTIMESTAMP WHERE ID = 1 AND LOCKED = 0;

-- *********************************************************************
-- Update Database Script
-- *********************************************************************
-- Change Log: master.xml
-- Ran at: 22.02.2024, 15:08
-- Against: HR@jdbc:oracle:thin:@dev_low
-- Liquibase version: 4.25.1
-- *********************************************************************

-- Changeset PRE_SCRIPTS/compile_HR_before.sql::compile_HR_after::rafal
-- Compile HR invalid objects after other changesets executuon
begin
   dbms_utility.compile_schema(
      schema         => 'HR',
      compile_all    => false,
      reuse_settings => true);
end;
/

INSERT INTO HR.DATABASECHANGELOG (ID, AUTHOR, FILENAME, DATEEXECUTED, ORDEREXECUTED, MD5SUM, DESCRIPTION, COMMENTS, EXECTYPE, CONTEXTS, LABELS, LIQUIBASE, DEPLOYMENT_ID) VALUES ('compile_HR_after', 'rafal', 'PRE_SCRIPTS/compile_HR_before.sql', SYSTIMESTAMP, 50, '9:84b226d042023ca9771041f4c887fd6a', 'sql', 'Compile HR invalid objects after other changesets executuon', 'EXECUTED', 'version_1', 'jira-3', '4.25.1', '8610923542');

-- Changeset DATABASE/HR/TABLE/parameters.sql::create_paramters_table::rafal
-- New parameters table
create table hr.parameters (
    id       number generated by default on null as identity
             constraint parameters_id_pk primary key,
    name     varchar2(255 char),
    value    varchar2(4000 char)
);

INSERT INTO HR.DATABASECHANGELOG (ID, AUTHOR, FILENAME, DATEEXECUTED, ORDEREXECUTED, MD5SUM, DESCRIPTION, COMMENTS, EXECTYPE, CONTEXTS, LABELS, LIQUIBASE, DEPLOYMENT_ID) VALUES ('create_paramters_table', 'rafal', 'DATABASE/HR/TABLE/parameters.sql', SYSTIMESTAMP, 51, '9:830a9f31b55e62c8fc4a3f8c2ee4e51c', 'sql', 'New parameters table', 'EXECUTED', 'version1', 'jira-3', '4.25.1', '8610923542');

-- Changeset POST_SCRIPTS/DML/parameters_dml.sql::DEV_parameters_env_type::rafal
-- Environment type values for PARAMETERS table at DEV only
INSERT INTO HR.PARAMETERS (name, value) VALUES ('ENVIRONMENT_TYPE', 'DEV');

INSERT INTO HR.DATABASECHANGELOG (ID, AUTHOR, FILENAME, DATEEXECUTED, ORDEREXECUTED, MD5SUM, DESCRIPTION, COMMENTS, EXECTYPE, CONTEXTS, LABELS, LIQUIBASE, DEPLOYMENT_ID) VALUES ('DEV_parameters_env_type', 'rafal', 'POST_SCRIPTS/DML/parameters_dml.sql', SYSTIMESTAMP, 52, '9:d707b31273b18adf3fce32ddce9f1553', 'sql', 'Environment type values for PARAMETERS table at DEV only', 'EXECUTED', 'version_1', 'jira-3', '4.25.1', '8610923542');

-- Changeset POST_SCRIPTS/DML/parameters_dml.sql::PROD_parameters_env_type::rafal
-- Environment type values for PARAMETERS table at PROD only
INSERT INTO HR.DATABASECHANGELOG (ID, AUTHOR, FILENAME, DATEEXECUTED, ORDEREXECUTED, MD5SUM, DESCRIPTION, COMMENTS, EXECTYPE, CONTEXTS, LABELS, LIQUIBASE, DEPLOYMENT_ID) VALUES ('PROD_parameters_env_type', 'rafal', 'POST_SCRIPTS/DML/parameters_dml.sql', SYSTIMESTAMP, 53, '9:7868f1d9e91fa2c43b86cd6f8bd5d698', 'sql', 'Environment type values for PARAMETERS table at PROD only', 'MARK_RAN', 'version_1', 'jira-3', '4.25.1', '8610923542');

-- Changeset POST_SCRIPTS/compile_HR_after.sql::compile_HR_before::rafal
-- Compile HR invalid objects before other changesets executuon
begin
   dbms_utility.compile_schema(
      schema         => 'HR',
      compile_all    => false,
      reuse_settings => true);
end;
/

INSERT INTO HR.DATABASECHANGELOG (ID, AUTHOR, FILENAME, DATEEXECUTED, ORDEREXECUTED, MD5SUM, DESCRIPTION, COMMENTS, EXECTYPE, CONTEXTS, LABELS, LIQUIBASE, DEPLOYMENT_ID) VALUES ('compile_HR_before', 'rafal', 'POST_SCRIPTS/compile_HR_after.sql', SYSTIMESTAMP, 54, '9:84b226d042023ca9771041f4c887fd6a', 'sql', 'Compile HR invalid objects before other changesets executuon', 'EXECUTED', 'version_1', 'jira-3', '4.25.1', '8610923542');

-- Release Database Lock
UPDATE HR.DATABASECHANGELOGLOCK SET LOCKED = 0, LOCKEDBY = NULL, LOCKGRANTED = NULL WHERE ID = 1;liquibase --defaults-file=dev.liquibase.properties update --label-filter=JIRA-3
All went well.

Only values for DEV are in the PARAMETERS table:
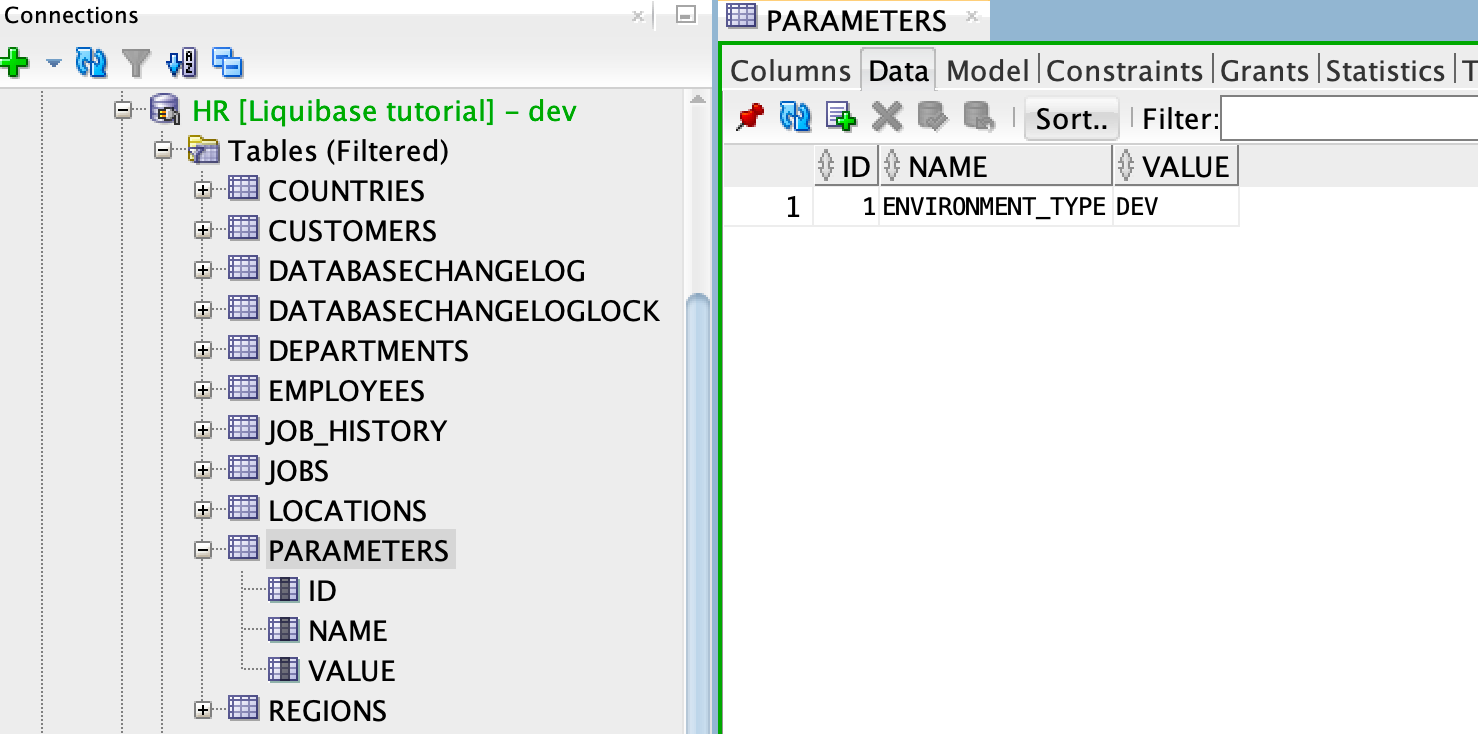
You can now merge the JIRA-3 branch into DEV.
Finally, I will show you deploying changes made on DEV to another environment – in my case, it’s PROD, but it could also be UAT, PRE-PROD or any other. I’ll move changes from JIRA-1 and JIRA-2 first, and then follow with JIRA-3. You will only need to prepare proper liquibase.properties files with connections.
In the previous part of this tutorial, RAFAL and JOHN developed some new features for version_1 of their application. They completed tasks JIRA-1, JIRA-2 and JIRA-3.
A new guy joins our team: Matt, a project manager. He says: “We need to deploy only changes from JIRA-1 and JIRA-2 tasks to PROD”.
I’m glad we used contexts and labels because it will be easier. Here’s how to do it.
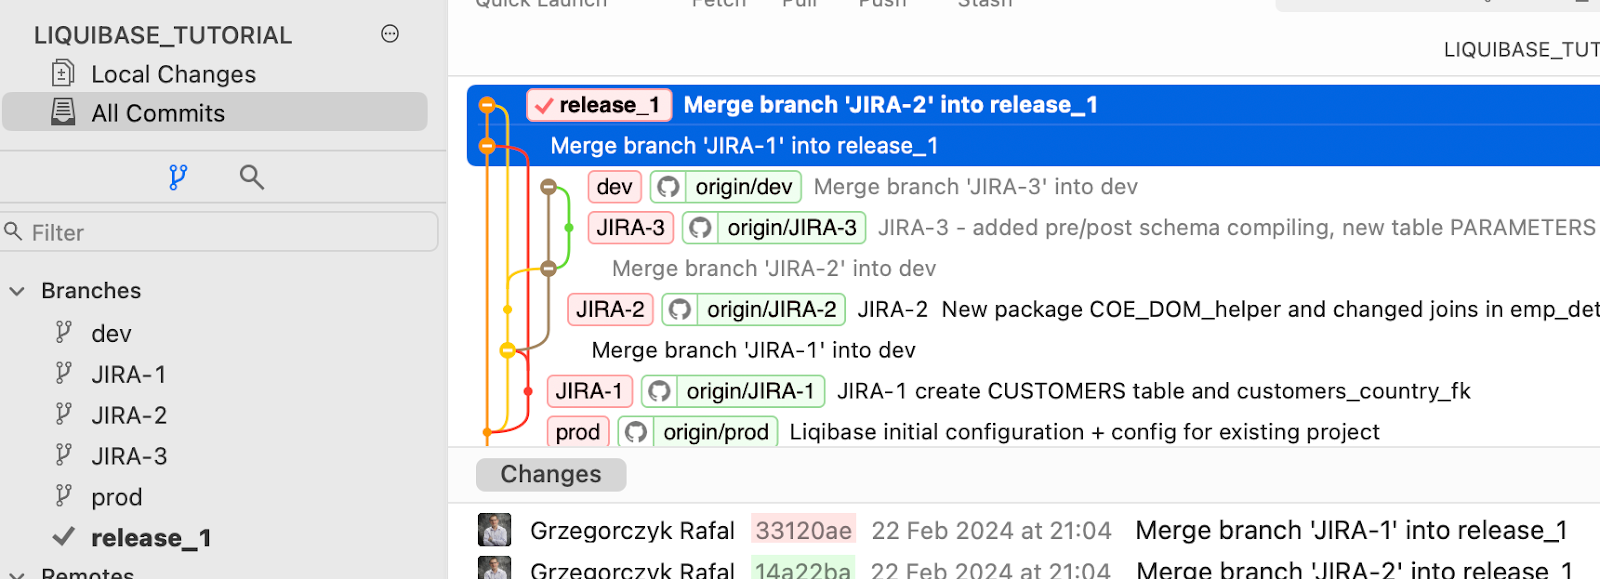
As you remember, we merged JIRA-1, JIRA-2, and JIRA-3 tasks to the DEV branch. So I can’t just merge DEV into PROD for deployment because it would include JIRA-3 changes that are not required.
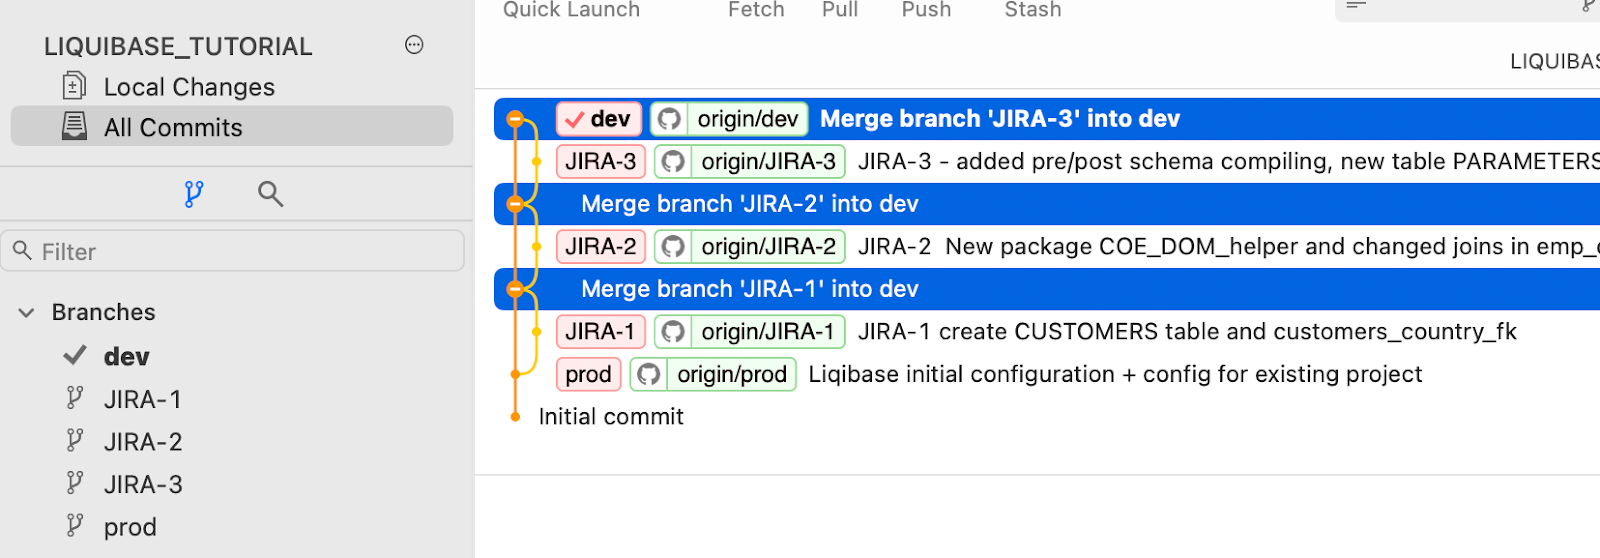
Here’s what we need to do:
You’re almost ready to deploy to PROD.
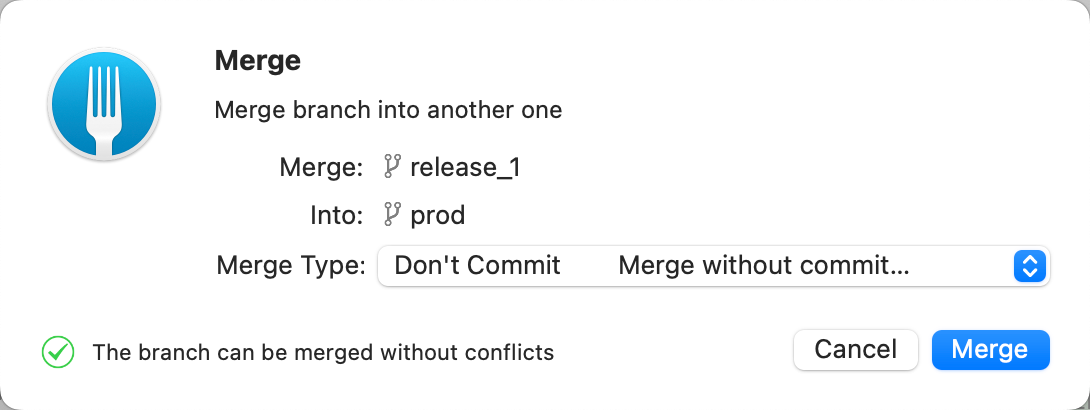
Now, deploy changes from your PROD branch to your PROD database. Run update-sql to see what will be deployed:
liquibase --defaults-file=prod.liquibase.properties update-sql --label-filter=JIRA-1,JIRA-2
There are no other pending changes on the PROD branch, so you could also run this command without the –label-filter parameter.
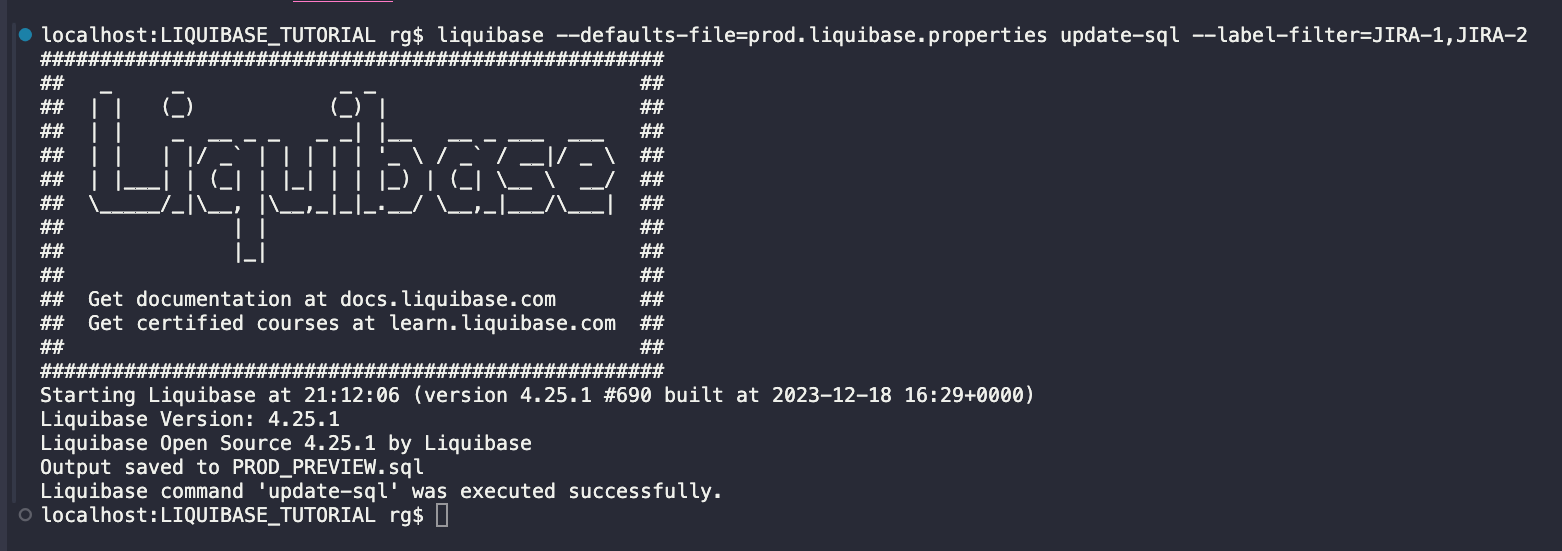
The script looks just like expected and contains only changes from tasks JIRA-1 and JIRA-2 (preview the full script here).
You can also use the status command to check what changesets will be deployed:
liquibase --defaults-file=prod.liquibase.properties status
The output looks like this:
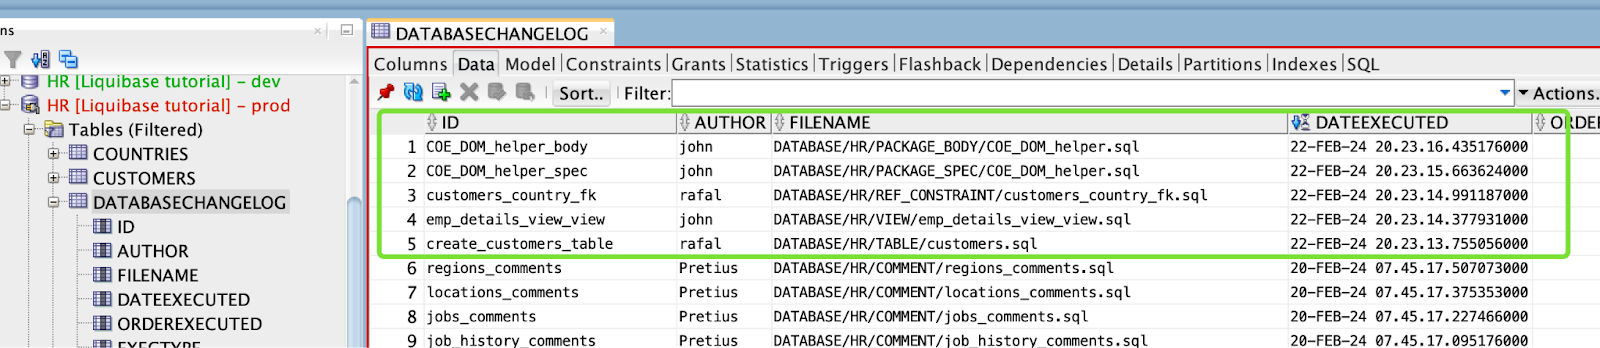
5 changesets have not been applied to HR@jdbc:oracle:thin:@prod_low
     DATABASE/HR/TABLE/customers.sql::create_customers_table::rafal
     DATABASE/HR/VIEW/emp_details_view_view.sql::emp_details_view_view::john
     DATABASE/HR/REF_CONSTRAINT/customers_country_fk.sql::customers_country_fk::rafal
     DATABASE/HR/PACKAGE_SPEC/COE_DOM_helper.sql::COE_DOM_helper_spec::john
     DATABASE/HR/PACKAGE_BODY/COE_DOM_helper.sql::COE_DOM_helper_body::john
Steps:
liquibase --defaults-file=prod.liquibase.properties update --label-filter=JIRA-1,JIRA-2
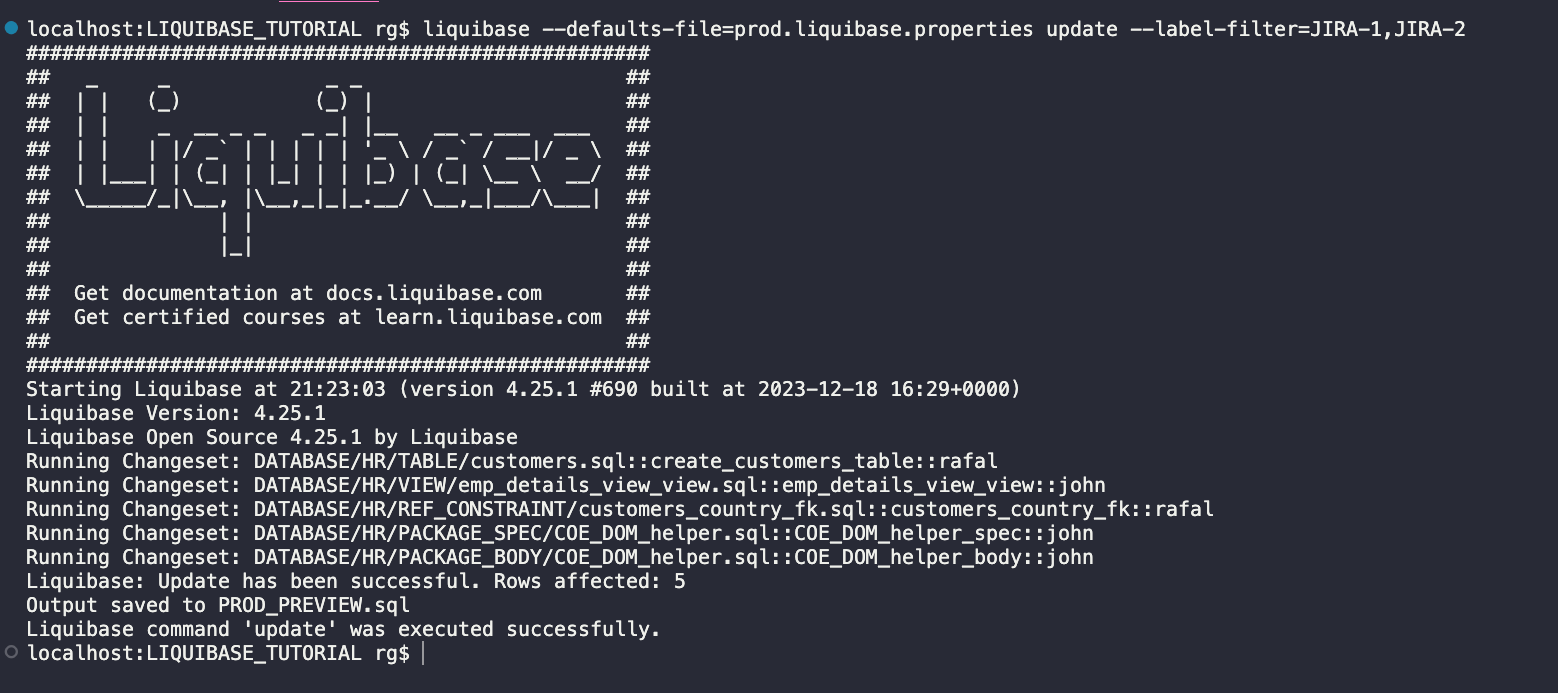
Everything was deployed as expected.
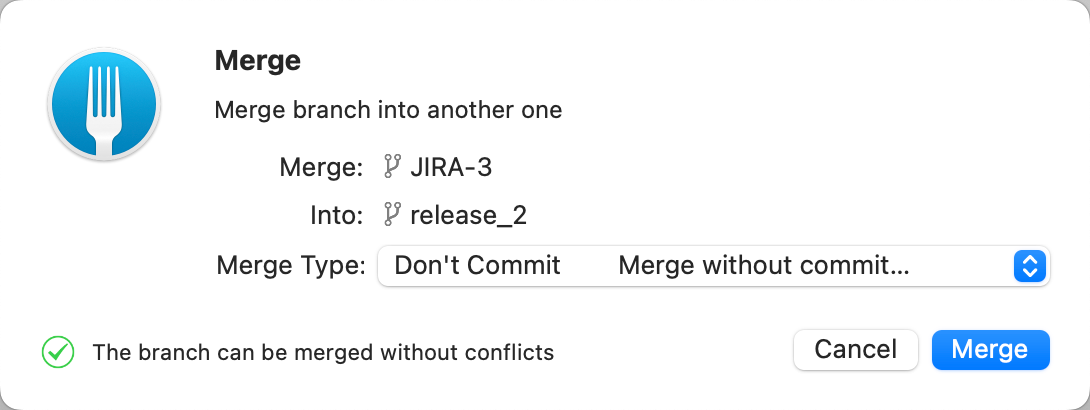
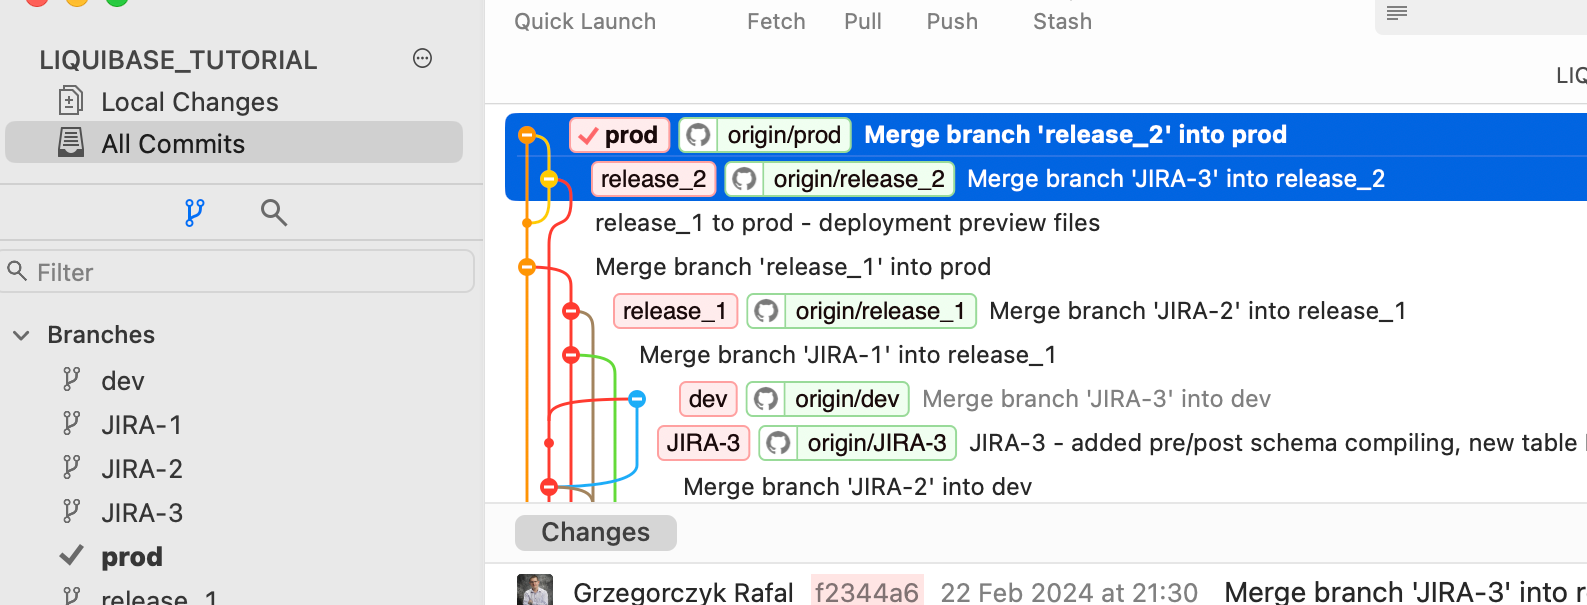
It’s time to deploy the remaining changes from JIRA-3 to PROD.
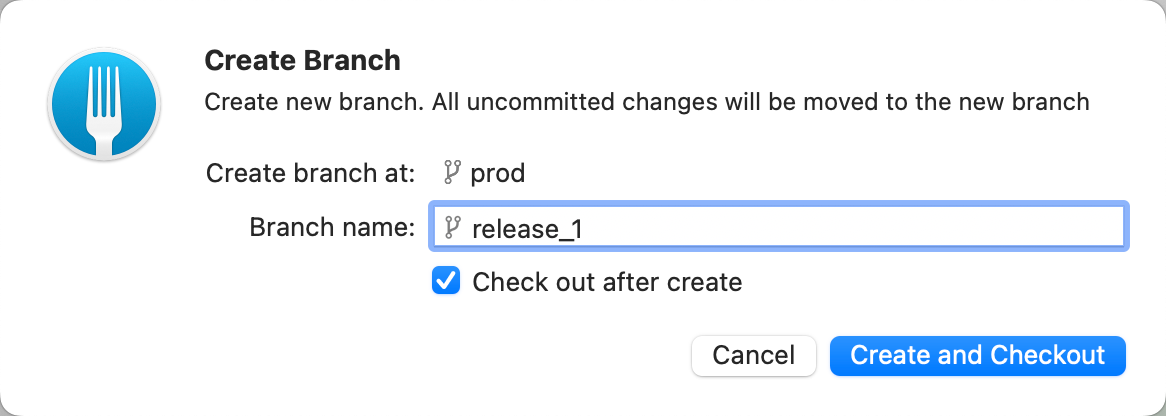
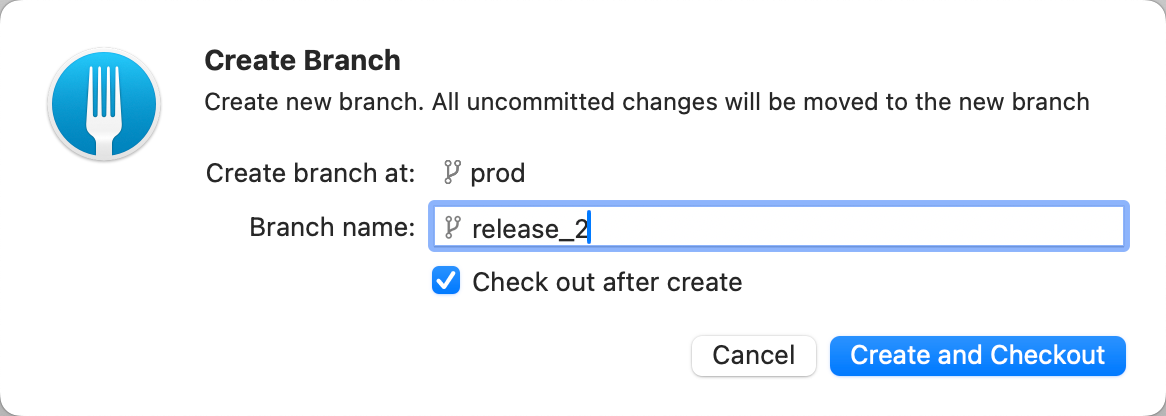
You’ll need to merge JIRA-3 to the newly created branch release_2 to do this. Then, merge the release_2 branch into PROD (repeat the steps mentioned above where applicable).
Steps:
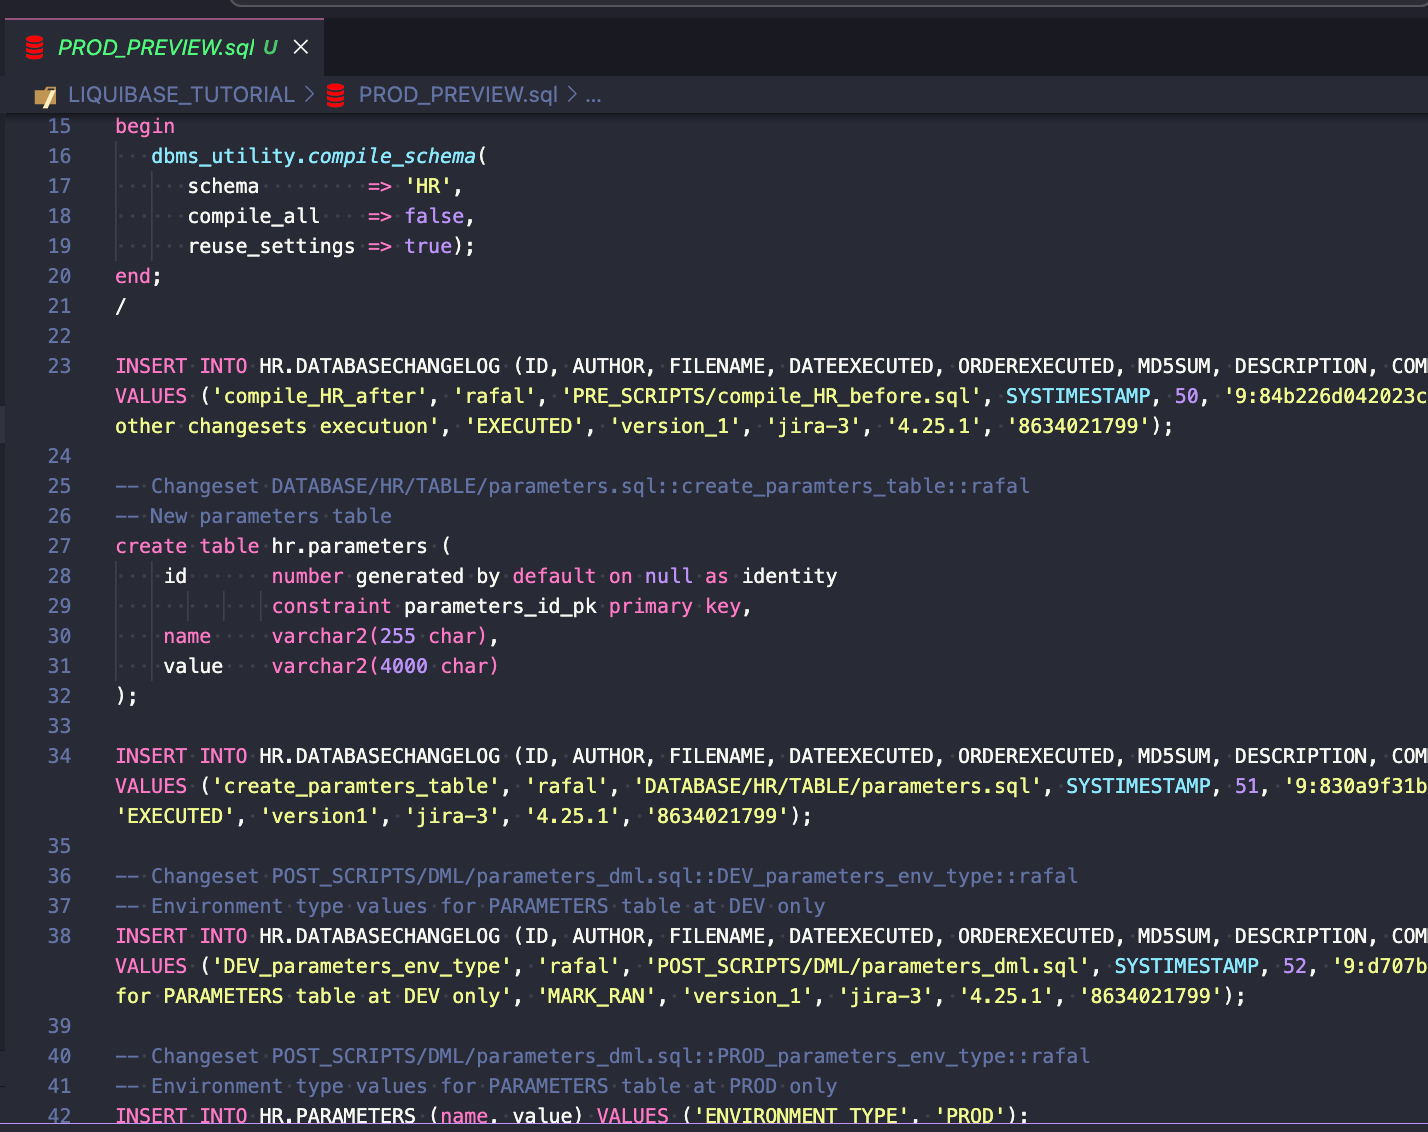
liquibase --defaults-file=prod.liquibase.properties update-sql --label-filter=JIRA-3
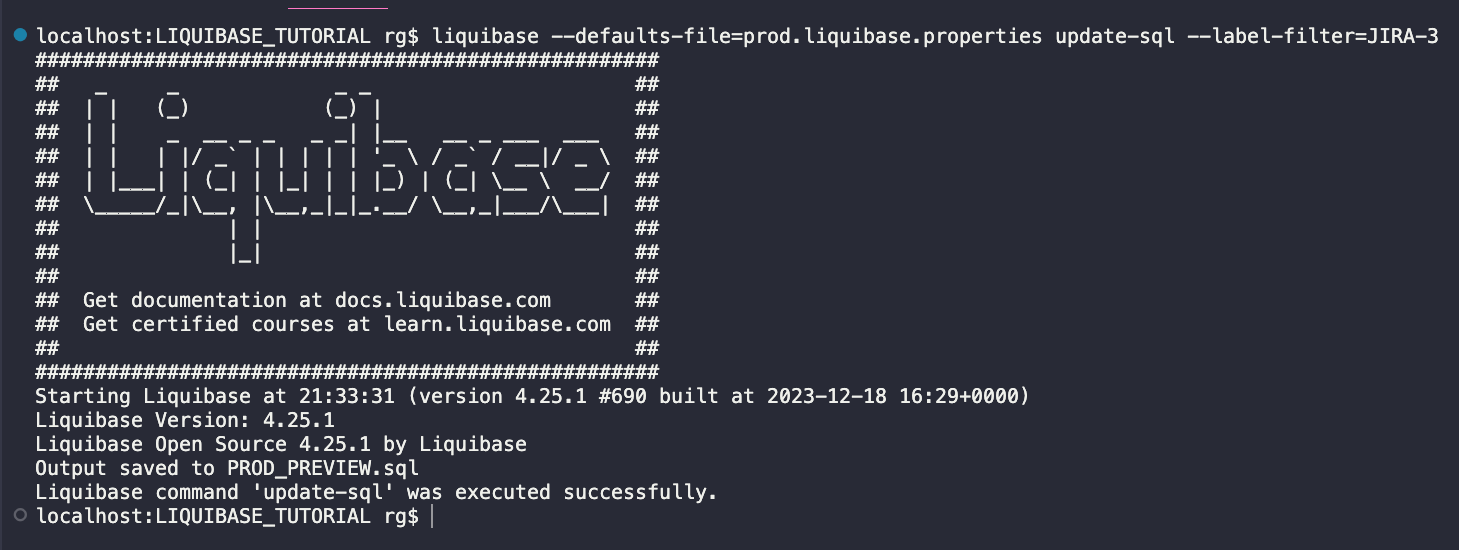
The file looks good (the full script preview is available here).
Steps:
liquibase --defaults-file=prod.liquibase.properties update --label-filter=JIRA-3
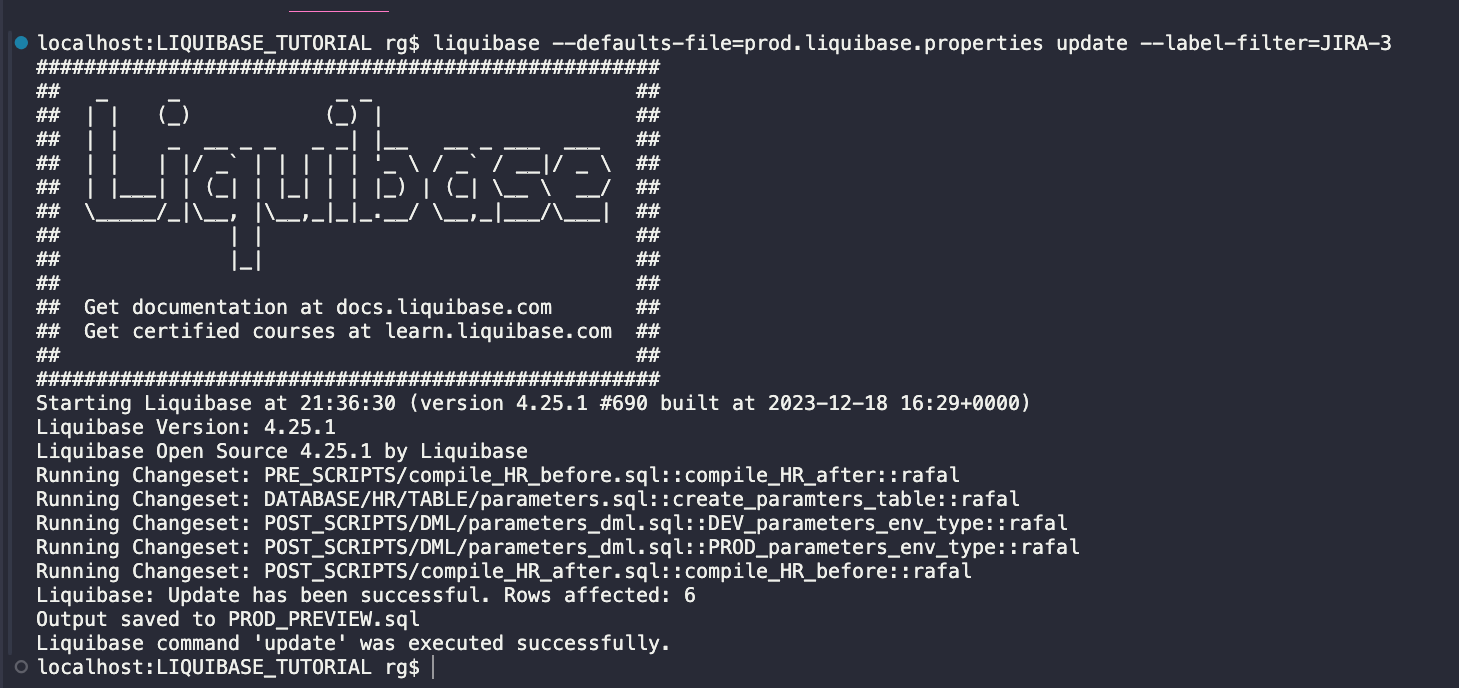
Finally, all changes from JIRA-1, JIRA-2 and JIRA-3 tasks are deployed to PROD. To check if this is true, run the STATUS command again:
liquibase --defaults-file=prod.liquibase.properties status
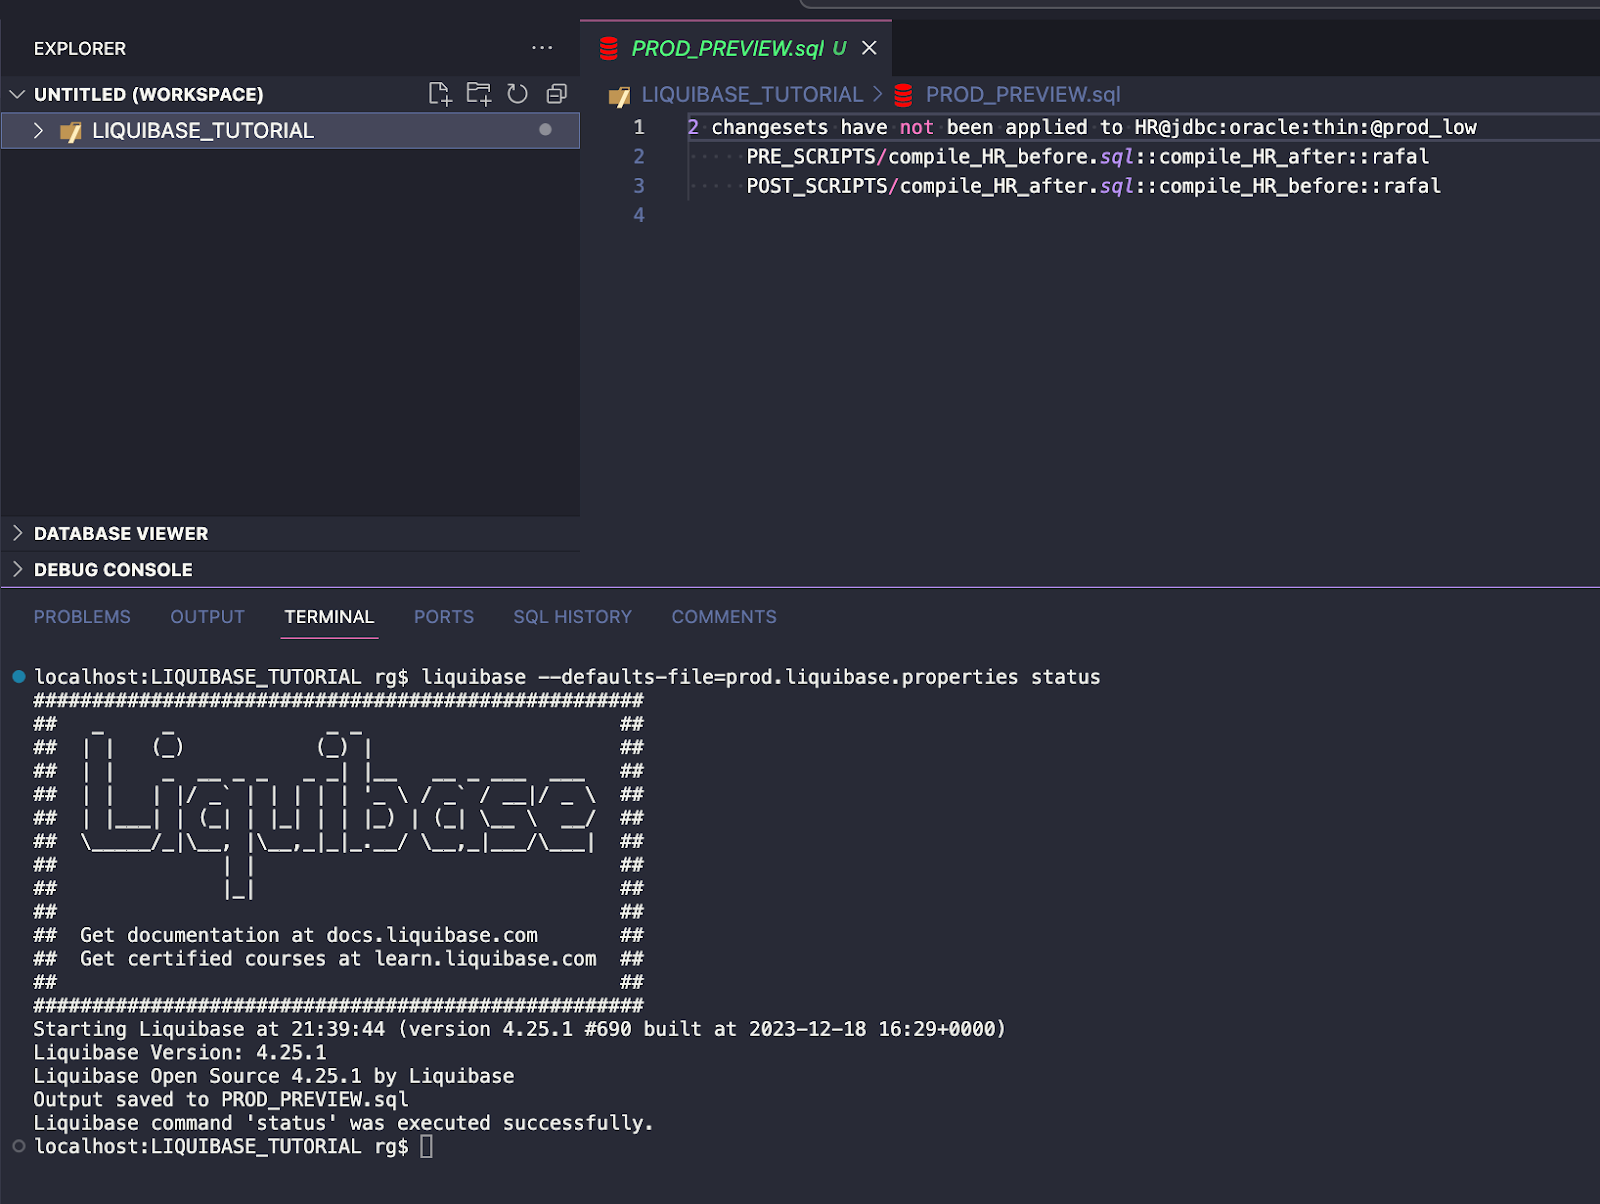
The output looks like this:
2 changesets have not been applied to HR@jdbc:oracle:thin:@prod_low
     PRE_SCRIPTS/compile_HR_before.sql::compile_HR_after::rafal
     POST_SCRIPTS/compile_HR_after.sql::compile_HR_before::rafal
This is true because these are two changesets that have the runAlways:true parameter set, so they will be executed every time.
What you read above are the best practices I learned during the last few years of working with Liquibase – during many projects and for various clients. I hope it will give you some insights regarding the possibilities of this free, open-source tool. Here are some recommendations for using this solution:
You can also check out other Liquibase-related articles on the Pretius blog:
Pretius developers know how to use Liquibase to great effect. We have a great deal of experience with different industries and know a lot about designing system architecture. Do you need help with creating or refurbishing a complex solution with many databases? Drop us a line at hello@pretius.com (or use the contact form below). We’ll get back to you in 48 hours and together we’ll find out what we can do for your company.


