
Liquibase is a powerful and flexible tool that can help you take care of your database version control management. I wrote about this solution in a couple of my previous articles so if you haven’t read them yet,I encourage you to do so – last year I’ve covered the Liquibase basics and GIT Collaboration. Now I’d like to deal with other interesting topics.
In this blog post, I’ll show you how to:
Interested? I certainly hope so. Let’s begin!
Here’s what you’ll need to make full use of the information provided in this article:

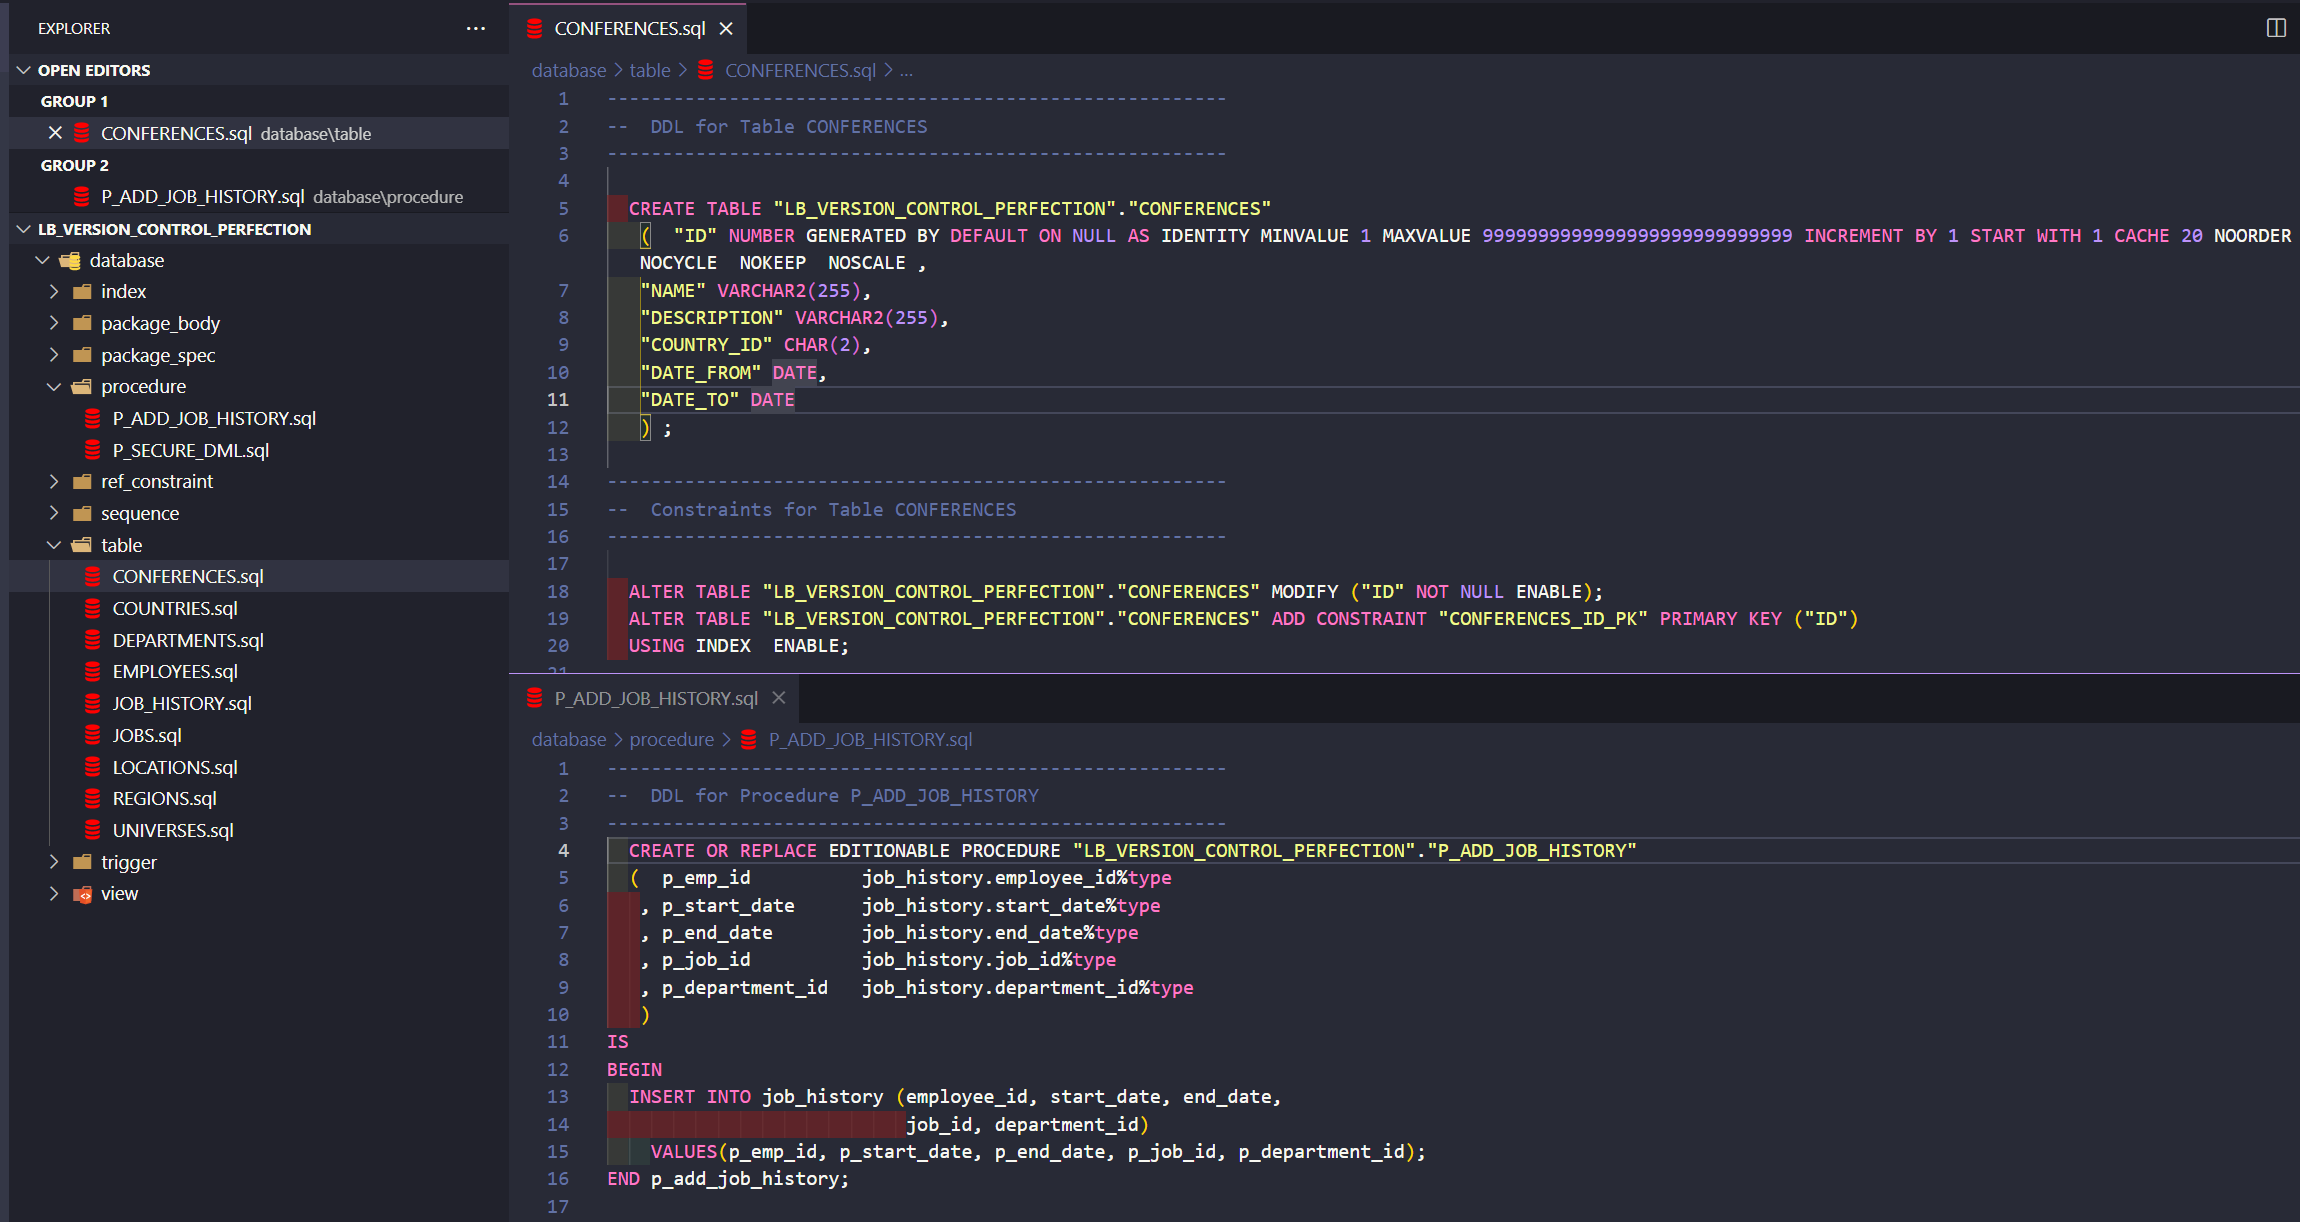
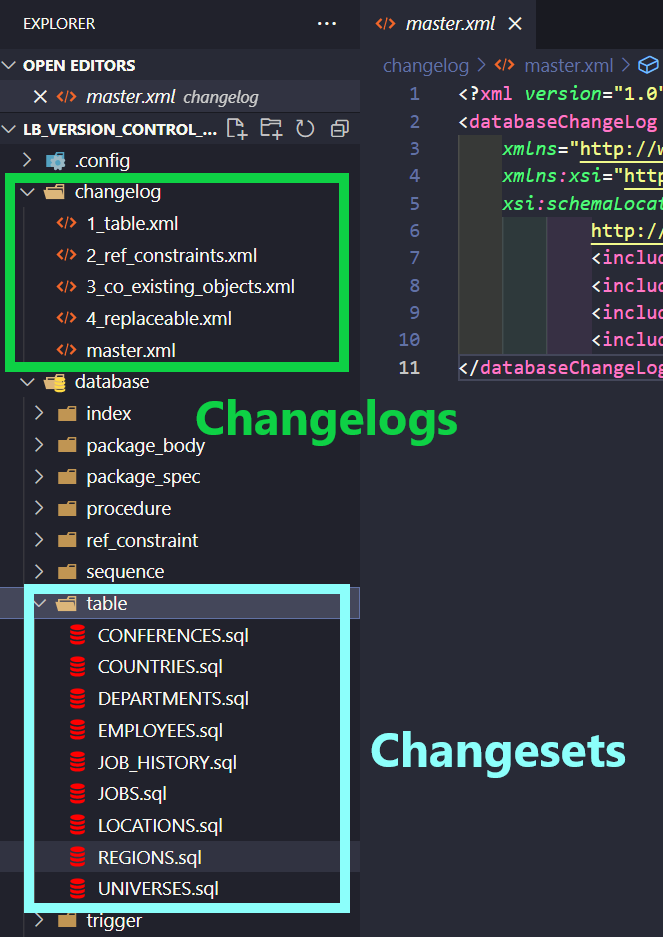
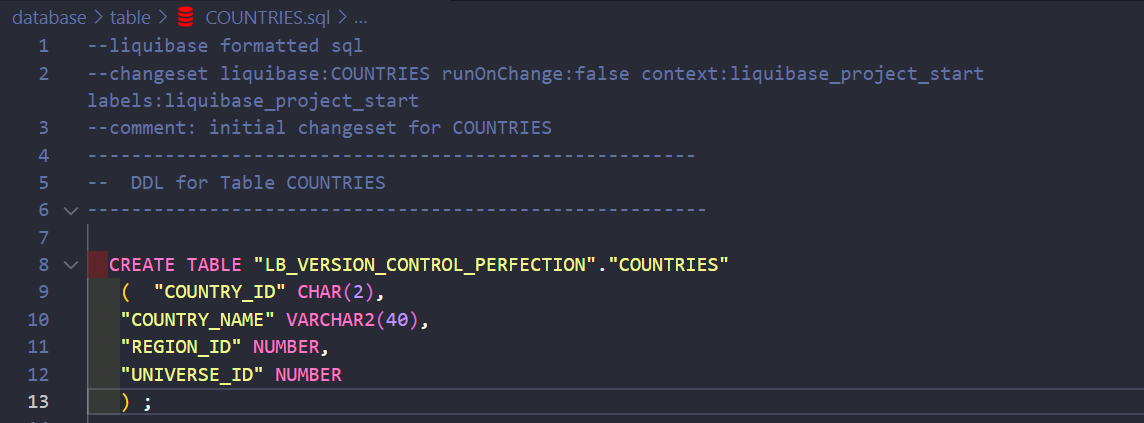
All my objects are stored in the GIT repository in my local LB_VERSION_CONTROL_PERFECTION\database folder. The files are clean – I’ve just exported them from my SQL Developer. Here’s how my repository and sample object looks.
If you haven’t already, you obviously need to install Liquibase on your PC. If you’re not sure how to do that, check my aforementioned Liquibase tutorial from March 2021 – I’ve covered this topic in more detail there, and there’s no point in repeating the same information here. Besides, it’s a pretty simple process anyway.
To configure your project properly, you need to go through a few steps:
You need to create the liquibase.properties file, or, alternatively, you can use my sample where I use my local XE database.
If you want to read more about how a Liquibase property works, you can always check the extensive documentation made available by the technology’s developers. Also, if you want to connect your project to your Oracle ATP database in the cloud, check the fourth subsection in my tutorial.
As long as you point to our driver in liquibase.properties, you need to create a folder and put the OJDBC there. The final result should look like this:

A “changelog” is the root (a ledger) of all your database changes. You need to create a root changelog file master.xml inside the changelog folder (of course, file and folder names don’t really matter – these are just the ones I used). It will include locations of smaller changelogs, grouped by database object types.
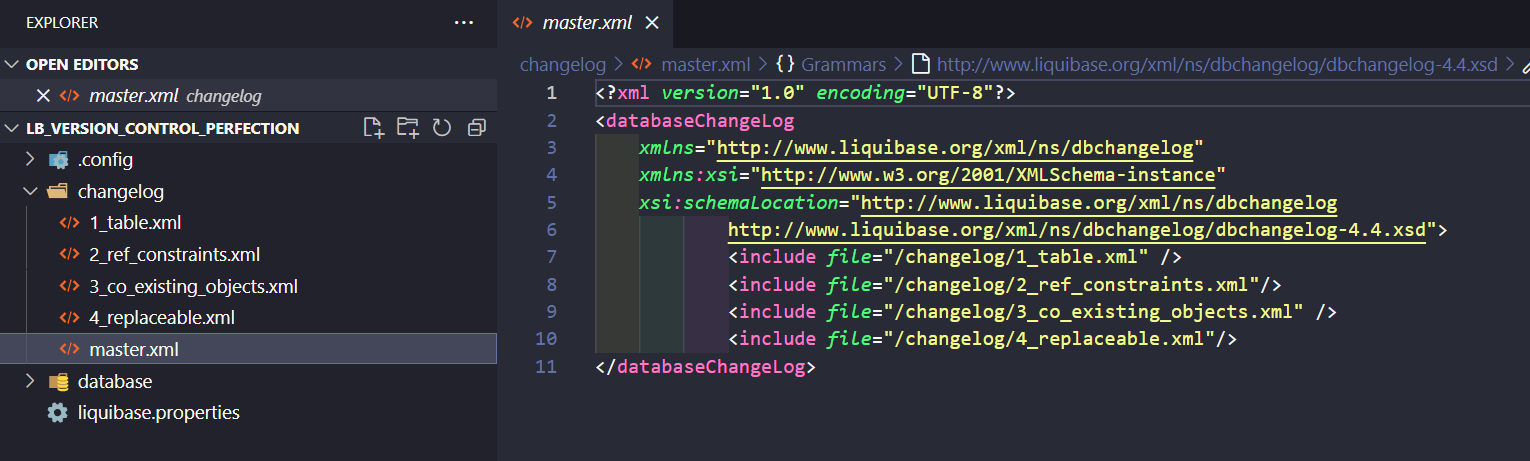
I will mainly use SQL changelogs in this tutorial, but to maintain the order of executing changes, you need changelogs written in .XML. Every .XML changelog needs to start like this:
<?xml version="1.0" encoding="UTF-8"?>

<databaseChangeLog

    xmlns="http://www.liquibase.org/xml/ns/dbchangelog"

    xmlns:xsi="http://www.w3.org/2001/XMLSchema-instance"

     xsi:schemaLocation="http://www.liquibase.org/xml/ns/dbchangelog

            http://www.liquibase.org/xml/ns/dbchangelog/dbchangelog-4.4.xsd">


<!--PUT YOUR FILES / OTHER CHANGELOGS HERE–/>


</databaseChangeLog>
Of course, you also need those smaller changelogs.
Below is a screenshot that shows you how every smaller changelog looks inside. As you can see, there is a direct path pointing to the folders with database objects. Liquibase will execute scripts from those folders, one by one, in the provided order.
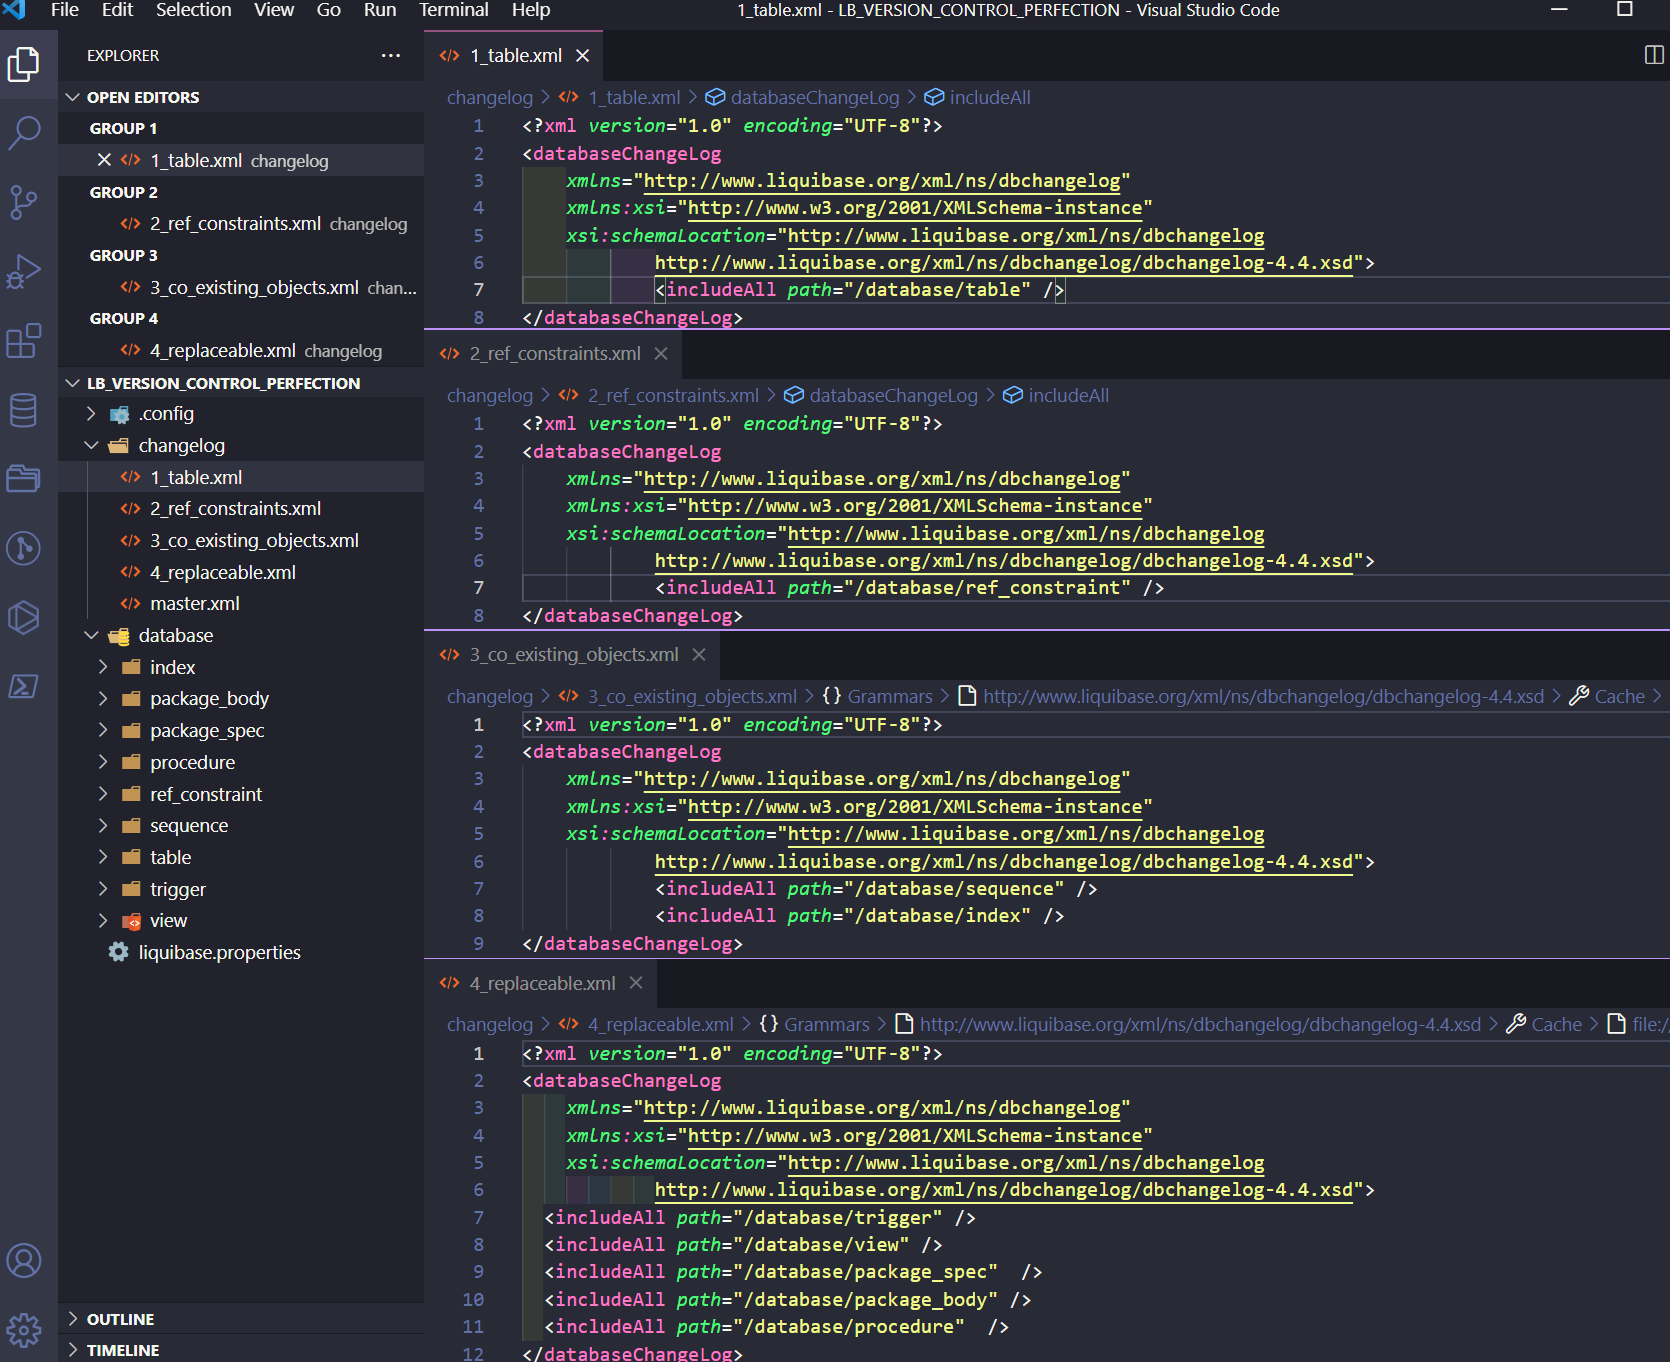
It allows you to specify a directory that contains multiple changelog files – take all files inside of that folder and execute them (unless they were already executed).
Important notice:
Depending on your project needs, you can create as many smaller changelogs as you want. Just remember: the order of these changelogs in master.xml is the order in which Liquibase will execute them. Order your changelogs in the way you would normally execute scripts during manual deployments, for example:
In simpler words, you need to tell Liquibase that those objects already exist, and that it’s not supposed to touch them until you change something in these already existing files.
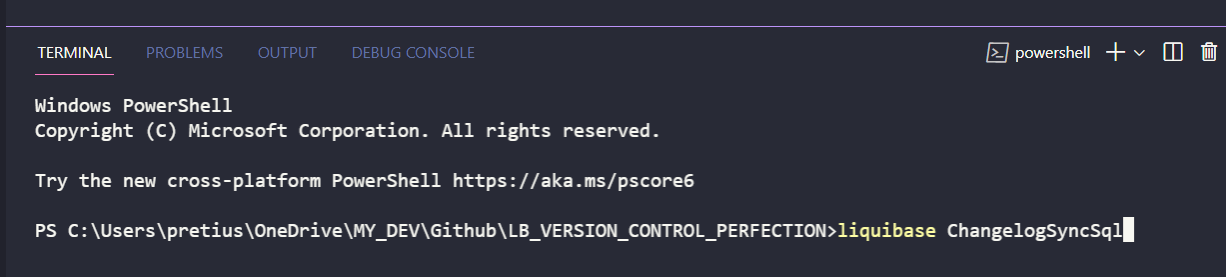
In Your Visual Studio Code, run the PowerShell terminal (or other, if you prefer) from the parent location of your database folder. In my example it’s LB_VERSION_CONTROL_PERFECTION\database.
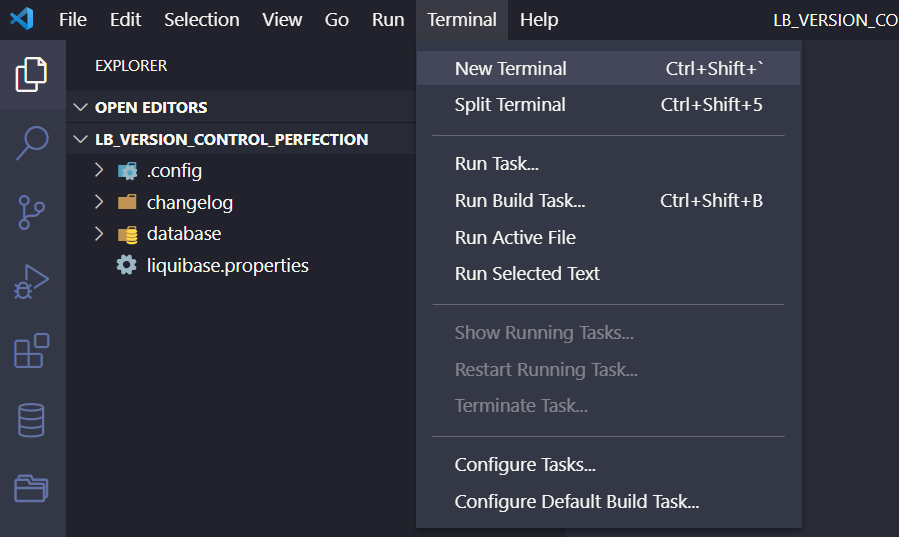
Then, run the following command:
liquibase ChangelogSyncSQL
PRO TIP: Adding “SQL” to many Liquibase commands will generate a preview SQL that would normally be executed. It’s a good practice to ALWAYS review your changes by making a script preview.
You can find the output SQL script of my command in my repo.
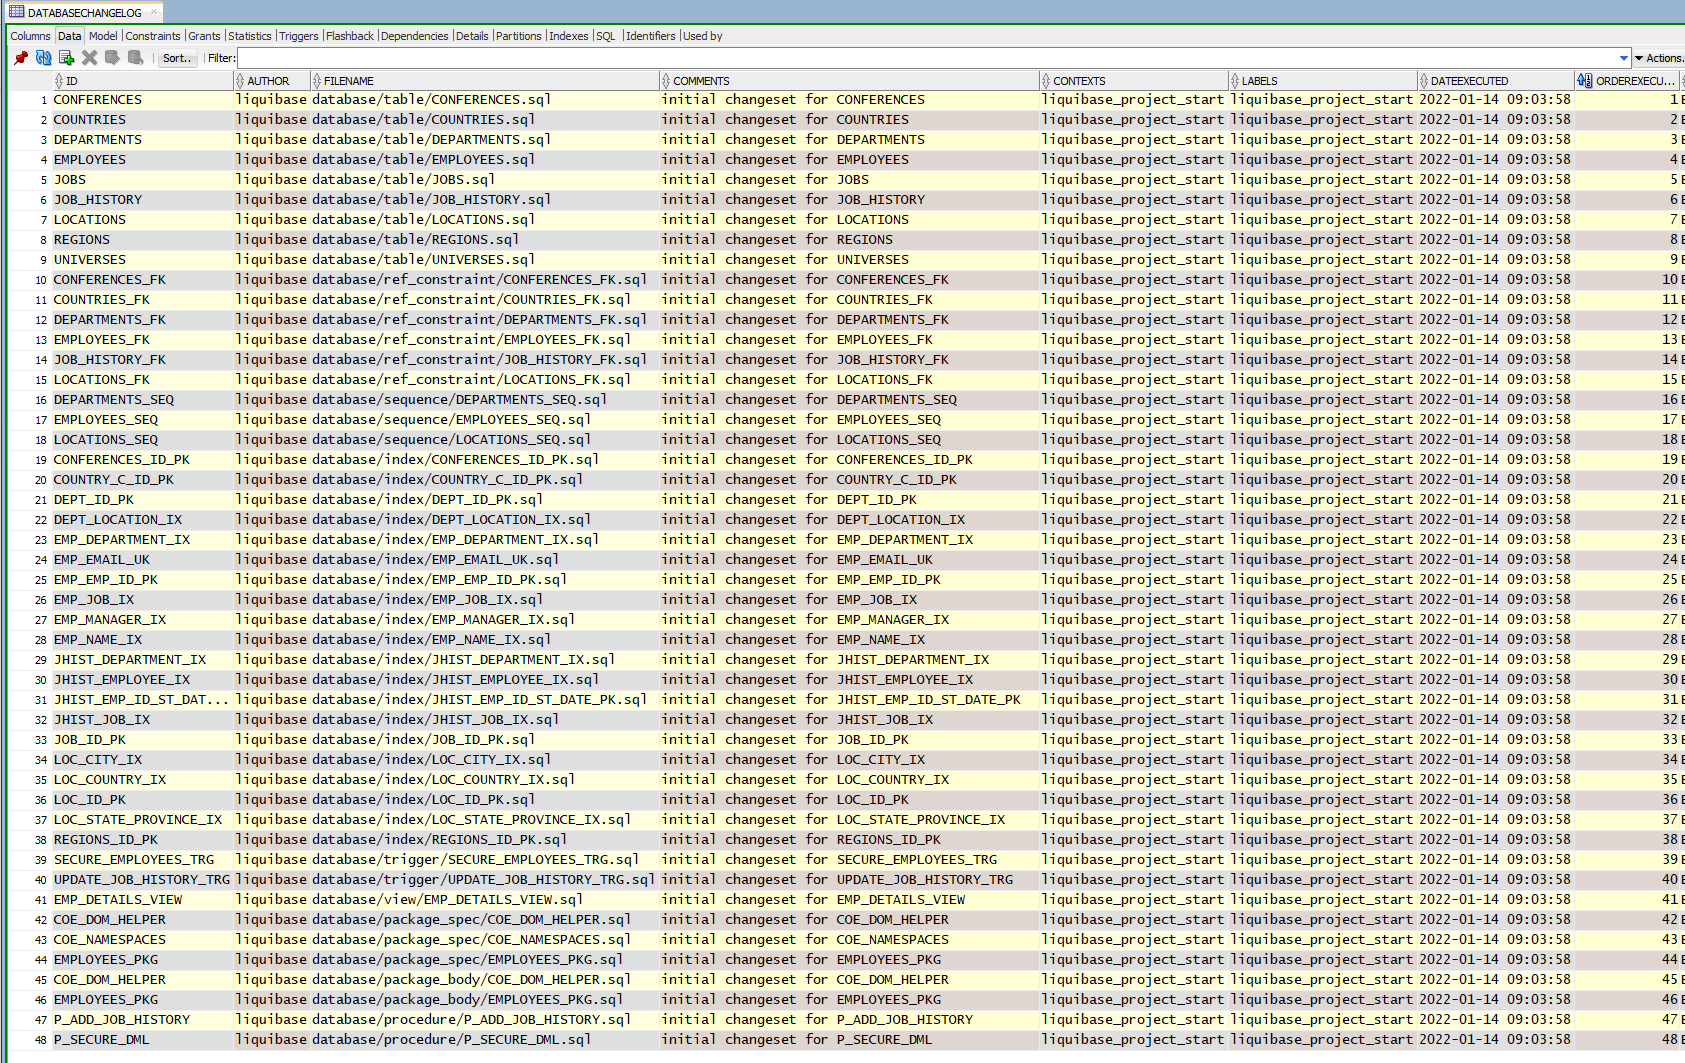
As you may have noticed if you analyzed the file, the script is only making inserts into the DATABASECHANGELOG table. Liquibase will create those tables automatically for you. More information about them can be found in my basic tutorial and the technology’s documentation.
In this case, making inserts only to the DATABASECHANGELOG table is ok, since I don’t want to execute my scripts because they already exist in my database. That’s why I used the changelogSync command.
Liquibase treats all your SQL files in folders such as tables, index, and so on, as small changes that should be executed to the database (and it would be executed if I used the update command instead of changelogSync). Such a small change is called a CHANGESET. It’s a unit of change that Liquibase executes to your database. The changes created by multiple changesets are tracked in CHANGELOGS.
Easy right? You’ve already created some changelogs (pointing to folders with changesets) in STEP 2.
So, after checking my script generated via the ChangelogSyncSQL command, now I can run it without the sql added at the end.
liquibase changelogSync
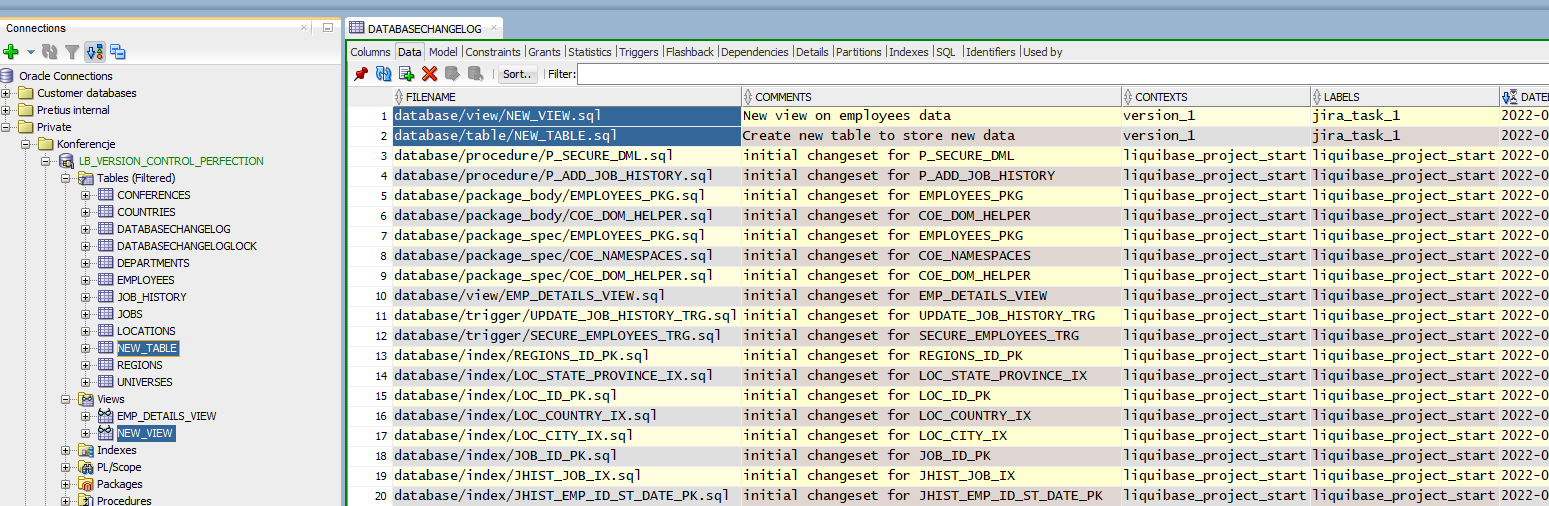
You can check the result of that execution in the DATABASECHANGELOG tracking table. The number of SQL scripts in your database folder equals the number of rows in the tracking table.

Now, Liquibase knows that those objects were created earlier. So, running the liquibase changelogSyncSQL command once again will not generate any sql script to execute. Also, running the update command will not make any changes to the database.
Notice that we don’t have much information in the DATABASECHANGELOG columns like ID, AUTHOR, CONTEXT and LABELS. That makes versioning for a specific LABEL or CONTEXT basically impossible.
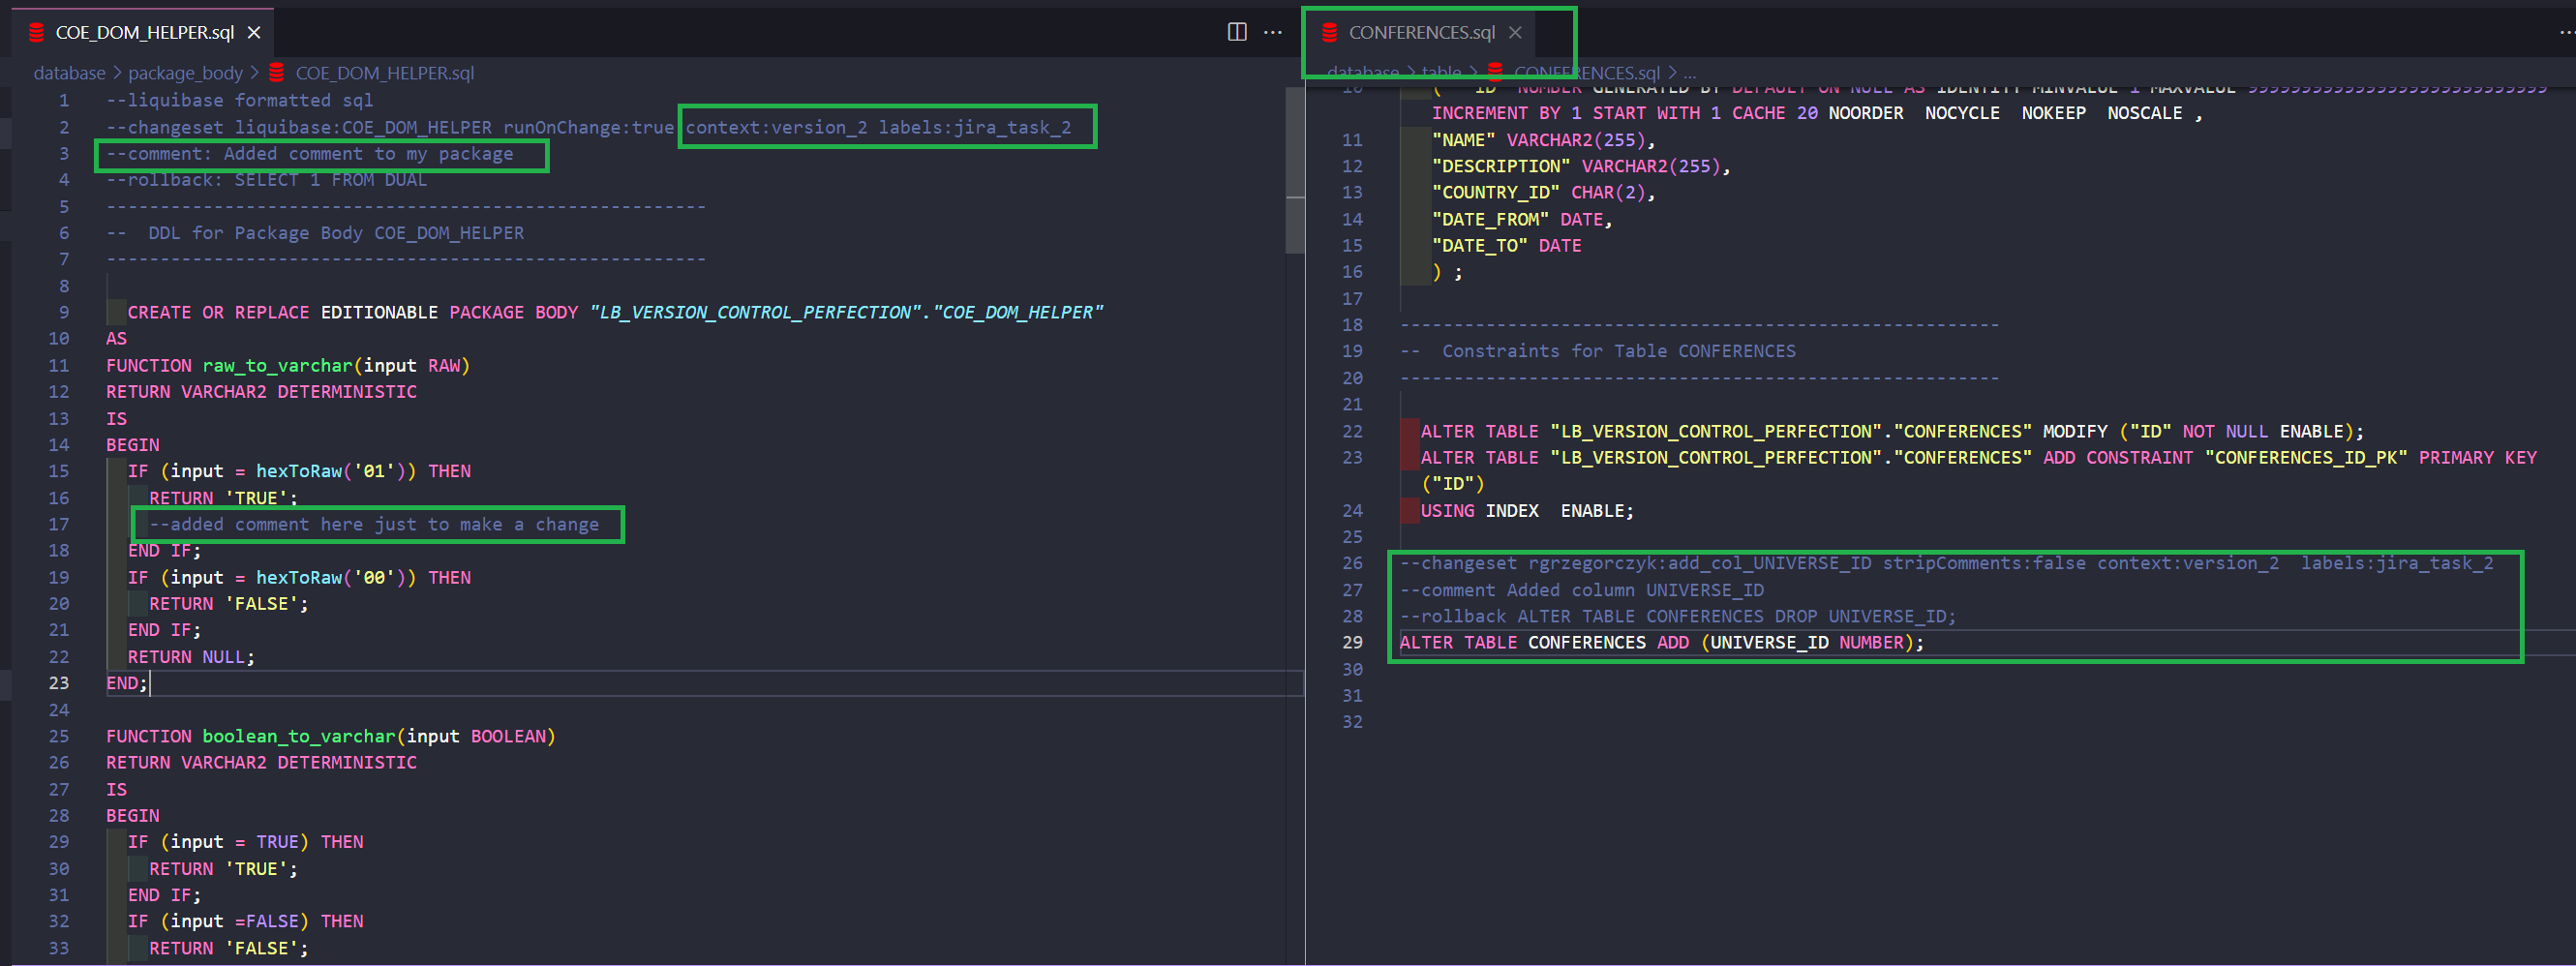
In ideal world, every object in your repo (every change called changeset) should be followed with some Liquibase syntax, like this:
And the result in the tracking table will look like this (much more info here, isn’t there?):

Now I have the following information displayed:
So… wait! What? Should I write those 3 lines to all of the objects in the repository? I have dozens of objects – and you probably have even hundreds! Yes… you should. However, I’ve created a PowerShell (PS) script that will make that work for you in just a few seconds. 🙂 You can find the script in my repo.
If your repository looks like mine, you probably won’t have to do anything – just run the script. Otherwise, adjust it a little to fit your folders (It’s my debut when it comes to writing PS scripts, so please be understanding). After running the PS script my changesets look like this:

So now, all changesets have:
So, let’s run synchronization command once again:
liquibase ChangelogSync
If you’ve already executed this command earlier, just delete all old rows from the DATABASECHANGELOG table – we’ll cover rollbacks later.
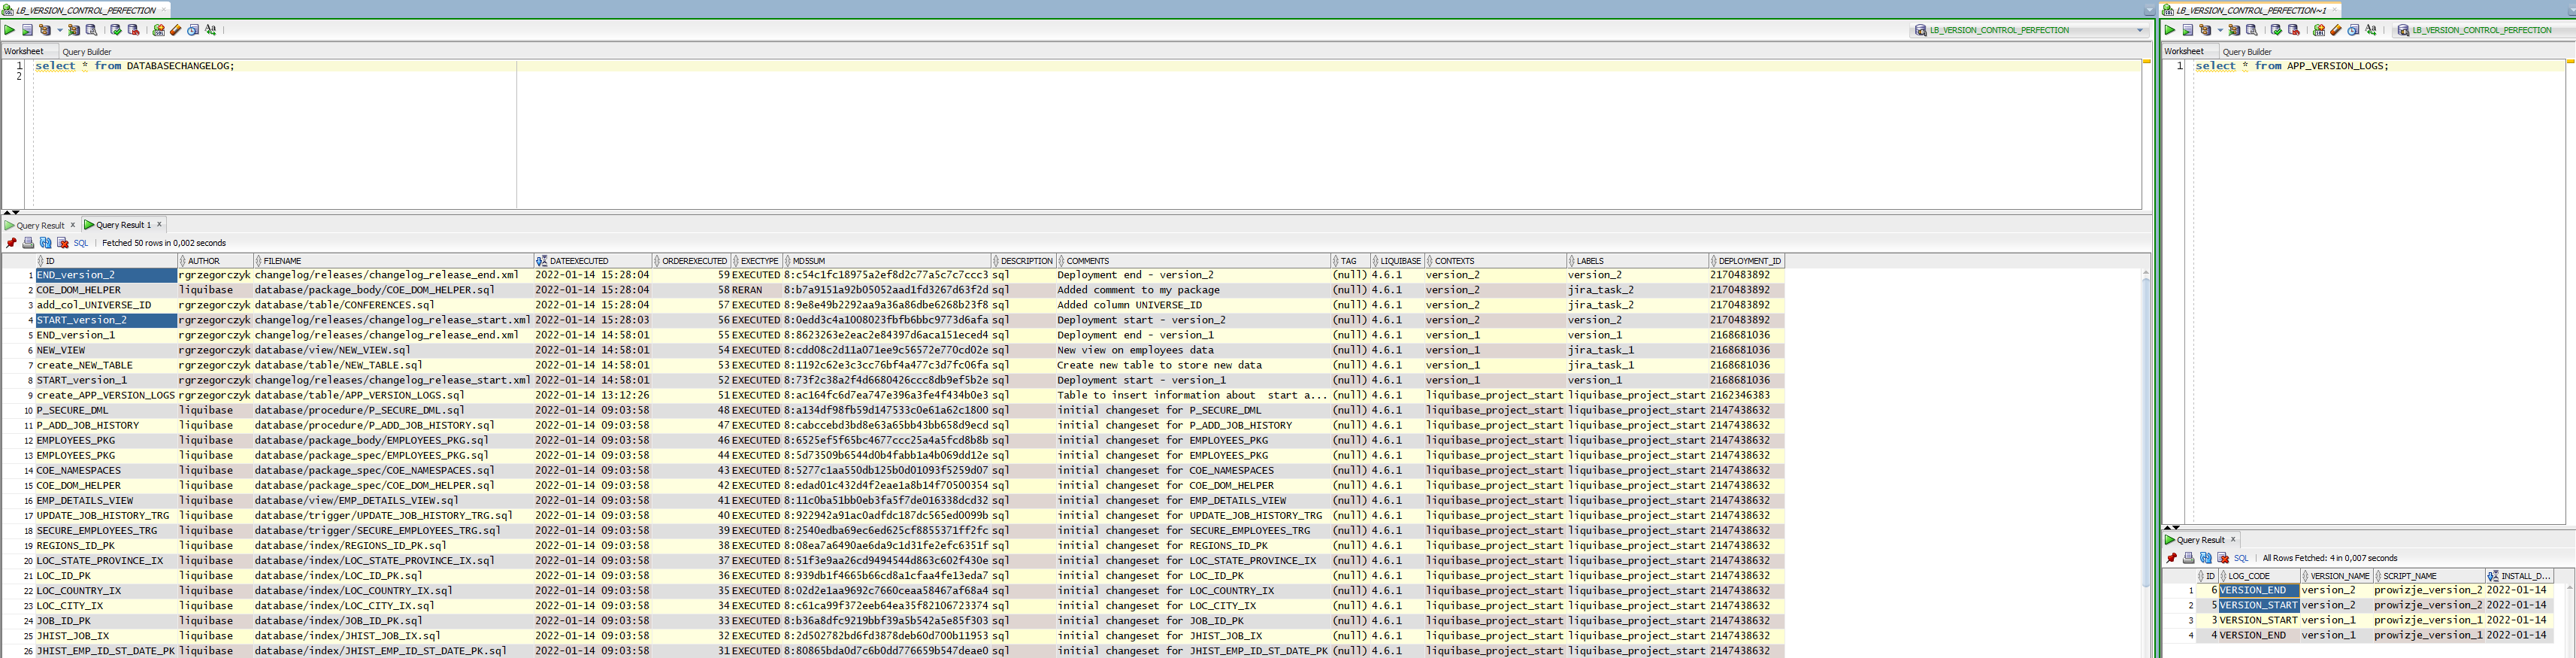
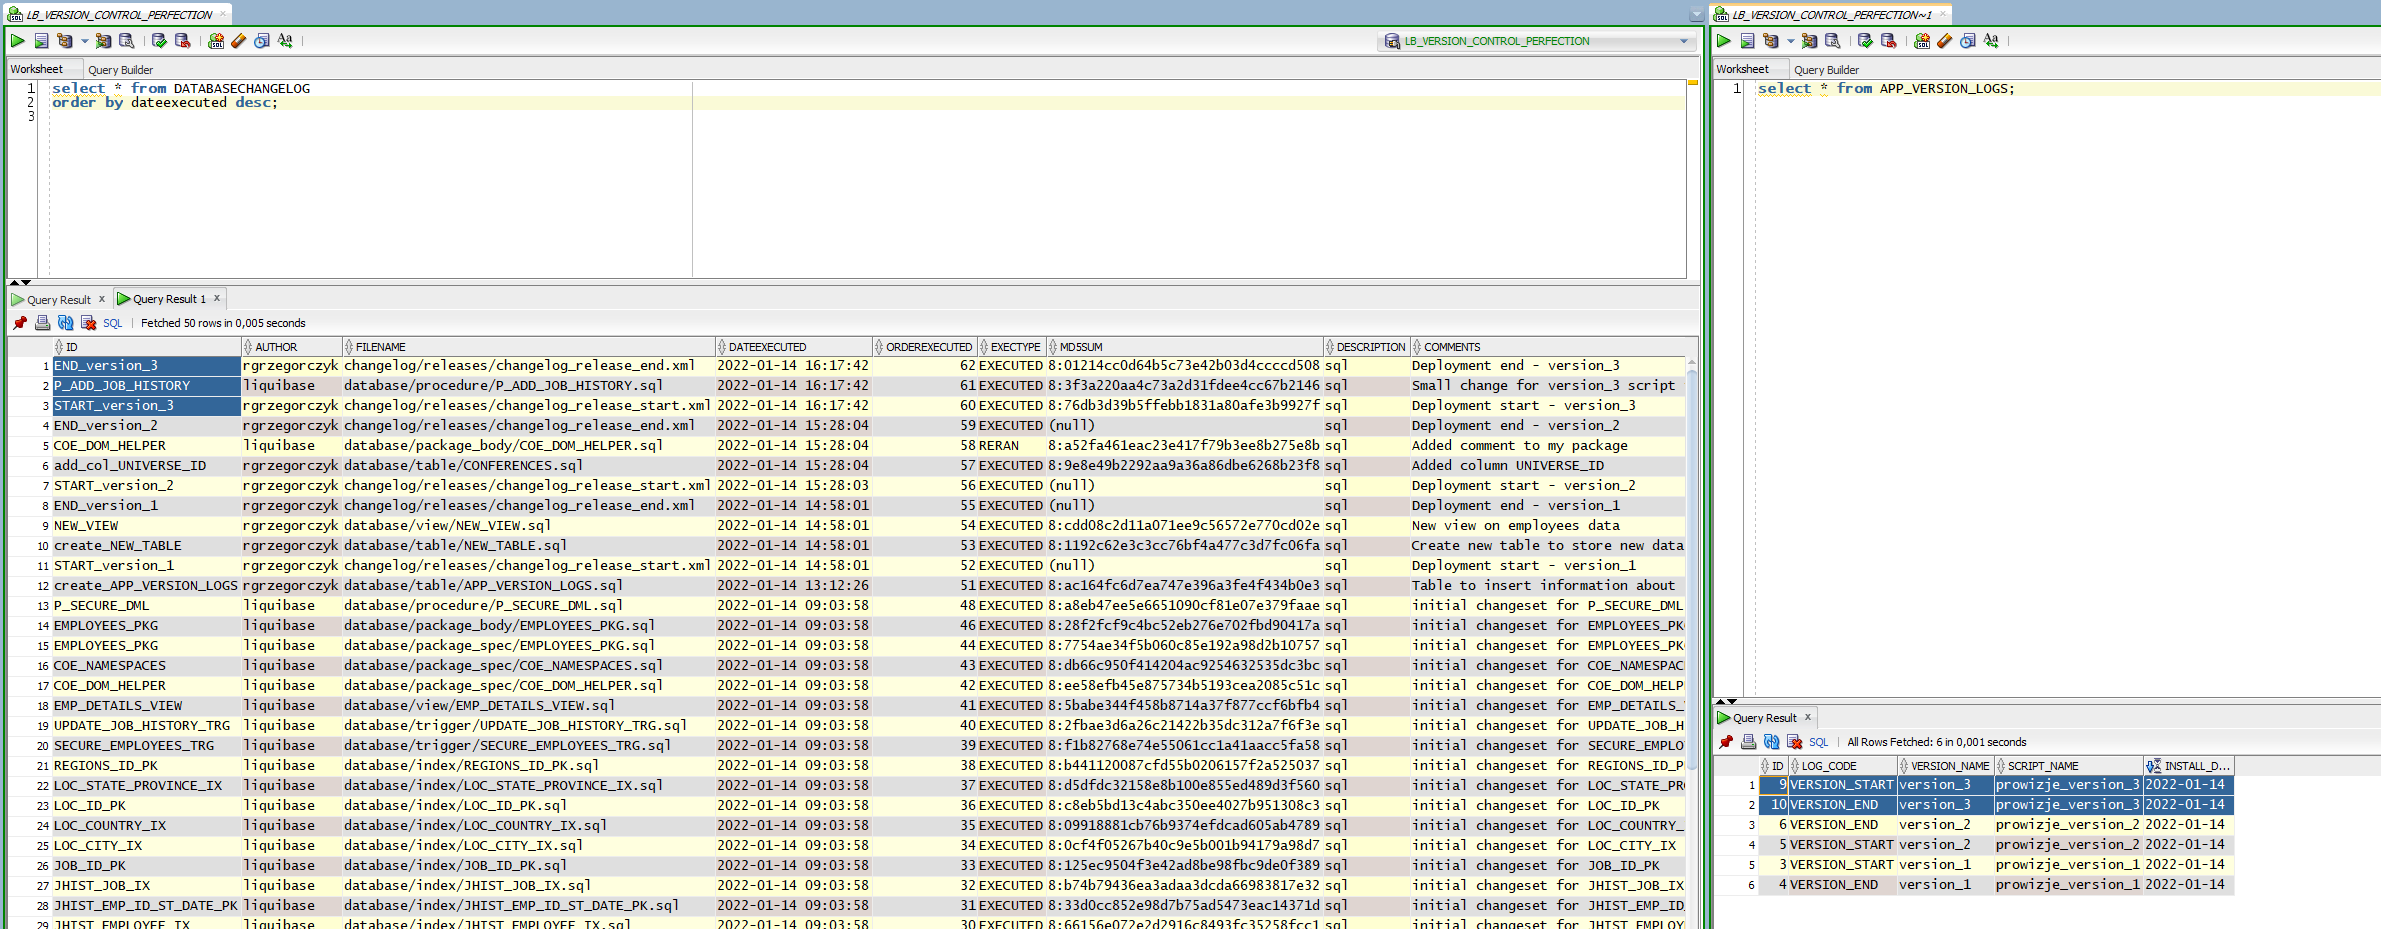
And here’s the final, ideal result in my DATABASECHANGELOG table:
Well done. You have successfully synchronized existing database objects with Liquibase.
Liquibase won’t execute any changes to those objects until you change something or add new changesets.
As you know from my basic tutorial, Liquibase needs a changeset to track your changes. If your changeset is replaceable (like a package or a function), you just change the object and Liquibase will do the rest. If your changeset is associated with a non-replacable object (such as “create table”), you can’t modify it. You should write a new changeset, for example “alter table”.
My goal is to simplify creating changesets. Many developers don’t know Liquibase or don’t want to learn new syntax – that’s why I created snippets for Visual Studio Code. It will simplify your work, help avoid mistakes and standardize the usage of Liquibase in the project.


Here we go – we have created a changeset. Now, just use TAB and your cursor will skip to places you should modify.
What about snippets for replaceable files? Let’s create a view file NEW_VIEW.sql and choose a replaceable snippet:
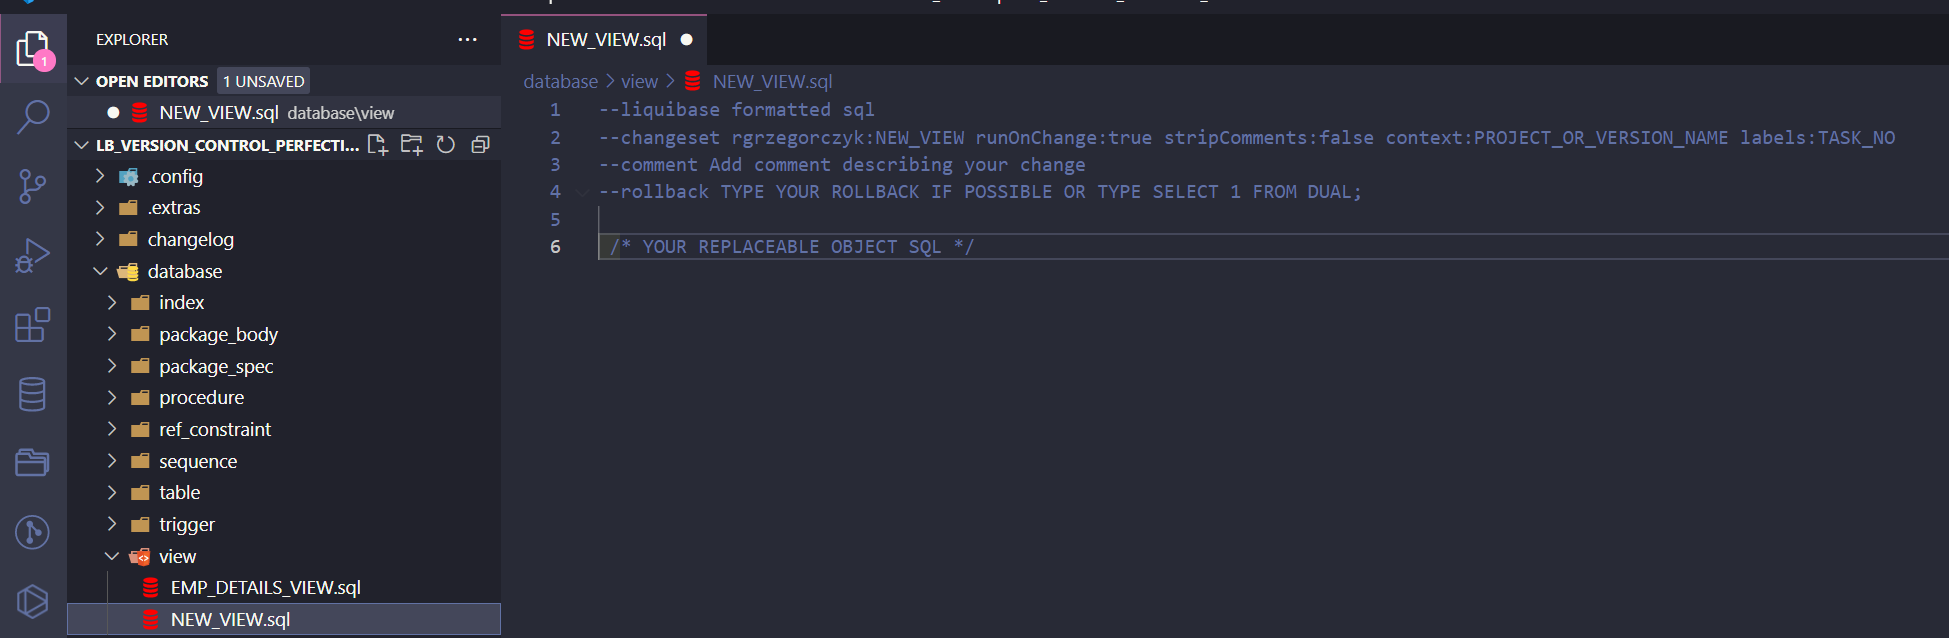
Even better, right? Your changeset ID was automatically filled with the file name NEW_VIEW. If you want you can adjust snippets to your needs, and I’ll probably add more of them in the future (ones specific for table, package and views changes). Stay tuned, and check my GitHub repository regularly.
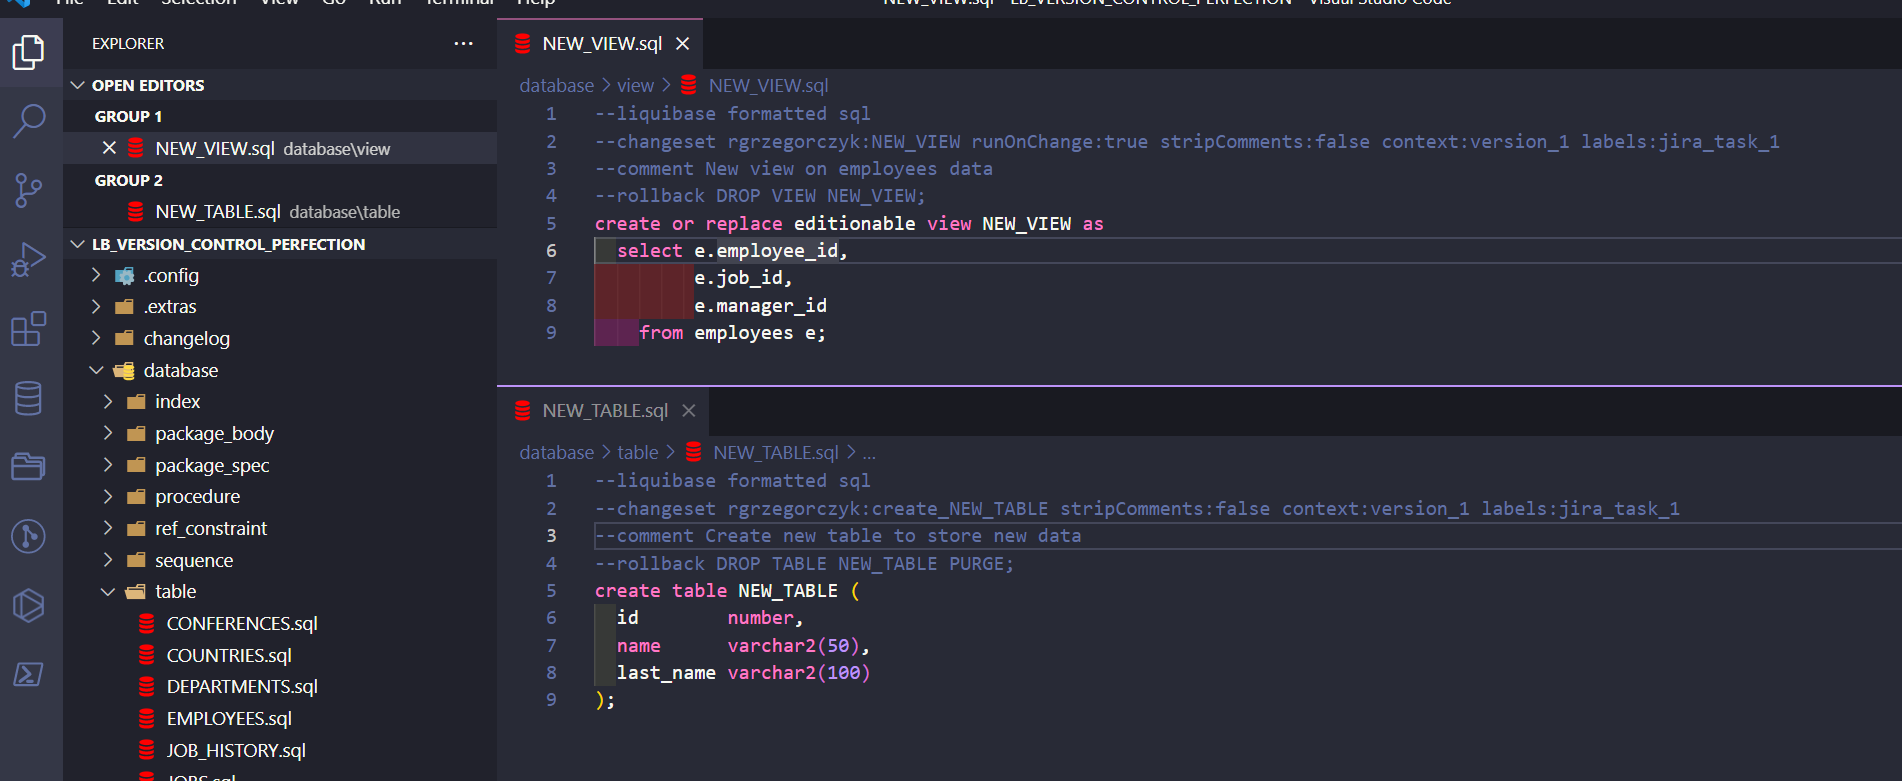
I’ve added scripts to my NEW_TABLE.sql and NEW_VIEW.sql changesets:
I will preview the Liquibase Update script:
liquibase updateSQL
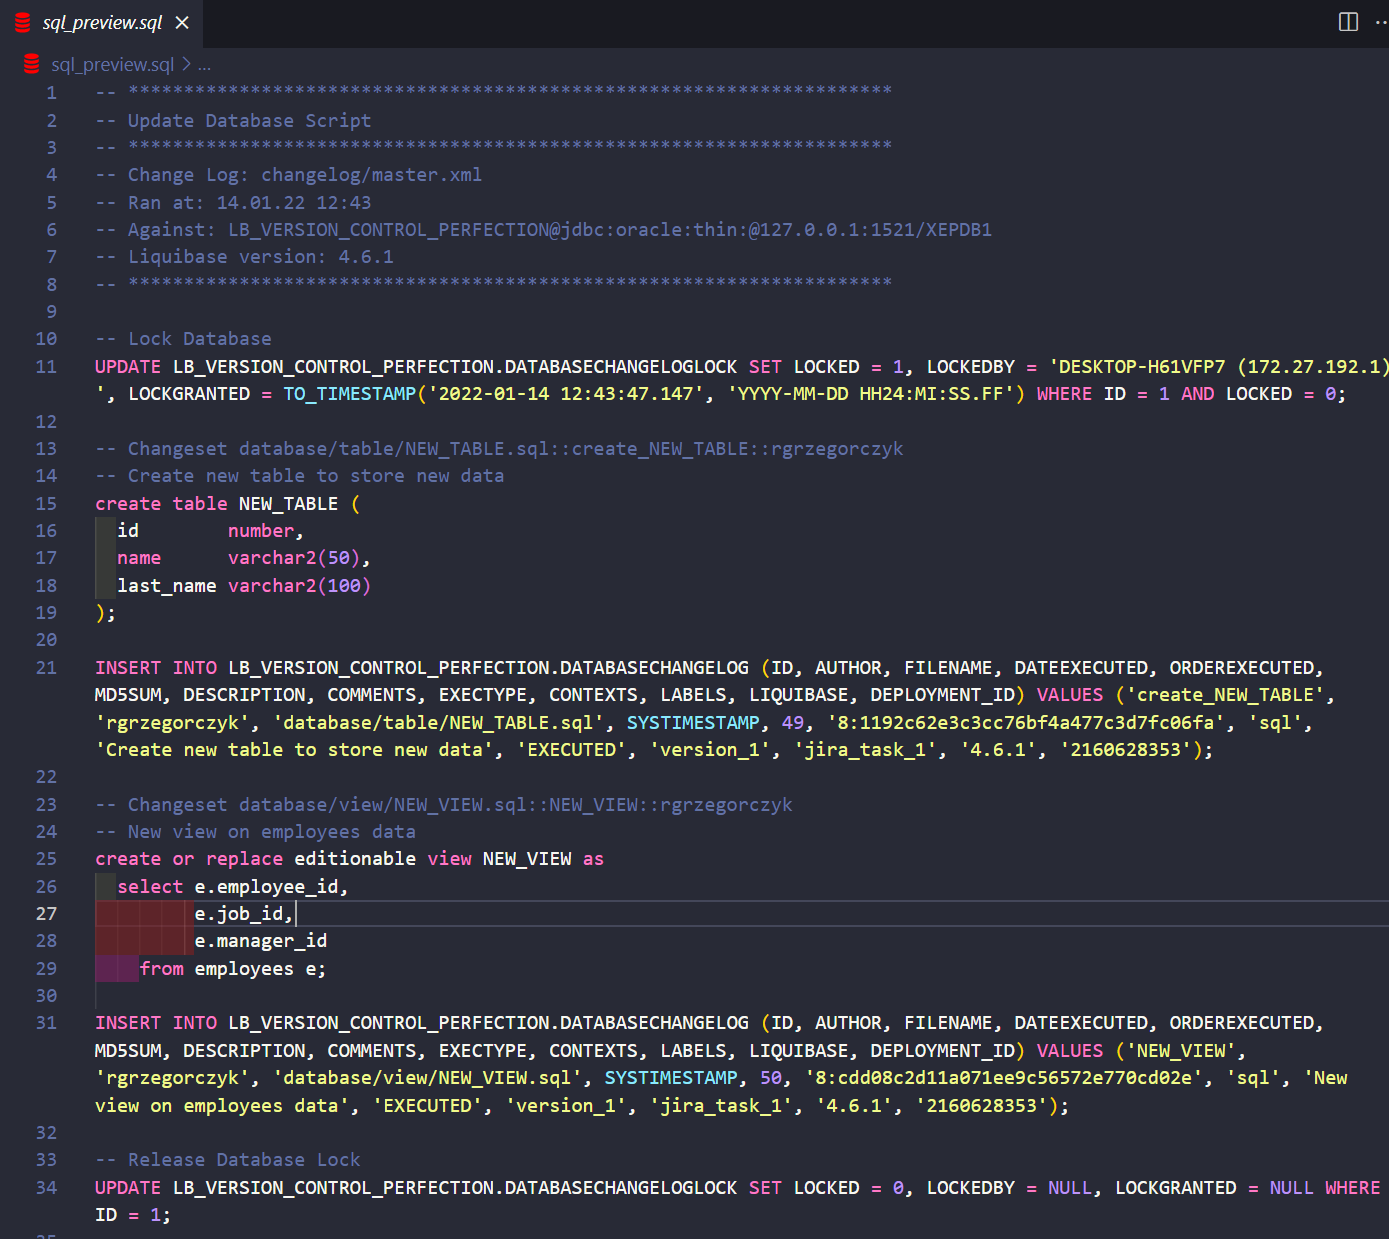
Looks okay, so I will execute the changes by running:
liquibase update
My new table and view were created. I also have 2 new rows in the databasechangelog tracking table. Take a look at CONTEXT and LABELS columns -> context = version_1, labels = jira_task_1. Always add context and labels to your changesets. It will help you with deployment versioning.
[post_frame text=”Schedule a call” link=”#contact”]Do you need developers who know Liquibase?[/post_frame]
Now, I’ll show you how you can quickly version your deployments. Sometimes the information from the DATABASECHANGELOG table is enough, but do you often have a requirement to insert some logs at the beginning and at the end of your deployment? For example, we want information about the version start and the version end in the table called APP_VERSION_LOGS.
My table existed at the beginning of my project, so I’ve added a new changeset in location /database/table/app_version_logs.sql.
Now, let’s see what I have by grouping tracking table changes:
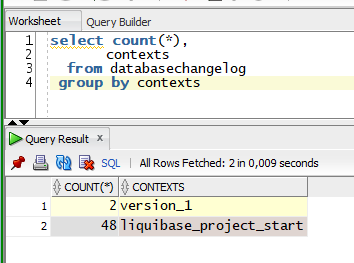
In most of my projects, CONTEXT is responsible for version or project name, and I will stick to it. Now, I want to use Liquibase to add INSERT into my APP_VERSION_LOGS every time I create a new version script. How to prepare it?
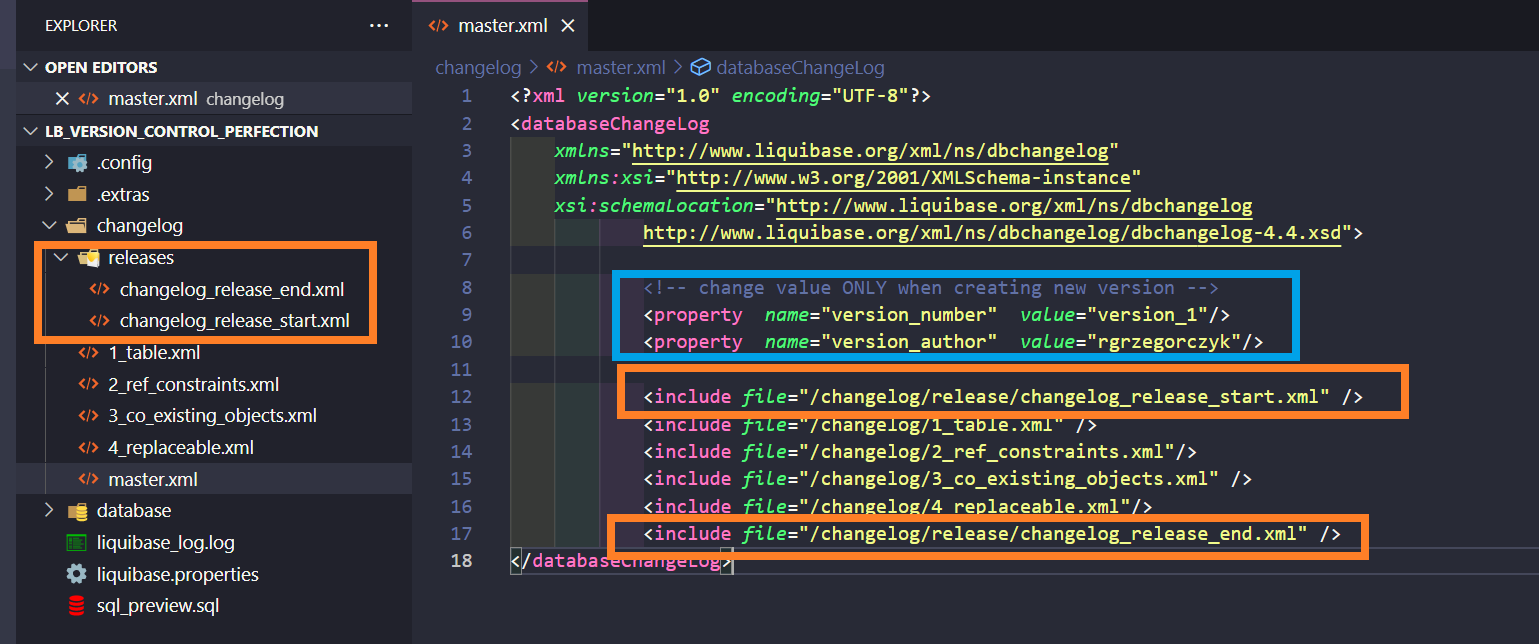
I’ve created 2 changelogs in the /release/ folder:
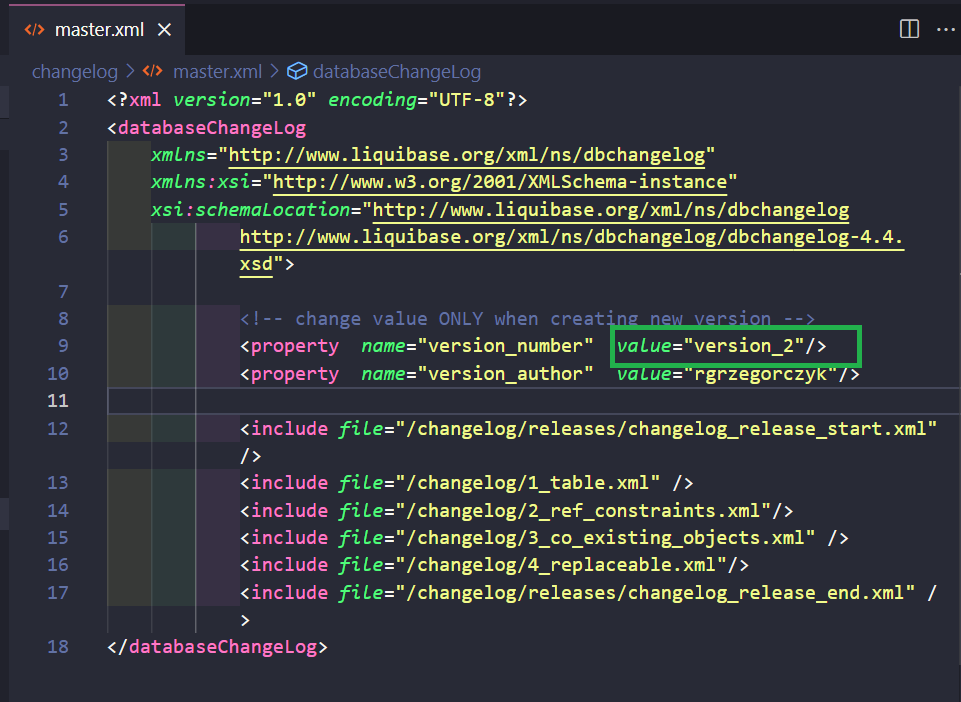
Those changesets will be responsible only for deployment versioning. I also specified them in my master.xml changelog, and created two “liquibase property” tags with “version number” and “version author”.
Now, let’s go to my changelog_release_start.xml.
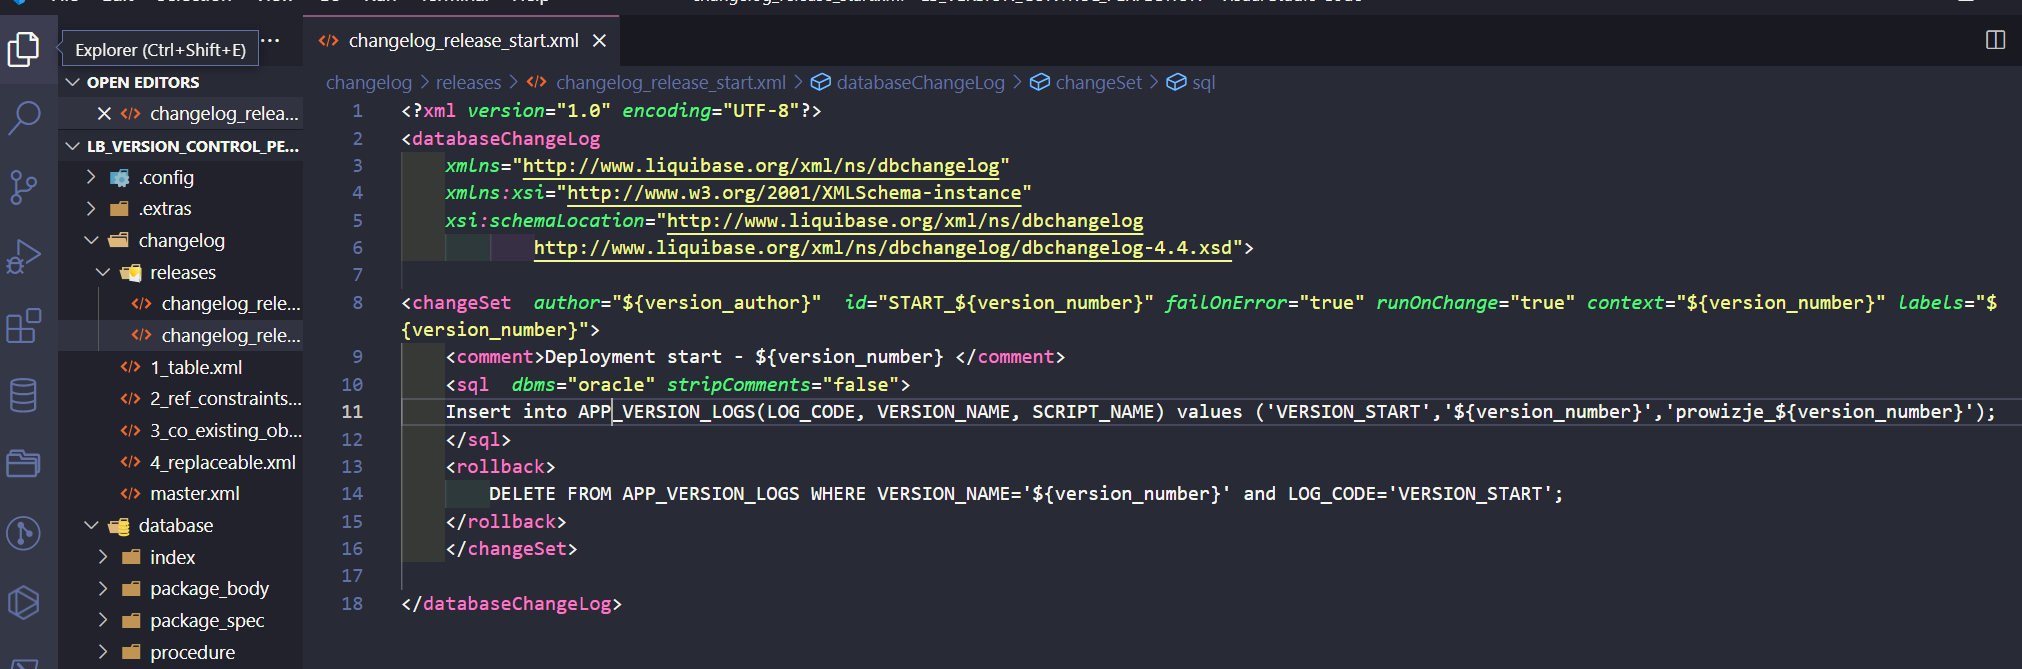
There is 1 defined changeset with values:
<changeSet author="${version_author}" id="START_${version_number}" failOnError="true" runOnChange="true" context="${version_number}" labels="${version_number}">
I have also used ${version_number} at insert and rollback (delete) statements. Think of ${version_author} and ${version_number} as variables you can use among your Liquibase files. I’ve defined them only once (in the master.xml file) and will use them in many places.
My changelog_release_end.xml file looks similar but instead of “START”, the value there is “END”.
Let’s preview the Liquibase SQL script now:
liquibase updateSQL
The result can be found in the version_1_release_script.sql file in my repo. As you can see there, Liquibase generated two insert statements into the app_version_logs table – just as I’ve wanted. Okay. Now I want my last 2 changes (with label = jira_task_1) deployed as “version_1”.

First, I will rollback those changes, by using the following command:
liquibase rollbackToDate 2022-01-13'T'12:00:00 --labels=jira_task_1
The command basically says “rollback changes with label jira_task_1 to a state before a specified date”.
And now, I have to deploy again with versioning changesets (inserts into APP_VERSION_LOGS).
liquibase update
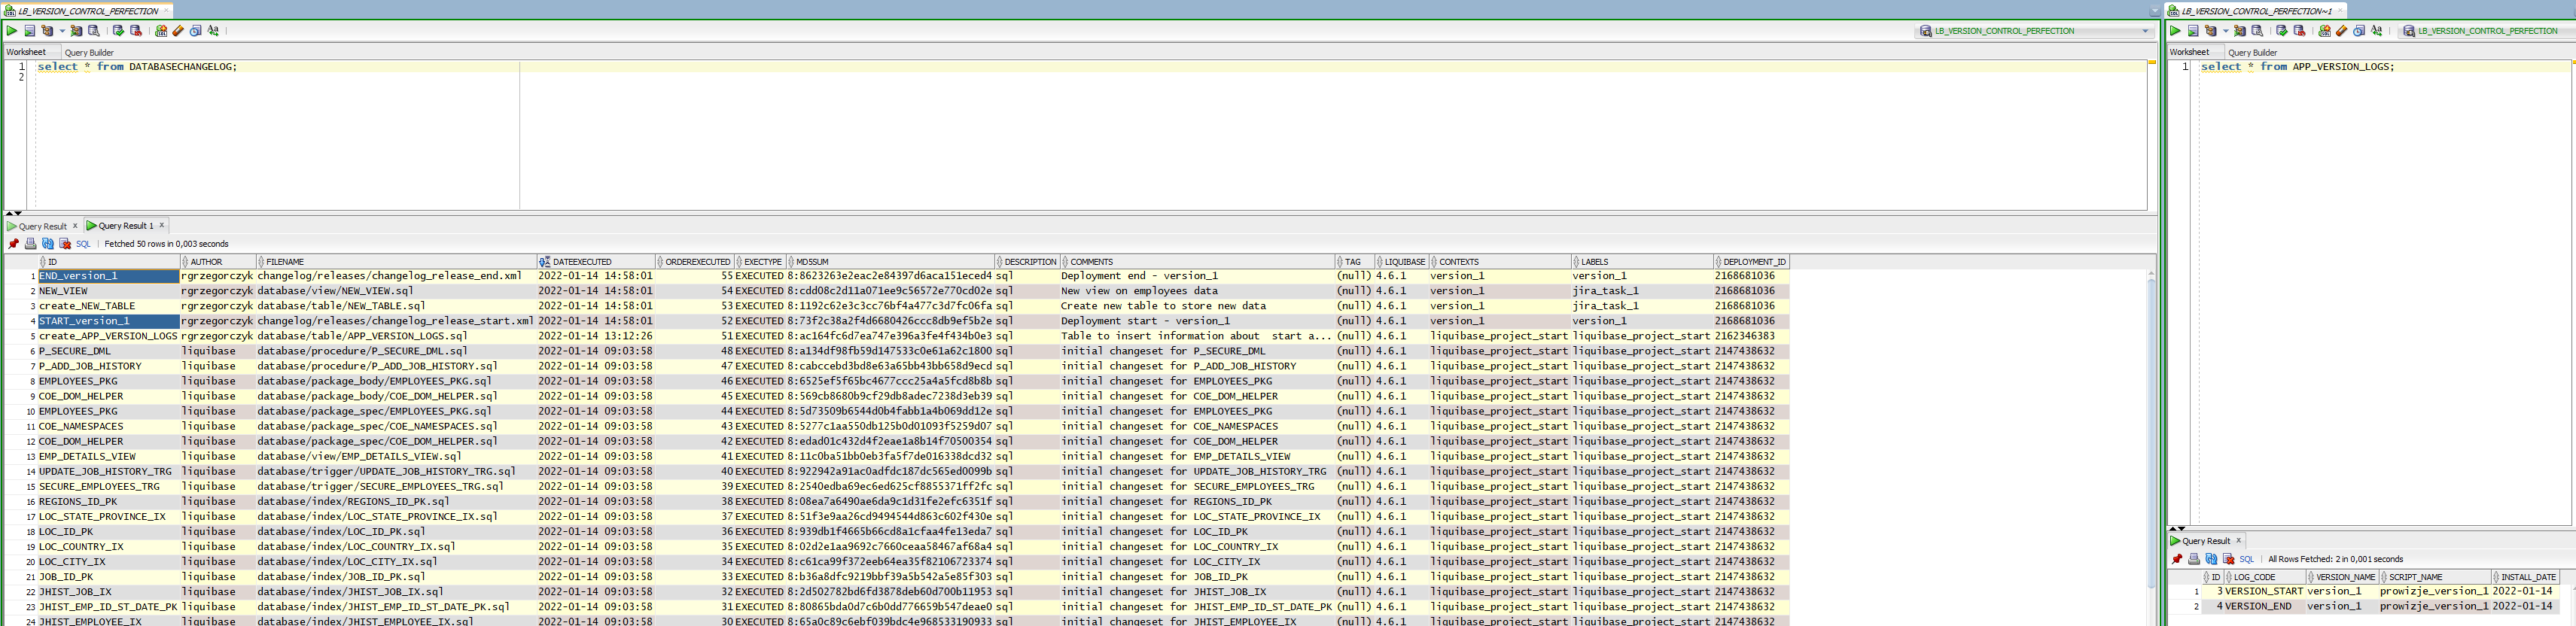
So, the final result is:
Okay, so I’ve created some changesets. Now, where’s that promised automation? Read on.
First, let’s create the “version_2” of my deployment script. It will contain 2 changes:
In “version_2”, I want these changes executed, along with additional inserts into APP_VERSION_LOGS.
Should I change changelog_release_start.xml and changelog_release_end.xml files again? No! I just need to change the value of properties in the master.xml file.
Let’s preview the Liquibase script:
liquibase updateSQL
If you run the command above, you should get what you can find in the version_2_release_script.sql file in my repo. Now, if you execute the script:
liquibase update
The result should look like this:
All of the above is great and should work in various circumstances. But what if:
So, how can we create Liquibase changesets with additional SQLcl specific syntax (note that the free Liquibase Community Edition doesn’t support SQLcl syntax)?
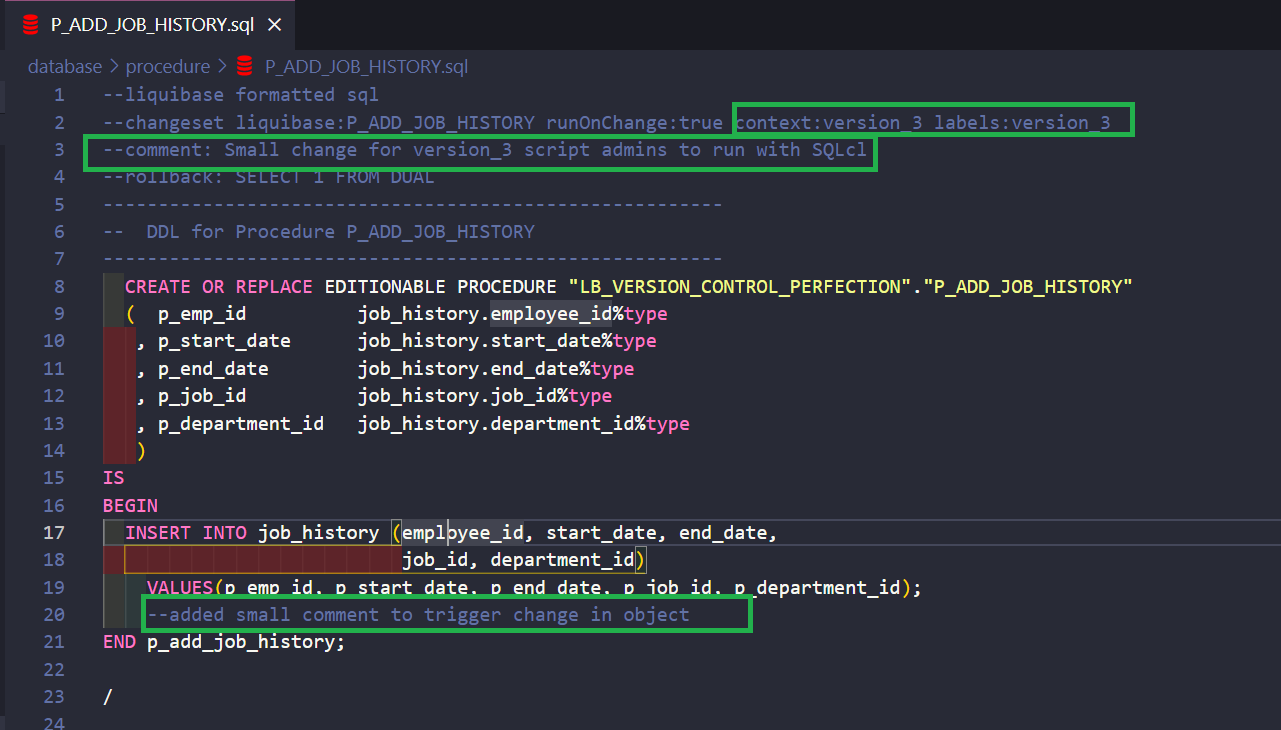
We can handle this as well. I’ll show you how, using the example of “version_3”. Let’s assume that this version should generate an SQL script – a script for database admins with SQLcl specific tags like SET DEFINE off, spool, prompt or spool off. Besides this, I want to run Liquibase the same as usual on my DEV environment (with full access).
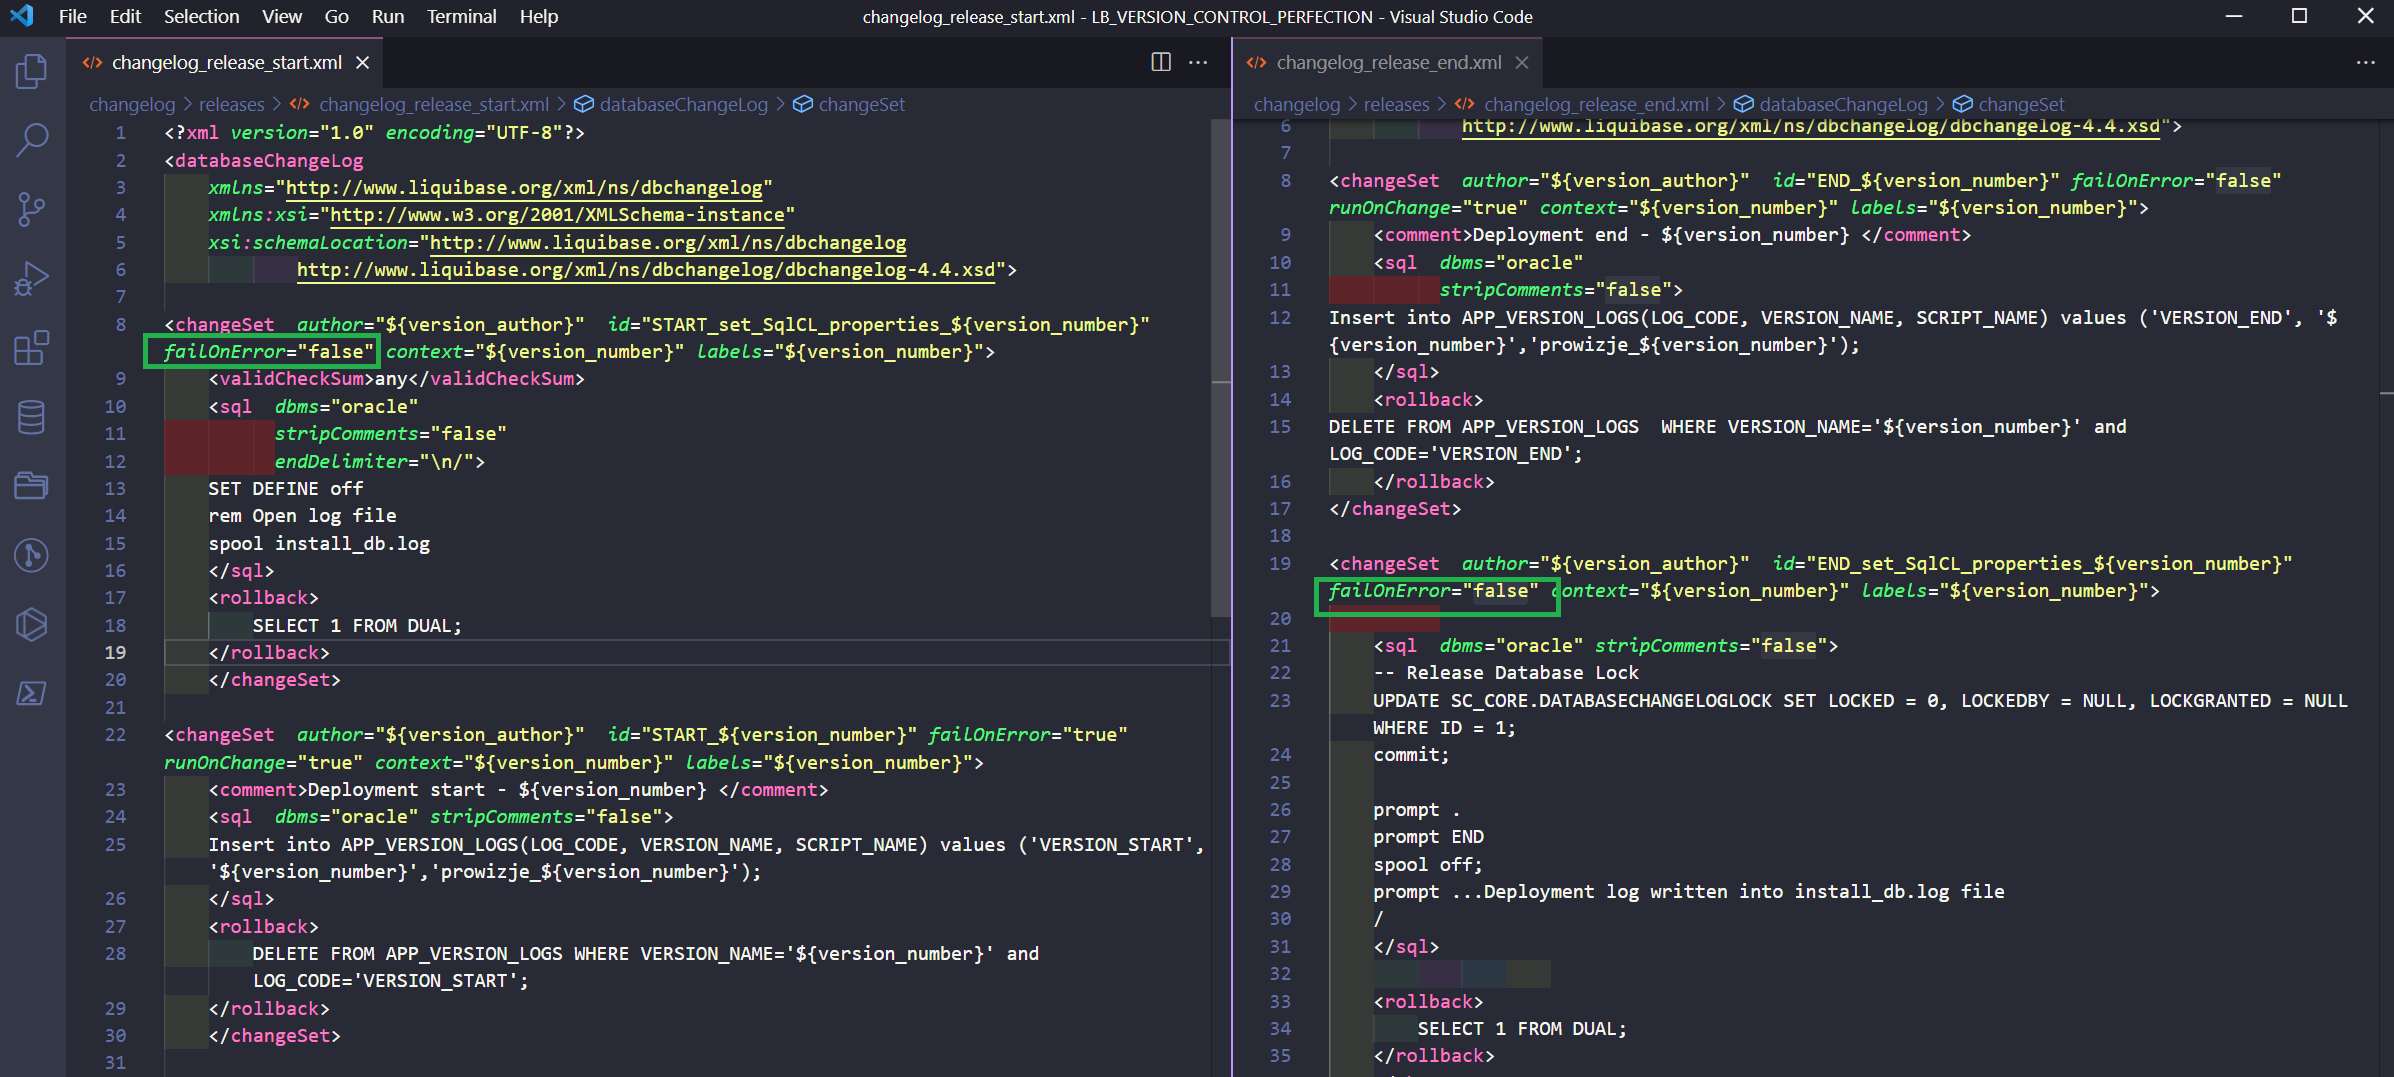
I’ve added a new changeset at the beginning of my changelog_release_start.xml file. It will set a specific SQLcl syntax. I did the same with the changelog_release_end.xml file.

I’ve also added a small change to my objects for “version_3”.
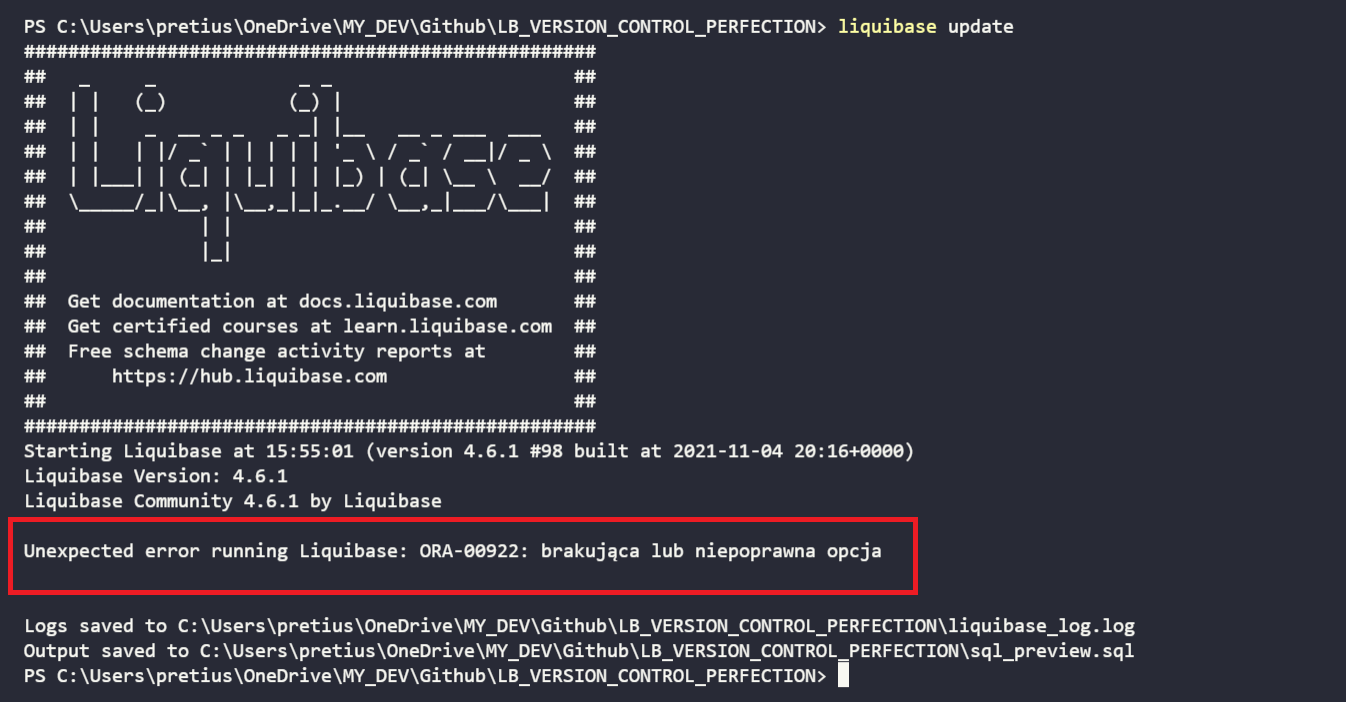
After that, running the liquibase update command would normally fail, because it doesn’t recognize SQLcl specific syntax (it can handle this in the Pro version).
But I can still generate an SQL file for the client’s admins:
liquibase updateSQL
The result looks like this (this is the version_3_SQL_CL_release_script.sql file in my GitHub repo).
However, I also want to run the liquibase update command on my DEV environment – just to have the same changes on both environments. That’s why I’ve added the failOnError=”false” parameter to those SQLcl specific changesets. So, now Liquibase will ignore errors in changesets with SQLcl syntax. It won’t show the errors.
So, the final result of the liquibase update command is:
But how to test whether this SQLcl script will pass on production (without access)? I have an easy way to do that (example with the “version_3”).
liquibase rollbackToDate 2022-01-13'T'12:00:00 --contexts=version_3
liquibase updateSQL
liquibase update
Imagine that I am a developer responsible for deployment on a UAT or PROD environment. My team pushed some changes into the GIT branch called “version_4”.
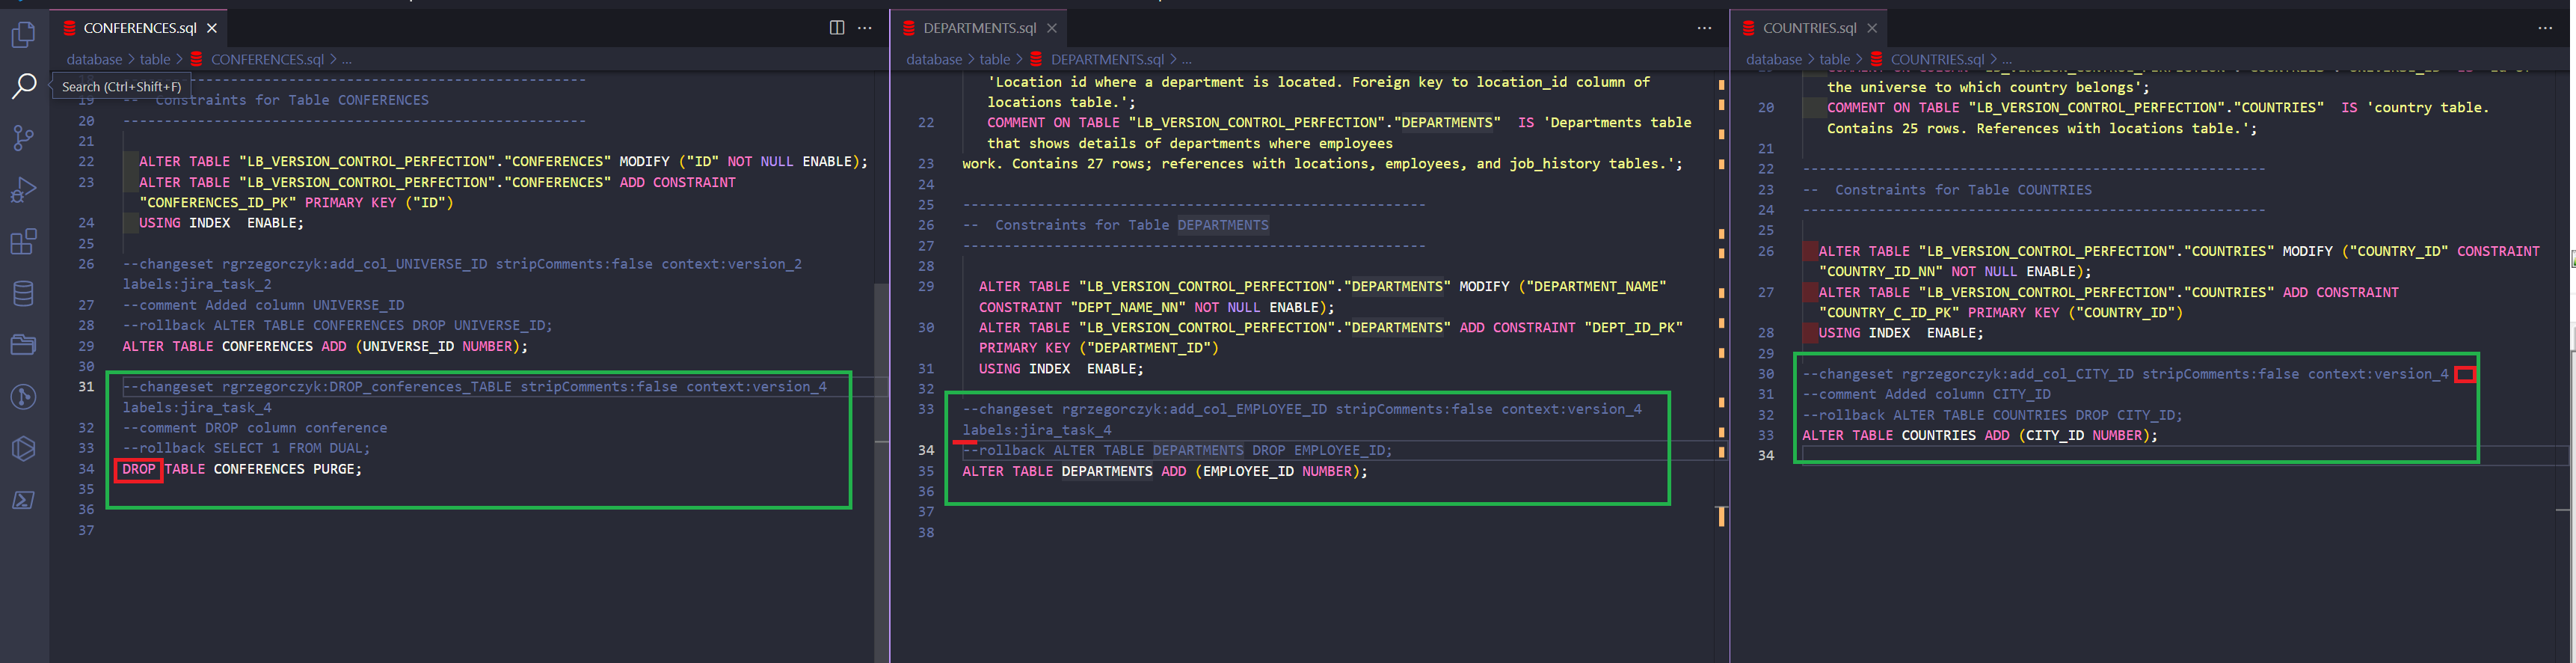
Have a look at the lines of code with red marks… What’s wrong with it? Got it?
Normally, you would probably ask the developer to add a comment, label, and explain why there is a need for a DROP table, right?
But first, you would have to find those missing/critical changes. What if there were hundreds of changes to check? We don’t have time for this.
That’s why I prefer to use the “liquibase checks” feature instead. In order to use them, you have to:
liquibase checks run
It will create a new file liquibase.checks-settings.conf in the /database/ folder.
Liquibase checks show
The list of checks will be generated into a sql_preview.sql file (you can read more about Liquibase checks here).
liquibase checks disable --check-name=SqlGrantWarn

liquibase checks disable --check-name=SqlRevokeWarn

liquibase checks disable --check-name=ChangeDropColumnWarn

liquibase checks disable --check-name=ModifyDataTypeWarn

liquibase checks disable --check-name=SqlUserDefinedPatternCheck

liquibase checks disable --check-name=TableColumnLimit

liquibase checks disable --check-name=SqlGrantSpecificPrivsWarn

liquibase checks disable --check-name=ChangeTruncateTableWarn

liquibase checks disable --check-name=SqlGrantOptionWarn

liquibase checks disable --check-name=SqlGrantAdminWarn
ChangesetCommentCheck

ChangesetContextCheck

ChangesetLabelCheck

ChangeDropTableWarn
liquibase checks run
Let’s look at the sample of the generated report:
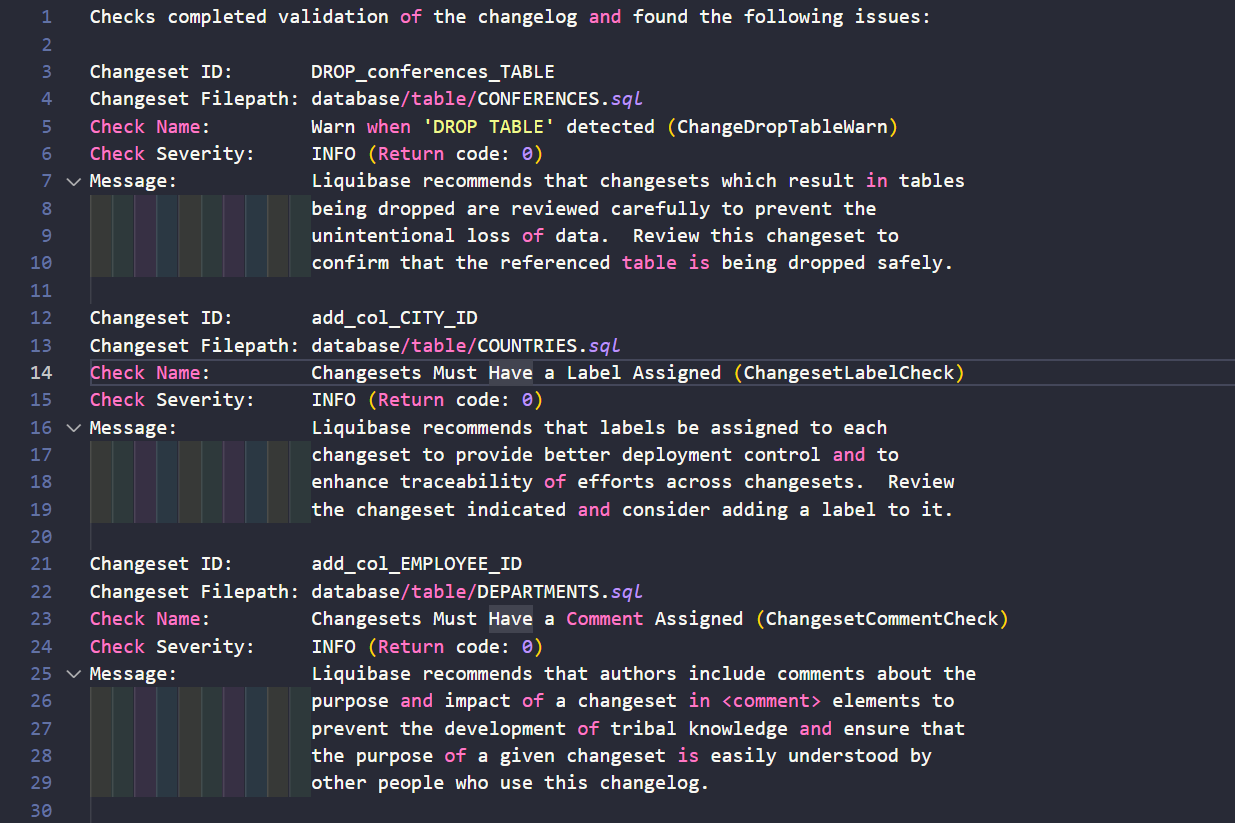
Everything is listed in the report. You don’t have to manually check your changesets. Just review the report and ask developers to correct or explain changes. You can check the full quality check report in the liquibase_checks_report.sql file in my repo.
Example: I want to run my compile schema script only if objects in invalid state exist.
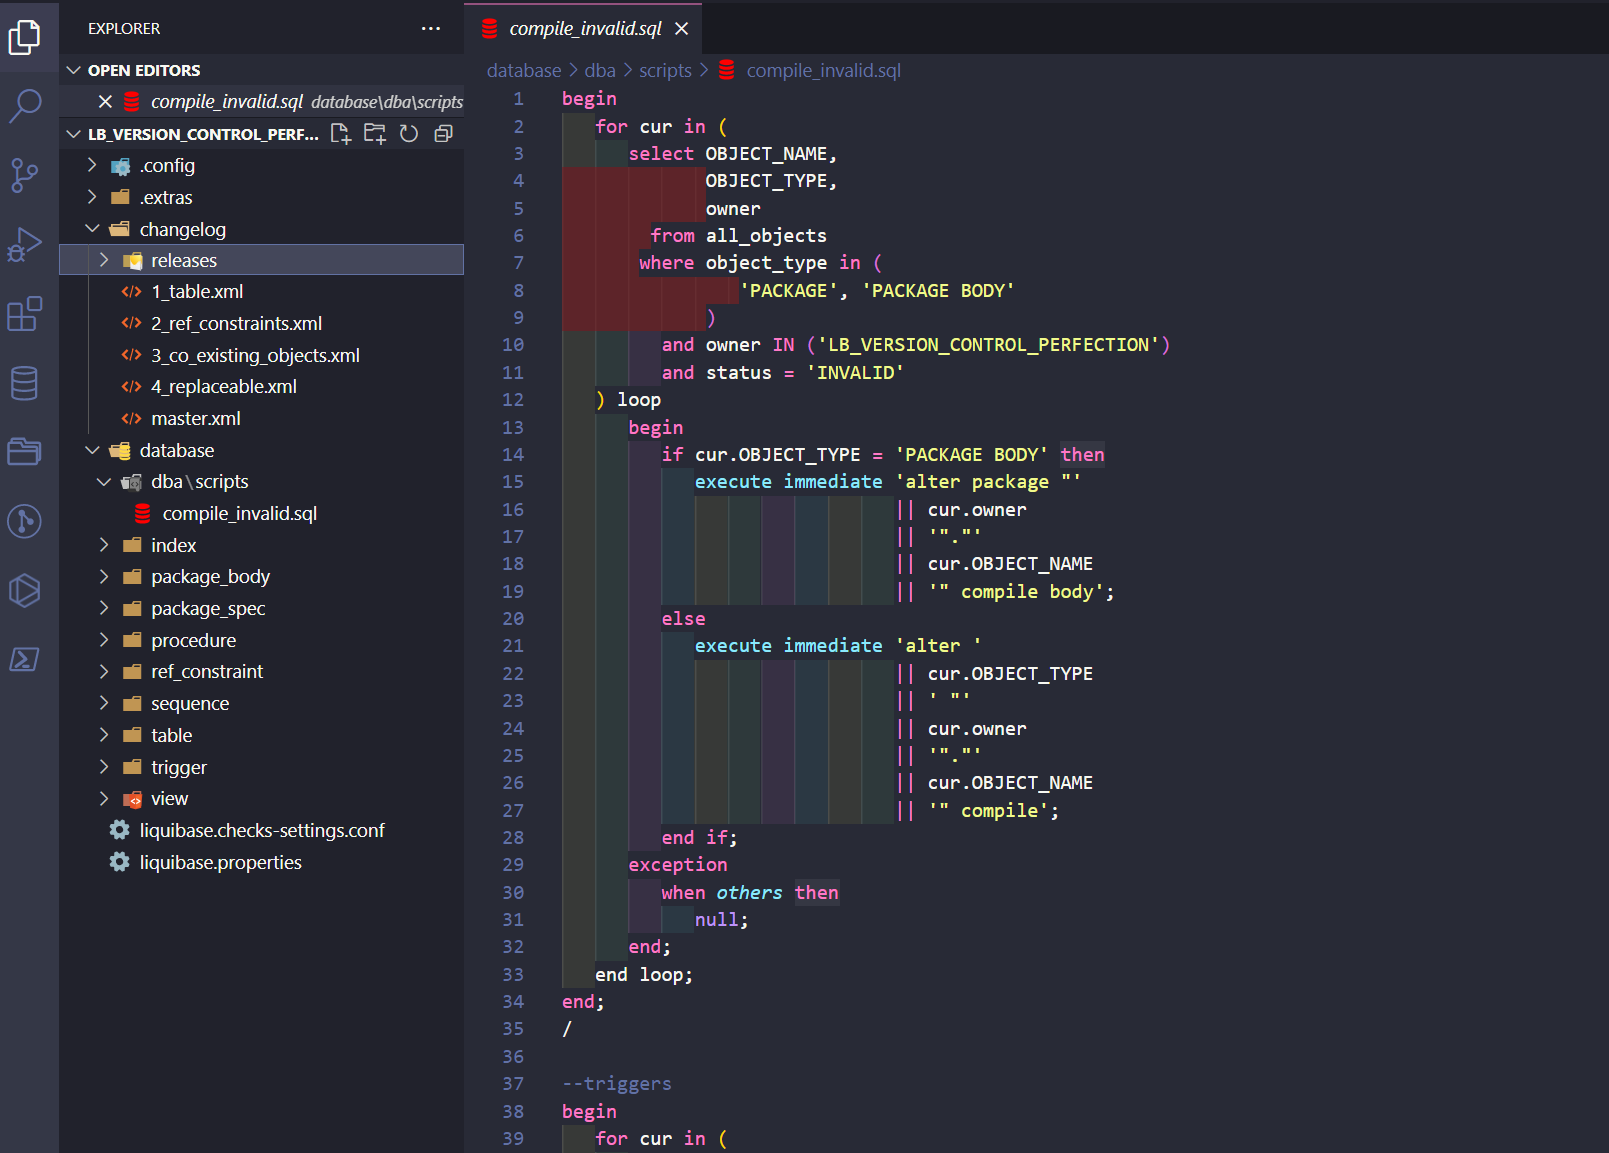

The author, context, and labels will be set using properties defined in the master.xml file. The ID will always be different depending on the version_number value. Notice the <preConditions> and condition => <sqlCheck> as the expected result of the attached SQL = 1.
So, let’s run the update command (I’ve removed the changeset with DROP and fixed missing comments, labels, and contexts – those found in the report from Step 7).
liquibase update

The Script executed successfully with a warning – just as I’ve wanted. The compile schema script was not executed because I don’t have any invalid objects.
It’s worth noting that there are many more types of Liquibase preCondtions. You can read about them in the documentation.
As you can see, Liquibase can make managing database version control changes much easier, making a developer’s life a lot easier. The features I’ve shown you can be used in many different circumstances – not just theoretical situations, but actual projects you might develop for various companies and industries. I hope my tips will be of help to you. And of course, you can expect more articles like that in the future (the topics I plan to cover include automated rollbacks and comparing multiple database schemas). Stay tuned!
The Pretius team knows how to fit database technology to the needs of a specific customer. We have a great deal of experience with DB-oriented technology, including Liquibase. We also know a lot about designing software architecture. Do you need help? Drop us a line at hello@pretius.com (or use the contact form below). We’ll get back to you in 48 hours and tell you what we can do for your company.


