
Since you’re here, I believe you’re looking for an answer to the question: how to make your deployment process easier? I’m also pretty sure that I don’t have to explain why it’s worth doing because you already know that. So, if you’re really interested in the continuous deployment of database changes, and APEX applications, you are in the right place. In this article, I would like to share my experience with continuous deployment for the Oracle Application Express platform.
Starting off, I would like to encourage you to start with Rafal Grzegorczyk’s articles about Liquibase, because in my tutorial I assume that you already know how to use Liquibase changelogs and changesets in your repository. If you don’t know how to manage your repository with Liquibase, please read Rafal’s Liquibase tutorial first and adapt your repo to be able to make installation with Liquibase.
Another important thing you need to know is that you shouldn’t compile on your own when you implement an automation process. All of your changes, even on dev environments, should be deployed using Gradle. Therefore, you should also install Gradle on your PC to be able to execute the deployment in the same way as your deployment environment will.
Last but not least, you will have to export your APEX applications using SQLcl, not via a web browser. I know it sounds weird, but trust me, it’s much quicker and simpler than you think (more on that later, in the section about simplifying work with the repo). Of course, if you don’t have SQLcl on your PC, you’ll have to install it first too. 😉
The first thing you need to take care of is your deployment environment. In my case, I will use 5 tools which I will install on a separate application server (Ubuntu), and 2 simple SQL scripts which I will put in my code repo. Please also keep that in mind if you are hosting code repo on external servers like gitlab.com or github.com, your server will also have to be visible for those services. These are the tools that I’ll be using:
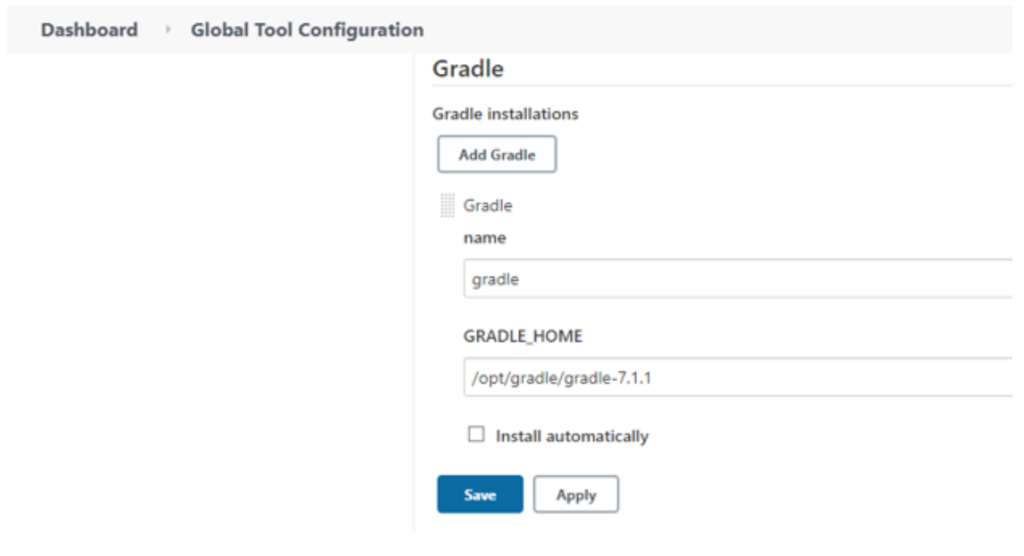
I have installed all my tools, so I’m ready to configure them to work together. The first step of the configuration is to set up the Gradle runtime environment in Jenkins.
To do so, You need to set the name and the GRADLE_HOME path in Jenkins settings.
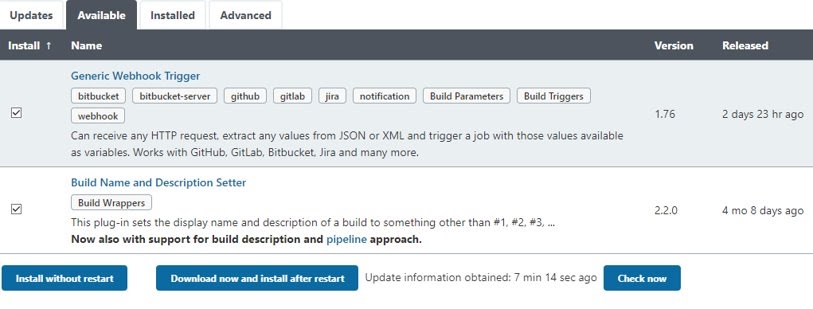
 The next step is to install plugins in Jenkins. I like to use at least those 2 plugins from the screen below. The first one (Generic Webhook Trigger) is obligatory because it will be responsible for communication with our GIT server. The second (Build Name and Description Setter) is optional but very nice to have – you’ll see why later. Also, if you are using Slack, it’s a good idea to install a Slack plugin to set up your feedback even better. Use your imagination. 😉
And that’s it for Jenkins! The basic configuration is done. The rest should work out of the box.
Now it’s time to take a look at Gradle and its build.gradle file which should be put into the root of the repo. Two supporting SQL scripts need to be placed in .config/_exec/ like so:
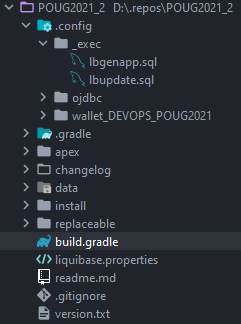
lbgenapp.sql – is the file for exporting the application.
set cloudconfig .config/wallet_DEVOPS_POUG2021/wallet.zip
connect USERNAME/PASSWORD@DB_NAME
lb genobject -type apex -applicationid &1 -runonchange -expSupportingObjects I -dir ./apex/
exit
lbupdate.sql – is used to import the application.
set cloudconfig .config/wallet_DEVOPS_POUG2021/wallet.zip
connect USERNAME/PASSWORD@DB_NAME
lb update -changelog "&1"
exit
Of course, for both of these files, you need to name your wallet (however you want). You also need to specify the folder name in the repo.
When it comes to the build.gradle file, we basically divide it into 4 parts.
Example build.gradle file:
plugins {
  id 'org.liquibase.gradle' version '2.0.4'
  id 'java'
}

repositories {
  mavenCentral()
  maven {
    url "https://mvnrepository.com/artifact"
  }
}

dependencies {
  liquibaseRuntime('org.liquibase:liquibase-gradle-plugin:2.0.4')
  liquibaseRuntime('org.liquibase:liquibase-core:4.4.3')
  liquibaseRuntime('org.liquibase:liquibase-groovy-dsl:3.0.2')
  liquibaseRuntime('com.oracle.database.jdbc:ojdbc11:21.1.0.0')
}

def changeLogFilePath = 'changelog/master.xml';
def applicationsChangelogPath = 'changelog/replaceable/6_applications.xml';
def host;
def port;
def sn;
def usr;
def pww;
def oci_db_name;

task installApexApps() {
  doLast {
    def stdout = new ByteArrayOutputStream();

    exec {
      def cmd = "sql /nolog @.config/_exec/lbupdate.sql " + applicationsChangelogPath;
      commandLine "sh", "-c", cmd

      standardOutput = stdout;
    }

    def str = stdout.toString();
    println "Output: $stdout";

    if (!str.contains('Errors encountered:0'))
    {
      throw new GradleException("Error ocured during application import. Please check logs.")
    }
  }
}

task('standard_connection') {
  doLast {

    host = 'hostname';
    port = '1521';
    sn = 'service_name';
    usr = 'DEVOPS_POUG2021';
    pww = 'something_difficult';

    liquibase {
      activities {
        main {
          changeLogFile changeLogFilePath
          url 'jdbc:oracle:thin:@(DESCRIPTION=(ADDRESS=(PROTOCOL=TCP)(HOST=' +
               host + ')(PORT=' + port + '))(CONNECT_DATA=(SERVICE_NAME=' + sn + ')))'
          username usr
          password pww
        }
      }
    }
  }
}

task('cloud_connection') {
  doLast {

    oci_db_name = 'rgatp28_high';
    usr = 'DEVOPS_POUG2021';
    pww = 'of_course_there_will_be_our_super_secret_password';

    liquibase {
      activities {
        main {
          changeLogFile changeLogFilePath
          url 'jdbc:oracle:thin:@' + oci_db_name + '?TNS_ADMIN=.config/wallet_DEVOPS_POUG2021'
          username usr
          password pww
        }
      }
    }
  }
}

task('run_uat_unit_tests') {
  doLast {

    oci_db_name = 'rgatp28_high';
    usr = 'DEVOPS_POUG2021';
    pww = '';
    //here some testing scripts
  }
}
As you can see in my file, I have a task to connect to a local database (task: ‘standard_connection’) and also a cloud database (task: ‘cloud_connection’). The connection string is a bit different. Basically, you should have one task per one environment that you have. For example, if you have: DEV, UAT, PREPROD, and PROD databases, you should have 4 tasks with connection parameters defined in each task for the correct database, e.g.:
task(‘dev’) {
  doLast {
    oci_db_name = devdb_high;
    usr = 'DEV_USER';
    pww = 'of_course_there_will_be_our_super_secret_password'

    liquibase {
      activities {
        main {
          changeLogFile changeLogFilePath
          url 'jdbc:oracle:thin:@' + oci_db_name + '?TNS_ADMIN=.config/dev_wallet/wallet.zip'
          username usr
          password pww
        }
      }
    }
  }
}

task(uat) {
  doLast {
    oci_db_name = uatdb_high;
    usr = 'UAT_USER';
    pww = 'of_course_there_will_be_our_super_secret_password'

    liquibase {
      activities {
        main {
          changeLogFile changeLogFilePath
          url 'jdbc:oracle:thin:@' + oci_db_name + '?TNS_ADMIN=.config/uat_wallet/wallet.zip'
          username usr
          password pww
        }
      }
    }
  }
}
And so on!
Now, it is time to create a project in Jenkins. Let’s assume that we need a task for UAT deployment.
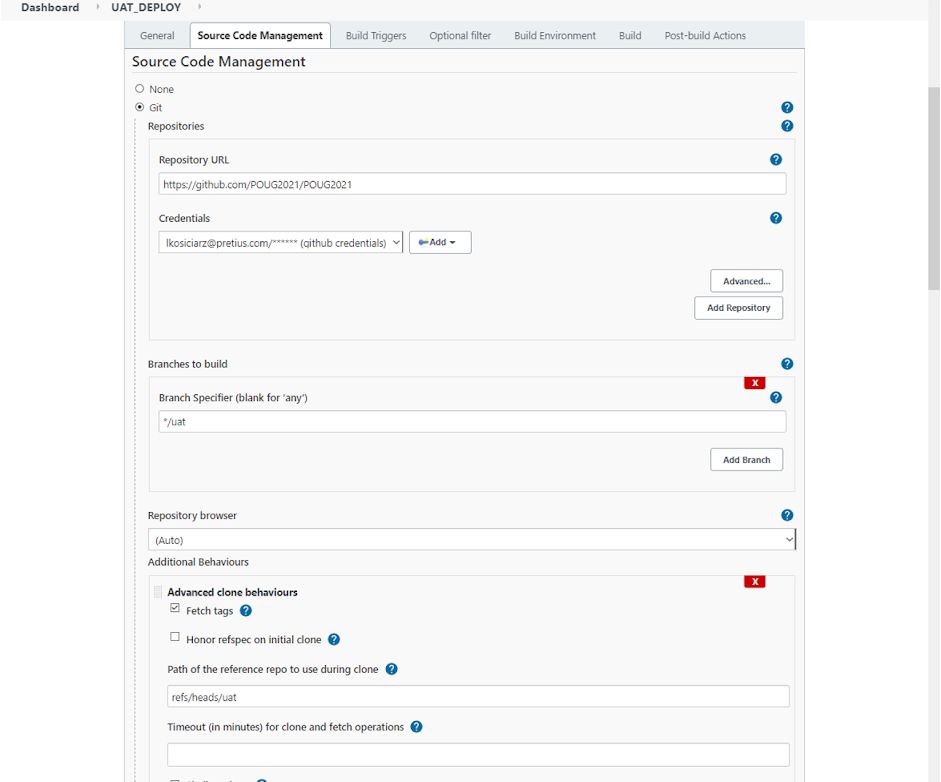
The first thing that I need to set up in my UAT_DEPLOY task is a code repository. Basically, you need to specify the URL, branch name for checkout, and of course credentials to connect.
 Another thing to configure is the build triggers. That’s where the first plugin, Generic Webhook trigger, comes in handy. I am using it as my build trigger – you could say it’ll serve as the doors which GIT can knock on, bringing information about new changes as a gift. 😉 The first thing I do after enabling the trigger is set up a variable – name it however you want, and in Expression, type the path to the branch name, which in my case is $.ref. We’ll use that variable later.
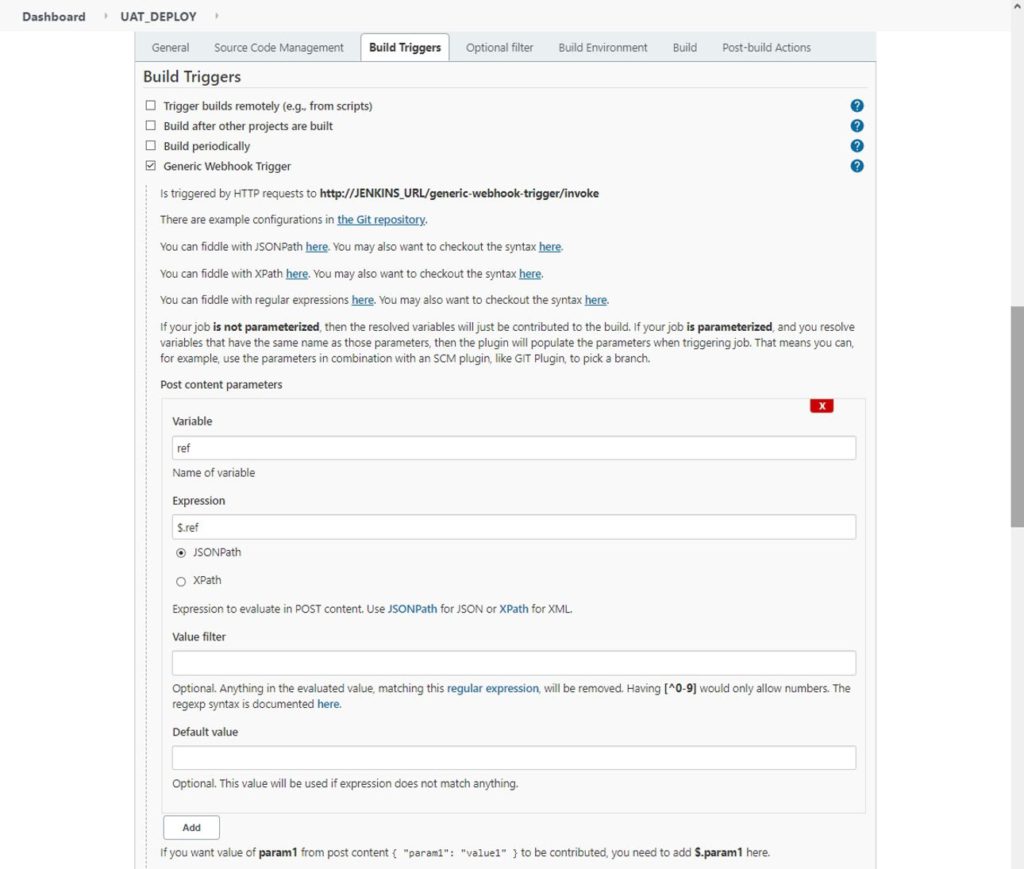
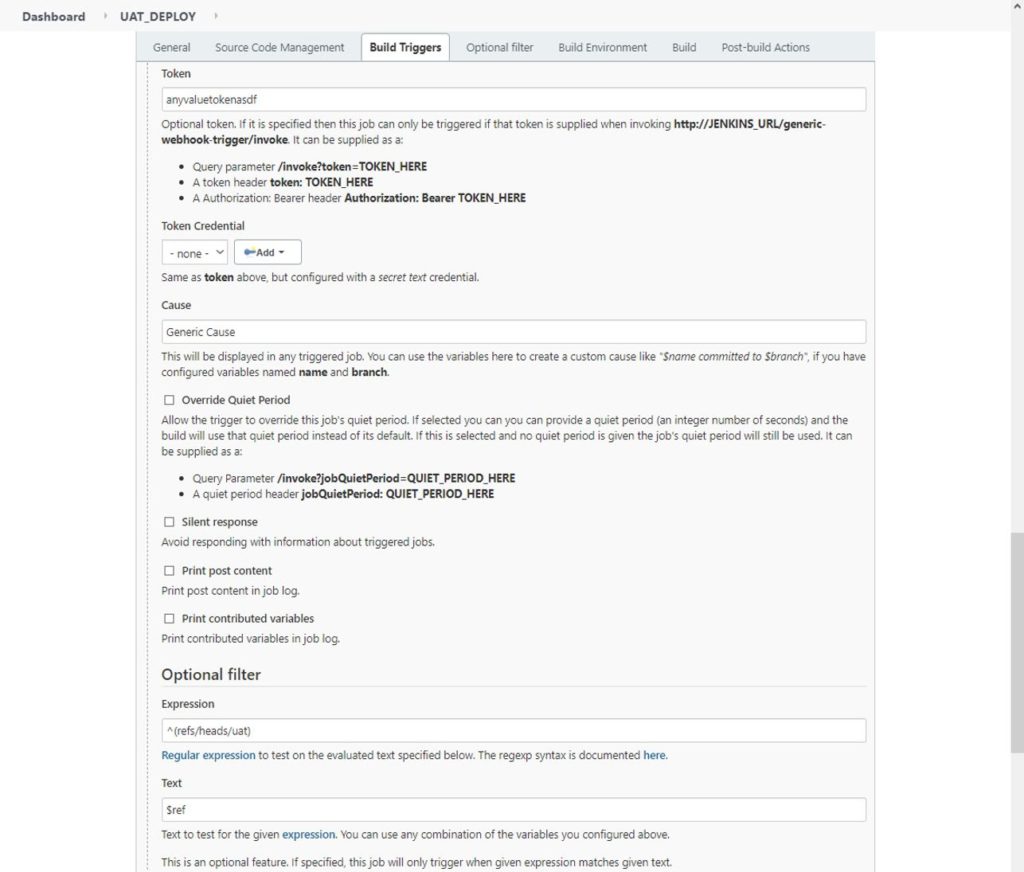
Another thing to set up is the security token, which you’ll need for the GIT Webhook configuration. It should be something complicated. And the last thing for this trigger is the “Optional filter”. I would like to only accept changes for the UAT environment – basically only the “uat” branch is welcome.
So, in Expression, I type what I expect to see in regular expression: ^(refs/heads/uat)
For text to look up I am referencing my variable “ref” using phrase: $ref
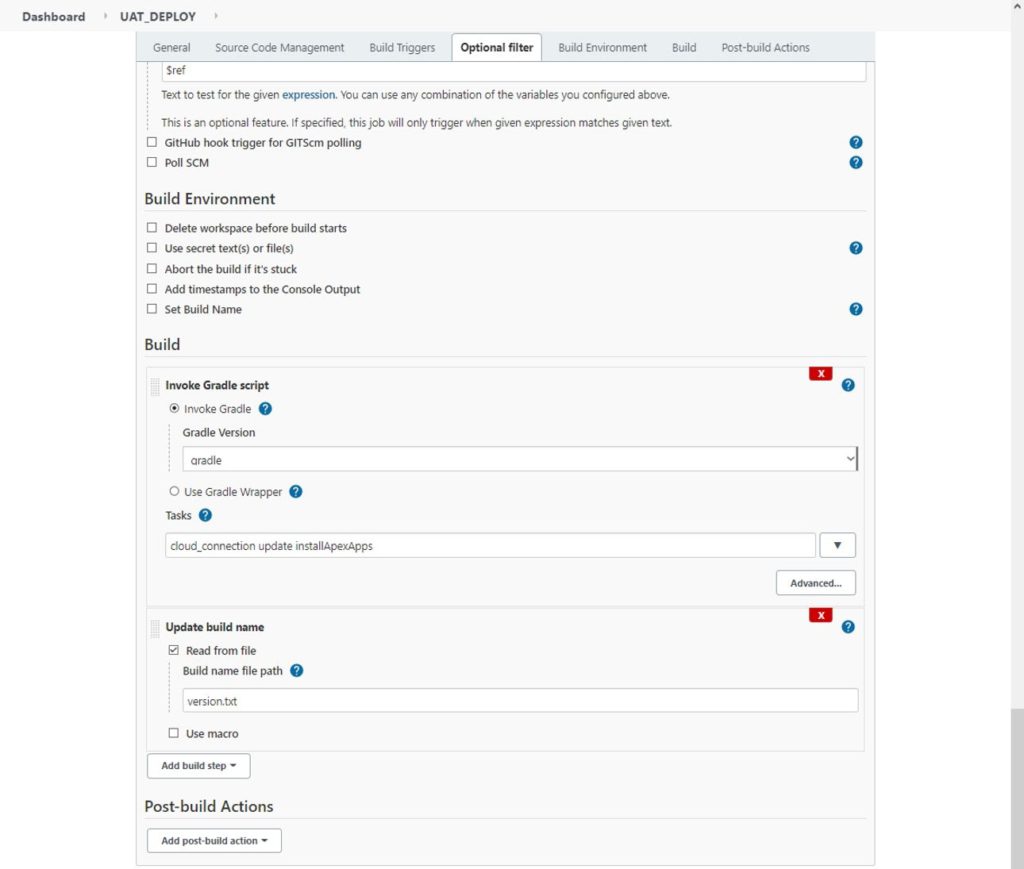
The final step for project configuration is to invoke our Gradle tasks. So in the “Build” section, I added a new build step called “Invoke Gradle script”. Remember that in the Version field you need to choose the one which you configured in Jenkins settings before. And of course, you need to type your task names like this: connection_task update installApexApps.
To clarify, the first task will tell Gradle where it should connect, the second will execute “liquibase update” and the last one will install APEX applications using SQLcl.
The second build step which I like to add – optional, but nice to have – is “Update build name”. To find the name itself, I look at the file version.txt, which is in my code repo. Thanks to that, I know what I’m deploying instead of following numbers. Imagine someone asks you: “what have you deployed in build #118?” Tricky, right? This solves that problem because instead of #118 you’ll see e.g. “Changes to employees table”.
Now, when we have the project in Jenkins, we can basically run it by hand. But of course, running it manually after every push to the repository is not automation. At least I wouldn’t call it an automated process. To make it really automated, you need to set up a webhook in GIT. In most cases, it’s stupidly easy. 😉
Just log in to your repository and find the Webhooks tab in Settings. There, you need to type in the URL to your Jenkins and events which should run this webhook (usually push is enough). The URL itself should look like this:
https://<your_jenkins_server_ip_or_dns>:<jenkins_port>/generic-webhook-trigger/invoke?token=<your_token_from_jenkins>

Now, when you push to branch “uat”, the UAT_DEPLOY task in Jenkins should be run automatically!
In this part, I will show you how to create OS aliases to make your APEX application export even simpler. Just look at this command:
lb genobject -type apex -applicationid 100 -runonchange -expSupportingObjects I -dir ./apex/
Imagine that you have to type it every time whenever you need to make a change or hotfix to your application. It looks a little scary to remember. 😉
What you need is just an alias in OS – in my case in WSL, which is Windows Subsystem Linux, which I also recommend to you.
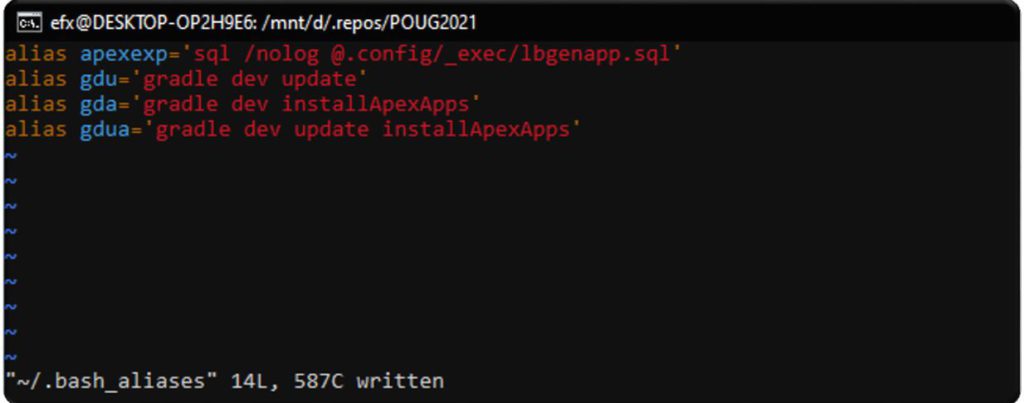
In ~/.bash_aliases file you need to add something like:
alias apexexp=”sql /nolog @.config/_exec/lbgenapp.sql”
Now, to export the application you just need to type this in the console:
apexexp 100
I hope this article was at least a little bit helpful. In the second part, I will show you how to make a copy of your previous version of the repository when, in case of a Liquibase rollback, you’d like to have the last working version of your packages, functions, procedures and so on.
If you’re interested in Oracle APEX development, I advise you to check out the other articles on the Pretius blog:


