
I’ve written this article to complete what I believe are missing steps between the Technical Paper explaining that CI/CD can be achieved and the actual steps required to achieve it. If you have not yet read that document, I suggest you do it now (start at page 17) to become familiar with the approach. It also contains the basic setup required to get started.
I will set this up on Oracle Cloud as it’s the most convenient place to deploy a generic solution.
This article was written with this quote in mind:
“Most developers on the team don’t need to directly interact with the file artifacts since another team member playing the role of a build manager adds their work to the Git repository.”
It’s from the Overview of Team-Centric Development Approach section of the Oracle APEX Application Development Lifecycle Technical Paper, and it’s important as you’ll see later.
This article has been designed so that the ‘Build Manager’ has already constructed a build zip file and this will be deployed and tested by this method.
I’ve prepared a test repository pretius-apex-lifecycle-aligned-sample-customers which is a derivative work of the APEX Sample Customers Application, built to demonstrate the alignment to the Oracle APEX Application Development Lifecycle Technical Paper.
The repository deviates somewhat from the Technical Paper to incorporate some advancements in thinking as mentioned on page 7 of my Deconstructing the APEX Application Development Lifecycle Paper presentation. All deviations from the Technical Paper are mentioned in the README.md.
As part of the Initial setup section, you’ll acquire a Jenkins Instance and a docker image containing Oracle 23c+ORDS+APEX.
Using the utilities provided in the pretius-apex-lifecycle-aligned-utils repository, you will build a Jenkins server to deploy & test the Sample Customers Application, before removing the container and collating all the test evidence.
It is the intention that you can take the ideas from this work and adapt your repository to this method, adding or removing steps as appropriate.
I will use Oracle Cloud in my example as it’s the most convenient place to deploy a generic solution.
IMPORTANT: Please see the Suitability as an Approach section at the end of this blog post before implementing these techniques as some issues were found that you should be aware of.
Now that we’re done with preliminary information, let’s start going through the initial setup steps you’ll need to complete to get going. Configuring everything should take 1-2 hours, and once everything is up and running, you can CI/CD in peace – you won’t have to do this again.
Here are the steps we’ll go through:
Once you complete these steps, you’ll need to deploy & test the APEX Sample Customers Application – I’ll take you through this too. Once familiar with deploying that APEX Sample Customers Application, you can adapt your repository to deploy & test it with this method.
In this section, we’ll install and configure Jenkins and other necessary tools. Do the following:
1. Set up a new Jenkins compute box on OCI using this guide
2. You will need more storage as you deal with several large docker images. Follow this guide to add 50GB more storage to your machine
3. When complete, on your Jenkins machine install Docker (it’s actually Podman – this is fine, I’ll use the docker commands in case of other O/S’s)
sudo yum install docker -y
4. Install Git
sudo yum install git -y
5. Install NodeJS + dependencies required for Cypress and run these dependencies
cd /home/opc
sudo dnf module install nodejs:18/common -y
npm install cypress
Use this command to run the dependencies
sudo yum install -y xorg-x11-server-Xvfb gtk2-devel gtk3-devel libnotify-devel GConf2 nss libXScrnSaver alsa-lib
6. Install SQLcl
sudo yum install sqlcl -y
7. Set the JAVA_HOME for SQLcl to work correctly
export JAVA_HOME=$(readlink -f $(which java) | sed "s:bin/java::")
8. Install the pretius-apex-lifecycle-aligned-utils
cd /home/opc
curl -L -o pretius-apex-lifecycle-aligned-utils.zip https://github.com/Pretius/pretius-apex-lifecycle-aligned-utils/archive/refs/heads/main.zip
unzip pretius-apex-lifecycle-aligned-utils.zip
mv pretius-apex-lifecycle-aligned-utils-main pretius-apex-lifecycle-aligned-utils
rm pretius-apex-lifecycle-aligned-utils.zip
9. Optional step: install the lifecycle scripts from the Oracle APEX Application Development Lifecycle Technical Paper.
cd /home/opc
curl -L -o lifecycle-technical-paper-files.zip https://apex.oracle.com/go/lifecycle-technical-paper-files
unzip lifecycle-technical-paper-files.zip -x "__MACOSX/*"
rm lifecycle-technical-paper-files.zip
The process described in this article will create a new agent running on the same machine as Jenkins. If you plan to have Docker 23c on another machine, you can run these commands there instead.
1. Log in to Jenkins Dashboard via your web browser
2. Disable the Built-in Node by following these steps:
Dashboard > Manage Jenkins > Manage Nodes and Clouds > Built in Node > Configure > Number of executors > 0 > Save
3. Add a new Permanent Agent:
Dashboard > Manage Jenkins > Manage Nodes and Clouds > New Node > Node Name > jenkinsnodecicd
4. Select Permanent Agent and click Create
5. Set the Remote root directory to:
/home/opc/jenkinsnodecicd
6. Set Use WebSocket to Checked
7. Save
8. Click on the jenkinsnodecicd
IMPORTANT: There are two code boxes here… We’ll only use the first one.
9. In Terminal, make a folder and then change the directory to /home/opc
mkdir /home/opc/jenkinsnodecicd
cd /home/opc
10. Run the first line from the first code box (i.e., it starts with curl) in the terminal, e.g.
curl -sO http://xxx.xxx.xxx.xxx:8080/jnlpJars/agent.jar
11. To make this agent auto-load on a reboot of the UNIX box, create a new file like this:
sudo nano /etc/systemd/system/jenkins-cicd-node.service
12. Paste in the following…
IMPORTANT: Remember to change the line stated after you paste it in. Tip: Paste the below into a text editor, change the values and then paste it into nano.
[Unit]
Description=Jenkins CICD Node agent
After=syslog.target


[Service]
Type=simple
User=opc
ExecStart=/usr/bin/java -jar /home/opc/agent.jar -jnlpUrl [PASTE IN FROM LINE TWO STARTING WITH http:// AND ENDING WITH THE END OF THE CODE BOX]
Restart=always
RestartSec=30


[Install]
WantedBy=multi-user.target
13. Enable, start and check the service
sudo systemctl enable jenkins-cicd-node.service
sudo systemctl start jenkins-cicd-node.service
sudo systemctl status jenkins-cicd-node.service
14. Press Ctrl + C once to exit and stop viewing the end of file
15. Refresh your browser and the agent will be connected

Now, you need to add firewall rules to see the Ddocker externally.
1. Use the following command
IMPORTANT: make sure the last line runs
YOURPORT=8023
PERM="--permanent"
SERV="$PERM --service=apex23cfree"


sudo firewall-cmd $PERM --new-service=apex23cfree
sudo firewall-cmd $SERV --set-short="APEX23cFree ports"
sudo firewall-cmd $SERV --set-description="APEX23cFree port exceptions"
sudo firewall-cmd $SERV --add-port=$YOURPORT/tcp
sudo firewall-cmd $PERM --add-service=apex23cfree
sudo firewall-cmd --zone=public --add-service=http --permanent
sudo firewall-cmd --reload
2. Optional/Recommended: expose the Docker external port to view APEX externally – more detailed information on that later
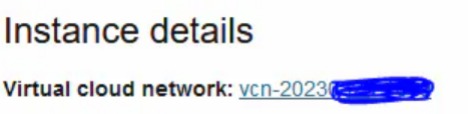
3. In your Compute Instance, right-click the VCN hyperlink and open the link in a new tab
4. Click on Security Lists
5. Click on Default Security List
6. Click Add Ingress Rule using the following details:
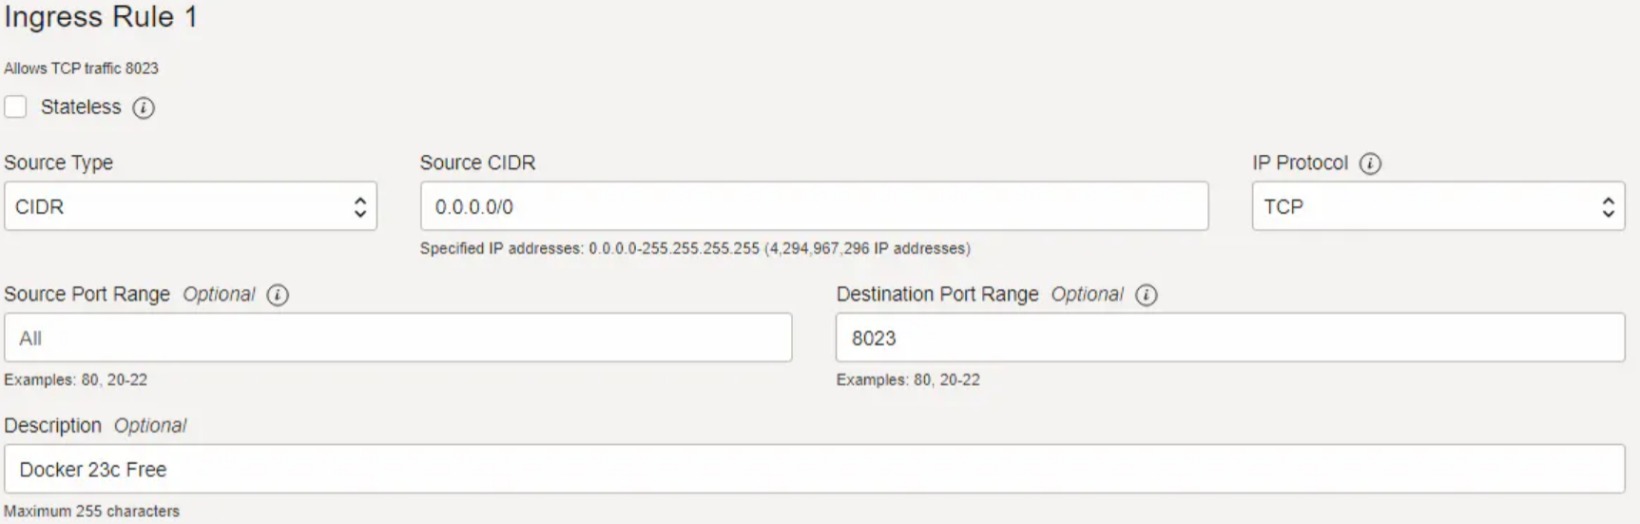
7. Click Add Ingress Rule at the bottom
You’re almost there. In this section, you will pull the Official Oracle 23c Free Docker image, and add APEX and ORDS to a new container. After that, you will prepare the container for imaging, image it and then test it out to see if it’s ready to use for CI/CD.
1. Construct your docker image using this Oracle 23 Free Docker guide. However, when it comes to testing, switch localhost for the IP address of your Unix box.
2. Enter the docker container
docker exec -it 23cfree /bin/bash
3. You will need to do a bit of preparation next
All these changes are temporary and will reactivate again the next time the container is started.
sudo sh /home/oracle/scripts/stop_ords.sh
sqlplus / as sysdba
shutdown
exit
4. Exit out of docker bash
exit
5. Commit this container as an image so you can use it for CI/CD
docker ps
you should see your container reference – e.g 5696fabdd5d7
FUN FACT: This step took so long – around 25 minutes – that I was able to finish writing this article.
IMPORTANT: Do not interrupt the terminal and do not press random keys until it finishes or you’ll have to re-run this lengthy step (this happened to me once).
docker commit 5696fabdd5d7 23cfreeapeximg
You can ignore the WARN messages. When finished, the entire output would look like this:
[opc@jenkins-2 ~]$ docker commit 67c538ec7fca 23cfreeapeximg
WARN skipping since it is a socket
Getting image source signatures
Copying blob 02b6badf6ca4 skipped: already exists
Copying blob 31e3dab70331 skipped: already exists
Copying blob 64a8d294e45f skipped: already exists
Copying blob 49d330f0ae32 skipped: already exists
Copying blob 3f8984bc5a38 done
Copying config 65d5c6963c done
Writing manifest to image destination
Storing signatures
65d5c6963ca1bbc35694a36c38d1c5824f32157a4355e85edf80ce86cd41a8ab
6. Stop the 23cfree container
You need to do this because it’s hogging your ports. You won’t remove it completely as the idea is that this will be used for upgrades & this blog post will be updated accordingly
docker stop 23cfree
7. Create a new container with the new image to test it
docker run -d -it --name 23claunch -p 8521:1521 -p 8500:5500 -p 8023:8080 -p 9043:8443 -e ORACLE_PWD=E localhost/23cfreeapeximg
If you need to bash to it, you can use the following command (this is for information purposes only – don’t run this step):
docker exec -it 23claunch /bin/bash
8. Give it 60 seconds, then test if APEX can be reached
wget -O - http://localhost:8023/ords
Success looks like this (what you see here is part of the HTML from the APEX sign-in page):
apex.item( 'F4550_P1_COMPANY' ).setFocus();
} finally {
apex.event.trigger(apex.gPageContext$,'apexreadyend');
};
});
});
});apex.pwa.cleanup( { serviceWorkerPath:'\u002Fords\u002Fr\u002F\u002Flogin\u002Fsw.js?v=22.2.0-3142018\u0026lang=en' } );
</script>

-                       [ <=>                ]  21.95K  --.-KB/s    in 0.001s

2023-04-13 20:35:50 (25.1 MB/s) - written to stdout [22476]
If you see infinite connection retries, then sadly this step has failed. You must remove your container and image and repeat the Docker commit step above. To remove the container and image, use this command:
# DO NOT RUN THIS STEP IF YOU SAW A SUCCESS ABOVE
docker rm 23claunch
docker rmi localhost/23cfreeapeximg
9. Enable linger
You may have already run this. But you can rerun it.
loginctl enable-linger $UID
10. Testing is over now, so stop and remove the container
docker stop 23claunch
docker rm 23claunch
And that’s it – the initial setup is done. Now you can move to the other part of this article.
This picture shows all the steps performed in the Jenkins pipeline. As you can see, it takes around 8-9 minutes to complete.
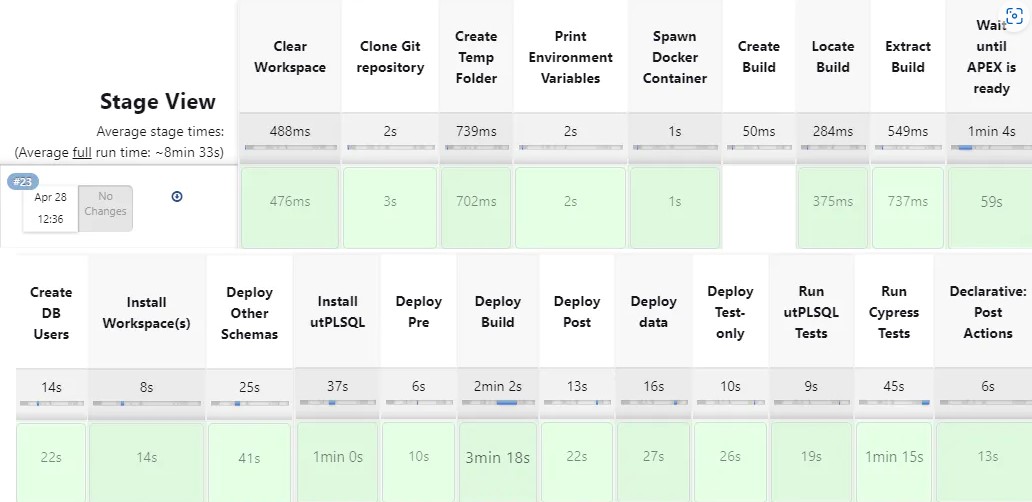
Following the build, the following artifacts are stored:

1. The zip file used to deploy the build
2. Video evidence of the APEX app working (taken from Cypress). This test is just logging in and out of the application, but the test case can be adapted to your tests

3. utPLSQL Tests (not pictured due to this bug in SQLcl 23.1) in JUnit XML file format
All steps are explained in the utils repository. However, to emphasize some key points:
This section hooks up the demonstration pipeline to the environment setup work you have recently completed.
1. Go to Jenkins > Dashboard > New Item
Item Name = Sample-Customers-CICD-Pipeline
Type = Pipeline
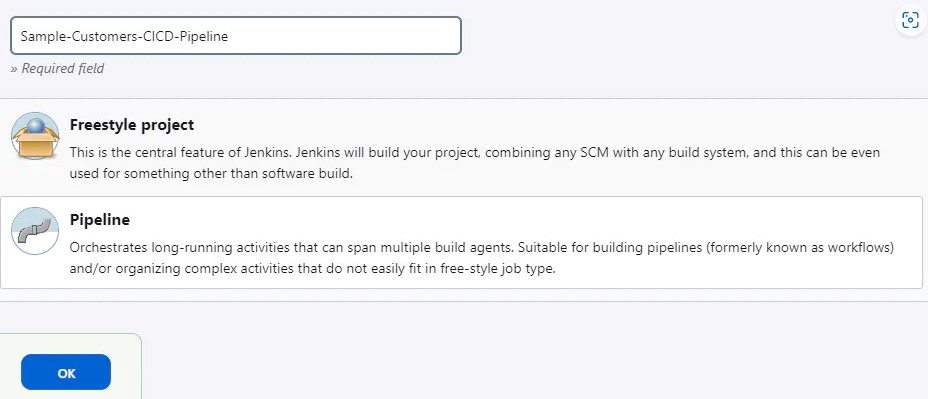
2. Click OK to create the pipeline
3. Copy the contents of pretius-pipeline.jenkinsfile to the Pipeline > Script
4. Click Save
5. Click Build Now
If all is well, the build will be complete as per the first picture in the Oracle APEX CI/CD in Action section of this article.
To adapt this to your project:
1. The folder structure must resemble the test repository pretius-apex-lifecycle-aligned-sample-customers
2. The artifacts must be exported through apexexport2git and zipped using apexgit2buildzip. Please also see the Suitability as an Approach section at the end of the article which highlights some issues as of SQLcl 23.1
3. The build zip must include the workspace and resemble the structure of sample_customers_0000.zip
4. Other_schemas, data, pre, post & cypress folders are optional
5. The pipeline above is manually triggered. You can modify this to trigger upon other events.
If your GitHub project is on a private repository, you’ll need to allow Jenkins to access it by following the steps below.
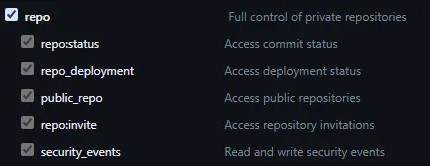
1. Create a GitHub Personal access token (classic) by following this guide. If you are using a private repo on GitHub for your CI/CD, you must complete this step
Note: you just need the repo scope.
2. Copy the token to clipboard, then go to Jenkins > Dashboard > Manage Jenkins > Manage Credentials > System > Global Credentials (unrestricted) > Add Credentials
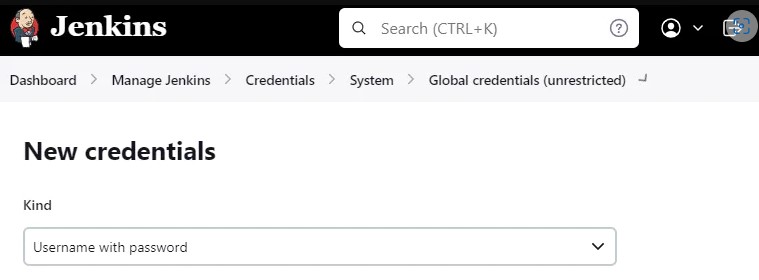
Username = your GitHub Username.
Password = Paste token from the clipboard.
1. Go to Jenkins > Dashboard > + New Item > Create a new pipeline, or copy the existing one
2. Paste in the contents of pretius-pipeline.jenkinsfile. There are two sections to modify to your requirements
| Name | Information | |
| Project Settings | This is for changing your Repository URL, Branch and Alias. The Alias is used by Cypress for accessing the Application URL | |
| Environment Specifics | Hardcode over the curly bracketed variables in this section if you want custom values. Otherwise, they are taken from the split files | |
Additionally, change the Jenkins Settings section if you require specific environment settings.
All exports/imports were performed using SQlcl 23.1. Using a previous version of SQLcl is not advisable.
To effectively implement the approach presented in this article, you’ll need to use the lb genschema -split command used in the apexexport2git script from the technical paper. If working with additional schemas, you must adapt this to the lb genschema -split -synonyms -grants command.
When following the method described in the Technical Paper, certain observations were made:
1. The general ordering of controller.xml was not consistent, with objects being referenced before they were created. This was also the case in Sample Customers. However, other projects were exported correctly without manual resolution. This has been logged as bug #35372250
2.This was more pronounced with the lb genschema -split -synonyms -grants command, with grants placed in inconsistent places. Let’s be clear about this with an example:
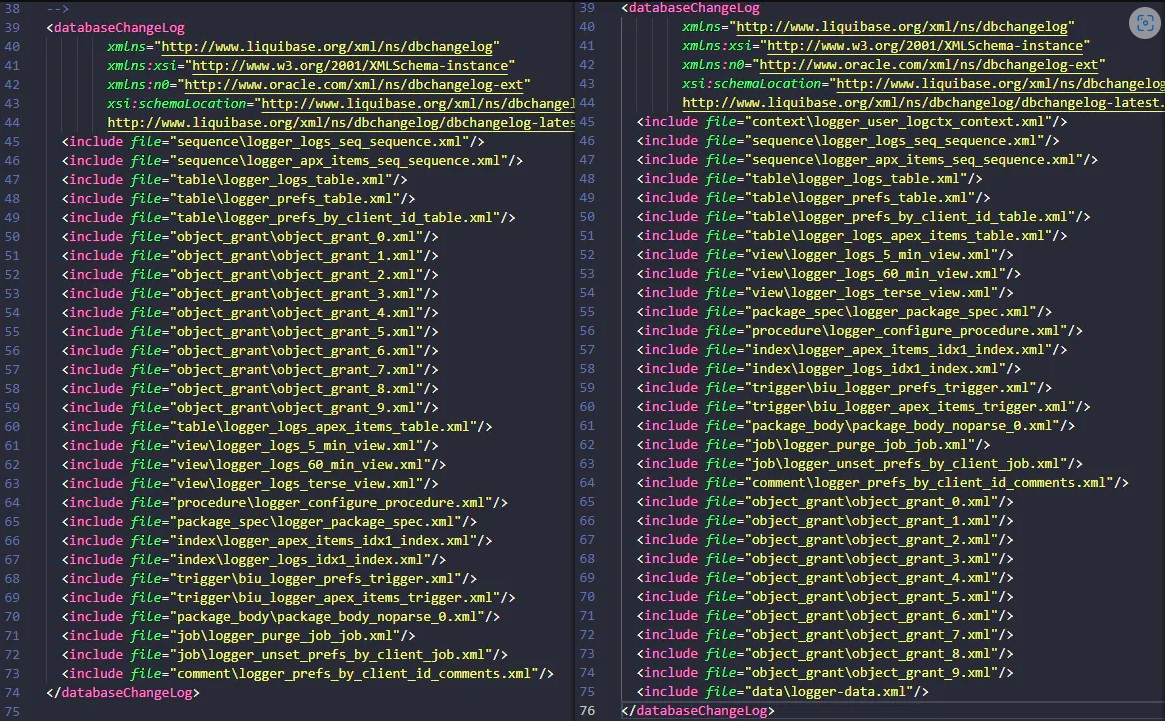
Left = As exported by lb genschema; Right = As left, however with manual resolution.
Regarding line numbers on the left, the issues here are:
3. Complex schemes such as ut3 from utPLSQL were impossible to export due to the numerous ordering issues. This is why the provided pipeline uses an alternative approach to download and install utPLSQL using the headerless method
4. Storage and Tablespace information were being emitted when specifically instructed not to emit. This causes lb update to error when specific named tablespaces cannot be located. This has been logged as bug #35372351
5. lb update removes blank lines, not only differing from the source but causing utPLSQL not to detect any tests to run. This has been logged as bug #35304127
6. Larger DB, i.e., controller.xml files containing 10k lines, take upwards of 4 hours to export with lb genschema
7. Some objects were emitted with parsing issues, however, they didn’t appear to cause a problem when importing for me

Hopefully, future versions of SQLcl will resolve the problems highlighted above. However for now the Build Manager has to manually resolve the issues in the generated changesets to enable the installation. This is why I’ve added the quote about the Build Manager, as multiple developers creating their builds in a Feature-Centric approach, for now, will certainly run into the above issues.
In addition, since APEX Applications cannot be imported in YAML nor is SQL merging supported, any merge conflicts requiring resolution will be problematic.
In the case of pretius-apex-lifecycle-aligned-sample-customers, manual attention was required to generate the changesets.
The bottom line is that this solution relies on SQLcl providing complete & ordered changesets & SQLcl 23.1 currently isn’t doing that. However, it’s still a useful approach to know for an APEX Developer, and the bugs will certainly get ironed out sooner or later. With this guide and the Technical Paper, you have everything you need to set things up.
If you have any questions, please contact me on Twitter (@Matt_Mulvaney) or via email (mmulvaney@pretius.com). Also, check out some of my other blog posts:


