When we are working on projects for our clients, we often face the problem of database schema migration. Each time we have to answer the same questions: In which script are the changes implemented by a teammate? Have the changes already been deployed or are they just waiting to be deployed? Has the quick change in the test environment been transferred to the development environment? Tools like Gradle and Flyway help us get the answers.
In this article, I would like to present how to migrate a database in a few simple steps. In the following example we will use:
- Oracle 12c database
- jdbc – interface for create database connection. Download link.
- Apache Maven – a tool for building projects (using it we will create a repository and install jdbc). Download link.
- Gradle – a tool for building projects. The tool is available under the Apache License 2.0. It allows you to create build scripts using domain language (DSL). Download link.
- Flyway Community Edition – database migration tool. Like Gradle, it is available under the Apache License 2.0. In the example below, we will use the Flyway functionality using the org.flywaydb.flyway plugin directly from the Gradle project. (Flyway installation will not be required).
- 3 sample database scripts:
- V1.1__TAB_EMPLOYEE – script responsible for creating the EMPLYEE table
- V1.2__SEQ_EMPLOYEE_ID script responsible for creating the SEQ_EMPLOYEE_ID sequence
- R__PKG_EMPLOYEE – script responsible for creating the PKG_EMPLOYEE package
More information on Gradle and Flyway can be found on the website:
- https://gradle.org/
- https://flywaydb.org/
Database migration with Gradle and Flyway
Download Apache Maven and jdbc. Create a repository using the command:
|
1
|
mvn install:install–file –Dfile=“<path>ojdbc8.jar” –DgroupId=“com.oracle” –DartifactId=“ojdbc8” –Dversion=“12.2.0.1.0” –Dpackaging=“jar” –DgeneratePom=“true”
|
Download Gradle and set the values of the GRADLE_HOME and Path system variables.
Create the Gradle project using the command:
|
1
|
gradle init
|
We choose the following project parameters:
- Type = basic
- DSL = groovy
- Project name = TEST
After building the project, you will notice that a new build.gradle file has been created. By editing it, add the ‘org.flywaydb.flyway’ plugin to project, define a database connection and basic migration parameters.
My build.gradle file looks like this:
|
1
2
3
4
5
6
7
8
9
10
11
12
13
14
15
16
17
18
19
20
21
22
23
|
plugins {
id “java”
id ‘org.flywaydb.flyway’ version ‘5.1.4’
} /*Plugins declaration*/
repositories {
mavenCentral()
mavenLocal()
} /*Repository declaration*/
dependencies {
compile (“com.oracle:ojdbc8:12.2.0.1.0”)
} /*jdbc dependency*/
flyway {
url = ‘jdbc:oracle:thin:@localhost:1521:oracle’ /* The jdbc url to use to connect to the database */
driver = ‘oracle.jdbc.driver.OracleDriver’ /* The fully qualified classname of the jdbc driver to use to connect to the database */
user = ‘test_user’ /* Database user */
password = <PASSWORD> /* The password to use to connect to the database */
locations = [‘filesystem:database’] /* Comma–separated list of locations to scan recursively for migrations.*/
sqlMigrationSuffixes = [‘.sql’, ‘.pck’, ‘.prc’, ‘.fnc’, ‘.trg’, ‘.tps’, ‘.jsp’] /* The file name prefix for repeatable SQL migrations. */
baselineOnMigrate = true /* Whether to automatically call baseline when migrate is executed against a non–empty schema with no metadata table */
} /*migration parameters*/
|
To the directory of the project add the ‘database’ folder where put all the database scripts (see the parameter locations in build.gradle).
The naming of individual scripts is very important. The appropriate name format allows you to distinguish the type of files and the order in which they are uploaded:
V1__TAB_EMPLOYEES
- V – Migration type: versioned,
- 1.1 – version number
- __ – separator
- TAB_EMPLOYEES – name
R__PKG_EMPLOYEE
- R – Migration type: repeatable
- __ – separator
- PKG_EMPLOYEE – name
Begin the database migration using the Flyway functionality. At the beginning let’s check the current state of the migration process using the command:
|
1
|
gradle flywayInfo
|
Result:
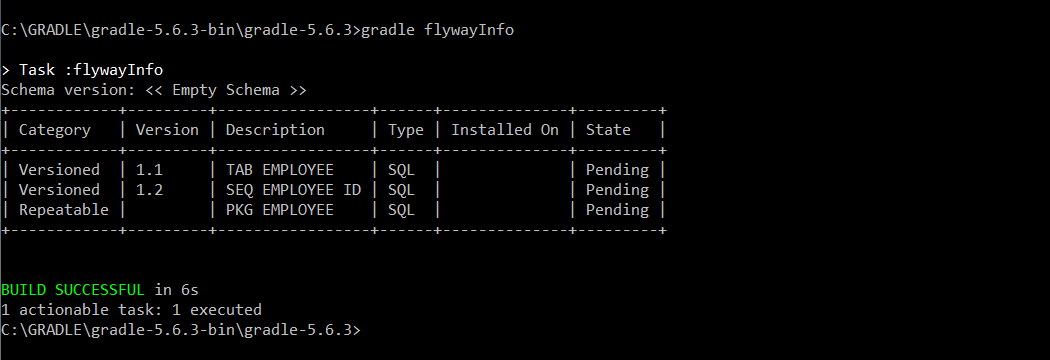
Currently 3 scripts are waiting for migration. Number of version is responsible for the order which scripts will run. The repeatable file is the package code file. Changes in this file are checked using the checksum stored in the flyway_scheme_history table which will be created in our schema during the first migration.
Run migration using the command:
|
1
|
gradle flywayMigrate
|
Then check the process results using the already known gradlew flywayInfo command.
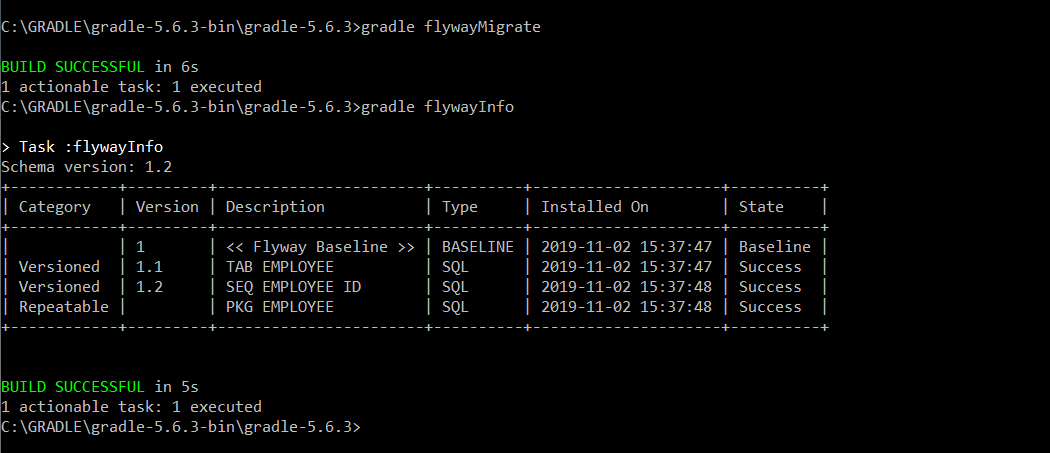
The migration was successful.
Oracle APEX application migration with Gradle
Above, I answered the basic questions about the migration problem. I presented capabilities of the Gradle and Flyway tools and with their help I prepared the migration process of several database scripts. However, let’s not forget about Oracle APEX applications. We can also migrate them using Gradle. All we have to do is use two commands export_apex and import_apex.
I presented an example configuration of the build.gradle file. Reminder. Build.gradle is located in the main project directory and describes its compilation. It is based on DSL. The file defines tasks responsible for performing specific actions (implemented in Groovy or Kotlin). We will implement actions like apex export and import by creating our own tasks. Let’s do it!
In the build.gradle file we will implement a sample task that will display “My first task!” on the screen.
|
1
2
3
|
task my_first_task {
println(“My first task!”);
}
|
To run the task we will use the command:
|
1
|
gradle my_first_task
|
Result:

Exporting Oracle APEX applications can be done in several different ways. One of them is to use the SQLcl command according to the following example:
|
1
|
apex export 100 —application id 100 export
|
Create a file export.sql containing the above command. Then in the build.gradle file define a new task export_apex according to the following example:
|
1
2
3
|
task export_apex(type:Exec){
commandLine ‘sql’, ‘test_user/<PASSWORD>@localhost:1521/oracle’, ‘@export.sql’
}
|
Tasks in Gradle have their own types that allow the use of specific methods. More about the tasks and their types can be found on the website: https://docs.gradle.org/
Start task using the command:
|
1
|
gradle export_apex
|
I’ve just exported Oracle APEX application. We can also import it using tasks. Example below:
|
1
2
3
|
task my_import_task(type:Exec){
commandLine ‘sql’, “test_user/<PASSWORD>@localhost:1521/oracle”, “@f100.sql”
}
|
Start task using the command:
|
1
|
gradle import_apex
|
Summary
Database migration is not the easiest thing to do. We must be sure that the scripts have been installed and the consistency of the database schemas has been preserved in all environments. In this article, I have presented a short guide on how to automate the migration process using Gradle and Flyway. I showed how to run and verify the migration process using a few simple commands. Then, I introduced you to other Gradle functionalities that allow you to migrate Oracle APEX applications using only one command. Based on my own experience, I can say that working with these tools may seem difficult at first, but over time everyone appreciates their use.