
My first article served as an introduction to the platform and an OutSystems tutorial for creating a simple CRM application using the platform. In the second one – OutSystems application development: First steps – I discussed the concept of the application. I also showed you how to develop pages with widgets. I also showed how to build a database, define entities and their attributes, and I mentioned a few words about local variables and screen actions. In this blog post, I will focus on application logic.
I described what a local variable is in the previous entry, using the test application as an example. Local variables will be the most common type of variables in your applications. However, because of their characteristics, they are not suitable for some tasks. In my example, I showed the use of a local variable to pass the identifier of the store that the user would like to display.
Local variables work only within the page they were created on. The data contained in them is available until the user goes to another page of the application. So, their purpose is to temporarily store the information. But what if we want to store data with a range that extends beyond the borders of a single page? This is what so-called client variables are for.
A client variable is a kind of variable that’s stored in the user’s browser. The content of the variable is being stored for as long as the user is logged in. Even if the browser is closed without logging out, the information in the variable won’t be lost. This results in two very important things:
Since the activities of my made-up publisher (you can read more about the basic assumptions I made in my first article) cover two regions, France and the United States, I decided to introduce a division between them.
Selecting the FR or US zone from the drop-down list you can see at the top right of the screen (as in the image below) will filter the information displayed to the user, limiting it to data associated with the zone they selected.
Since that selection will most likely be the same for the entire time the user remains logged in, regardless of how many pages they are working on, using a local variable would have a major drawback. The information stored in the local variable disappears the moment the user leaves the page, so navigating through several pages would cause the local variables to revert to their default values each time the application changed pages. This, in turn, would force the user to reselect the zone they want to work in each time they move to a new page.
There’s also another drawback: creating a local variable for the same task on each page adds unnecessary work for the developer.
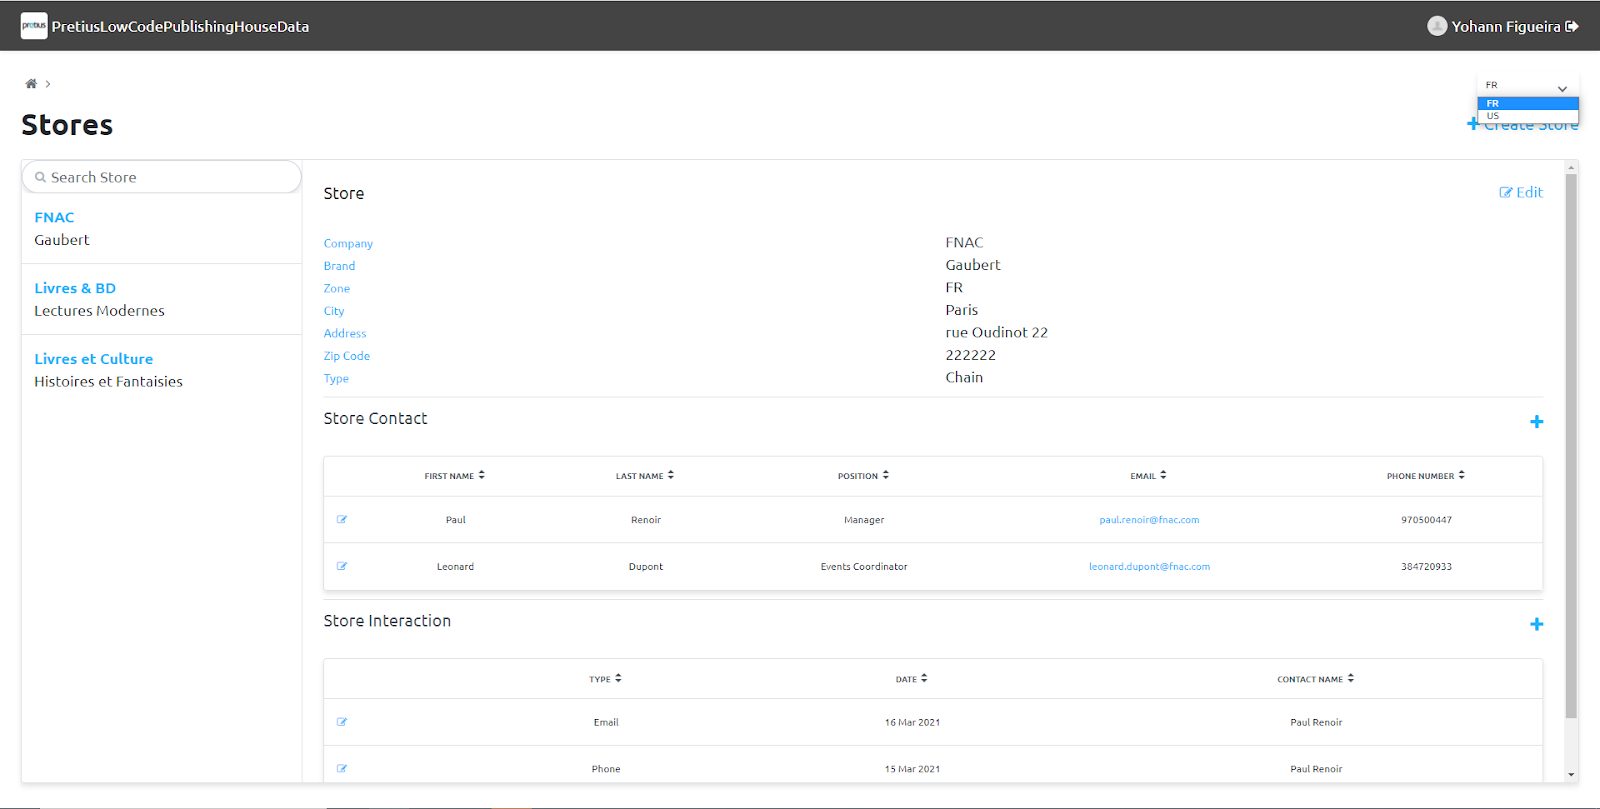
The region selection list.
In this situation, it’s useful to use a client variable that allows the app to remember the zone selection made by the user. In order to create a client variable, go to the Data tab in the right panel, locate the Client Variables folder, click the right mouse button, and select Add Client Variable. Now, all that remains is setting the variable’s data type, and naming it in properties. In the case of my app, I also specified the default value of my variable as FR.

Creating a Client Variable.
With the variable ready, all that remains is to use it in our aggregate filters – for example, in the aggregate that calls the partner list. This way, only the list of partners located in the fixed zone will be recalled.
Using the Client Variable in the aggregate.
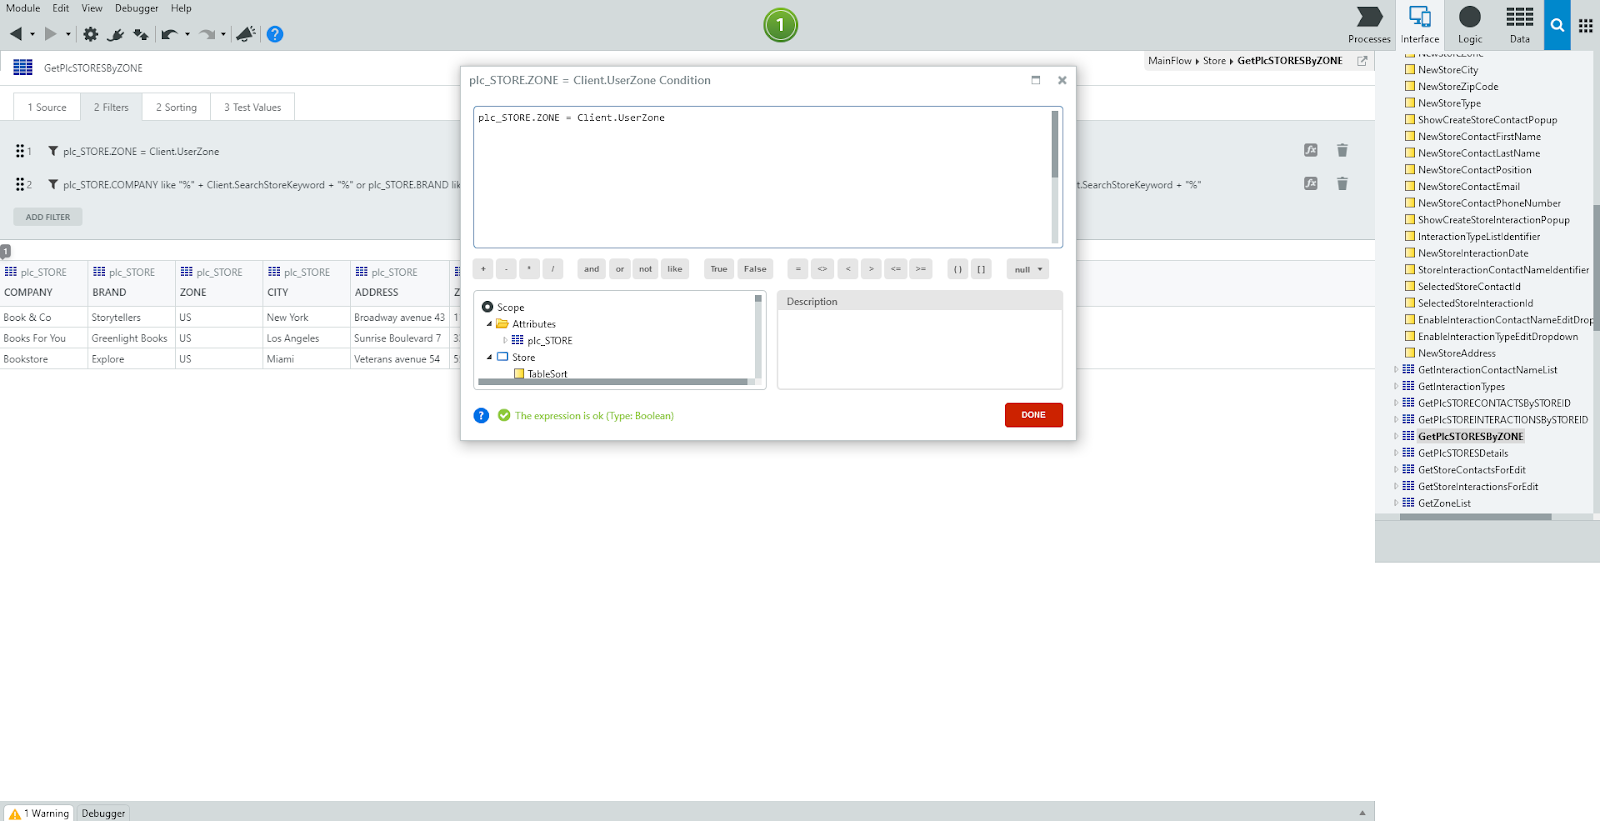
Now you’ll have to create the logic that changes the content of the variable. You’ll need a logic scheme that’ll assign a new value to the client variable whenever the Assign element is used. This logic will run each time you change the zone selection from the dropdown list. The list is built based on a so-called Static Entity. It is an entity in which the records are permanent – editing them is possible only from the IDE level. Each static entity has four attributes by default: identifier, label, order, and is_active. All default attributes can be modified and new ones can be added. In my static entity, I left only the identifier and label attributes, and created two records with labels US and FR.
You need to assign the value to the variable using a conditional statement. The dropdown list returns the value of the record’s identifier. Since there are only two items in the static entity and more won’t appear, you can define the conditional instruction based on the identifier value returned by the selected list item. Conditional statements in OutSystems start with the keyword if followed by a parenthesis defining the condition, the event when the condition is met, and the event when the condition is not met, separated by commas according to the following formula:
if( condition , true , false )
The condition you need to set is simple: checking if the identifier value returned from the list is equal to 1 – which corresponds to the record identifier from the label FR in the static entity. If the condition is true, assign the value FR to the variable, and since there are only two zones to choose from, in case the condition is false there’s only one value left to assign to the variable (US).
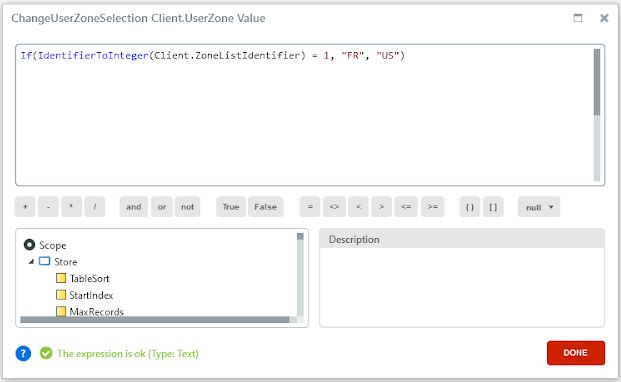
The ‘if’ instruction in OutSystems.
After assigning the new value to the variable, you’ll need to refresh the aggregate that brings up the list of stores from the database to include the new filter. You can do this by using the Refresh Element and selecting the correct aggregate. The full logic of the process is shown in the image below.
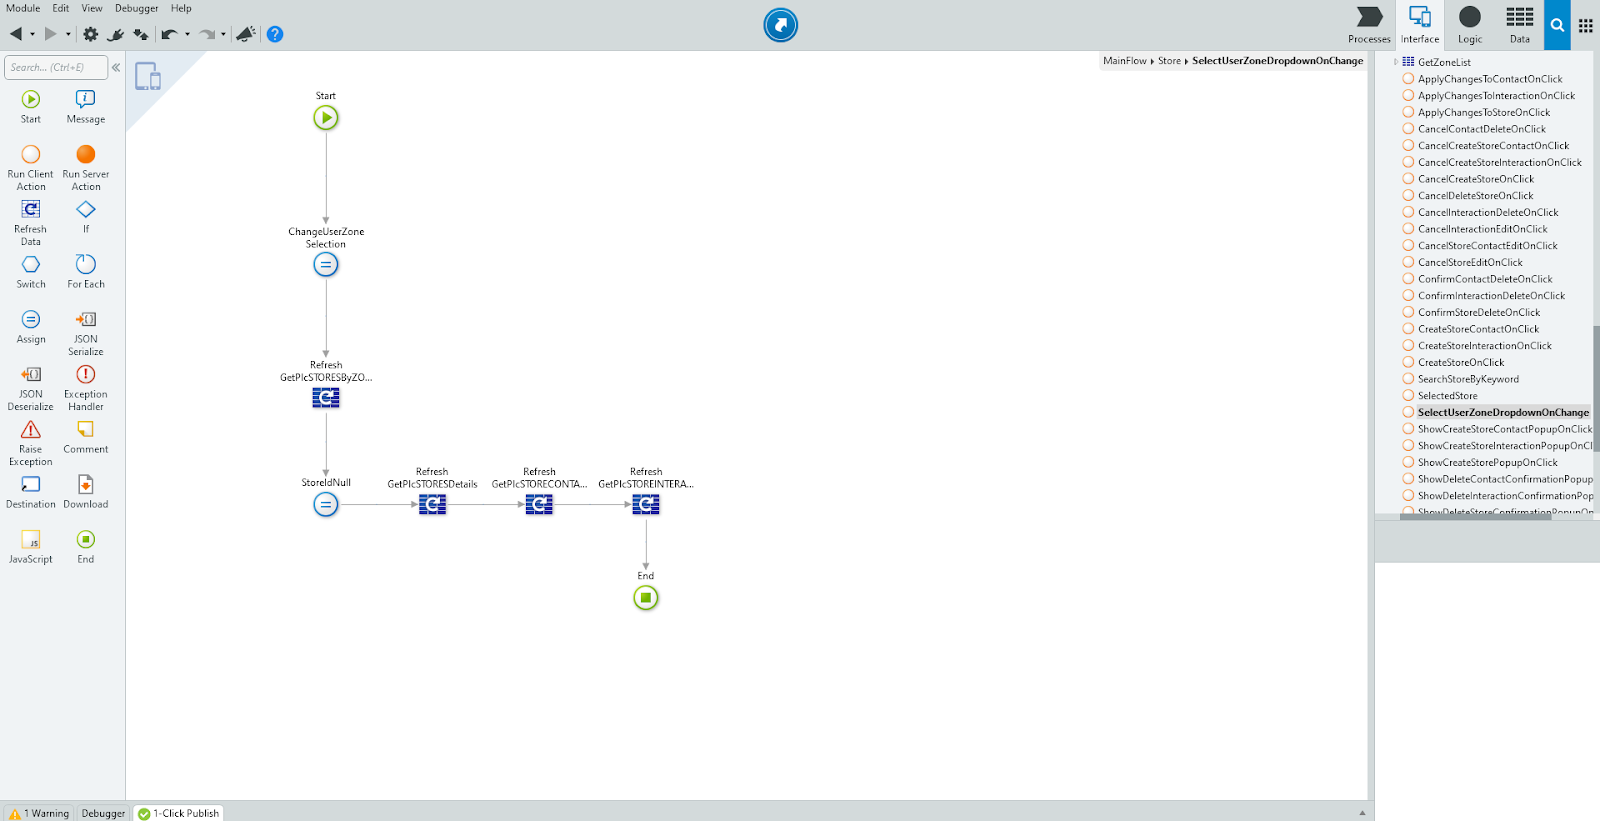
Assigning a new region to the Client Variable and reloading the page content.
The refresh of the other aggregates running on the page is also included in this logic. Skipping this step would cause the left column of the Master Detail element (discussed in the previous post) to change the list of stores to those in the selected zone when the zone is changed. However, the right column of the Master Detail element would still display the old information. This information is selected based on the partner identifier stored in the local variable. So, in order to reset the content of the page, you need to assign a null value to this local variable. That’s what the additional element in the logic scheme – Assign – is for. It’s used to reset the local variable to a null value using the built-in NullIdentifier() function. Null(…) type functions have been created in OutSystems for each data type. To assign them to a variable, find them in the Built-in Functions -> Data Conversion folder, which is located in the data tree in the expression window.

Null values and in-built functions in OutSystems.
After setting the local variable to null, you just need to refresh the dependent aggregates and the page will work as desired.
Users already have access to the data through the Master Detail widget and tables set up in it. You can enable data editing by creating forms in a popup dialog. I used the Popup widget, and the Form widget inside it, which is a region that’ll allow the user to interact with the data. In it, I have prepared the fields for making changes.
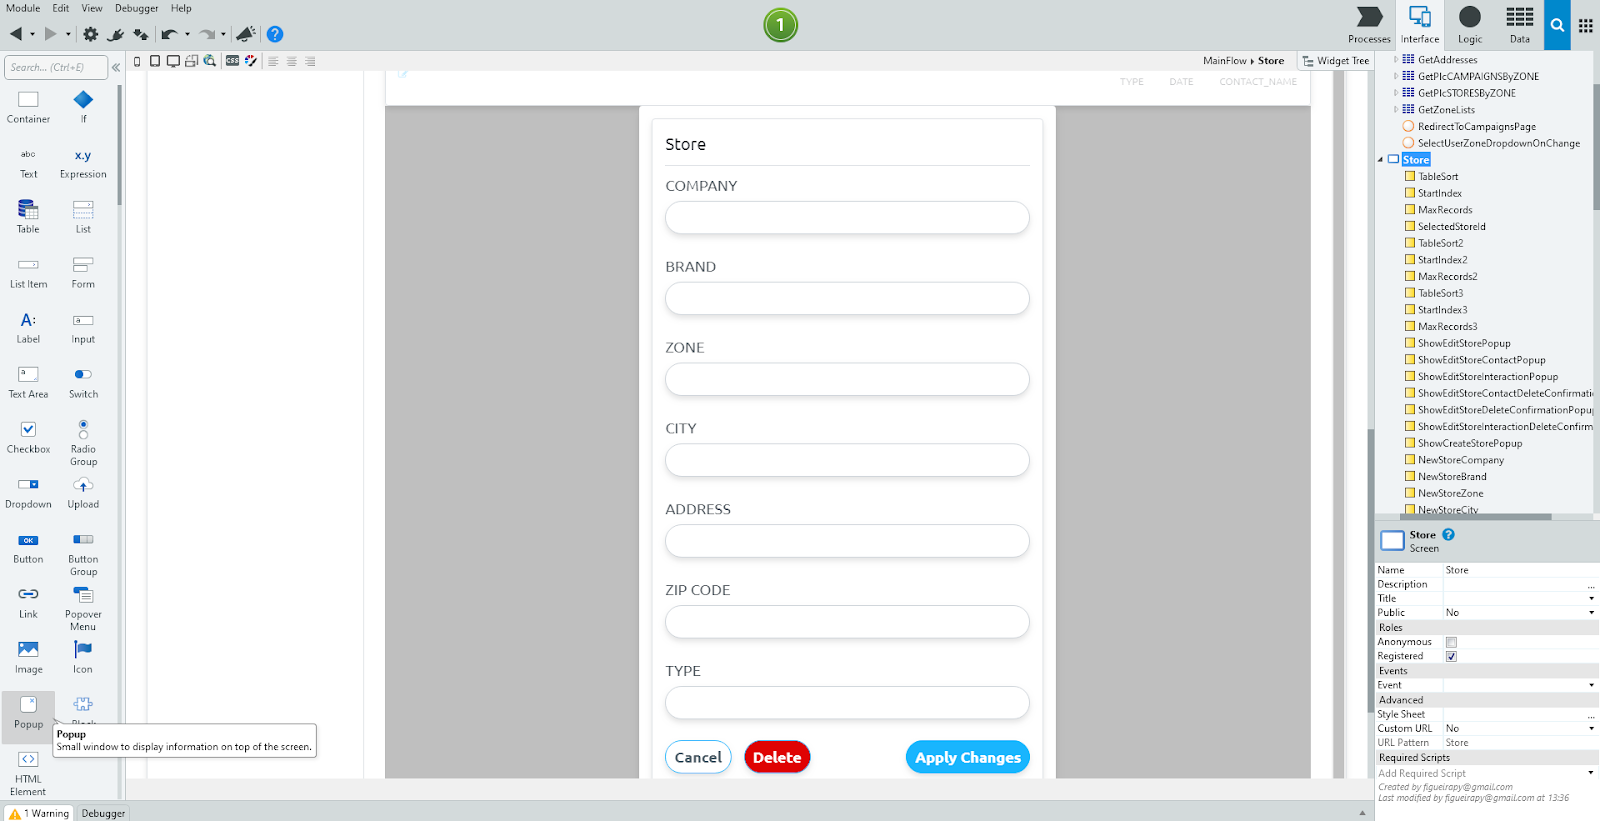
Creating the window.
Using widgets that give the user the ability to manipulate data, such as Input or Dropdown, requires indicating a variable where the user-entered value will be stored in their properties. If I was preparing these fields for entering new items in entities, I would assign a separate local variable to each field. When editing existing data, I would choose where that data is already stored – its position in the aggregates that invoked it.

Assigning a variable to store a value entered by the user
Due to the nature of the Popup widget that’s displayed above the rest of the page, you still need to define when it should be visible. In the widget properties, there is a Show Popup item. It needs information from the boolean category, where visibility can be defined. The assigned values can be fixed values of True and False, or defined variables with data type boolean. This is another example of using a local variable. You create a local variable of the boolean type, which has a default value False and then set it in the Show Popup position of the widget. Now, all that remains is to create a screen action that will change the local variable to True at the desired moment and display the window to the user.
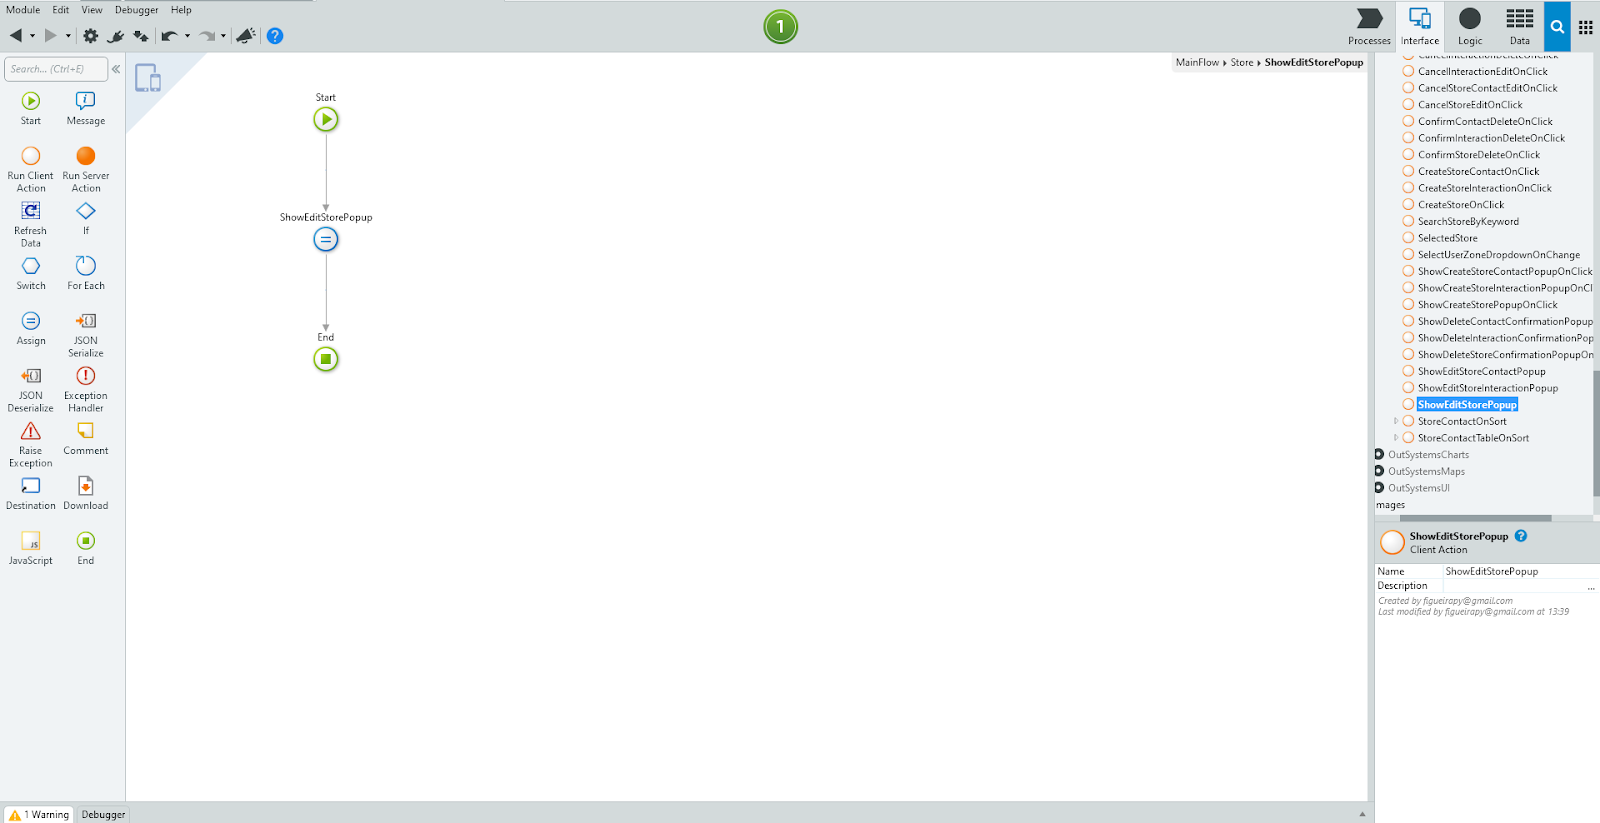
Setting the visibility of the editing window.
Screen Action is a type of logic that I have already described a couple of times. This is the logic working on the page level, but it can’t be used to manage the database. For this purpose, the Server Actions are used. There are some dependencies between them, based on mutual calling – screen actions can call server actions or other screen actions in their logic; server actions on the other hand can call other server actions, which you can use to create a complicated logic. It’s worth mentioning that there is also a type of logic called Client Action – it works on the application level and can invoke server actions too. However, I didn’t use this type of logic in my example application.
You can use the relationship between screen actions and server actions in the process of entering new data. For example, in my app, I used screen actions to make sure that the entered data is consistent with the assumptions – that entered values have a correct data type and that required positions are filled. If these conditions are met, the server action is activated, which contains the logic for entering the data into the database. The Message element can be used to confirm that the new data was entered into the database or to inform about a failure.
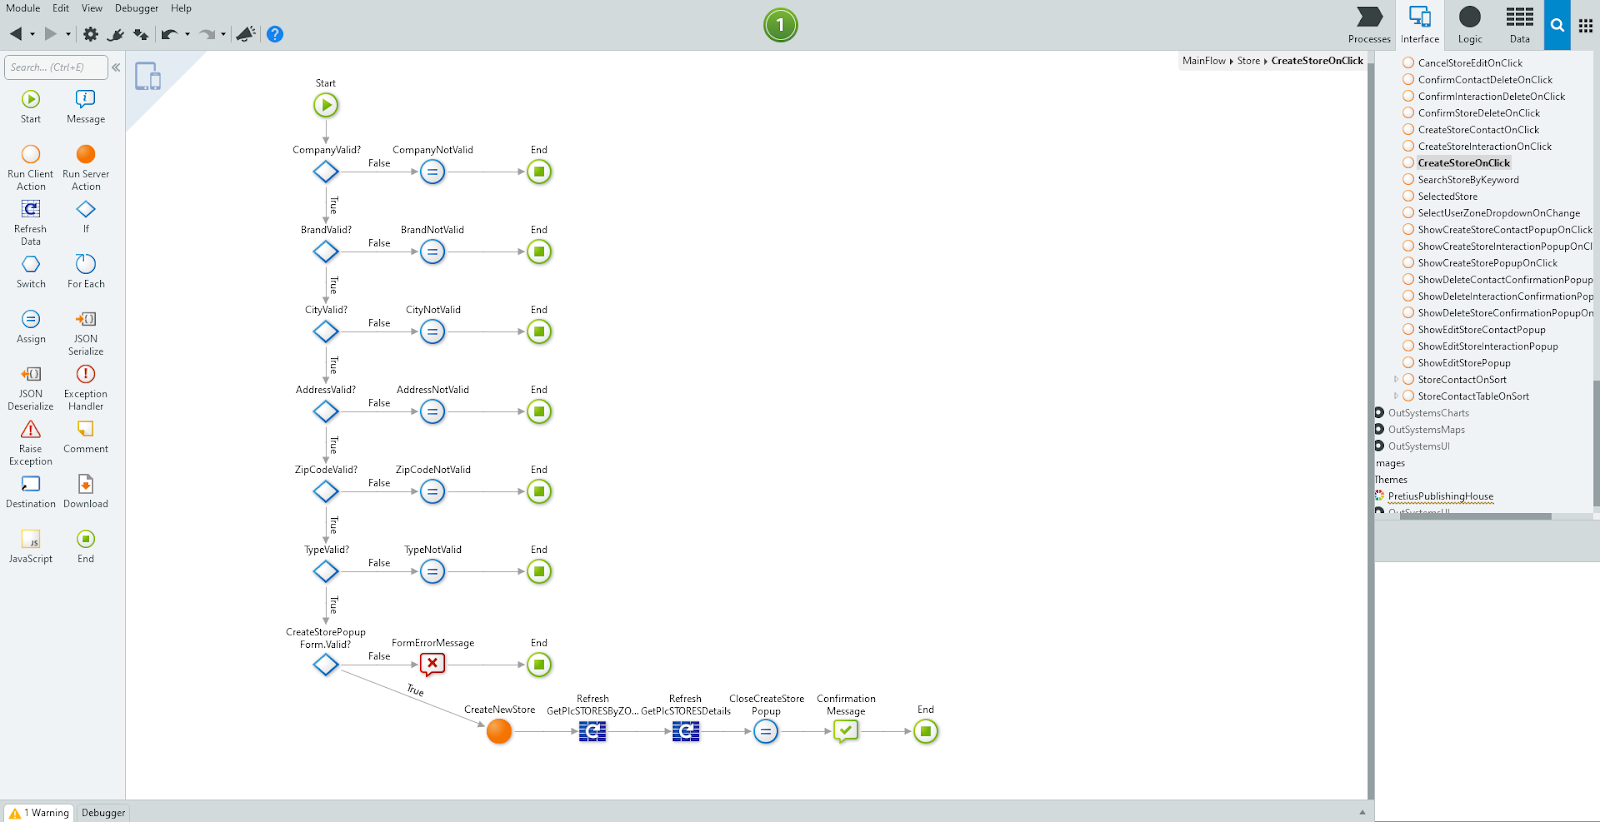
Screen Action to check the correctness of the entered data and invoke Server Action to Insert.
To validate the entered data, you can use the Valid function created by default with Form elements and data editing widgets such as Input. This function checks the conditions discussed above. It’s a function that returns a boolean value and is available in the If element of the logic diagram. Together with the Valid function, a ValidationMessage function is also created to explain to the user what the source of the error is, in case a false value is returned.
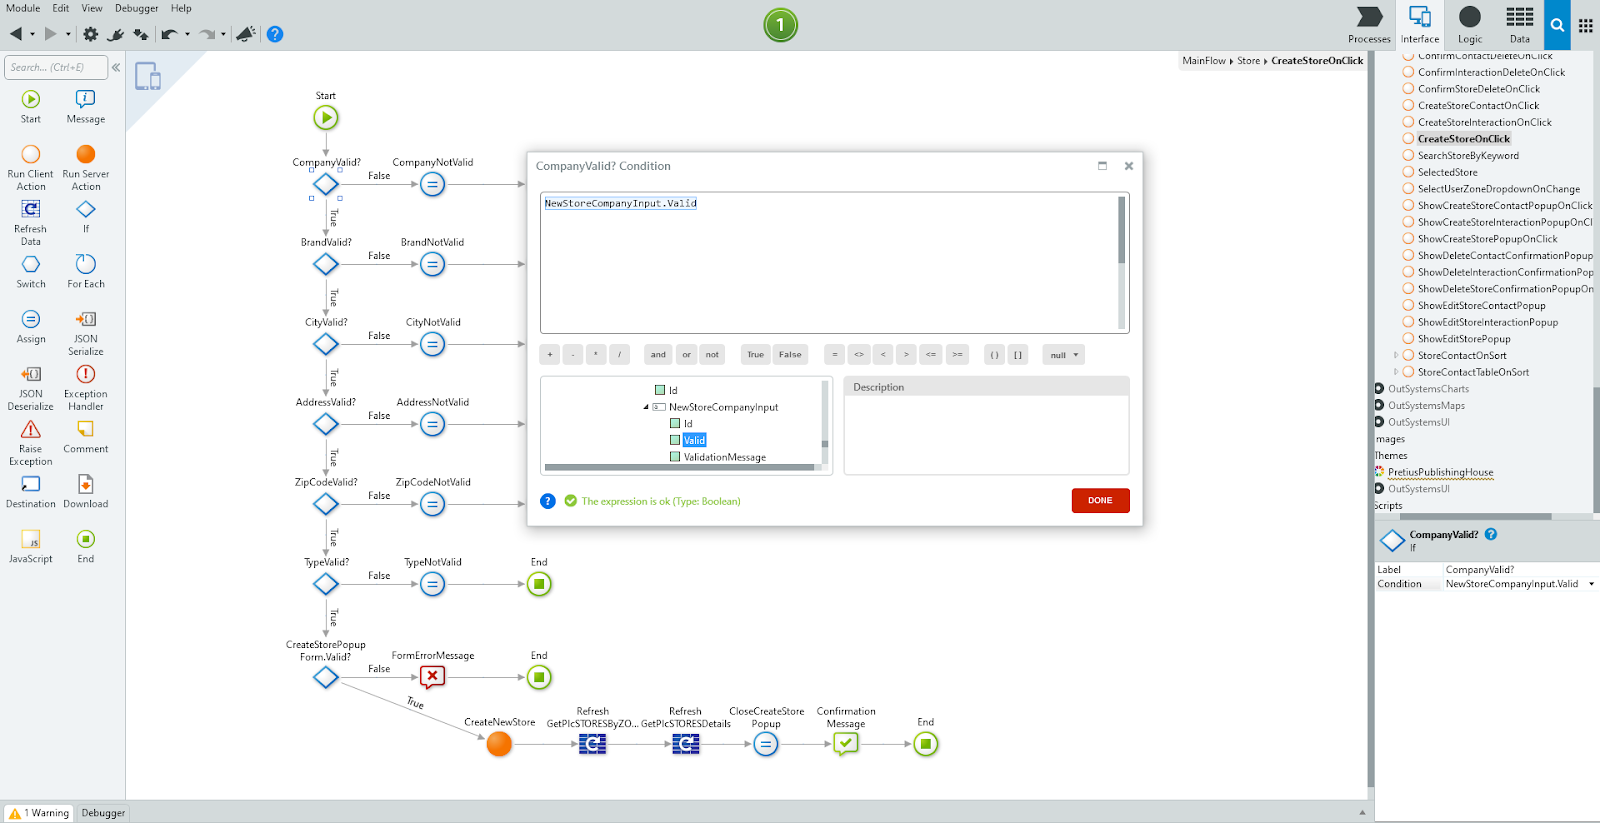
Built-in validation function.
Once the data is validated, the server action is invoked, inserting the data into the database. In my application, I did this by using the SQL element to write my own instructions. When the server action reaches its End element, the action automatically returns to the screen action. There it remains to refresh the aggregates affected by the data change and then close the dialog window.
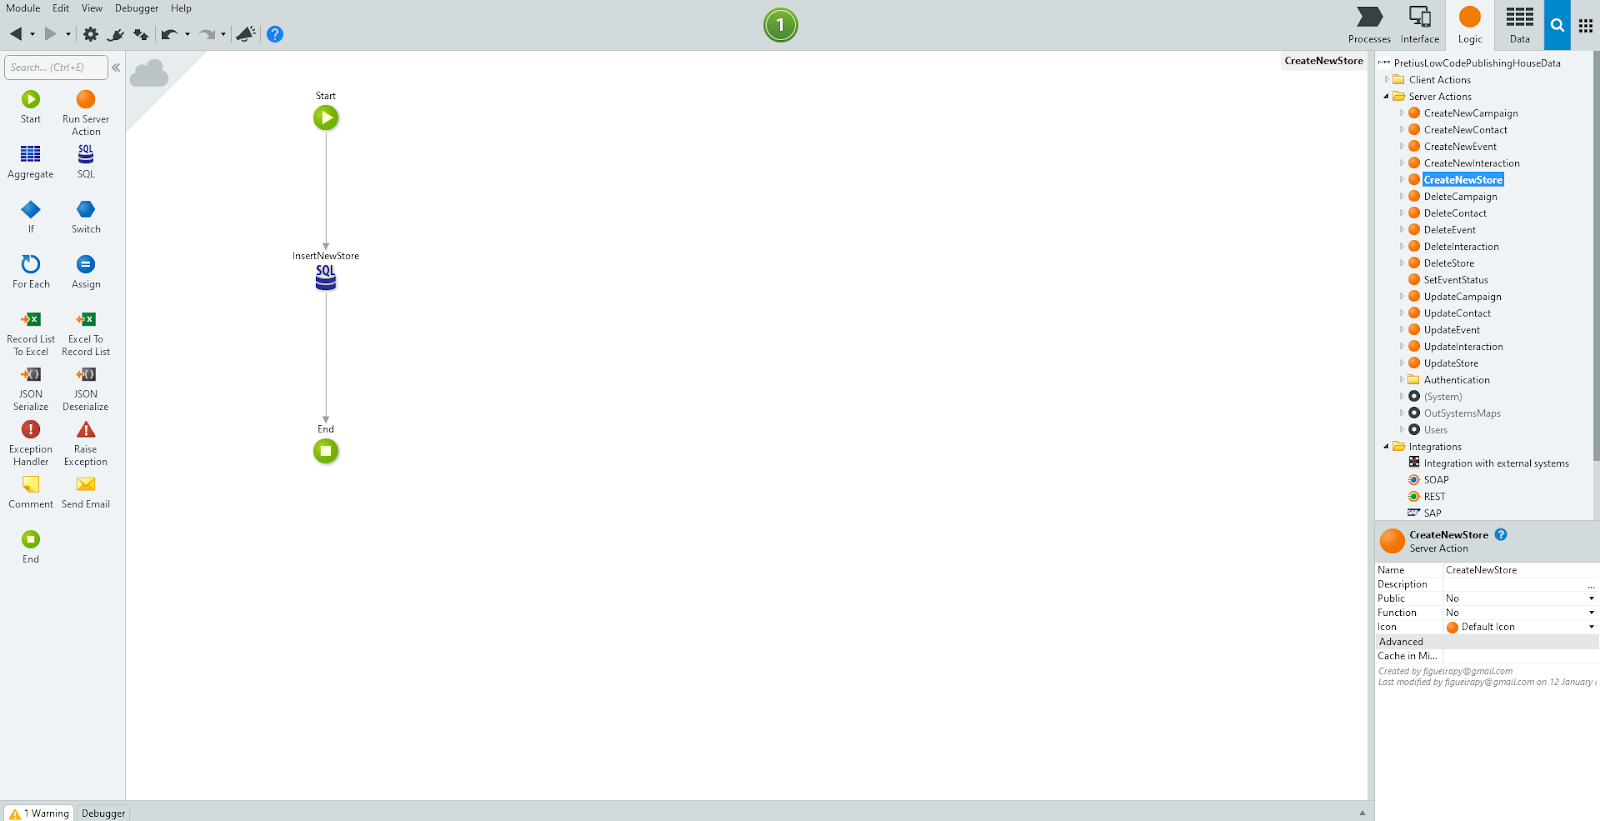
Server Action to insert new data into the table.
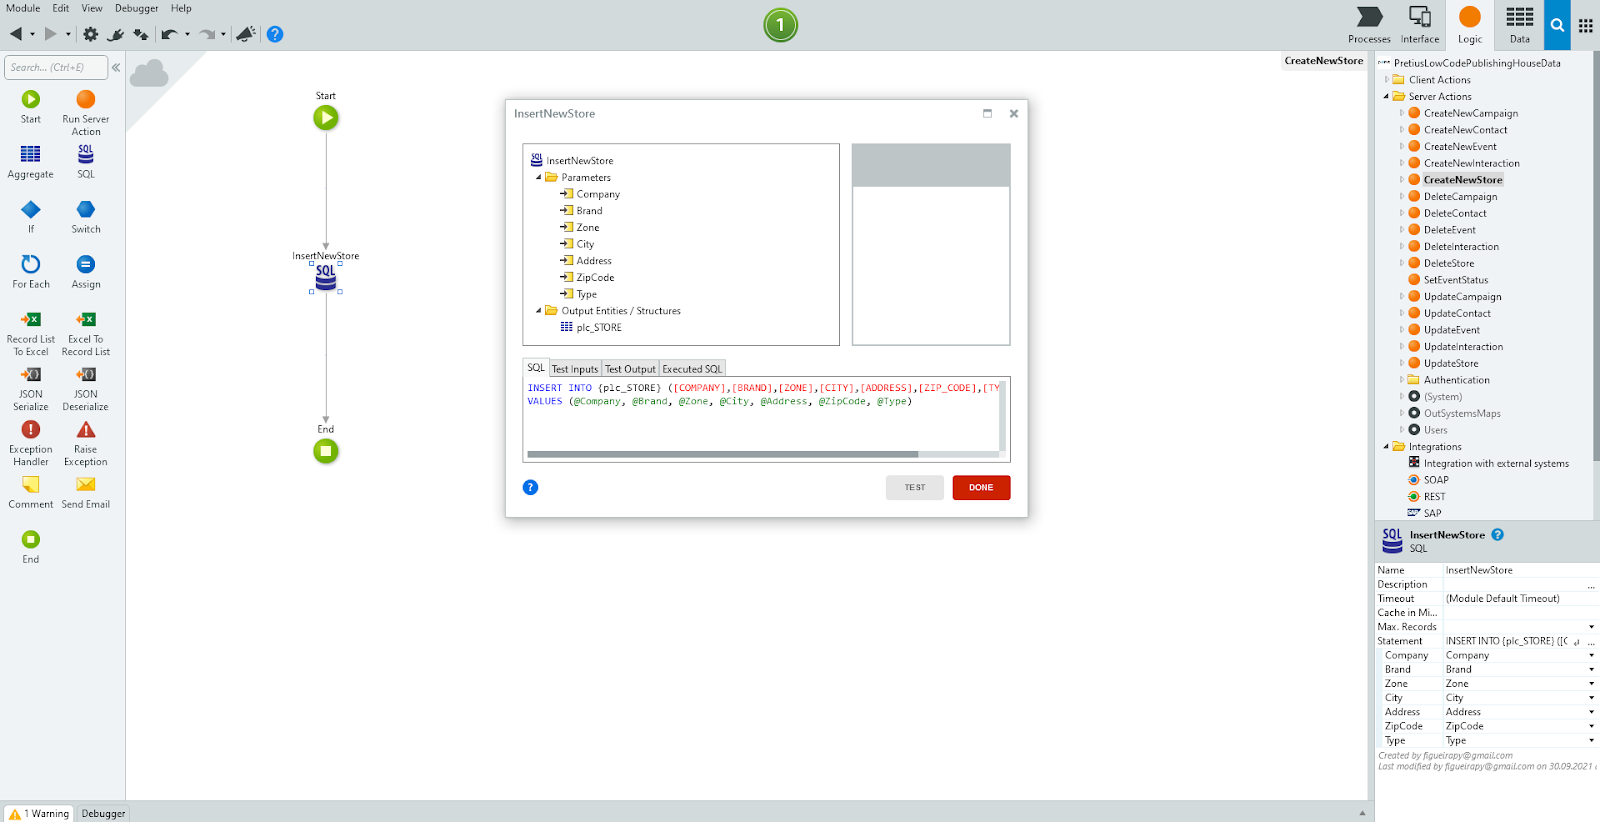
Writing your own SQL code allows you to define more complex queries. For example, you can use subqueries. The simplest insert, update and delete operations (and their combinations) are created with each new entity in the database. You can use them by dragging them from the Data tab under the selected entity. So, the lack of SQL knowledge is not an obstacle to building simple logic. Personally, I preferred to write my own SQL code, even for the simplest operations, because I found this to be a good opportunity to learn how to use the SQL Tool in the logic schema. You need to remember a couple of rules:
The data is passed to the SQL Tool from the server action level. Because server actions are not defined at the application page level, they don’t have direct access to the data. When it comes to the server actions, the data must be passed to them from the screen action level, which invokes them. The complete procedure is as follows:
Using SQL in OutSystems.
When using the SQL Tool, you should also define its output. The output can take various forms, from entities to so-called ‘Structures’. These take the form of a table, consisting of several attributes, each of which can have a different data type, although they are not themselves a form of variables like a local variable or client variable. In the case of the insert statement, I set as output the entity into which the data is to be inserted.
One more tool available in server actions that you can use is For Each which allows you to perform logic in a loop. My made-up publishing house organizes promotional campaigns for its publications. The partners take part in these, creating events lasting from one to several days. Each event has a status: Upcoming, In Progress, or Finished. I decided to use a loop to perform the status change automatically.

Loops in OutSystems.
First, I needed to define the range of data for which the logic was to be executed. I created an aggregate to call all data from the entity plc_EVENTS. In the For Each element, this allows you to reach for the list of items from this aggregate and therefore define which data should be iterated over.
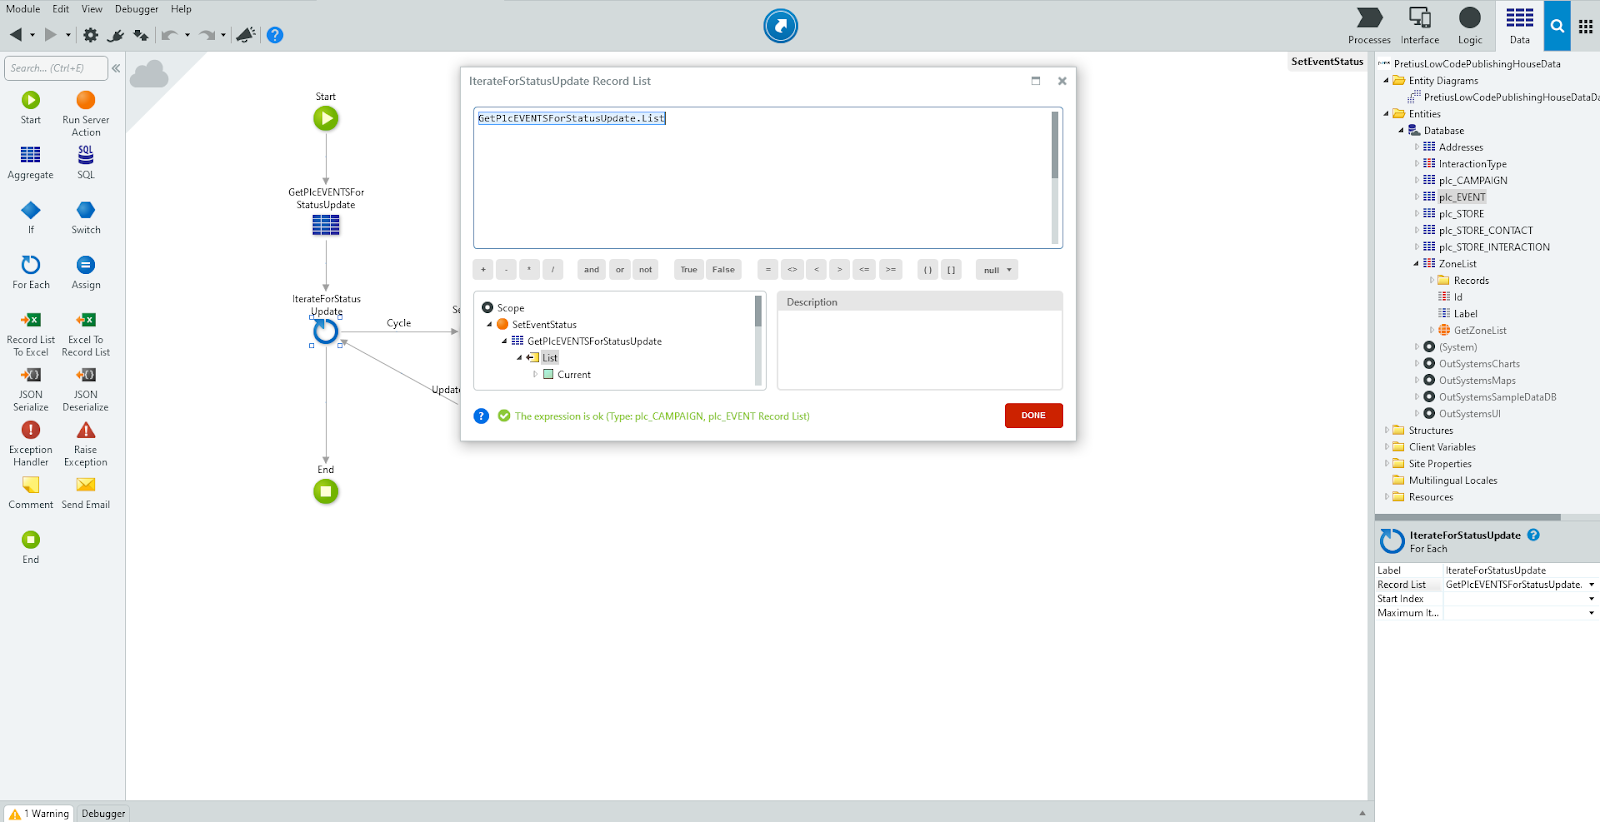
Selecting a list of items to perform logic in a loop.
In the Assign element, I defined an if statement. Its result was to select one of three statuses for the current item from the list. It compared the event date with the result of the CurrDate() function, which returned the date of the user device. If the event date was earlier than the current date, the status Upcoming was assigned, if both dates are the same the status In Progress was assigned, and otherwise, the status Finished was assigned. The status for the list item under consideration remains to be entered into the database – this is the responsibility of the SQL Tool. After it finishes, the logic returns to the beginning of the loop.
It took me very little time to master OutSystems platform to the level that allows me to freely navigate through the different levels of the application, define the logic, and understand how the tools available for building the application work. The development environment is very intuitive. What I have discussed is only the beginning of what there is to know about OutSystems development. There are many features and aspects of the platform I have not yet discovered, but the ease with which I acquire knowledge and the speed of progress only motivates me to continue learning. And the best thing about it – you don’t really have to do any courses or boot camps. Try it out and see for yourself – you see how quickly you can start developing great applications! And if you find something interesting that I haven’t menitoned in my articles so far, be sure to write me at yfigueira@pretius.com – we’ll share thoughts and experiences.


