

In today’s dynamic development environment, where security plays a key role, integrating an identity management system with the front-end layer – the part of the solution the users see and interact with – is becoming an integral part of IT projects. You need a robust IAM system with powerful capabilities to ensure the application’s security and comfort.
One solution that has gained recognition in the programming world is Keycloak – an open-source identity and access management software. It not only provides a ready-made set of comprehensive tools to handle identity and access management but also allows for flexible configuration in accordance with the individual needs of the project.
In this article, we will show you how to integrate Keycloak with the front-end layer of an application based on Angular. We’ll analyze the steps necessary to successfully integrate the solution with your front end and discuss the benefits of this connection (including a look at the features available in the newest versions of Keycloak). We’ll also offer tips on configuration and practical implementation examples, focusing on guiding developers who want to effectively secure their applications while providing users with a smooth and user-friendly experience.
Keycloak is a powerful open-source solution that provides features related to authentication, authorization, federated identity, session management, and many other advanced concepts, making it an ideal choice for projects requiring a secure and integrated environment. That’s why, at Pretius, we recommend Keycloak to many of our clients. And no, we’re not being paid by the Keycloak team (which would be hard since it’s an open-source solution) – we just find it extremely useful.
There are many ways to quickly and easily set Keycloak up, which should satisfy the needs of various users. The platform supports numerous protocol standards such as OpenID Connect, OAuth 2.0 and SAML 2.0, making it compatible with various applications. This approach allows you to offer the SSO (Single Sign-On) functionality regardless of your solution’s architecture.
Keycloak is also containerized, making it a perfect solution for container-based environments such as Docker or Kubernetes. This is evidenced by many features of this platform, including:
Thanks to these functions, Keycloak is one of the most popular Identity and Access Management (IAM) solutions. To become more familiar with the topic of Keycloak and understand in detail the value of its use, I encourage you to read the Keycloak SSO – advantages of Single Sign-On and a ready-made access management system article (including the free Keycloak Cost Estimation Cheat Sheet) published on the Pretius blog. You can also check out our comprehensive Okta vs Keycloak comparison.
To demonstrate the advantages of using Keycloak, we will set up a server and integrate it with a simple front-end application written in Angular version 17.
You’ll need to configure Keycloak. It’s a relatively simple process thanks to the documentation that guides the user step by step through the next steps, so we won’t show you how to do this in this article. Our server’s only purpose will be to demonstrate the topics discussed in the article, so we don’t need anything more.
We will be working with a front-end application created in Angular 17, so let’s start by presenting the libraries that allow you to use Keycloak. We’ve employed two:
💀 Still working with the legacy AngularJS framework? Find out how to upgrade your apps from AngularJS to the new Angular
For the purpose of this article, we need to have the ability to log out and be redirected to a dedicated log-out page. Also, our application needs to implement support for the basic functionalities provided by Keycloak. We distinguished the following scenarios that should be implemented:
Let’s start by downloading the Keycloak image for Docker from the official website. To run Keycloak in your local environment, simply use the following command:
docker run -p 8080:8080 -e KEYCLOAK_ADMIN=admin -e KEYCLOAK_ADMIN_PASSWORD=admin quay.io/keycloak/keycloak:23.0.4 start-dev
After executing this command, you can go to the Keycloak panel at http://localhost:8080. To perform the required configuration, follow the guidelines on the official Keycloak website. After making all the changes, just leave the Keycloak process running in the console to enable communication with it.
The realm we created for this tutorial was called Pretius-Keycloak-FE-Integration, while the selected client id was keycloak-angular-integration-tutorial.
You must also create a new Angular project for your front-end application using the Angular 17 framework. To do this, open the console and go to the directory where you want to create the project. Then enter the ng new command and the name of our project as presented below:
ng new keycloak-fe-integration
You will then be asked for information about features to include in the initial design. Select options depending on your needs and preferences, or accept the default values.
In our project, we use these libraries in the following versions:
To download these libraries, enter the following command in the terminal in the project folder:
npm install keycloak-js@22 keycloak-angular@15 --save
After installing the necessary npm packages and other dependencies required by Angular, you will be greeted by the view of your workspace with a root directory called keycloak-fe-integration (if you used the same name we did). The next step will be to replace the existing file structure with the one indicated below:
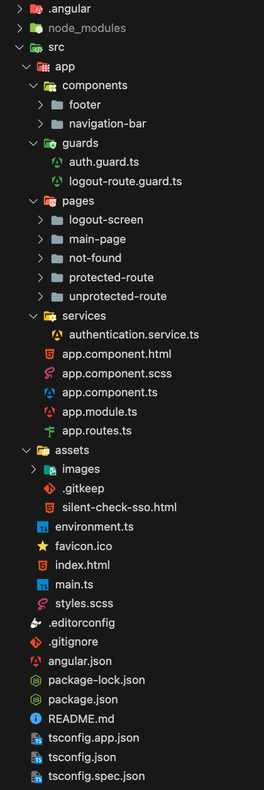
As you can see, all pages have been divided depending on their purpose in the pages folder. Before discussing the actual logic, let’s start by presenting the contents of the pages folder, which contains the components representing pages within the application. The main page of the application to which the user is redirected after the first launch is the main-page. So, let’s look at the logic behind it:
@Component({
  selector: 'app-main-page',
  standalone: true,
  imports: [NgIf],
  styleUrl: './main-page.component.scss',
  template: `<div class="content">
                <span class="title">Main page</span>
             </div>
             <a
                *ngIf="!isLoggedIn"
                role="button"
                class="button"
                (click)="redirectToLoginPage()"
                >
              Log In
              </a>`,
})
export class MainPageComponent {
  get isLoggedIn(): boolean {
    return this.authenticationService.isLoggedIn();
  }

  constructor(private readonly authenticationService: AuthenticationService) {}

  redirectToLoginPage(): void {
    this.authenticationService.redirectToLoginPage();
  }
}
The component only displays information about the user’s current location in the title and provides a button that allows logging in using Keycloak.
The next component to analyze is unprotected-route:
@Component({
  selector: 'app-unprotected-route',
  standalone: true,
  imports: [CommonModule],
  template: `
  <div class="content">
    <span class="title">Welcome {{ username }}!</span>
    <span class="status-text">This is an unprotected route</span>
  </div>
`
})
export class UnprotectedRouteComponent {
  get username(): string {
    return this.authenticationService.isLoggedIn()
      ? this.authenticationService.userName
      : 'friend';
  }
  constructor(readonly authenticationService: AuthenticationService) {}
}
As you can see, this component focuses only on displaying the user’s name when the user is logged in. Otherwise, you get the friend string.
If you then look at the protected-route component, you will also notice that it only focuses on displaying simple data:
@Component({
  selector: 'app-protected-route',
  standalone: true,
  template: `
  <div class="content">
    <span class="title">Welcome {{ authenticationService.userName }}!</span>
    <span class="status-text">This is a protected route</span>
  </div>
`
})
export class ProtectedRouteComponent {
  constructor(readonly authenticationService: AuthenticationService) {}
}
Also, in the case of the last two components, you only find simple code responsible for displaying plain HTML code. Below is the content of the not-found folder:
@Component({
  selector: 'app-not-found',
  standalone: true,
  template: `<h1>Page not found</h1>`
})
export class NotFoundComponent {}
And here is logout-screen displayed when the user logs out of the application:
@Component({
  selector: 'app-logout-screen',
  standalone: true,
  template: `
  <div class="content">
    <span class="title">You have been logged out!</span>
  </div>`
})
export class LogoutScreenComponent {}
As you can deduce from the code elements above, the individual pages do not affect the communication between Keycloak and the front end. When preparing the guide, we followed the principle of not placing logic in components. It can only be found in guards protecting access to appropriate pages and in the website containing the logic responsible for communication between the Angular application and Keycloak. Later in the article, we will discuss the most important elements and their role in the system.
After successfully installing the keycloak-angular library, you can configure the Keycloak module in a front-end app. First, define the environment variables used within the application. To do this, create a file, e.g. environment.ts, in the main project directory. Below are the variables used when creating our project:
export const environment = {
  production: false,
  keycloak: {
    authority: 'http://localhost:8080',
    redirectUri: 'http://localhost:4200',
    postLogoutRedirectUri: 'http://localhost:4200/logout',
    realm: 'Pretius-Keycloak-FE-Integration',
    clientId: 'keycloak-angular-integration-tutorial',
  },
  idleConfig: { idle: 10, timeout: 60, ping: 10 },
};
We’ll explain the exact purpose of these variables in the following sections. In short, they represent information regarding the configuration of the Keycloak server to which the Angular application will connect.
To ensure that Keycloak is initialized when the application starts, add the APP_INITIALIZER token and define a function to run in the application runtime, then add it to the AppModule, so that Keycloak initialization will take place with the appropriate configuration. In our application, we used a modular application solution. The content of this module is presented below:
export const initializeKeycloak = (keycloak: KeycloakService) => async () =>
  keycloak.init({
    config: {
      url: environment.keycloak.authority,
      realm: environment.keycloak.realm,
      clientId: environment.keycloak.clientId,
    },
    loadUserProfileAtStartUp: true,
    initOptions: {
      onLoad: 'check-sso',
      silentCheckSsoRedirectUri:
        window.location.origin + '/assets/silent-check-sso.html',
      checkLoginIframe: false,
      redirectUri: environment.keycloak.redirectUri,
    },
  });

@NgModule({
  bootstrap: [AppComponent],
  declarations: [AppComponent],
  imports: [
    RouterModule.forRoot(routes),
    BrowserModule,
    KeycloakAngularModule,
    CommonModule,
    HttpClientModule,
    NavigationBarComponent,
    FooterComponent,
  ],
  providers: [
    {
      provide: APP_INITIALIZER,
      useFactory: initializeKeycloak,
      multi: true,
      deps: [KeycloakService],
    },
    provideUserIdleConfig({
      idle: environment.idleConfig.idle,
      ping: environment.idleConfig.ping,
      timeout: environment.idleConfig.timeout,
    }),
  ],
})
export class AppModule {}
This code allows you to configure Keycloak support within the application. The initializeKeycloak() function is key here, as it’s responsible for the correct initialization of this service. You must ensure that the data provided to it accurately reflects the configuration you have provided in Keycloak. To do this, set the following values in the config object:
You also need to set loadUserProfileAtStartUp to force the application to download data about the currently logged-in user when it loads. Without this setting, after the user logs in, their data will not be available. This means that to use it, it will be necessary to download it manually.
The next object that you need to configure is initOptions. It’s a configuration object that allows you to customize the operation and initialization of Keycloak. The attributes that we set are:
The value window.location.origin + /assets/silent-check-sso.html points to the location of the static HTML page file that is used for silent SSO checking. This file enables communication via iframe between the application and Keycloak. To do this, create this file in the specified location and place the following code in it:
<html>
  <body>
    <script>
      parent.postMessage(location.href, location.origin);
    </script>
  </body>
</html>
Available options may vary depending on the Keycloak version and application specifics. Check the Keycloak documentation for the most up-to-date information.
After properly initializing and configuring the module to communicate with Keycloak, you can use the functions it provides. For this purpose, create a separate service authorization.service.ts, which will provide you with the required methods to use Keycloak within the application. Since you only want to have one instance of this service within your application (singleton), use the standard approach when creating services via Angular CLI and leave the decorator @Injectable({ providedIn: ‘root’ }). Then, in the constructor, inject the service from the keycloak-angular library:
constructor(private readonly keycloakService: KeycloakService) {}
With the service prepared, let’s move on to implementing a few useful methods. The first will be the method that allows users to log in to the application. So, create the redirectToLoginPage() method:
redirectToLoginPage(): Promise<void> {
    this.keycloakService.login();
  }
Now, move on to implementing the remaining methods. For the purposes of this project, you will require information about the username, login status and the ability to log out within the application. The implementation of individual methods is presented below:
get userName(): string {
    return this.keycloakService.getUsername();
  }

 isLoggedIn(): boolean {
    return this.keycloakService.isLoggedIn();
  }

  logout(): void {
    this.keycloakService.logout(environment.keycloak.postLogoutRedirectUri);
  }
As you can see, the API exposed by keycloak-angular allows you to implement all these requirements easily by calling the appropriate methods on the Keycloak website. It’s worth paying attention to the logout method, in which you can pass a parameter defining the path to which the user will be redirected after logging out of the application. As before, you also define this parameter using environment variables.
If you also want to implement automatic user logout after a specified period of inactivity, you can achieve this by calling the logout method, for example, using an external library that monitors user activity. We will demonstrate this effect using the angular-user-idle library. After completing the configuration according to the instructions included in the official documentation of the module, add the following code to the app.component.ts file:
ngOnInit(): void {
    if (this.authenticationService.isLoggedIn()) {
      this.userIdleService.startWatching();
      this.userIdleService
        .onTimerStart()
        .pipe(takeUntilDestroyed(this.destroyRef))
        .subscribe();

      this.userIdleService
        .onTimeout()
        .pipe(takeUntilDestroyed(this.destroyRef))
        .subscribe(() => {
          alert('Your session has timed out. Please log in again.');

          this.authenticationService.logout();
          this.userIdleService.resetTimer();
        });
    }
  }
The feature we have presented is designed to monitor user activity only after the user has logged in. This approach allows you to automatically log the user out of the application after a predefined period of time and then display appropriate information about it. However, it’s crucial to remember to reset the timer when calling this function. Otherwise, the alert will appear continuously, preventing the user from logging out.
After integrating with the Keycloak server, the next step is to create application routing and ensure appropriate access control to individual websites. To do this, let’s analyze the prepared app.routes.ts file, which lists individual subpages, and each of them is assigned appropriate access control using the canActivate guard:
export enum AppRoutes {
  Main = '',
  Protected = 'protected',
  Unprotected = 'unprotected',
  Logout = 'logout',
  NotFound = '404',
}

export const routes: Routes = [
  {
    path: AppRoutes.Main,
    pathMatch: 'full',
    component: MainPageComponent,
  },
  {
    path: AppRoutes.Protected,
    canActivate: [AuthGuard],
    component: ProtectedRouteComponent,
  },
  {
    path: AppRoutes.Unprotected,
    component: UnprotectedRouteComponent,
  },
  {
    path: AppRoutes.Logout,
    canActivate: [LogoutRouteGuard],
    component: LogoutScreenComponent,
  },
  {
    path: AppRoutes.NotFound,
    component: NotFoundComponent,
  },
  {
    path: '**',
    redirectTo: AppRoutes.NotFound,
  },
];
All subpages of our application are presented above. When analyzing the code, focus on the key parts for handling the logic related to authorization. To manage access to only selected pages, use guards on individual routes that you don’t want unlogged people to have access to. An example of such a page is the Protected page protected by AuthGuard. So, let’s examine how this guard works:
export const AuthGuard: CanActivateFn = (): boolean => {
  const authenticationService = inject(AuthenticationService);

  if (authenticationService.isLoggedIn()) {
    return true;
  }

  authenticationService.redirectToLoginPage();

  return false;
};
The above guard checks whether the user is logged in when trying to access a protected page. You do this using the isLoggedIn() method, which checks whether there is an active session for the current user and, depending on the result, redirects the user to the selected page or – if the active session is missing – to the login page. The second thing worth looking at is the page to which you are redirected after logging out. Here, you can also use a guard to manage access and limit the possibility of viewing it by a user who still has an active session in Keycloak. To do this, simply use the isLoggedIn() method provided by authorizationService.
export const LogoutRouteGuard: CanActivateFn = () => {
  const authenticationService = inject(AuthenticationService);
  const router = inject(Router);

  if (!authenticationService.isLoggedIn()) {
    return true;
  } else {
    return router.createUrlTree([AppRoutes.Main]);
  }
};
If the user has an active session, the guard will redirect them to the home page.
In order to check whether the application works as it should, you should confirm the correctness of the scenarios described at the beginning of the article. Let’s start by displaying the application’s home page without logging in. First, let’s run our application with the following command:
ng serve
Now, open any browser and go to http://localhost:4200. The main page of the application should appear:
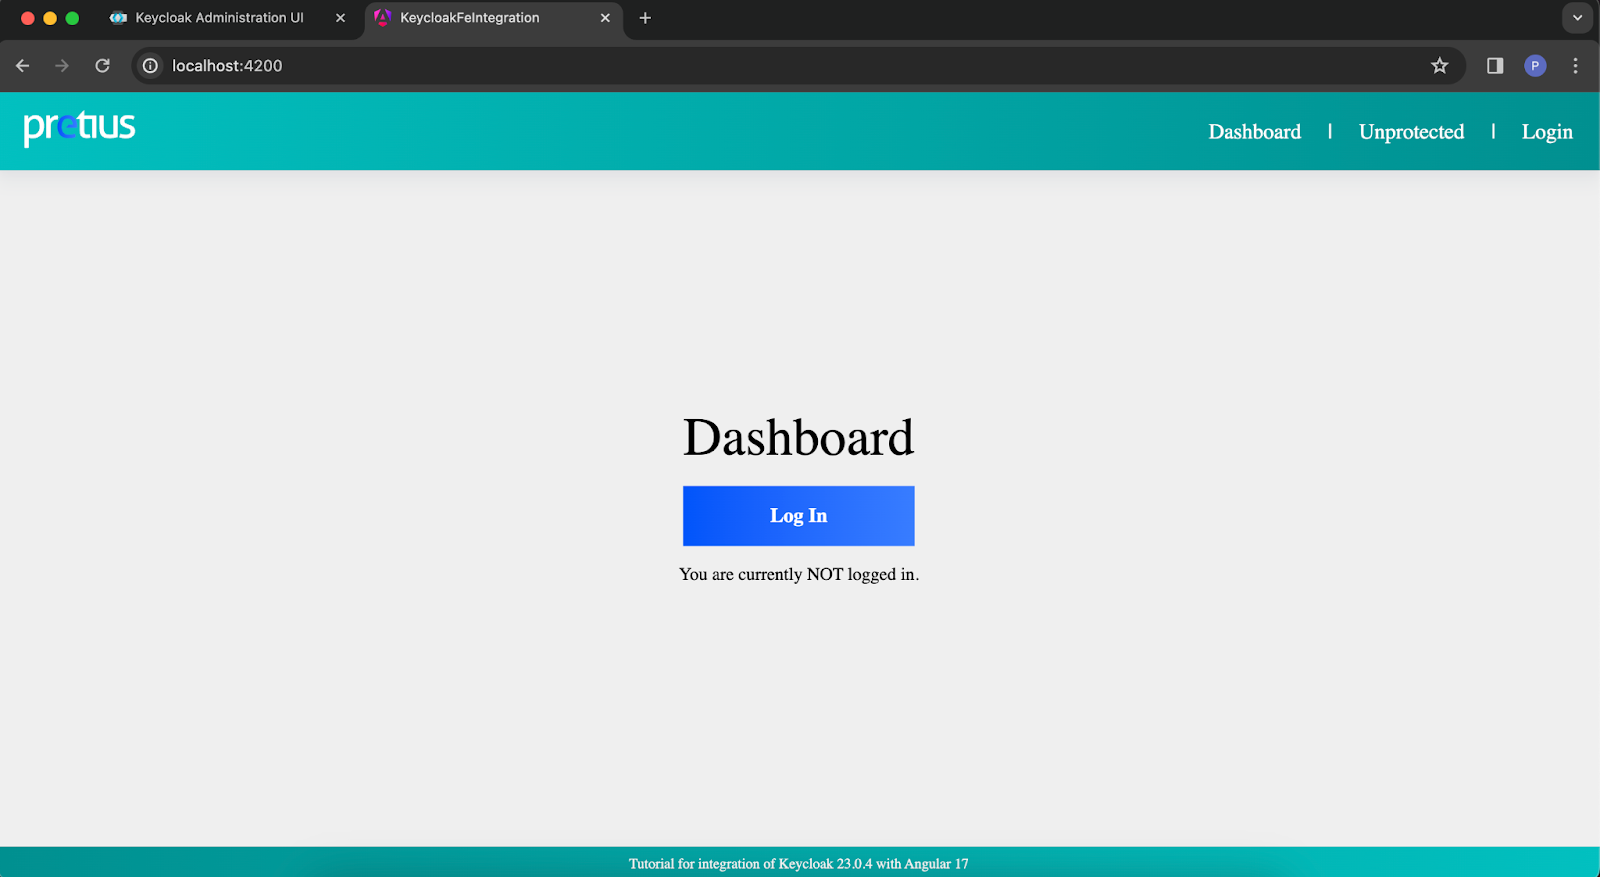
As you can see, everything started properly. The paths available to us are displayed in the upper right corner. So let’s go to the next page by clicking the Unprotected button:
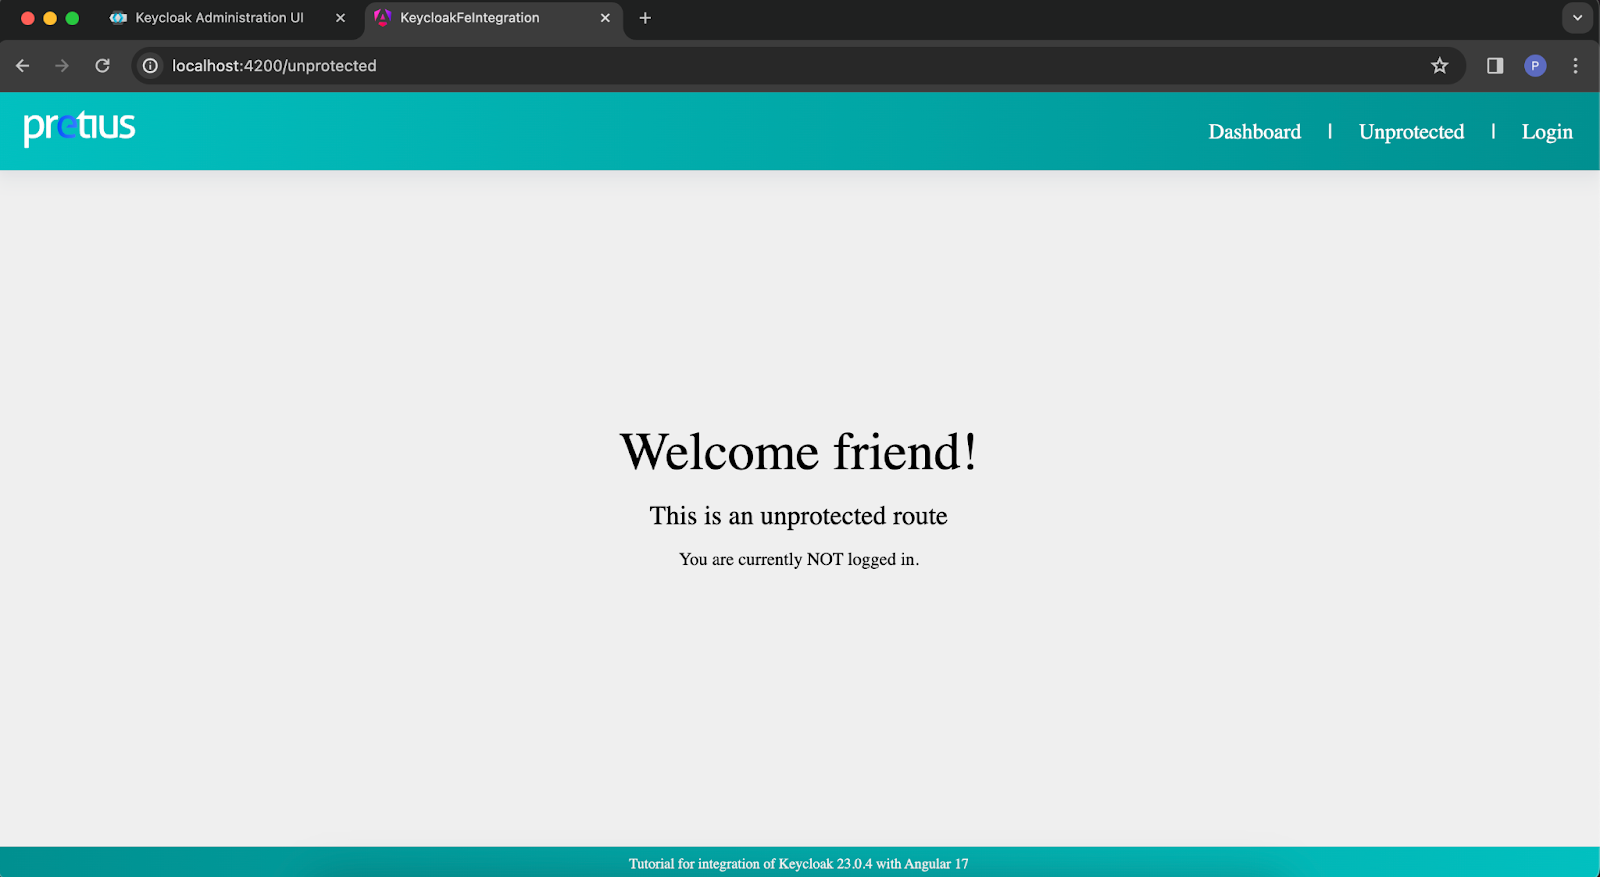
Here too, the application allows you to redirect even without having an active session in Keycloak. So let’s check the last option available, i.e., press the Login button:
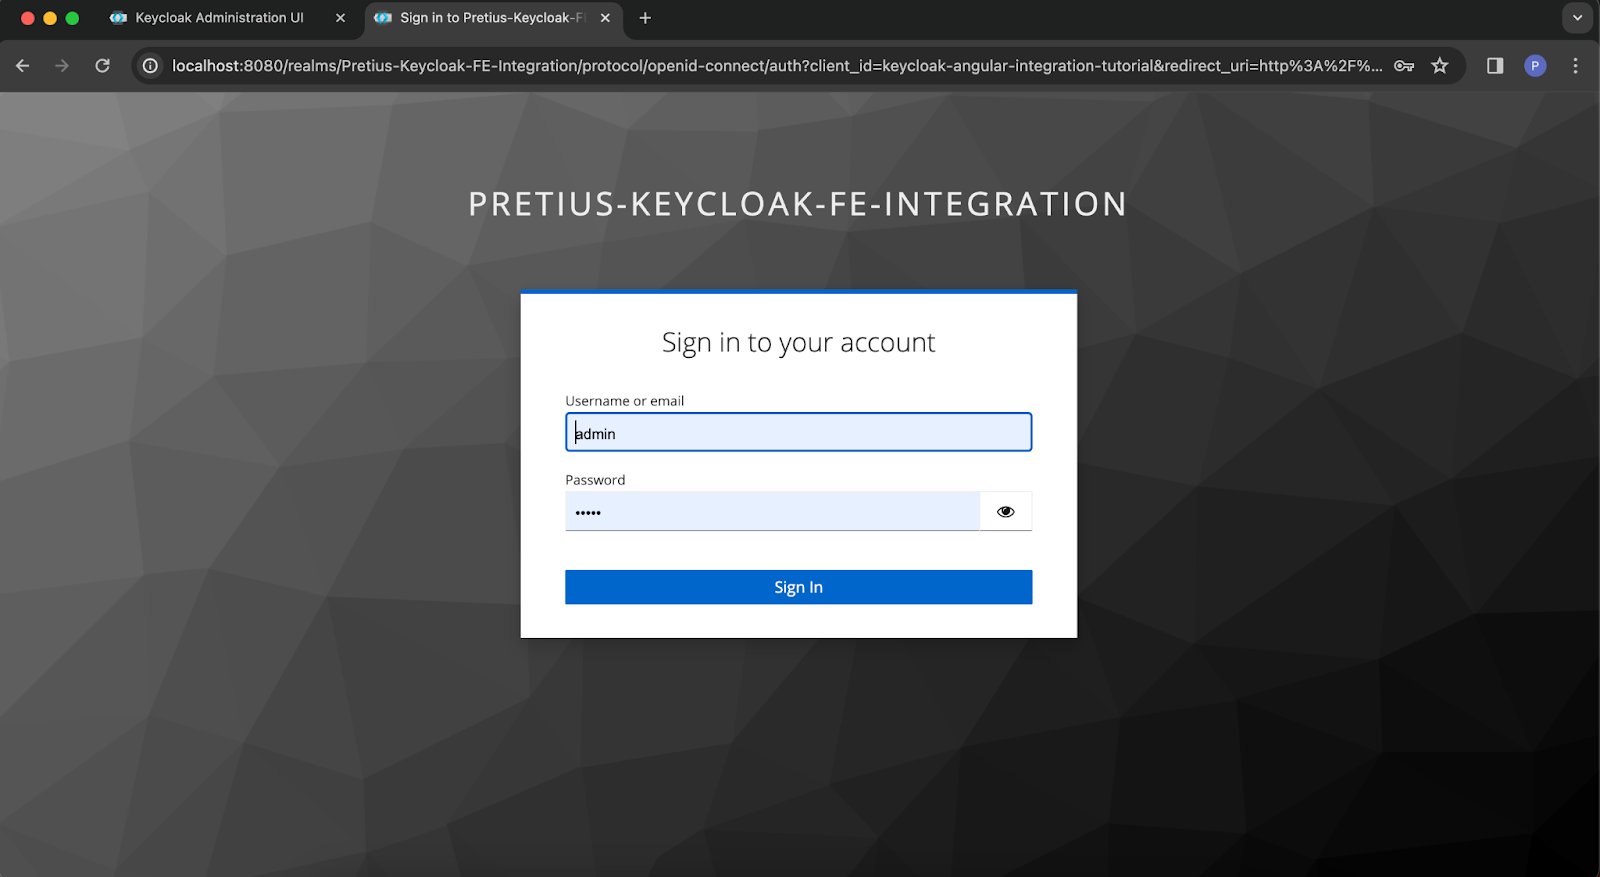
As a result of this action, the application correctly redirects us to the Keycloak login page. So, enter the user data and check whether you will be correctly authenticated.

After logging in, you should land on the home page, where you should now see information that you have been correctly authenticated. Let’s take a look at what the Protected and Unprotected pages look like after logging in to the application:

The application allows you to freely access the Protected page, where information with the name of the logged-in user is displayed. Next, let’s also check out the Unprotected page:
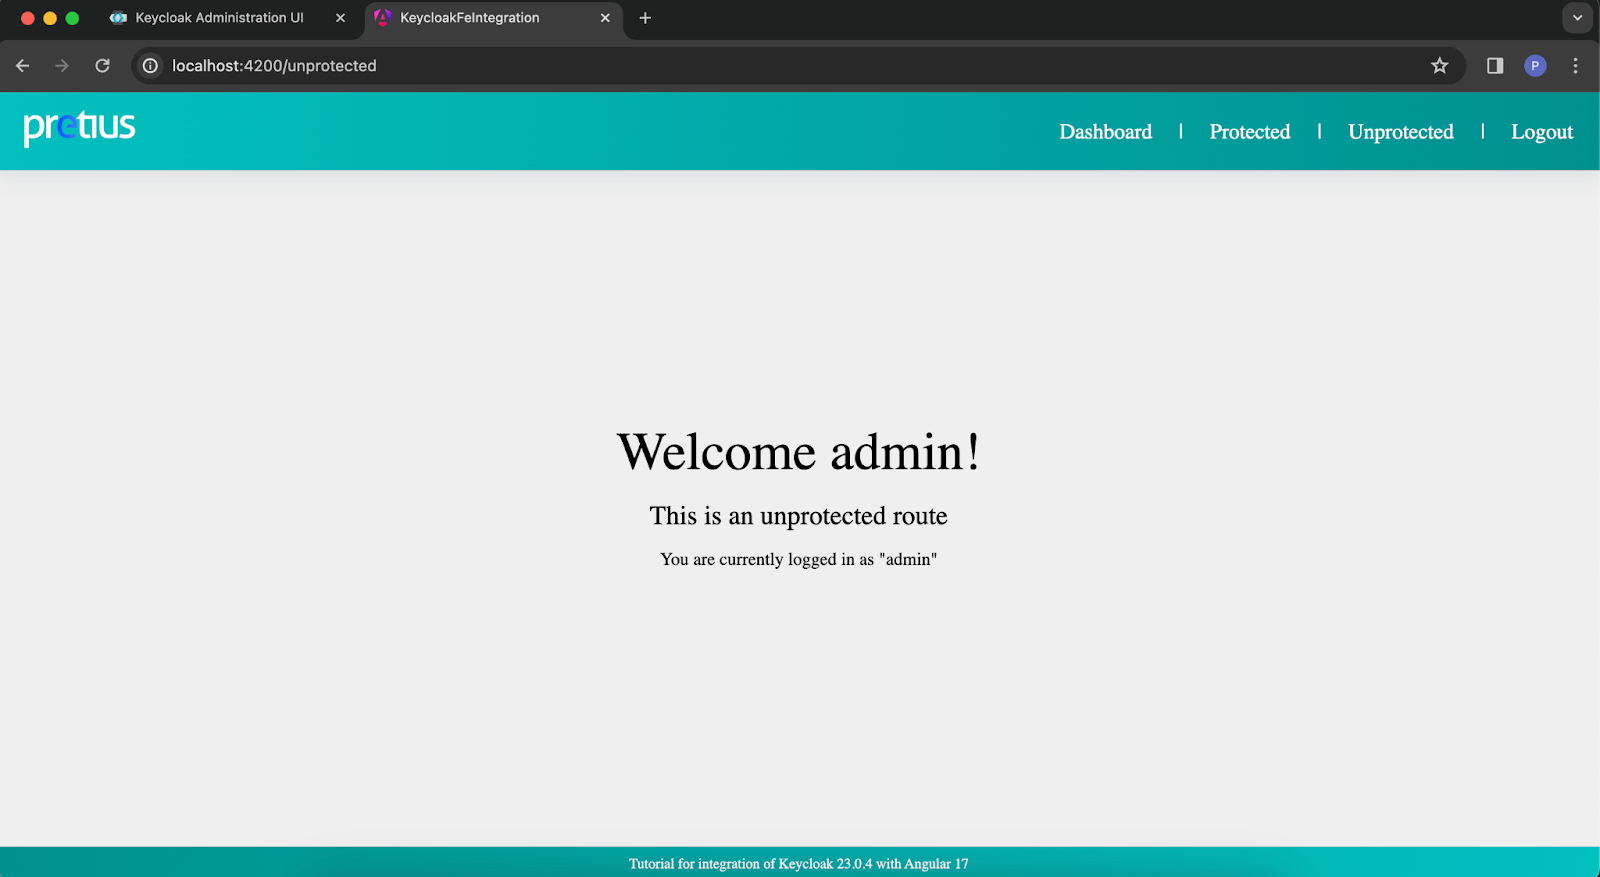
The Unprotected page also now displays the name of the logged-in user, which confirms correct authorization. Now, when the user tries to go to the /logout path with an active session, according to the assumed logic, he should be taken back to the home page. To log out, click the Logout button in the upper right corner of the application:
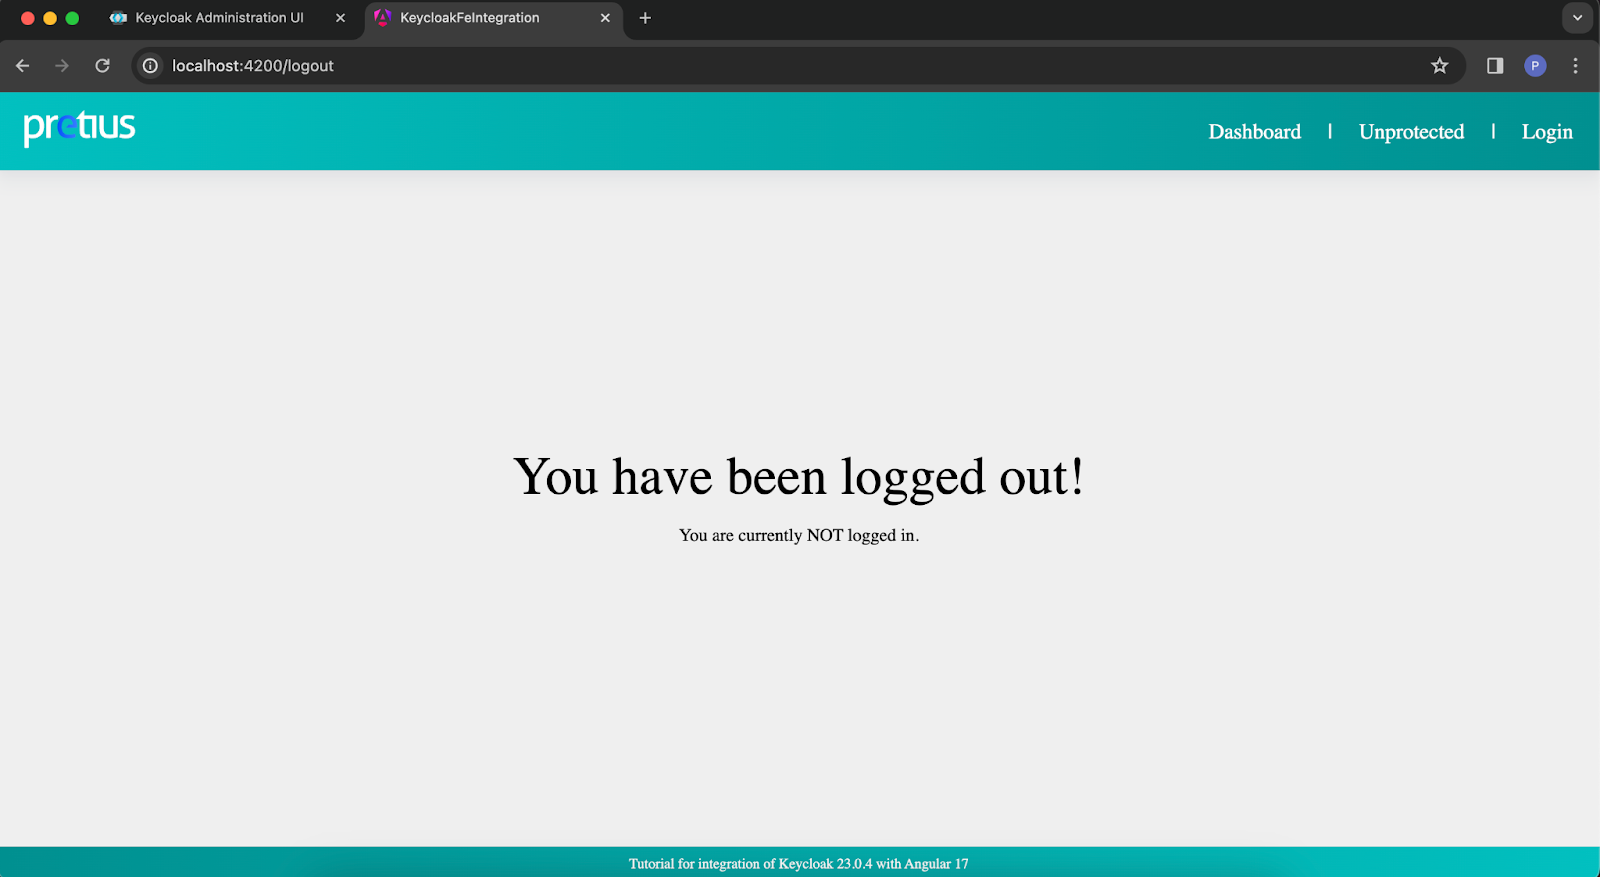
After pressing it, you land on a page informing you that you have been logged out, in accordance with the configuration we provided to Keycloak. As you can see, you no longer have an active session, as evidenced by the login status text under the page title. If, at this stage, you try to return to the protected page, i.e. Protected in our case, the application will automatically redirect you to the Keycloak login page.
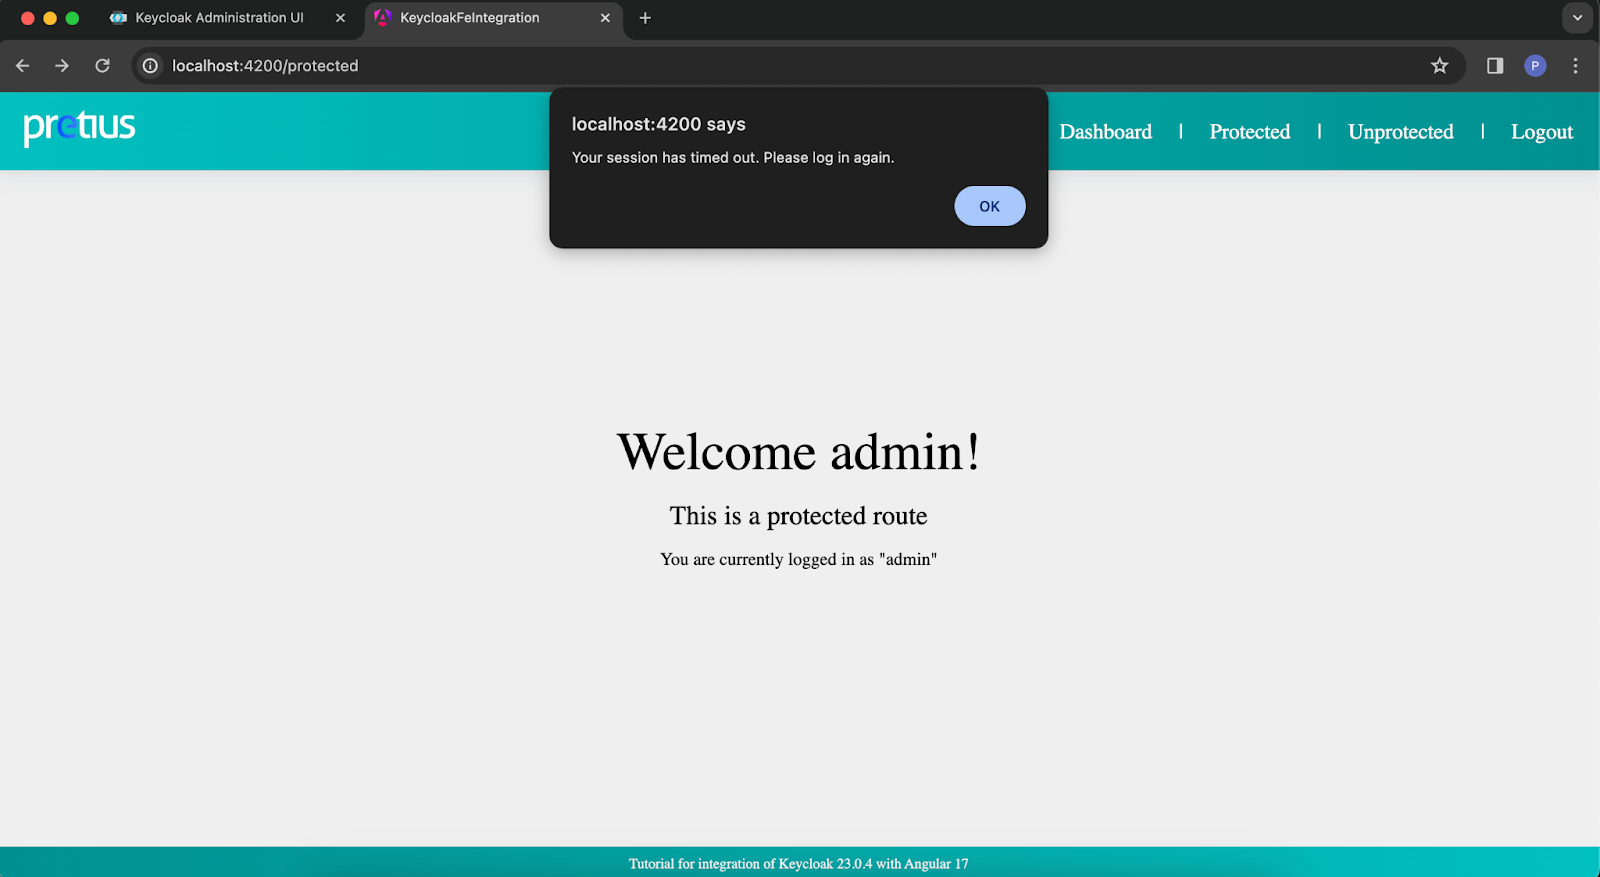
What will happen if you don’t perform any actions for a long time and are authenticated after logging in? Try doing nothing for the time indicated in the module configuration from the angular-user-idle library. After this time has passed, you will be greeted by an alert informing you that you have been logged out of the session due to inactivity, and after confirming it, you will be redirected to the Dashboard without having an active session.
In the context of an Angular-based application, the end-to-end authorization setup with Keycloak meets the access control requirements and provides a convenient and consistent experience for the end-user. Moreover, this IAM system allows you to address all potential concerns regarding the app’s data security standards. The Keycloak security team ensures you can sleep peacefully by constantly monitoring threats and releasing patches to protect against them.
The integration process is also very simple, thanks to the available libraries (keycloak-angular, keycloak-js). The API issued by keycloak-angular has been prepared to offer everything developers might require while creating an application. With this article, you should be capable of setting up a comprehensive tool which protects the application against any undesirable scenario. Also, a definite advantage of the keycloak-js and keycloak-angular libraries is undoubtedly the detailed documentation they offer. Thanks to it, understanding how the integration works and how to implement it is a relatively simple task.
If you’re thinking about implementing Keycloak at your company, consider dropping us a line. We’ve completed many enterprise-grade Keycloak projects for our clients, and we’ll be happy to share with you some case studies and estimate the possible costs of your Keycloak implementation. Such initial consultations are always free at Pretius, so just let us know about your needs – you can use the contact form below or write us at hello@pretius.com.
If you’re interested in Keycloak or Angular, you can also check out other articles on the Pretius blog:


