
Cypress test automation framework is a tool based on the JavaScript programming language. It’s designed for testing web applications, both locally and on the server. Based on the Mocha test framework (useful for testing asynchronous functionalities), it uses a test library for building Sinon/Chai assertions.
Cypress can be used both for UI automation and for testing API responses. It can also mock the API, which is helpful in simulating different types of responses coming from the backend and checking how they are displayed in the frontend part of the application.
Cypress is open-source, and the installation is relatively simple. The tool doesn’t require additional dependencies, packages, drivers, etc. You can start writing your first tests immediately after the installation. The tool has extensive documentation, which is very helpful, especially for novice users. It also has a large community on GitHub that can help in case of problems. The software is still being developed – new versions with bug fixes and new features are released regularly.
Cypress is a useful tool to add to your test suite. One of its biggest advantages is its universality and the possibility of using dynamic waits. By simulating the user’s behavior in the application, it gives the opportunity to easily debug tests – both with the use of DevTools and the option of going back to any step in the test. Thanks to this, it’s easy to track problems to see when they occurred in the actual test and why it ended negative.
As for the disadvantages, the most important is that ability to run many tests in parallel is turned off by default, which may extend tests execution time (it’s possible to do so, but it involves additional workload to configure it on CI server) .In addition, it should be noted that Cypress allows you to write tests in only one programming language – JavaScript (as opposed to, for example, Selenium or Playwright, which support many programming languages).
There is also no iFrame support, but Cypress works on most popular browsers, such as Chrome, Chromium, Firefox, and Edge. It’s not fully supported on Safari, however – you can run tests, but it’s an experimental functionality, and it may not work correctly. It’s a potential obstacle if you want to test for this browser. Also, until recently, a frequently indicated disadvantage of Cypress was the inability to open the browser in a new window and a new browser tab. However, this is possible in the current version of the framework.
To download and install Cypress, you must have the node.js package installed, which allows you to run applications written in JavaScript.
When it comes to where Cypress will be installed, you have 2 options:
Regardless of which option you choose, once the directory is opened in the terminal, there are 2 ways to install Cypress:
After installing, you need to run Cypress – to do this, open the “Cypress” directory in the terminal and enter the following command:
npx cypress open
After starting Cypress, the test runner will open. All tests in the “e2e” directory will be displayed in the runner like this:

In the case of a new installation, these will be sample tests added by default during the installation.
To run a test, click on its name. On the left, you see the progress of the tests, and on the right, you have a preview of the application being tested.
Here’s an example of a positive test result (passing test) – all assertions passed are shown in green:

And here’s an example of a negative test result – with the failed assertion in red (together with error description):
To start writing your first custom test, you need to open the “cypress” directory in any text editor (e.g., Visual Studio Code) and create a new test file in the “e2e” directory. Important: it needs to have the ‘cy.js’ extension.
Let’s create an example test. It will go to the Pretius homepage and check if the main logo and top menu are displayed. For this purpose, create a new file, and call it ‘first_test.cy.js’.
In the body of the test, add the name of the “Describe” function, describing what the given test checks (“Check main page”). Within the “Describe” function, you can add any number of “its” – individual test cases. Add information on what a particular test case checks in the description. Then, specify the content of the test – you want to call elements on the tested page using selectors available in DevTools, in the “Elements” tab:
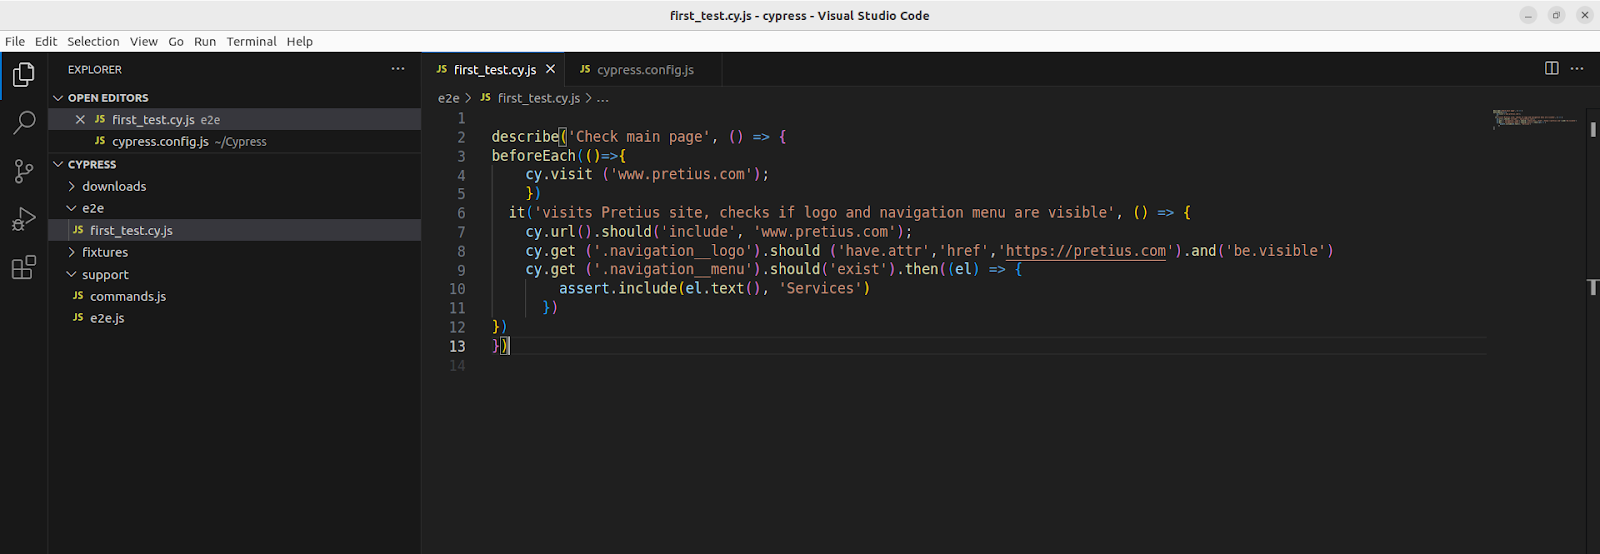
The exact code looks like this:
describe('Check main page', () => {
beforeEach(()=>{
cy.visit ('www.pretius.com');
})
it('visits Pretius site, checks if logo and navigation menu are visible', () => {
cy.url().should('include', 'www.pretius.com');
cy.get ('.navigation__logo').should ('have.attr','href','https://pretius.com').and('be.visible')
cy.get ('.navigation__menu').should('exist').then((el) => {
assert.include(el.text(), 'Services')
})
})
})
Run the test by clicking on it in the Cypress runner. As you can see, our test passed – in the upper part, there’s the information about the number of test cases that have positive and negative results (in this example, we have 1 positive and 0 negative results):

Assertions are the primary criterion for whether a test will pass or fail.
In the test example provided above, there are 5 assertions:
Other assertion examples:
The full list of assertions is much longer and can be found in the Cypress documentation.
You can use Page Object Pattern (POP) and custom commands to avoid duplication of the same code in many places. Here’s how to do this on the example of our test “first_test.cy.js”.
You use POP to write universal selectors for the same elements. Each element in the tested application should have its unique selector in one place in the test code. In our sample test for checking the “logo” element, we have the following code:
cy.get ('.navigation__logo').should
('have.attr','href','https://pretius.com')
This means that Cypress downloads an element with the CSS class “navigation__logo”, which should additionally have an “href” attribute with the value “https://pretius.com”.
Let’s imagine you use this element in many different test files (e.g. 10 tests). In case of any changes in the selector of this element (for example, changing the name of the “CSS” class or changing the value of the “href” attribute), you will be forced to update each test file and change it manually. To streamline this process, you can create a new “PageObject” directory, where a file containing common selectors for a given element will be located – let’s call it “MainPage.js”. Create the “MainPage” class, which you will then export to the test file:

In the “MainPage” class, you move our selector to the logo and give it a universal name (here “getMainPageLogo()”).
Do the same for the navigation menu selector, and name it “getMainPageNavigationMenu()”.
In the test, create a constant, assign it to the “MainPage” class, and import the class into the test file. This way, you have created the main class “MainPage”, which you refer to in the test. In the case of changes to the selector, you can just change it in one place – in the “MainPage.js” file located in the “PageObject” directory. The corrected test looks like this:

You can choose one of two approaches when it comes to the “.should()” assertion:
In my opinion, for the above example, it’s enough to check it once within one test file. Similarly to the previous case, you add selectors to the navigation menu.
Here’s the code:
import MainPage from "./PageObject/MainPage";

describe('Check main page', () => {
beforeEach(()=>{
cy.visit ('www.pretius.com/');
})
const mainPage = new MainPage();
it('visits Pretius site, checks if logo and navigation menu are visible', () => {
cy.url().should('include', 'pretius.com/');
mainPage.getMainPageLogo().should ('have.attr','href','https://pretius.com').and('be.visible')
mainPage.getMainPageNavigationMenu().should('exist').then((el) => {
assert.include(el.text(), 'Services')
})
})
})
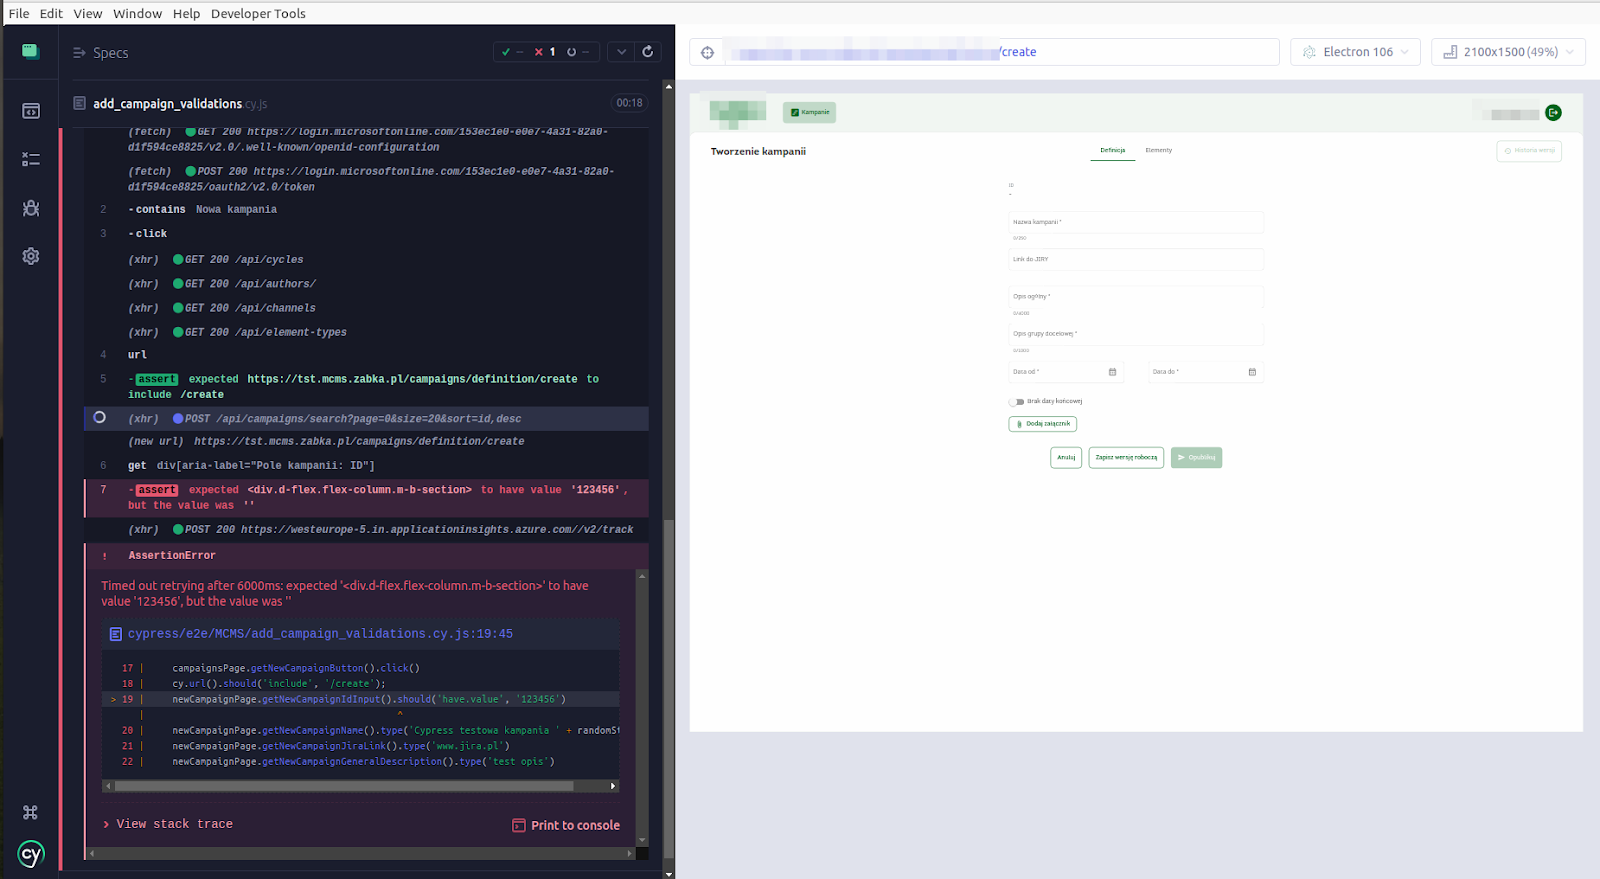
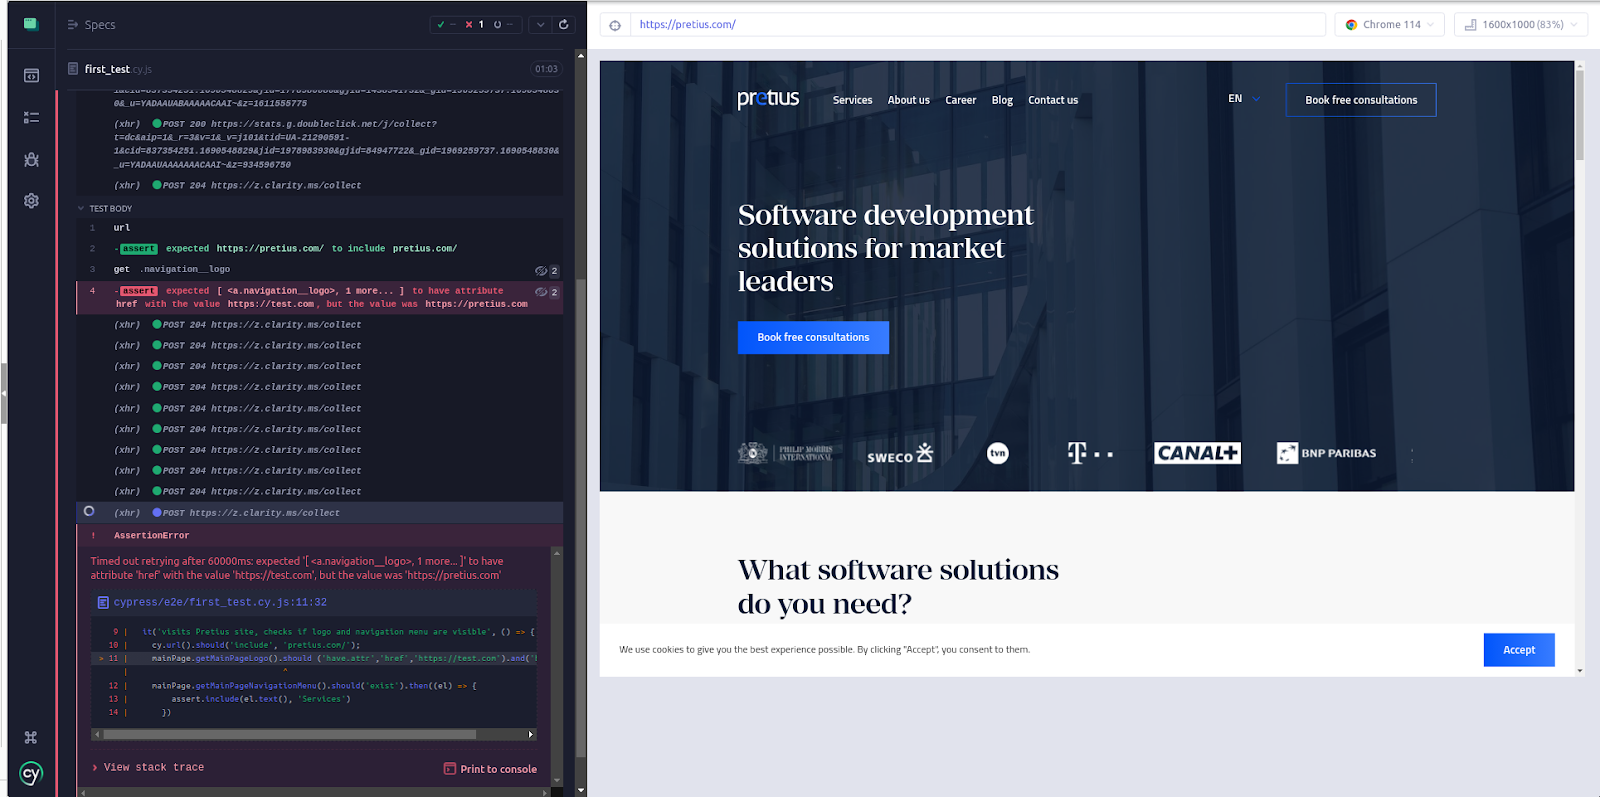
If everything has been configured correctly, the test result should be the same as in the first case, when Page Object was not used. All assertions should be marked green, the test should be conducted with a positive result. You can also slightly modify your test code to see if Cypress will return an error if the assertion is not met. Let’s find out if the “logo” element contains the “href” attribute with the value “https://test.com” – this time, the test should end with a negative result (because the attribute for this element is actually “https://pretius.com”).
So, you can change the test code once again:
import MainPage from "./PageObject/MainPage";

describe('Check main page', () => {
beforeEach(()=>{
cy.visit ('www.pretius.com/');
})
const mainPage = new MainPage();
it('visits Pretius site, checks if logo and navigation menu are visible', () => {
cy.url().should('include', 'pretius.com/');
mainPage.getMainPageLogo().should ('have.attr','href','https://test.com').and('be.visible')
mainPage.getMainPageNavigationMenu().should('exist').then((el) => {
assert.include(el.text(), 'Services')
})
})
})
This time the test failed, the Cypress test runner returned an error with a specific message – instead of “https://test.com” the “https://pretius.com” attribute was returned:
Custom Cypress commands – methods created by the user – are another way to simplify tests and prevent unnecessary code repetition. They should be placed in the “commands.js” file, which, by default, is located in the “support” directory. For the above example, you can add a command that will visit the “www.pretius.com” website. Simply add the following line of code to the ‘VisitMainPage’ command:
cy.visit ('www.pretius.com/')
This way, you specify the action to be performed after the command is called:

Then,import the “commands.js” file to the test file. Now, can specify the name of the command in place of the code:

The principle of operation is similar to the Page Object example – if you need to change something in the executed code (like changing the URL address to be visited or adding more actions), just change it in the appropriate method in the “commands.js” file, instead of every test. It’s especially beneficial in the case of a large number of tests.
This part of the article will describe the case of using Cypress for a project involving the creation and management of marketing campaigns for a store chain.
The web application was created in the Agile methodology. Test automation was carried out in parallel with software development and manual tests. The tests included designing, creating, executing and then automating test cases. The main goal of automation was to reduce the time for regression tests, which increased as development progressed.
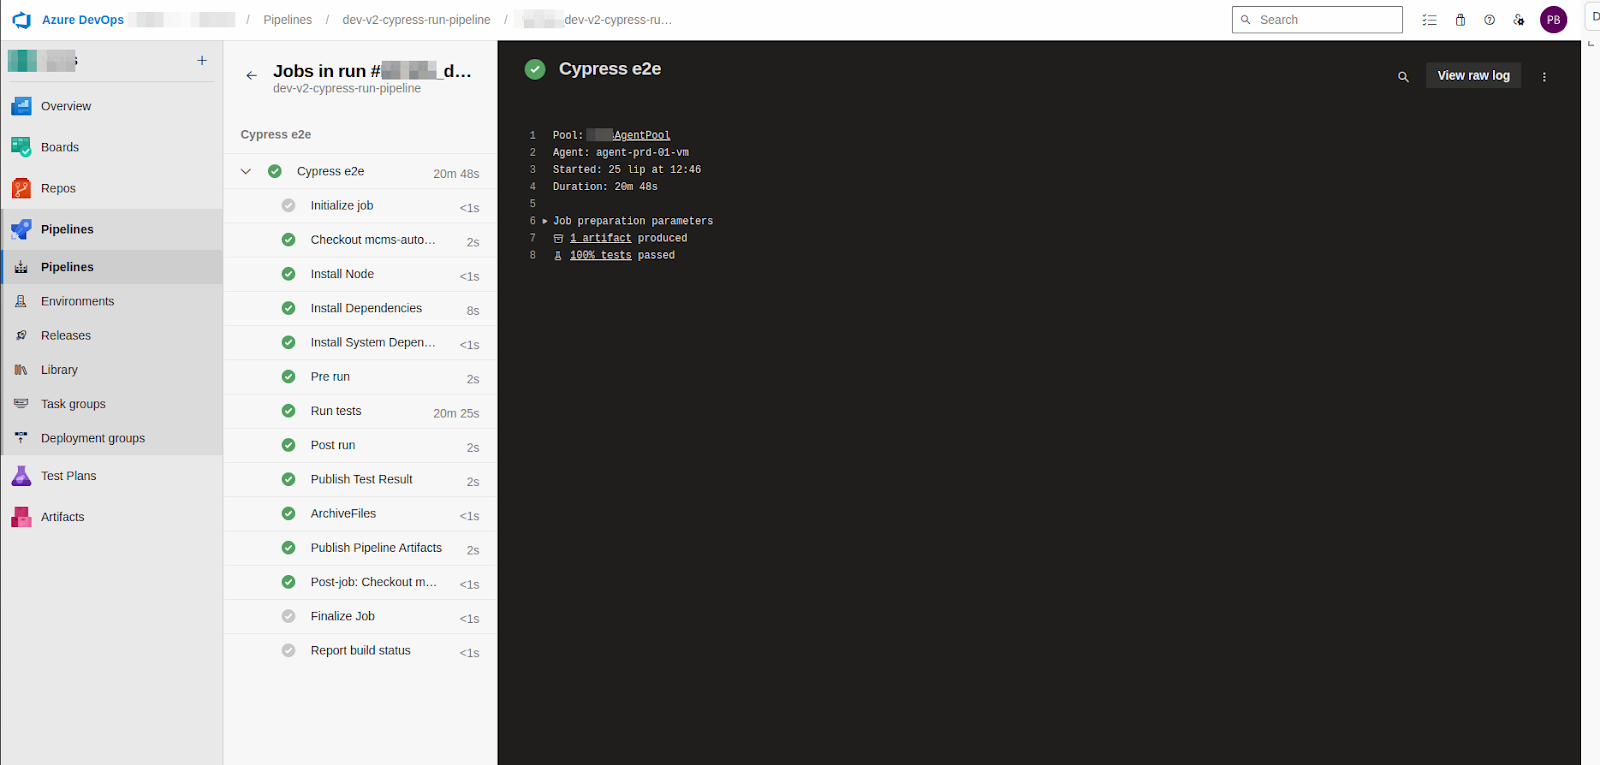
At the very beginning of the work, the tests were created and run locally. However, quite quickly, in the early phase of the project, we started to run tests in the CI/CD environment, based on the Azure DevOps platform, where a repository with automatic tests was created next to the repositories with the application source code.
A pipeline for running tests on the server in headless mode has been configured in the repository. We started each test by downloading the latest changes from the repository, installing the “node.js” package, and installing Cypress. We then ran the tests, and finally, after completing all test cases, we published the test results as a report.
The diagram below presents the individual stages in the pipeline operation:
After each test run on the CI server, we also configured the option to display statistics on the number of tests that ended in negative and positive results in a graphical form – without the need to download a report – for a given pipeline.
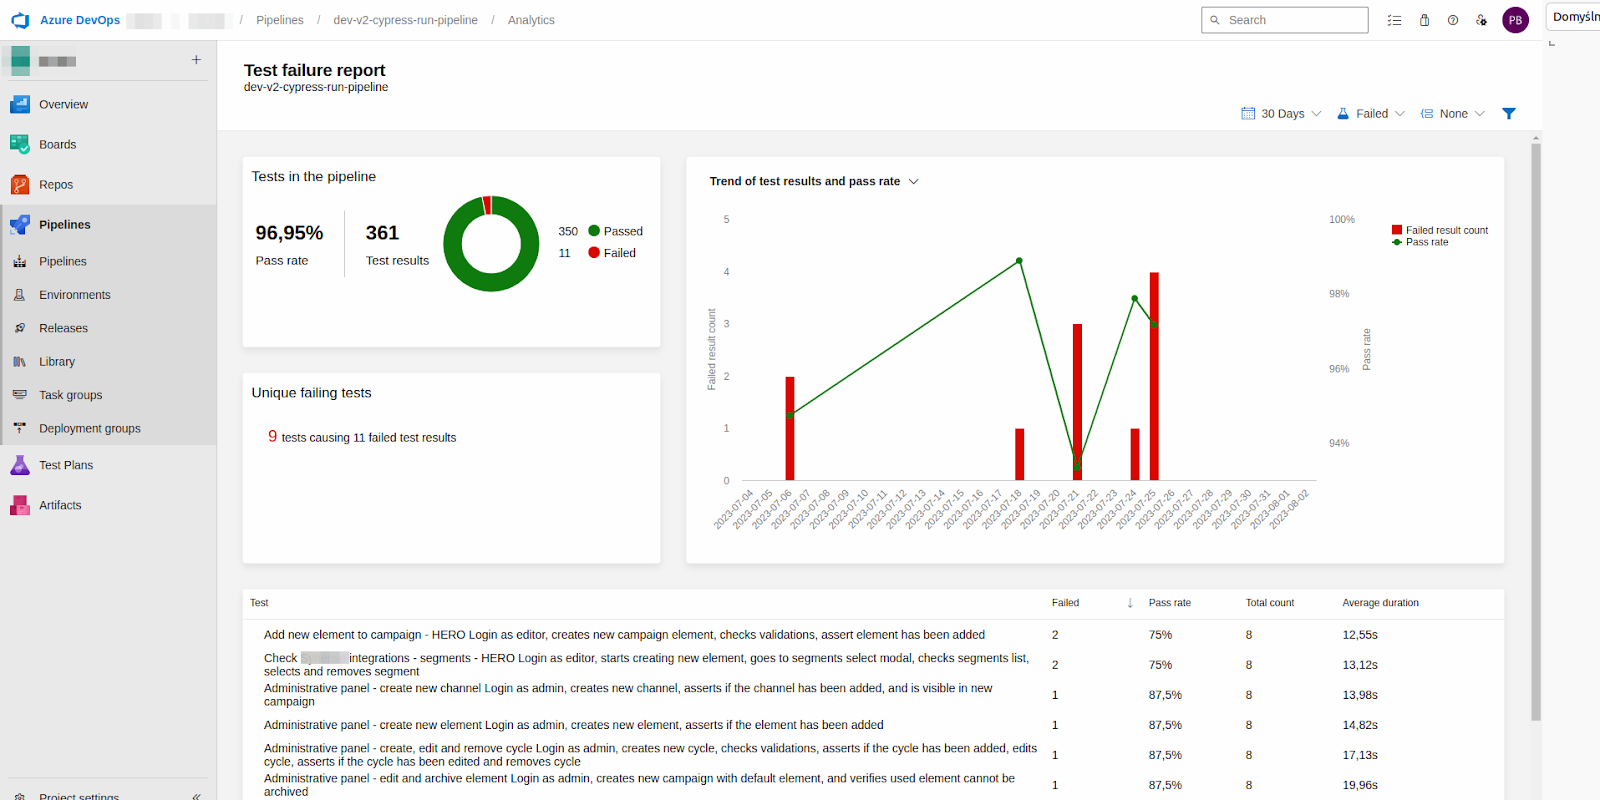
Thanks to this data, the user can see which tests are most likely to cause problems. It can help track down the root cause behind the issue and fix it faster.
In total, 47 test cases were created in the discussed project, checking the key functionalities of the system. The tests covered both positive and negative cases – checking whether the system responded correctly in the event of user errors was also very important.
One challenge we ran into at the beginning was the automation of authorization. In the discussed system, it was done using Azure Active Directory (AAD). Cypress doesn’t support multi-domain requests by default, so the redirection from the tested system to the AAD login page returned an error. The problem was resolved by implementing the “cy.origin” function.
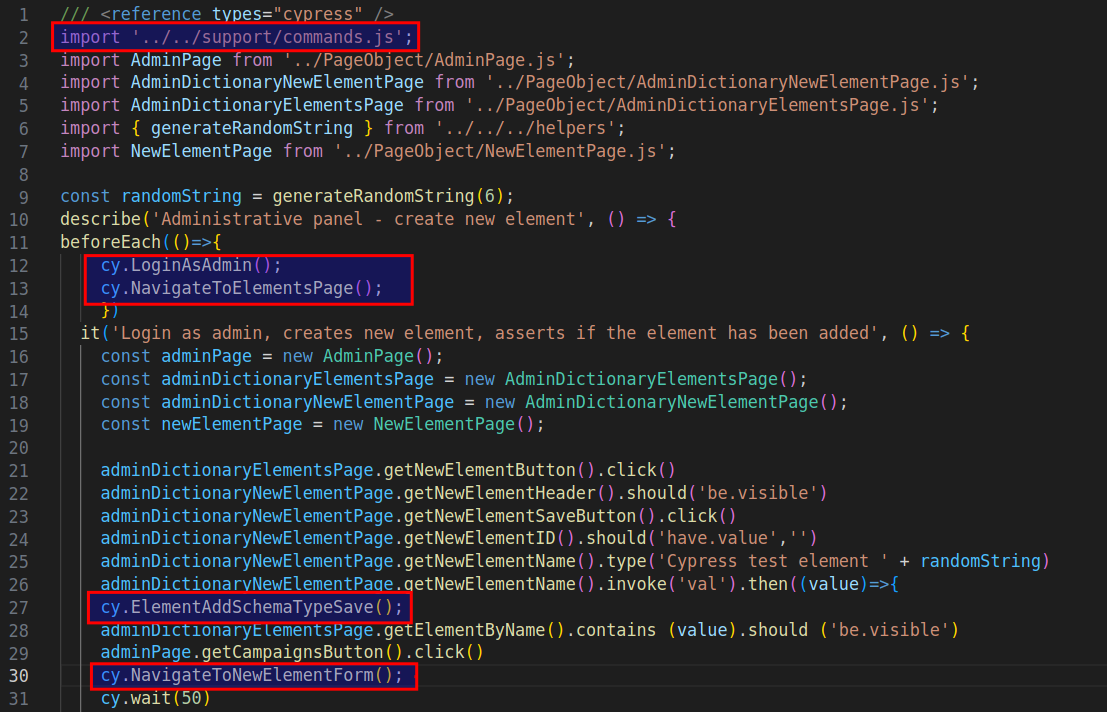
Automated tests were created using the Page Object Pattern design pattern. For each subpage in the tested application, a subpage was similarly created in the “PageObject” directory in the test repository. In each test file, there were unique selectors for elements on a given page. Below, you can see the selectors for the system administration page:

It’s a good practice to make selectors unique within the entire application. This is why the example above shows that the “aria-label” attribute has been added for most elements in the application. It distinguishes a given element, which often may belong to the same “CSS” class as other elements in the DOM structure of the tested application.
During the work on automated tests, we’ve also created Custom commands – methods in the “commands.js” file that performed a specific action in the test. It allowed us to place code in one place, from where it could be used in repetitively many tests. For example, the commands for logging in for each type of role in the system were created, as logging in was used in each test. Also, commands for saving a campaign element or navigating to a specific screen, as well as creating a marketing campaign with specific parameters – since tests should be stateless if possible (it’s advisable not to use the objects created in the system, but to create a new object for the test instead).
Here’s how the “commands.js” file looked:

As already mentioned, to use the selected command (or commands) in a test file, you just need to import the “commands.js” file into the test and invoke the command:
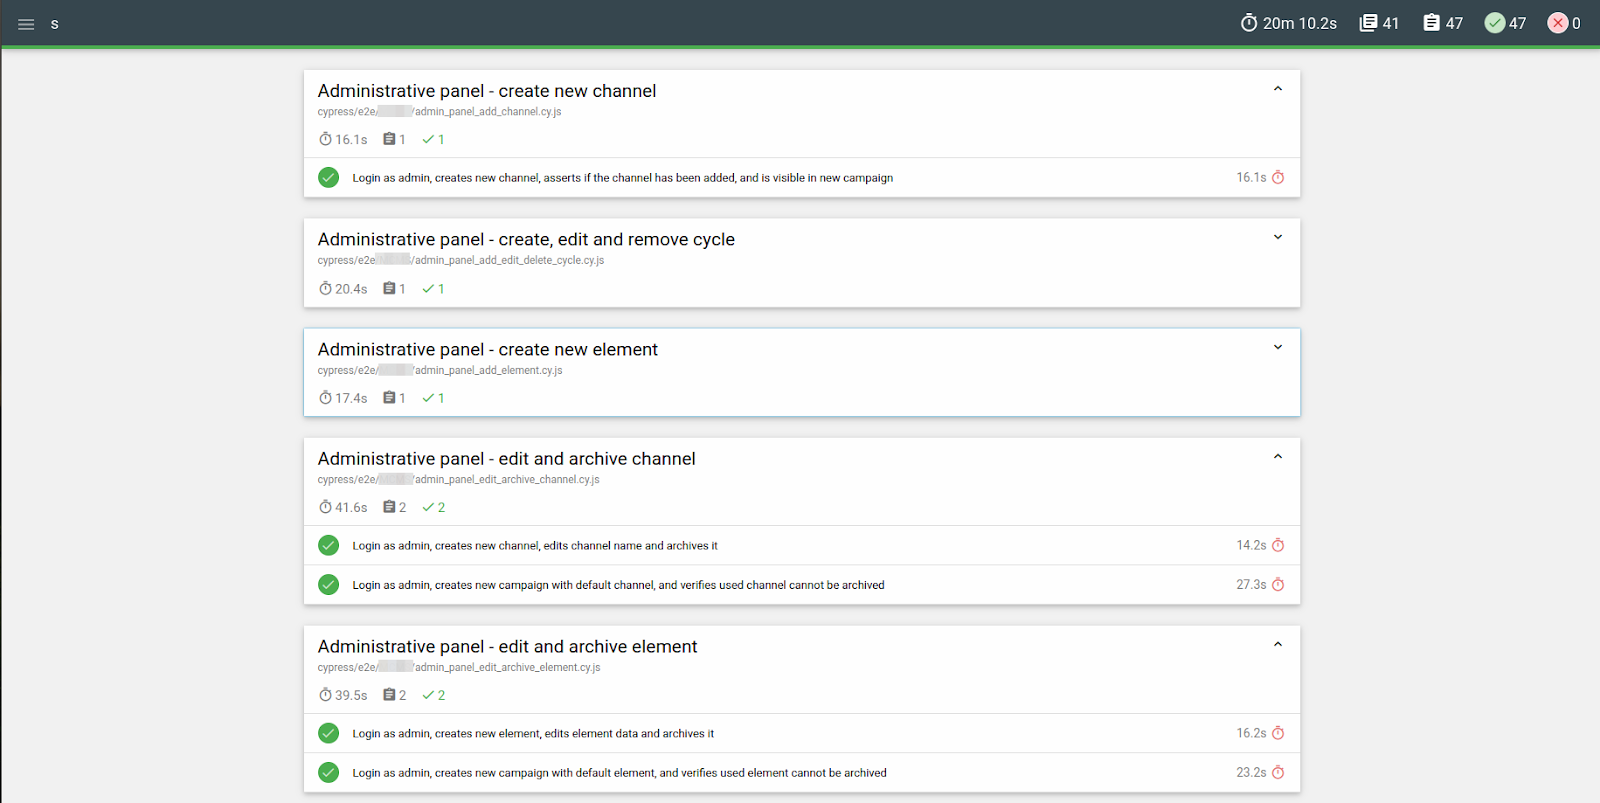
An important element in automated tests is the ability to conveniently and transparently report the results of these tests, which is undoubtedly a great value from a business perspective. In this project, we used the Mochawesome reporting module for this.
Each launch of the test pipeline resulted in generating a test report. It contained information on the total number of test cases, the number of successful test cases, and the number of failed test cases. In addition, for each generated report, information about the execution time of all tests and the execution time of individual test cases was included:
In the case of failed tests, the error message that appeared was also visible, e.g.:
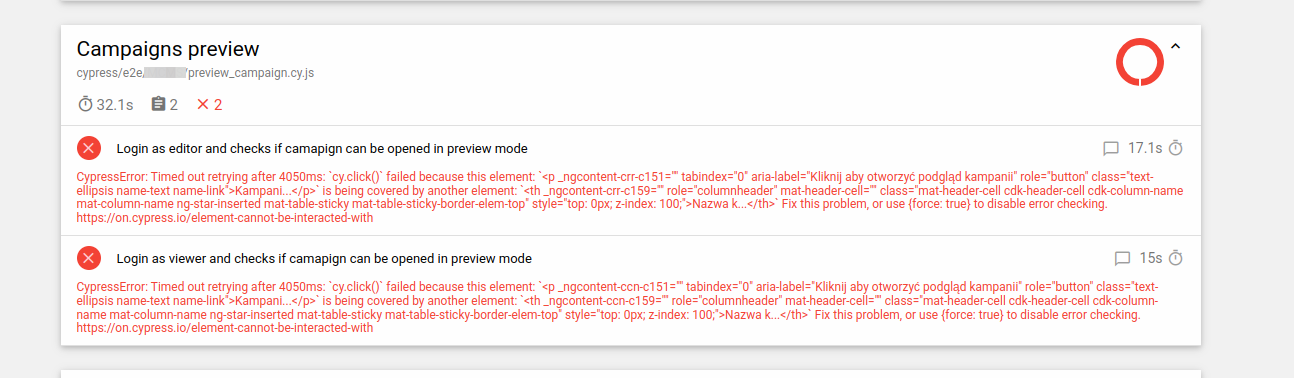
After clicking on the error message, in the “Additional Test Context” section, a screenshot of the moment when the error occurred was additionally visible:

To make it easier to determine the scope of functionalities covered by automatic tests, a list and a table of functionalities were created. It specified which test file checks a specific functionality.
The Cypress test framework is a useful tool for web test automation. It allowed us to quickly automate a large part of the functionalities in the newly created app, ensured good test coverage and saved the time necessary to perform regression tests. Cypress test development was straightforward, and using the Page Object Pattern design pattern and custom commands made the test maintenance and further development easier. For future test development, it’s also worth considering the optimization so you don’t unnecessarily extend the test execution time. Finally, JavaScript knowledge is useful when writing Cypress tests – it allows you to create them faster and more efficiently, and you can ensure good code-writing practices.
If you need help with the development, Cypress automation, and/or reliable testing of complex systems, reach out to us at hello@pretius.com or use the contact form below. We’ll analyze your business needs and problems together during free consultations.
Here are answers to some common questions regarding Cypress and software testing in general.
Cypress is an open-source tool for testing modern web applications. It’s based on the JavaScript programming language and on the Mocha testing framework. It can be used for both E2E and component testing, is easy to install, and doesn’t require advanced programming knowledge to start writing tests.
Yes, the Cypress framework can be used to conduct integration and unit testing.
Software testing is the process of verifying and validating that a software product meets the requirements and expectations of its users. It involves checking the software’s functionality, usability, reliability, security, performance, and quality. It can be conducted manually or automatically using various tools and techniques.
Selenium and Playwright are two examples of other helpful testing frameworks.
Yes, Cypress can be used for API testing, however it is not strictly dedicated to do this. What is worth mentioning, that Cypress can simulate different answers coming from API, which allows to check the behavior of frontend in case of different API response types.
Cypress test runner is the core of the Cypress test framework. This is the GUI window, that allows to easily visualize tests run in non-headless mode (unlike non-headless mode, where tests are being run in terminal). You can use it to conduct tests interactively – you see the executed commands and the DOM of the tested application or component simultaneously.


