
For a long time now, Frontend Developers have mostly used the popular CSR (client-side rendering) technique of page rendering in which most of the application logic is transferred from the server to the client’s (i.e., the recipient of the content) web browser. However, we are currently observing a fundamental change in the approach to application development. The teams behind popular frameworks such as React – and recently, as of version 16, also Angular – increasingly encourage using the so-called SSR (server-side rendering).
What caused this shift? What is SSR, and how does it differ from other page rendering techniques such as ISR or SSG? What are the best scenarios for using each of these approaches? And finally, how does SSR work in Angular, and how to implement it properly? Read on to find out.
👴Still using the legacy Angular JS? Learn how to upgrade AngularJS to the new Angular
Before we move to other topics, let’s stop for a moment and talk about how web applications are created now and how they were created in the past.
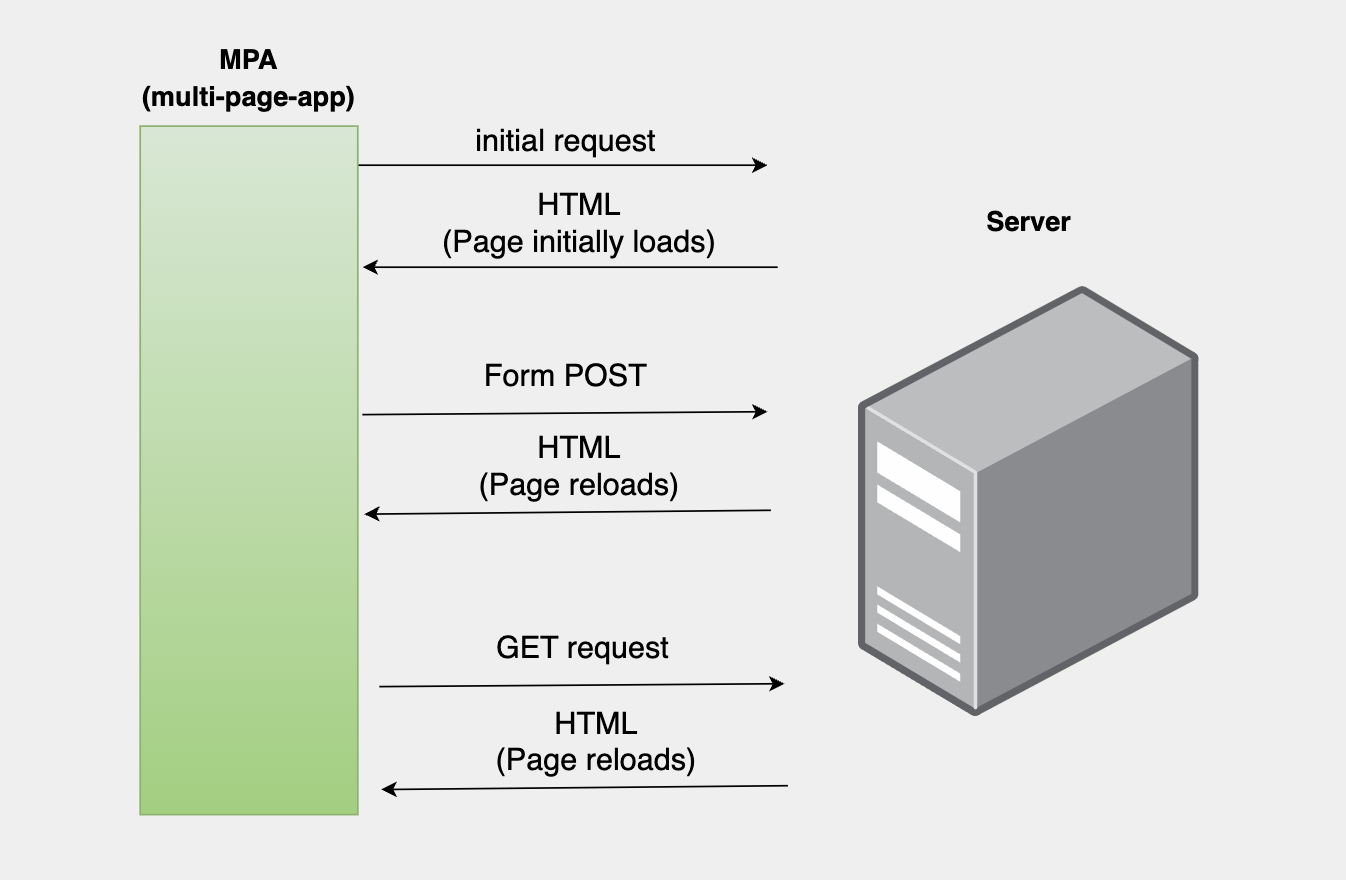
The old approach – before the dawn of CSR, SSR, etc. – is now referred to as MPA (multi-page application), and the name is directly connected to how websites created in this way work. Each page the user sees is a separate entity, delivered by the server to the client each time an action occurs (e.g., form submit, GET request for new data, changing a tab, etc).
For this reason, each time we perform an action, the server provides us with completely new HTML code that refreshes the page and replaces the existing code. This approach means that the browser does not have to perform any actions. Instead, everything happens on the server side. You can probably see some of the basic problems already, such as
Below, you can find a graphic showing how such a website works:
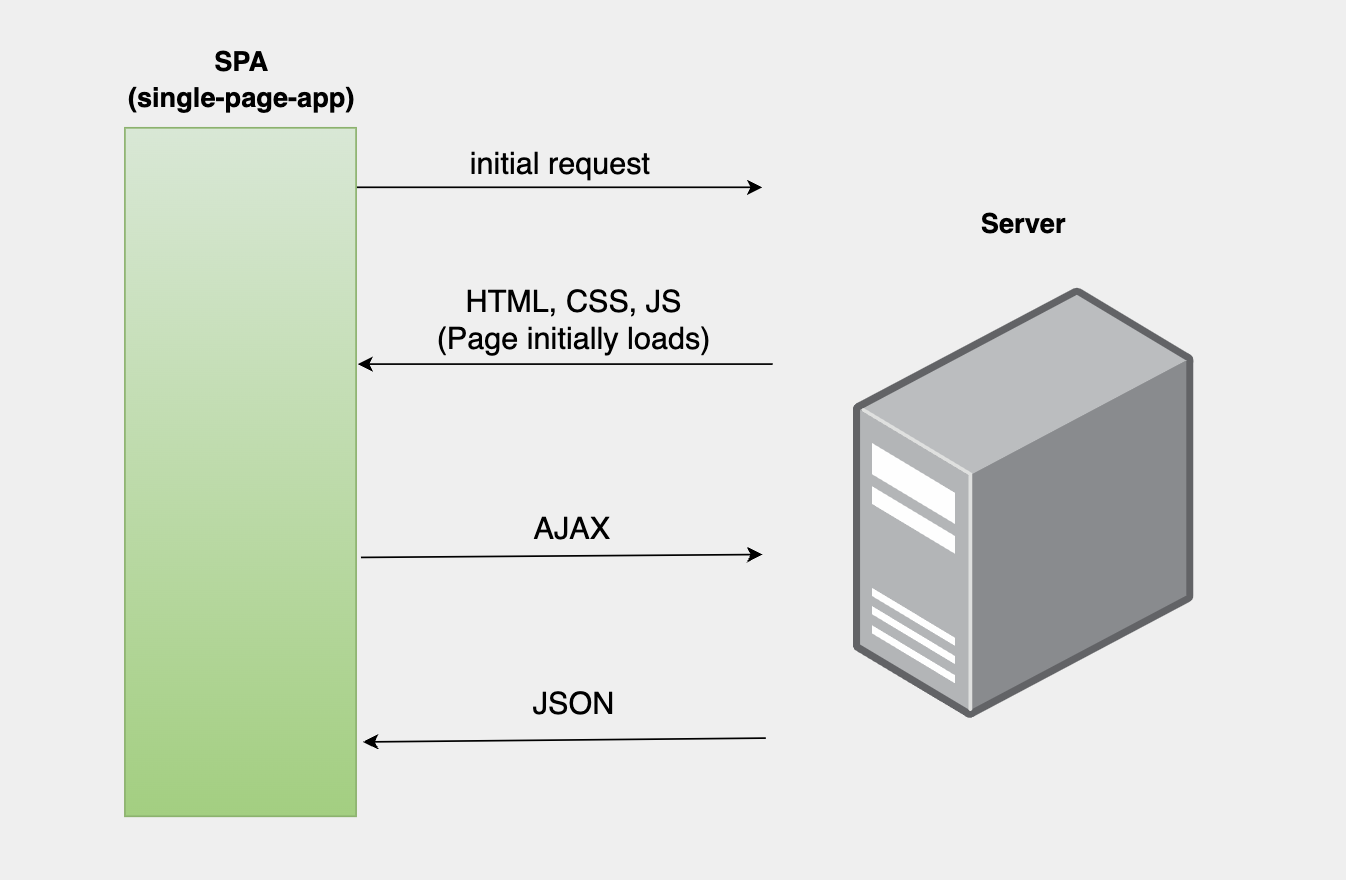
The real revolution came with the appearance of SPA (single-page application), which I discussed in more detail in my Angular vs. React article. These applications are made using libraries and frameworks such as Angular, allowing the creation of pages supporting all actions on the client’s side. This makes it possible to include fully-dynamic elements, resulting in completely interactive pages.
However, this also translates into reduced use of the server’s extensive resources to support operations – instead, users mostly use it to download data from (in the form of JSON files, for example). The entire logic is executed on the client’s target device. This approach is still very popular and many new pages are still being created using it. Below is a graphic that illustrates this approach’s operation:
However, a question may arise: if the transition to client-side operations is now so popular and allows the support of interactive elements, what motivates creators to return to server-side rendering? The reason is the constantly growing size of currently created applications and the much-improved data transmission we now have.
Because SPA applications use more resources, the load on the end-user’s device (the client) increases. This means it runs slower and needs more time to perform the required operations. At the same time, the resources provided by the server, which are usually much larger than those available to the user, are not used. As a result, the quality of the end-user experience declines over time as the apps become bigger.
Over the years, various ideas have emerged to solve the above-mentioned problems. The applications and libraries used were constantly optimized, and over time, creators realized that some websites could benefit from moving away from the CSR technique. For this reason, it was decided to combine CSR (client-side rendering) with greater use of server resources, as was the case in the past, and this is how the idea of SSR (server-side rendering) emerged.
Nowadays, websites implement very different business scenarios and, therefore, have completely different needs, which caused various solutions to appear. Below is a graphic comparing each of these approaches, detailing which technique requires how much work to deliver the application to the end user.

As you can see, each solution has a different approach to application rendering. There are three stages in this process:
The current trend is to reduce the amount of work the client performs while maintaining the ability to include dynamic content on pages. Moreover, the fact that the application building stage is performed only once (when changes are made to the application), is increasingly being used to shorten the time needed to deliver the application to the client. So, let’s move on to a detailed discussion of these techniques and the benefits of using them.
Pre CSR is a term I use for the technique of rendering page content on the server side before sending it to the client browser (it’s often called “traditional server-side rendering”, but it differs a lot from the current iteration of SSR that is the main topic of the article, so I decided to call it differently here to avoid confusion). This is the traditional method of creating websites in which all content is ready to be displayed as soon as the page is loaded.
Pre CSR is characterized by static content, which means that the page is rendered in advance and does not allow active interaction on the part of the customer. The advantage of this technique is the speed of page loading and ease of caching content, which translates into better performance and SEO.
The limitations of such websites – lack of interactivity and personalization – make this approach work mainly for websites with little changing content, such as portfolio websites or corporate websites.
In this approach, most of the rendering logic is transferred to the client side, i.e., the user’s browser. The server provides only the necessary data in the form of minimal HTML code and all logic written in JavaScript, and the entire rendering process takes place on the client side based on the received JavaScript code.
This approach allows for more dynamic user interaction and faster page loading after the first load because most operations and content updates are performed dynamically on the client side. CSR also offers better control over the user interface and allows dynamic content loading. However, the website’s performance depends on the user’s device. Moreover, CSR can make it difficult for web crawlers to index your content, negatively impacting SEO.
This solution works great for web applications that require high interactivity and dynamics, such as social media platforms and administration panels.
Server-side rendering (SSR) is a technique in which website content is rendered on the server side as complete HTML pages before being sent to the client’s browser.
SSR combines the advantages of Pre CSR with the interactivity possibilities offered by Client Side Rendering. The process is very similar to Pre CSR – the server processes the request received from the client, generates HTML and sends the finished document to the browser. Thanks to this, the browser receives ready-made page content that can be displayed to the user (which significantly shortens the loading time).
However, by itself, HTML doesn’t allow for dynamic content. The application is loaded but not hydrated (“hydrated” is a developer term that means that the page has been loaded and the JavaScript code responsible for adding dynamic event support has been correctly assigned to it). It means the page is displayed, but no buttons, online forms or navigation will work until JavaScript is hydrated. For this reason, JavaScript code is also sent to the browser, which the browser then provides to the framework used, enabling interactivity and personalization of content.
The advantages of this approach include better performance and faster content rendering, especially in the case of complex applications (they can use the server’s full computing power). You can also improve SEO because the website content is available for web crawlers. However, SSR also has disadvantages, such as generating a greater load on the server in the case of large applications and a more complicated implementation than in the case of CSR. Additionally, the waiting time for request execution may also be extended in case of a high server load.
This solution is perfect for websites that require fast loading and good performance, such as online stores and information portals.
Another page rendering technique has emerged in recent years, known as static site generation (SSG). In this method, pages are rendered server-side, similar to SSR, but with the difference that content is generated dynamically based on external data, such as the content of Markdown files or API queries.
This approach achieves a compromise between performance and interactivity, enabling the generation of static pages based on retrieved data that can be quickly delivered to users. To make changes to such a page, e.g., due to the appearance of a new entry, you simply run the application build again and deliver the updated version of the application to the server. The resulting loading speed and ease of content caching – which translates into better performance and SEO – come at the cost of lower interactivity opportunities.
This solution works great for websites that offer rarely changing content, such as blogs or portfolio websites.
The latest trend in web page rendering is Incremental Static Regeneration (ISR). It’s an improved SSG technique that combines the features of both SSR and SSG. It allows static pages to be rendered similarly to SSG but uses the SSR approach for pages containing changing data.
Therefore, we actually distinguish two scenarios for rendering pages using ISR:
This solution is intended for websites requiring dynamic content but with limited update frequency, such as online stores, blogs, information websites, etc.
Now that we understand the benefits and drawbacks of each rendering technique, we can move on to how it is done in Angular. As I told you before, since version 16, Angular applications can be extended with SSR logic. It allows us to render pages on the server and includes Prerendering logic (SSG), so we can benefit from implementing both of these approaches. One thing that is currently unavailable is ISR, which, as of today, is only available in the React-based framework called Next.js. Let’s move on and explore how Angular SSR approaches implementing all of these features.
First, let’s create a new Angular application that will use the capabilities offered by server-side rendering. The version of the Angular framework I will be working with in this tutorial is Angular 17. To create a new application, you only need to run the following command using the selected CLI:
ng new APP_NAME --ssr
Alternatively, if you want to add SSR to an existing Angular application, just use the following command:
ng add @angular/ssr
Regardless of which option you used, your application should now support SSR. So, go to the newly created folder and open the application using the selected IDE (in my case, it will be VSCode). When you now look at the structure of your project, you will see three interesting files that you don’t have in the case of a regular CSR-based project:
Let’s look at the first one. It’s the code responsible for creating the Node.js Express server. This is a fairly basic server setup, but what should catch your attention is the code below:
server.get('*', (req, res, next) => {
    const { protocol, originalUrl, baseUrl, headers } = req;

    commonEngine
      .render({
        bootstrap,
        documentFilePath: indexHtml,
        url: `${protocol}://${headers.host}${originalUrl}`,
        publicPath: browserDistFolder,
        providers: [{ provide: APP_BASE_HREF, useValue: baseUrl }],
      })
      .then((html) => res.send(html))
      .catch((err) => next(err));
  });
The above function will always be executed (due to the *) when a GET request is triggered by the client. As a result, this means that regardless of what path you go to in your application, the above logic will be performed before this transition is made. Also, pay attention to one of the arguments provided to the render method, namely bootstrap (the individual arguments are described in detail in the documentation). When you look for where this variable comes from, you will notice that it’s imported from the second file mentioned at the beginning:
import bootstrap from './src/main.server';
When you look at the contents of this file, you will notice that it’s an extremely similar application bootstrap, as is the case in the main file of every Angular-based application, main.js. Note that they use exactly the same function to run the bootstrapApplication app. The only major difference between these two files is where the application’s config is downloaded from. Details:
main.server.ts:
import { bootstrapApplication } from '@angular/platform-browser';
import { AppComponent } from './app/app.component';
import { config } from './app/app.config.server';

const bootstrap = () => bootstrapApplication(AppComponent, config);

export default bootstrap;
main.ts:
import { bootstrapApplication } from '@angular/platform-browser';
import { appConfig } from './app/app.config';
import { AppComponent } from './app/app.component';

bootstrapApplication(AppComponent, appConfig)

  .catch((err) => console.error(err));
As you may have already guessed, this means that the application is first rendered by the server and only then on the browser side. However, before we get to what exactly this translates into, let’s look at the last file mentioned above, i.e. app.config.server.ts:
import { mergeApplicationConfig, ApplicationConfig } from '@angular/core';
import { provideServerRendering } from '@angular/platform-server';
import { appConfig } from './app.config';

const serverConfig: ApplicationConfig = {
  providers: [
    provideServerRendering()
  ]
};

export const config = mergeApplicationConfig(appConfig, serverConfig);
Here, you can also see an interesting relationship: the Angular application’s configuration is merged with the server’s configuration. As a result, if you make changes to your application’s configuration, these changes will be reflected in the server configuration.
import { ApplicationConfig } from '@angular/core';
import { provideRouter } from '@angular/router';

import { routes } from './app.routes';
import { provideClientHydration } from '@angular/platform-browser';

export const appConfig: ApplicationConfig = {
  providers: [provideRouter(routes), provideClientHydration()]};
Now, let’s return to the earlier question: why does the server render the application before the client performs this process?
The answer to this question is related to the hydration process, which has already been discussed in the article. In the case of Angular, the markup obtained from building the application by the backend, i.e., on the server side, is transferred along with the necessary data to the client, which then renders the entire application based on it.
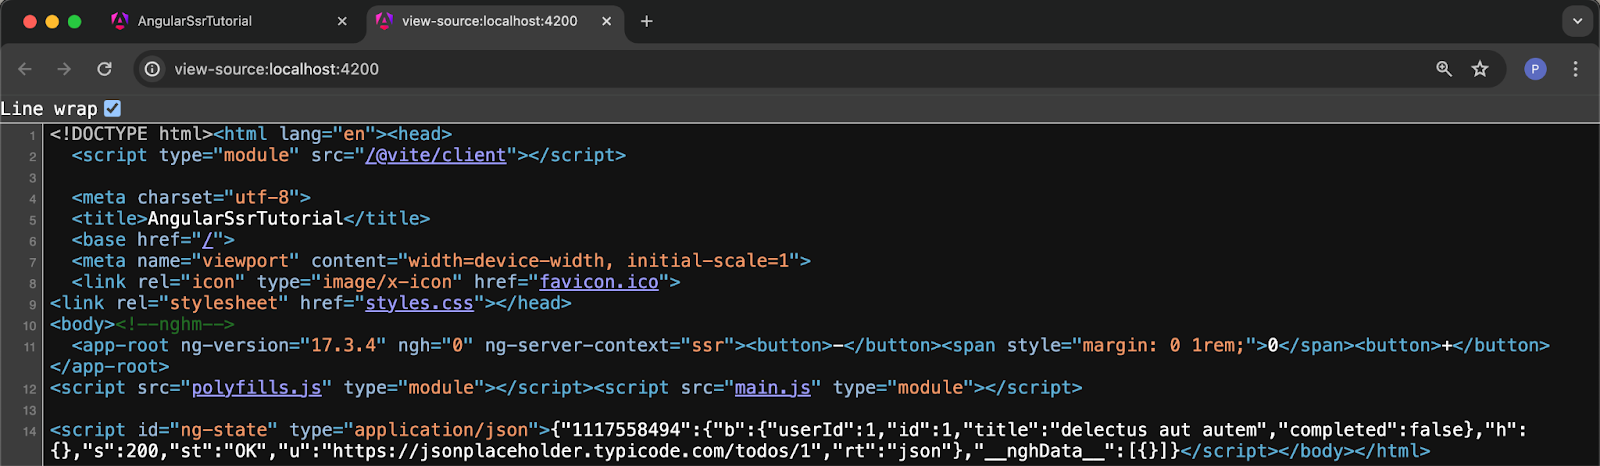
Thanks to this, the client doesn’t have to perform this entire process from the beginning but can use the version prepared by the backend. To see that this is actually happening, just run your application and right-click to display the website’s source code. You should see the following view:

As you can see, the code includes an additional parameter of the app-root tag, ng-server-context=’ssr’. In the middle of this tag, there is a markup of your application. This proves that your application was first rendered by the backend, which not only shortens the waiting time for the end-user to receive the page but also provides code that facilitates web crawlers’ indexing of pages.
To start implementing SSR, you need to define which elements of your application should be executed on the server side and which on the client side. Lifecycle Hooks is a crucial element of Angular, created for this very purpose – it allows you to manage the content rendering process effectively. Let’s look at which component lifecycle methods are performed on the side of the server, which are executed by the browser, and the consequences of this.
When each component is rendered, the constructors and some of the lifecycle methods, such as ngOnChanges, ngOnInit, ngDoCheck, etc., will be executed both on the server side and in the browser. However, the rest of the event handlers, which are not directly related to rendering, will be executed only on the browser side. To illustrate this process, let’s modify the app.component.ts file as follows:
import { AfterViewInit, Component, OnInit } from '@angular/core';
import { RouterOutlet } from '@angular/router';


@Component({
  selector: 'app-root',
  standalone: true,
  imports: [RouterOutlet],
  template: `<button (click)="decrement()">-</button>
    <span style="margin: 0 1rem">{{ counterValue }}</span>
    <button (click)="increment()">+</button>`,
})
export class AppComponent implements OnInit, AfterViewInit {
  counterValue = 0;
  ngOnInit(): void {
    console.log('ngOnInit: Hello from the browser and the server!');
  }
  ngAfterViewInit() {
    console.log('ngAfterViewInit: Hello from the browser and the server!');
  }
  constructor() {
    console.log('constructor: Hello from the browser and the server!');
  }
  decrement() {
    console.log('decrement: Hello from the browser!');
    this.counterValue--;
  }
  increment() {
    console.log('increment: Hello from the browser!');
    this.counterValue++;
  }
}
The result of this code is a simple application that allows you to display a counter whose value can be increased and decreased by pressing the appropriate buttons. However, what should interest you most is the result of the ngOnInit and ngAfterViewInit hooks. Start the application in the chosen CLI using the following command:
ng serve
The following information should appear in the console:

Additionally, when you look at your browser’s console, you will also see the same entries:

This proves that the app managed to perform operations both on the server side, and the browser side. However, you must be aware of certain limitations of this approach. Browser-specific elements such as global objects: window, document, navigator, location or localStorage are not available outside of the browser. Let’s try to modify the constructor code by adding one of these objects to it, for example:
constructor() {
  console.log('Hello from the constructor!');
  console.log('This is current href in the browser: ' + window.location.href);
}
As a result of this action, the server will return an error about the lack of window definition, as shown below:
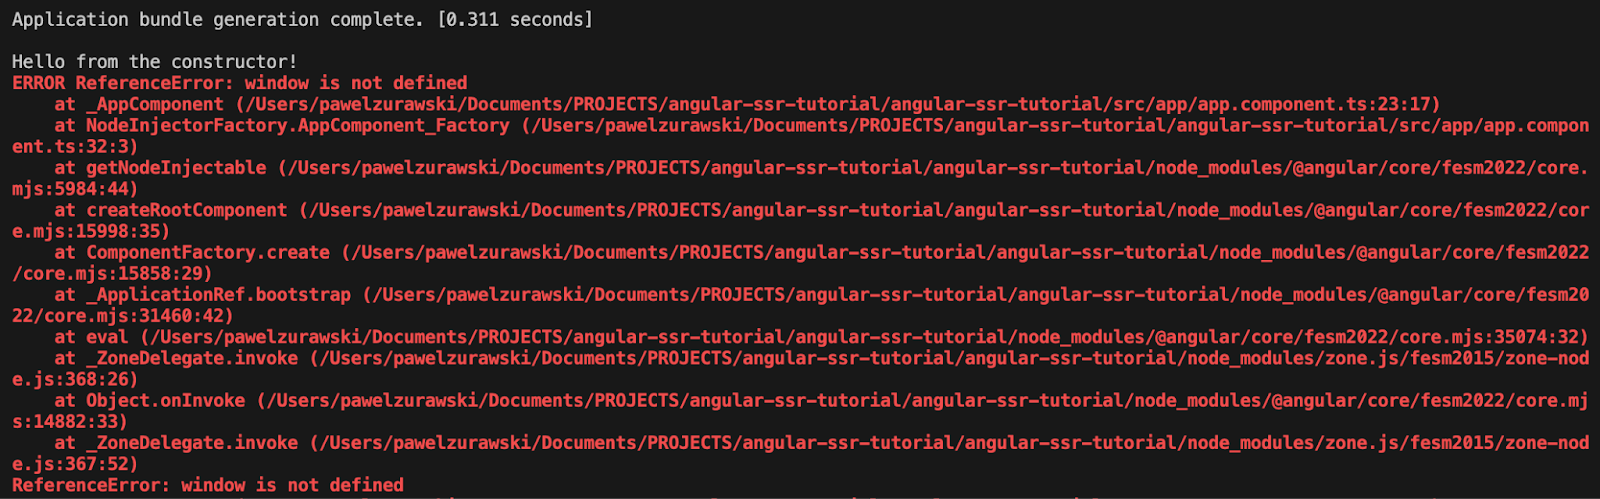
The same situation occurs when you try to use this code in any lifecycle hook which executes on the side of the server. Now you’re probably wondering how to get around this problem. After all, in many cases, it’s necessary to, for example, read the value contained in localStorage when initializing the component. Angular provides two solutions to this problem.
1. Use of the isPlatformBrowser, isPlatformServer functions and the PLATFORM_ID constant value
The first approach is to use a function that returns information about the type of platform on which the application code is executed. This approach is nothing new, but it works great in this case. So, add the appropriate code to your application and check its operation.
import { isPlatformBrowser, isPlatformServer } from '@angular/common';
import {
  ...,
  inject
} from '@angular/core';


...


platformId = inject(PLATFORM_ID);
ngOnInit(): void {
  if (isPlatformBrowser(this.platformId)) {
    console.log('Hello from the ngOnInit in the browser');
    console.log(
      'This is current href in the browser: ',
      window.location.href
    );
  }
  if (isPlatformServer(this.platformId)) {
    console.log('Hello from the ngOnInit on the server');
  }
}
The above code should trigger a different console entry when ngOnInit is executed, depending on the platform on which it was executed. To check the correct operation of this mechanism, just look at these consoles:
Server:

Browser:

The code correctly printed the appropriate information, indicating where it was executed. Additionally, you can see that with this approach it’s possible to access browser-specific global objects, as seen in the screenshot from the browser console.
2. Using lifecycle hooks afterRender and afterNextRender
The second approach is to use the new hooks introduced in Angular 17. Let’s discuss their purpose and how they work and then try to achieve a similar effect as in the previous point.
That’s the theory. Let’s move on to implementing the required logic within your application.
import {
  ...,
  afterNextRender
} from '@angular/core';

 constructor() {
    afterNextRender(
      () => {
        console.log('Hello from the afterNextRender!');
        console.log(
          'This is current href in the browser: ',
          window.location.href
        );
      },
      { phase: AfterRenderPhase.Write } // Optionally you can choose a phase
                                           when your code should be executed
    );
  }
Server:

Browser:

You achieved the expected effect and executed your code only on the browser side. Additionally, the new hook allows you to choose in which rendering phase the code should be executed, allowing for greater transparency and readability of the code and easier optimization of its operation (check out the documentation for more info).
Another useful option Angular SSR offers is the ability to cache responses received from queries. This means that the server will query the data that your application requires and then pass this data to the front-end along with the rendered application. You can easily see how it works by introducing a few modifications to your application.
First, you’ll need to make some small changes to the configuration of your app.config.server.ts file. To configure the HttpClient service used for this purpose, you must provide the provideHttpClient function. It’s recommended, but not necessary, to provide the withFetch() function to achieve better performance (if this option is missing, Angular will notify you about it by displaying a “warning” message in the console).
import { provideHttpClient, withFetch } from '@angular/common/http';


const serverConfig: ApplicationConfig = {
  providers: [provideServerRendering(), provideHttpClient(withFetch())]
};
After adding the ability to query the server, you can now modify the application code so that it performs a GET query. So, let’s start by creating a website that will perform this query. You can use the command for this:
npx ng g s SERVICE_NAME
Then go to the newly generated file and modify it as follows:
import { HttpClient } from '@angular/common/http';
import { Injectable, inject } from '@angular/core';


export class AppService {
  http = inject(HttpClient);


  simpleGetRequest() {
    return this.http.get('https://jsonplaceholder.typicode.com/todos/1');
  }
}
As you can see, this website allows you to perform a simple GET query using the popular JsonPlaceholder API, which allows you to download test dummy data easily. This should be enough to demonstrate how GET query caching works in Angular SSR. Of course, nothing stops you from using the data provided by your own server if you have one. Now, return to your application and modify app.component.ts to trigger your query.
import { RouterOutlet } from '@angular/router';
import { tap } from 'rxjs';
import { AppService } from './app.service';
...


@Component({
  imports: [RouterOutlet, HttpClientModule],
  providers: [AppService],
  ...
})
...


appService = inject(AppService);
  ngOnInit(): void {
    this.appService
      .simpleGetRequest()
      .pipe(
        tap((resp) => {
          console.log(resp);
        })
      )
      .subscribe();
  }
As a result of adding the above changes, both in the console of your server and in the browser, you should see the following information.
Server:

Browser:

But that’s not all. The above information proves that in both cases, you successfully completed the query on both the server and browser sides. However, how to check whether the received data is actually cached and transferred from the server? Well, nothing could be simpler – all you need to do is examine the source code of your website. This time, you should see the following view:
You can also see here that the server has transferred the information received as a result of the query to the client. This clearly proves that your GET query has been correctly cached. However, it is possible to cache not only GET but also POST queries, which may prove useful when using, for example, GraphQL. To add this option, go to the app.config.ts file and modify the provideClientHydration settings as shown below:
export const appConfig: ApplicationConfig = {
  providers: [
    ...,
    provideClientHydration(
      withHttpTransferCacheOptions({
        includePostRequests: true,
      })
    ),
  ],
};
Server-side rendering is a classic technique for creating web applications, and from the very beginning, it has been the default way of presenting content to users. However, over time, it became less popular due to its limitations. Fortunately, thanks to the evolution of technology and changes in the approach to page rendering, SSR is back in a completely new form. With the new capabilities and advanced tools offered by today’s front-end technologies, applications using SSR run even faster, are better optimized in terms of performance and SEO, and provide much better user experiences by reducing page loading time (among other things).
The introduction of Server-Side Rendering (SSR) by the Angular team is a milestone in the development of this technology. It opens up new opportunities to create even better applications, taking advantage of everything mentioned above. Even though Angular started officially supporting this technology relatively recently, it’s constantly developing its support and adding new functionalities to provide developers with the widest possible set of tools and possibilities. Thanks to this, Angular fits into the latest trends in creating mobile applications and is becoming an increasingly attractive choice for projects requiring SSR.
Also, if you’re interested in content related to front-end development and frameworks, check out some of the other articles on our blog:


