
Disclaimer (January 11, 2024): this article was originally published in July 2022, but it has been updated several times with new information regarding features added in Oracle APEX versions 22.1 and 23.1. The last of these updates took place in January 2024.
In one of my previous articles – Oracle APEX tutorial: Uncover Oracle’s best-kept low-code secret – I’ve told you what Oracle APEX is, and what it can do. However, It’s an evolving technology, which constantly changes and improves. In this blog post, I’ll show you some of the most beneficial features that Oracle has introduced in versions 23.1 and 22.1.
Version 23.1:
Version 21.2:
I’ll go over all of them in detail and show you how they work using a demo application I’ve made for this purpose. Also, this article is based on a few presentations I made for various conferences. If you prefer the video format, you can always watch them on our YouTube channel:
Let’s take a few steps back and start with a formal introduction to Oracle’s low-code solutions. The company has two of these:
The important thing to note here is that Oracle APEX is a web-based solution. You develop, deploy and run your applications in the web browser. APEX works with mobile, standalone, desktop, and tablet browsers. The solution can be used by Database Developers, Front-End Developers, and Citizen Developers (non-technical people who take part in the process of software development thanks to APEX’s ease of use).
You can run APEX using Oracle’s Autonomous Cloud. The database there is self-repairing, self-driving, and self-running. It comes in two flavors: Autonomous Transaction Processing (ATP), and Autonomous Data Warehouse (ADW). However, you can also run APEX as a Database Cloud Service (DTS), on-premise, or using a private cloud. There are both official and community-made containers too – for example, the one using Docker, which I use in the examples in this article.
I won’t take you through APEX’s history, the advantages of working with it, examples of use, as well as the setup and basics of building applications with this solution. If you want more information on some or all of these things, you can find it in my Oracle APEX tutorial – the previous blog post.
Oracle APEX 23.1 brought a couple of really interesting new features. Let’s go through them one by one.
Let’s start with the new, modernised Object Browser. The cool thing about it is that it stores the session states of the tab you visit so you can get back to it – not just in the browser, but the tab itself. It also provides several easy ways to create new database objects.
In APEX App Builder, go into the Object Browser, and you can see a collection of objects. As you can see… I’ve got a weather table here.
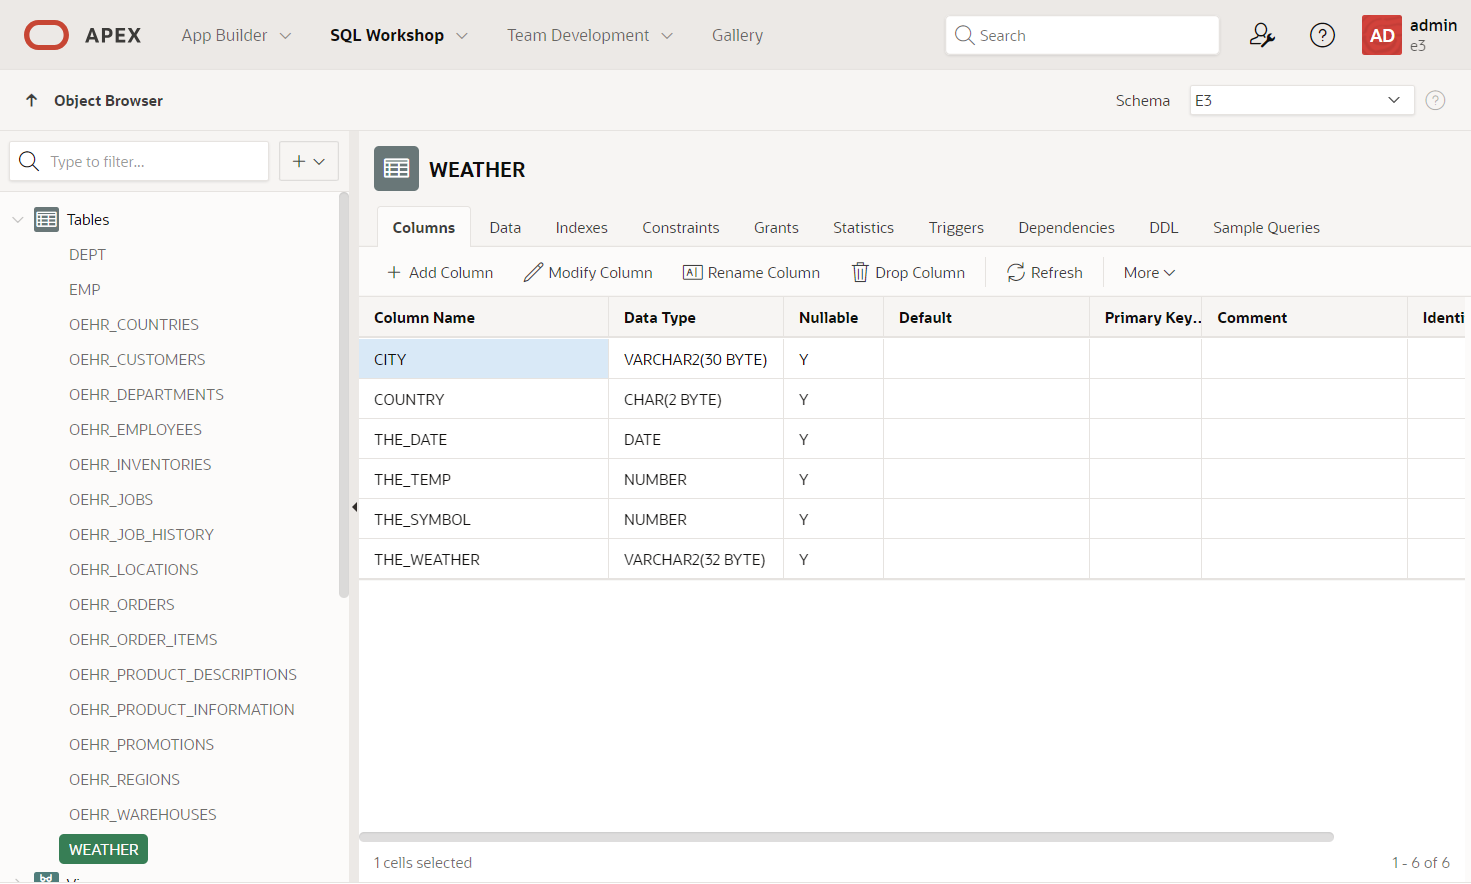
If you click through the tabs, you can see the data, statistics, and sample queries, which you can run straight away – if you click the Run button, it’ll go straight into SQL Commands. You also have the ability to copy the query.
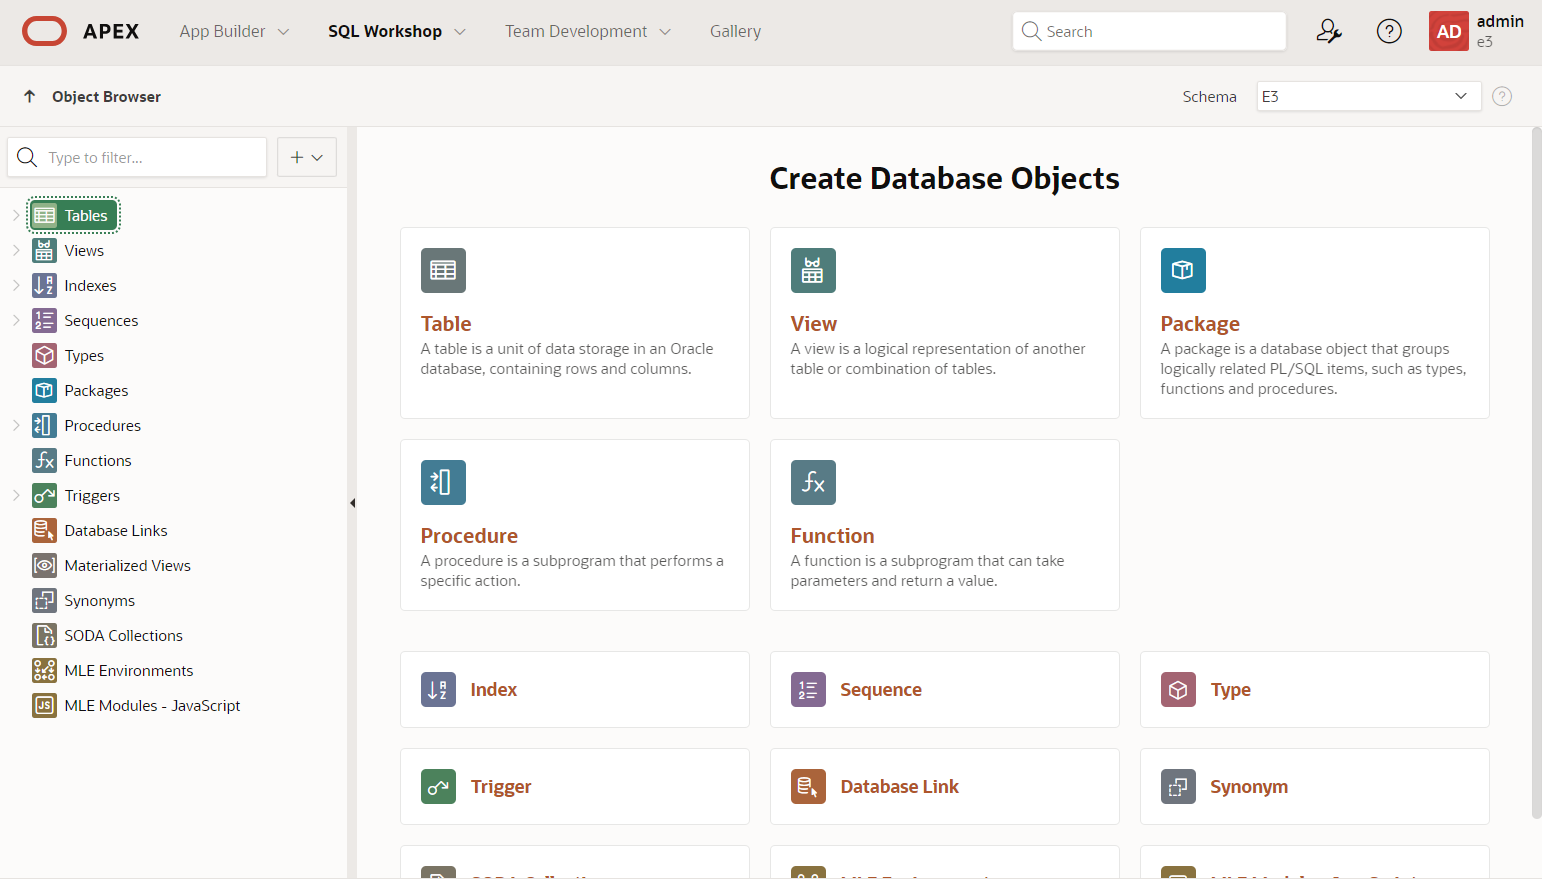
If you go back into Object Browser, you’ll land on the very same object you were previously focusing on. If you open a new page in a separate tab, you’ll see a splash screen – a landing page allowing you to create database objects. The browser allows you to select and copy/paste multiple columns exactly how you copied them, which I like.
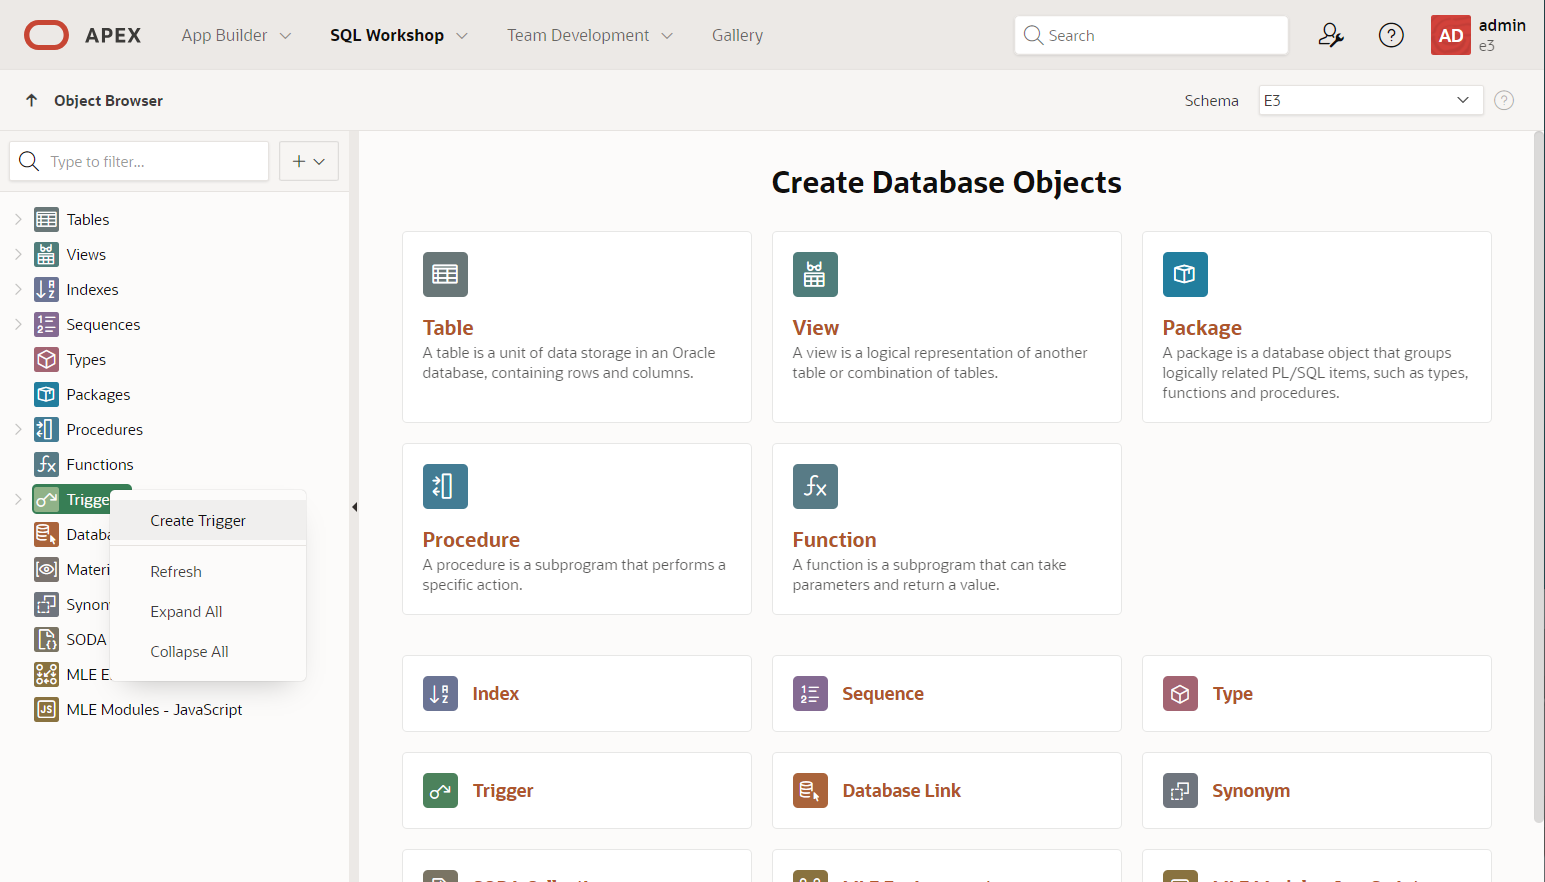
You can also right-click the positions on the list on the left side of the screen – or click the + button next to it – to create various things really quickly.
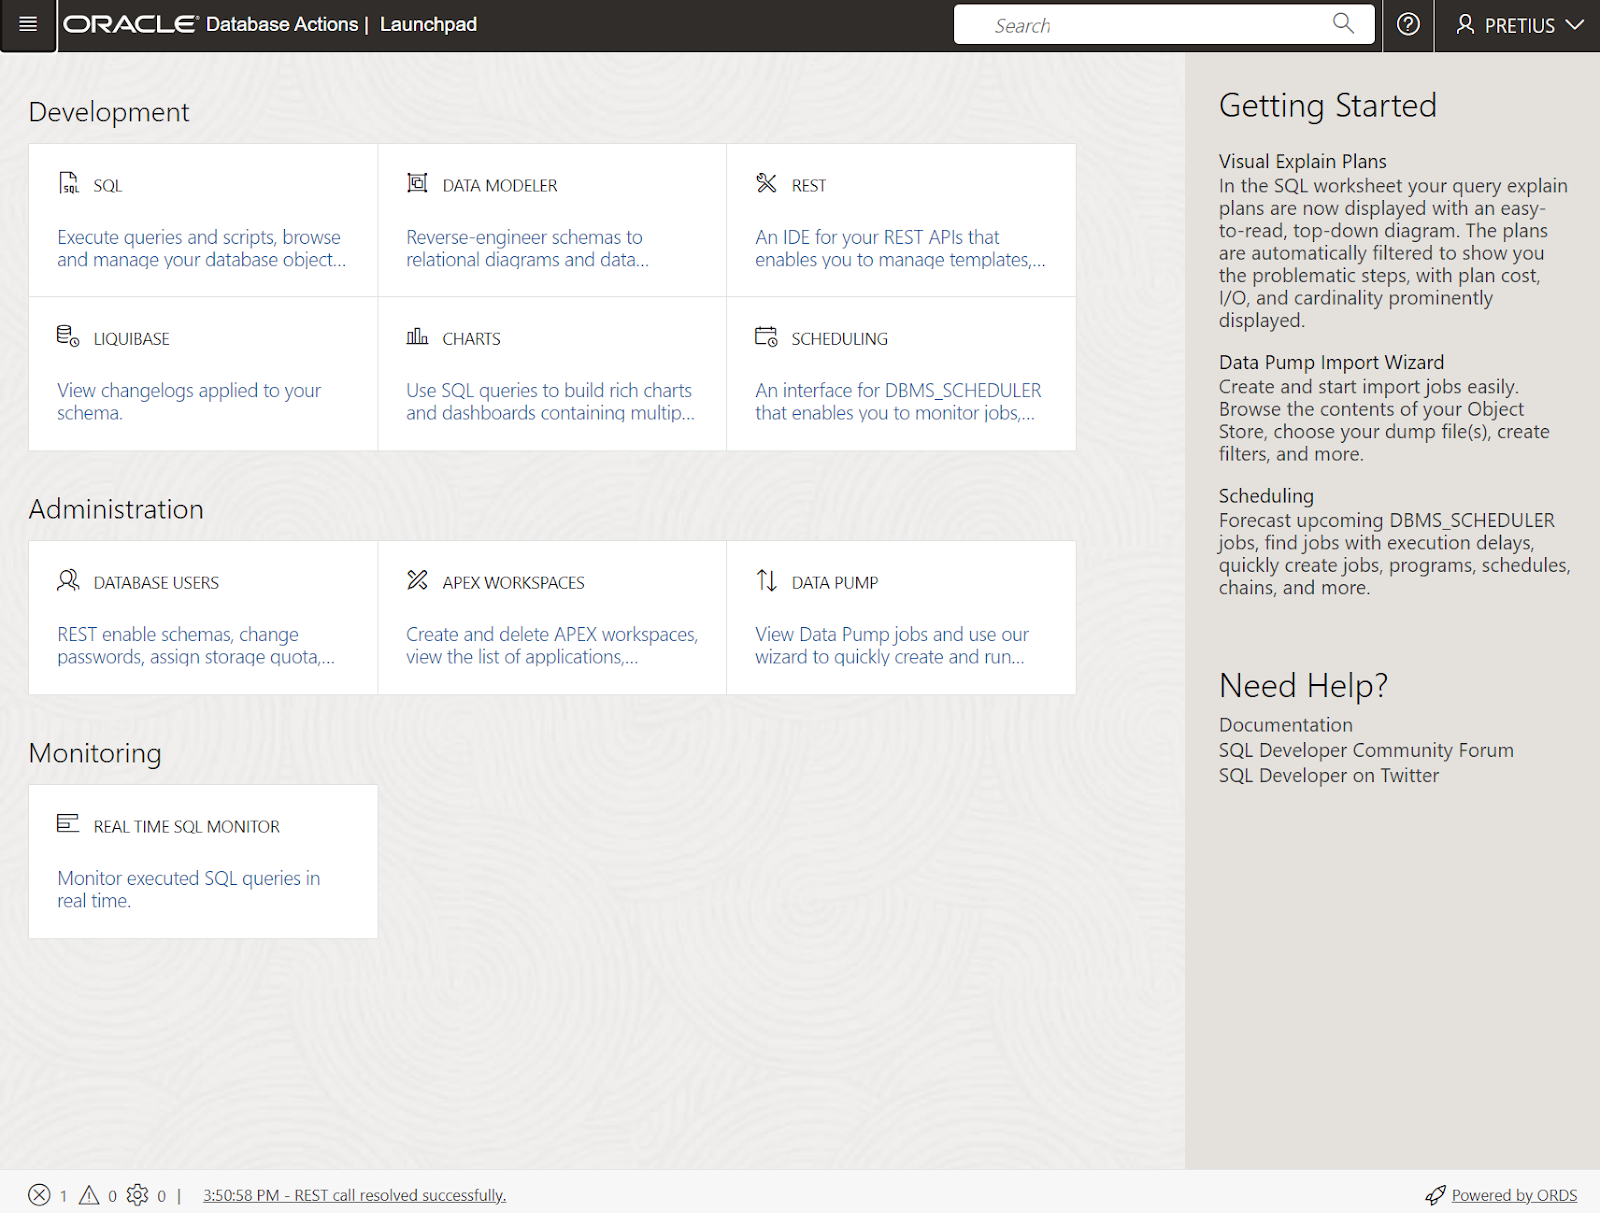
Another interesting new feature is the SQL Developer Web, which you can access from the Object Browser menu. It’s a browser-based application that uses ORDS to provide many of the database and administration features you know from the desktop-based SQL Developer, although it seems to be a bit slower.
However, it’s worth pointing out that the SQL Developer Web will only be available if you meet four conditions:
If you meet these conditions and have a single REST-enabled schema, you’ll go straight to that one when you click the SQL Developer Web button under SQL Workshop. If you have more than one, you’ll be able to choose.
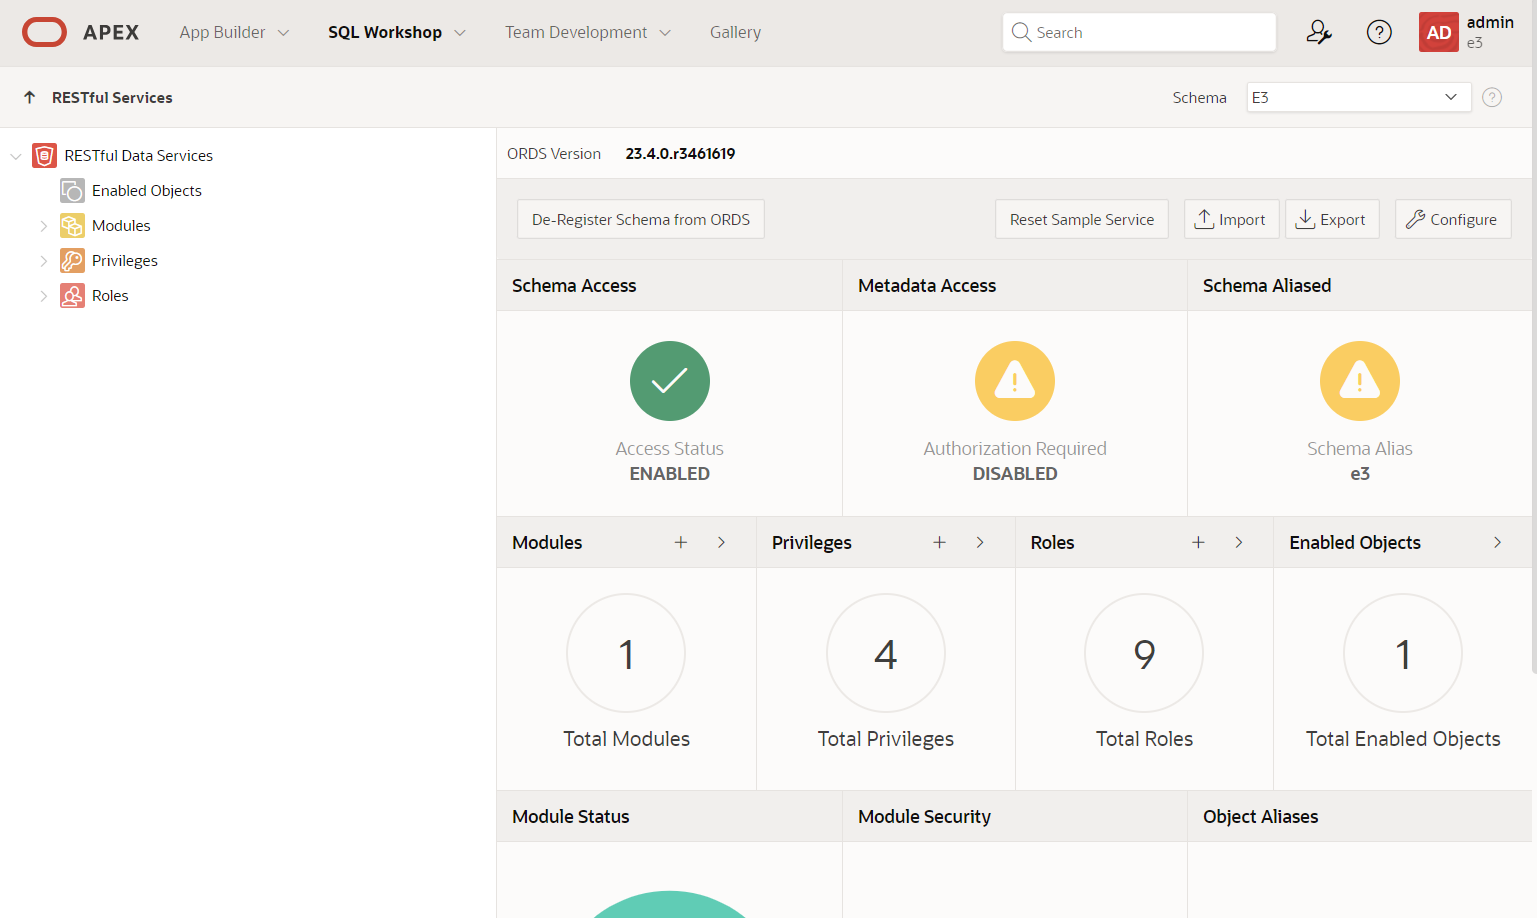
The SQL Developer Web provides some bonus features – for example, you can manage database users, create charts, and do a couple of other things.
One big way in which SQL Developer Web is better than the traditional SQL Developer is that it allows you to create Materialized Views, which SQL Workshop does not allow. Cool.
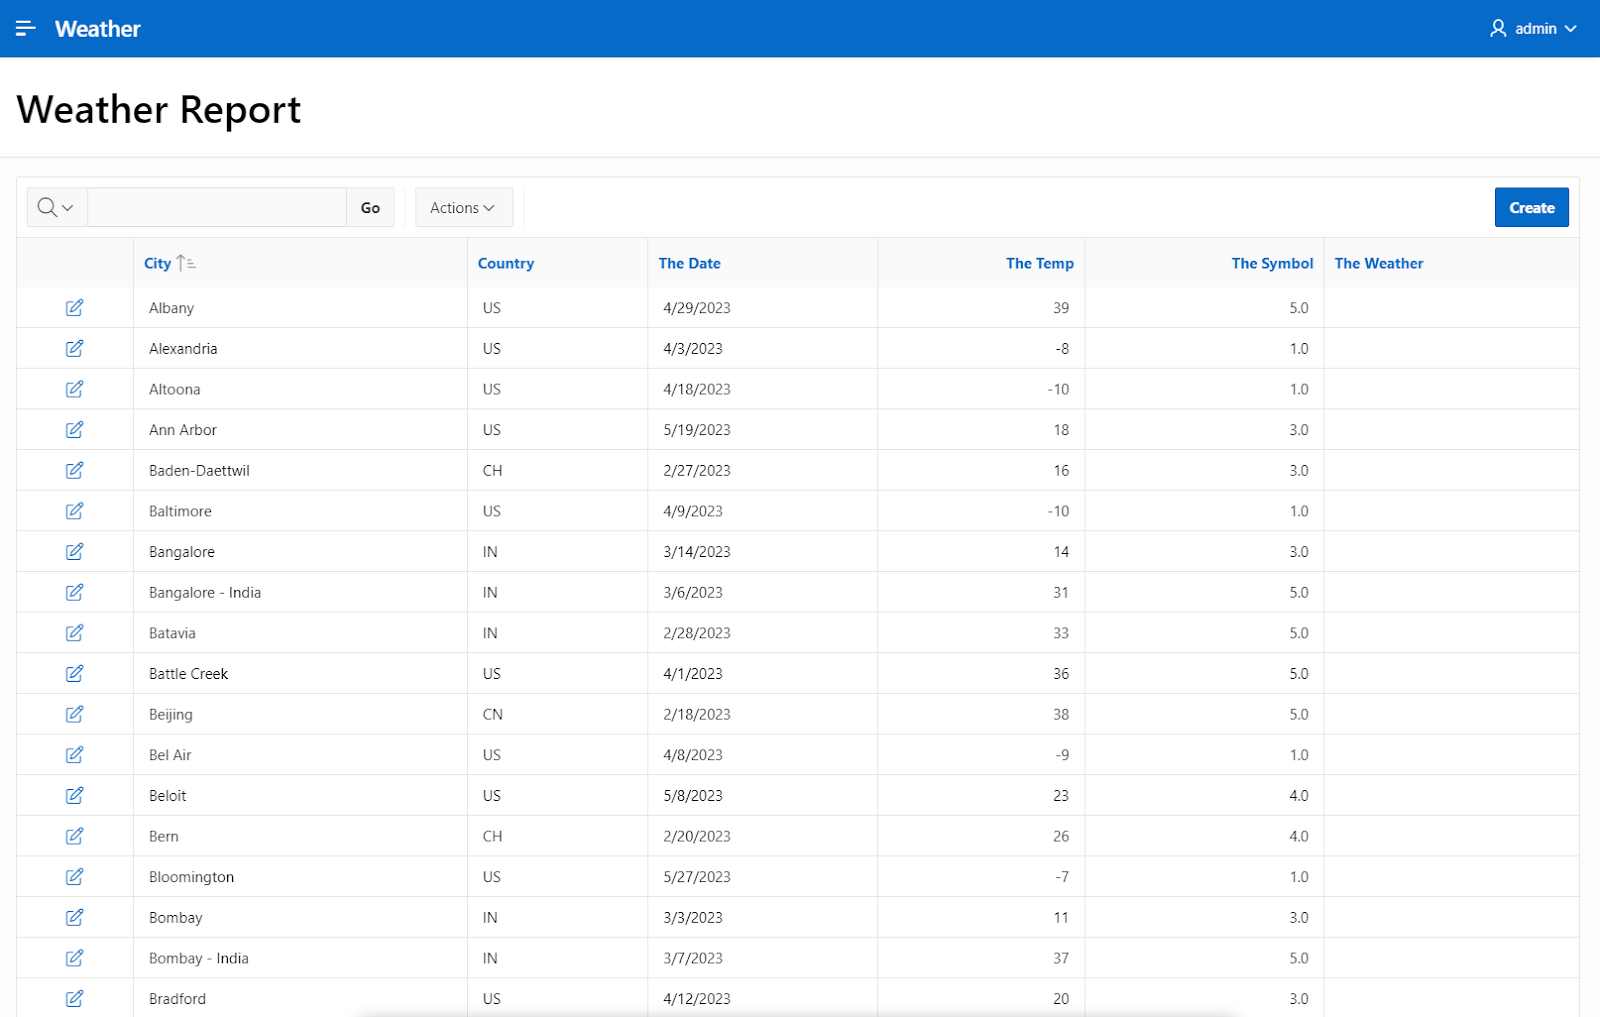
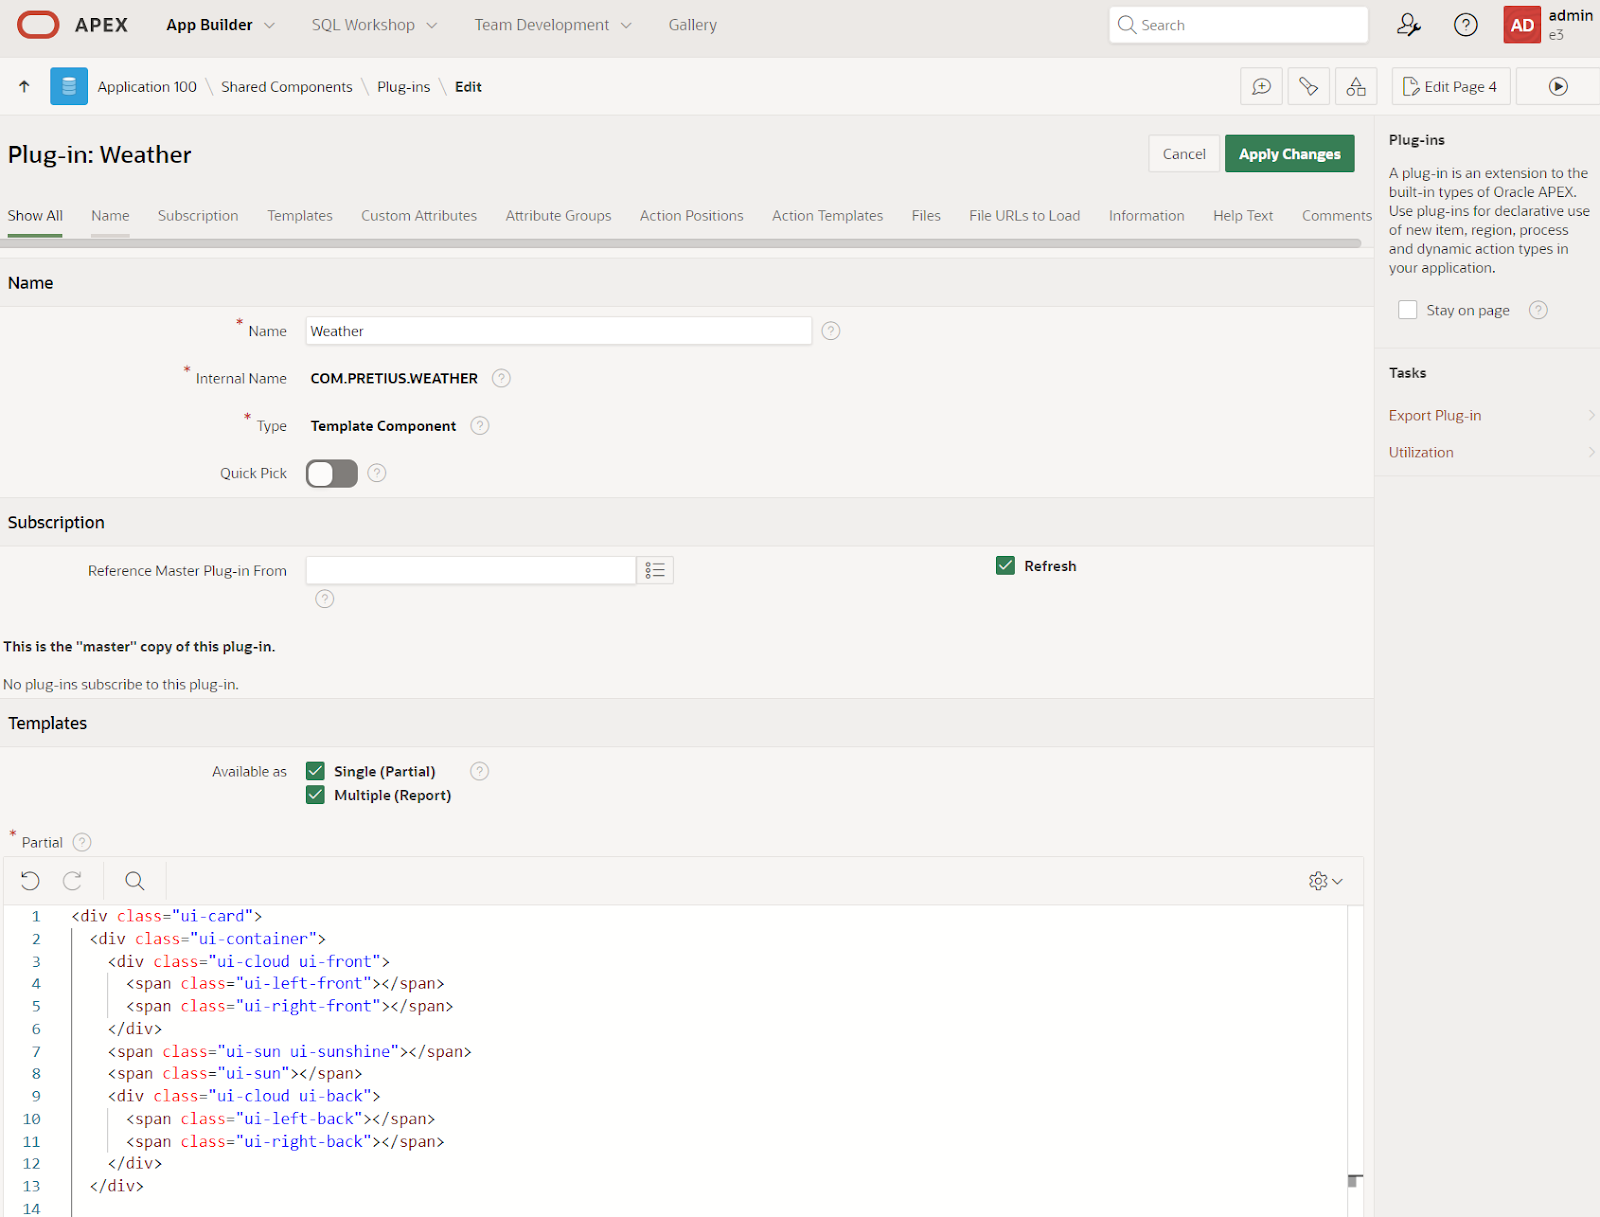
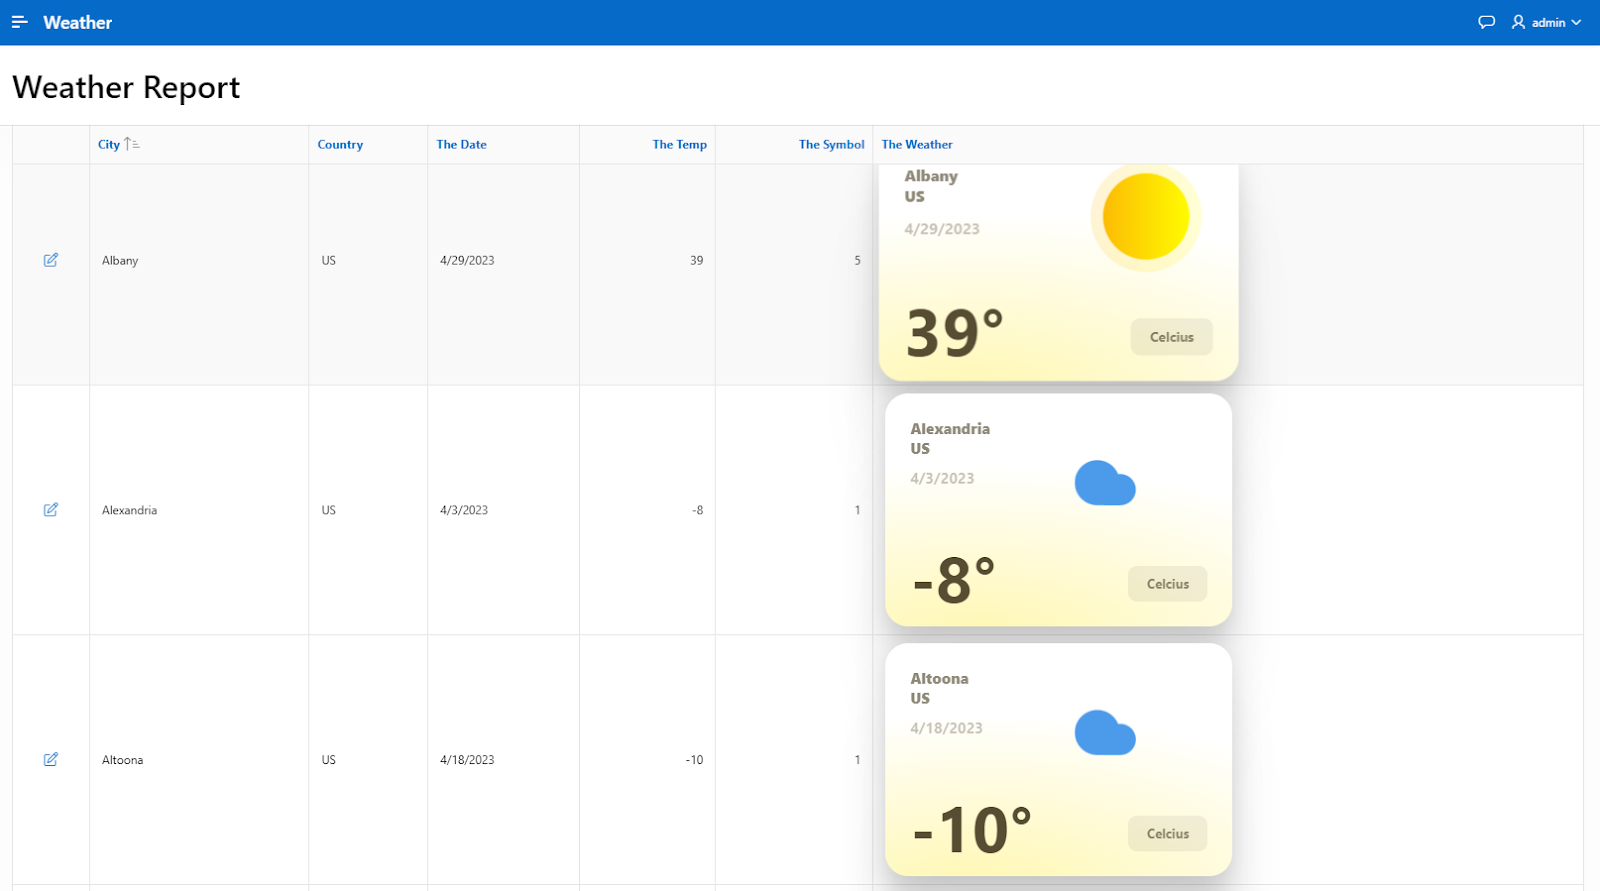
Another nice new feature is the Template Components. To explain what it is and how to use it, I’ll go to my demo app, which stores data regarding temperatures in various cities of the world. While numerical information is quite handy, sometimes it’d be nice to have a way to show it in a more visual way. For this to work, I’ve created a The Weather column that you can see on the right side.
I did a Google search for weather visualization and found a nice card posted by @zanina-yassine. I’ve copied the HTML & CSS.
Now, let’s create a Template Component – I copy the HTML again and go to the Shared Components. We won’t find Template Components there yet because it’s a type of plug-in – so I select Plug-ins and then Create from Scratch. I specify the name and select the Template Component type. I also need to decide whether it should be available as Single (Column), Multiple (Report), or both – I choose both.
I remove a couple of lines from the partial, paste in the HTML code I copied earlier, and press the Create Plug-in button.
I’m halfway through the Template Component creation. The other thing I need to do is upload the CSS I copied earlier.
I go to the File section of my plugin’s settings and choose Create File. I call it weather.css, press Create, copy the contents of the CSS file, but change the prefix.
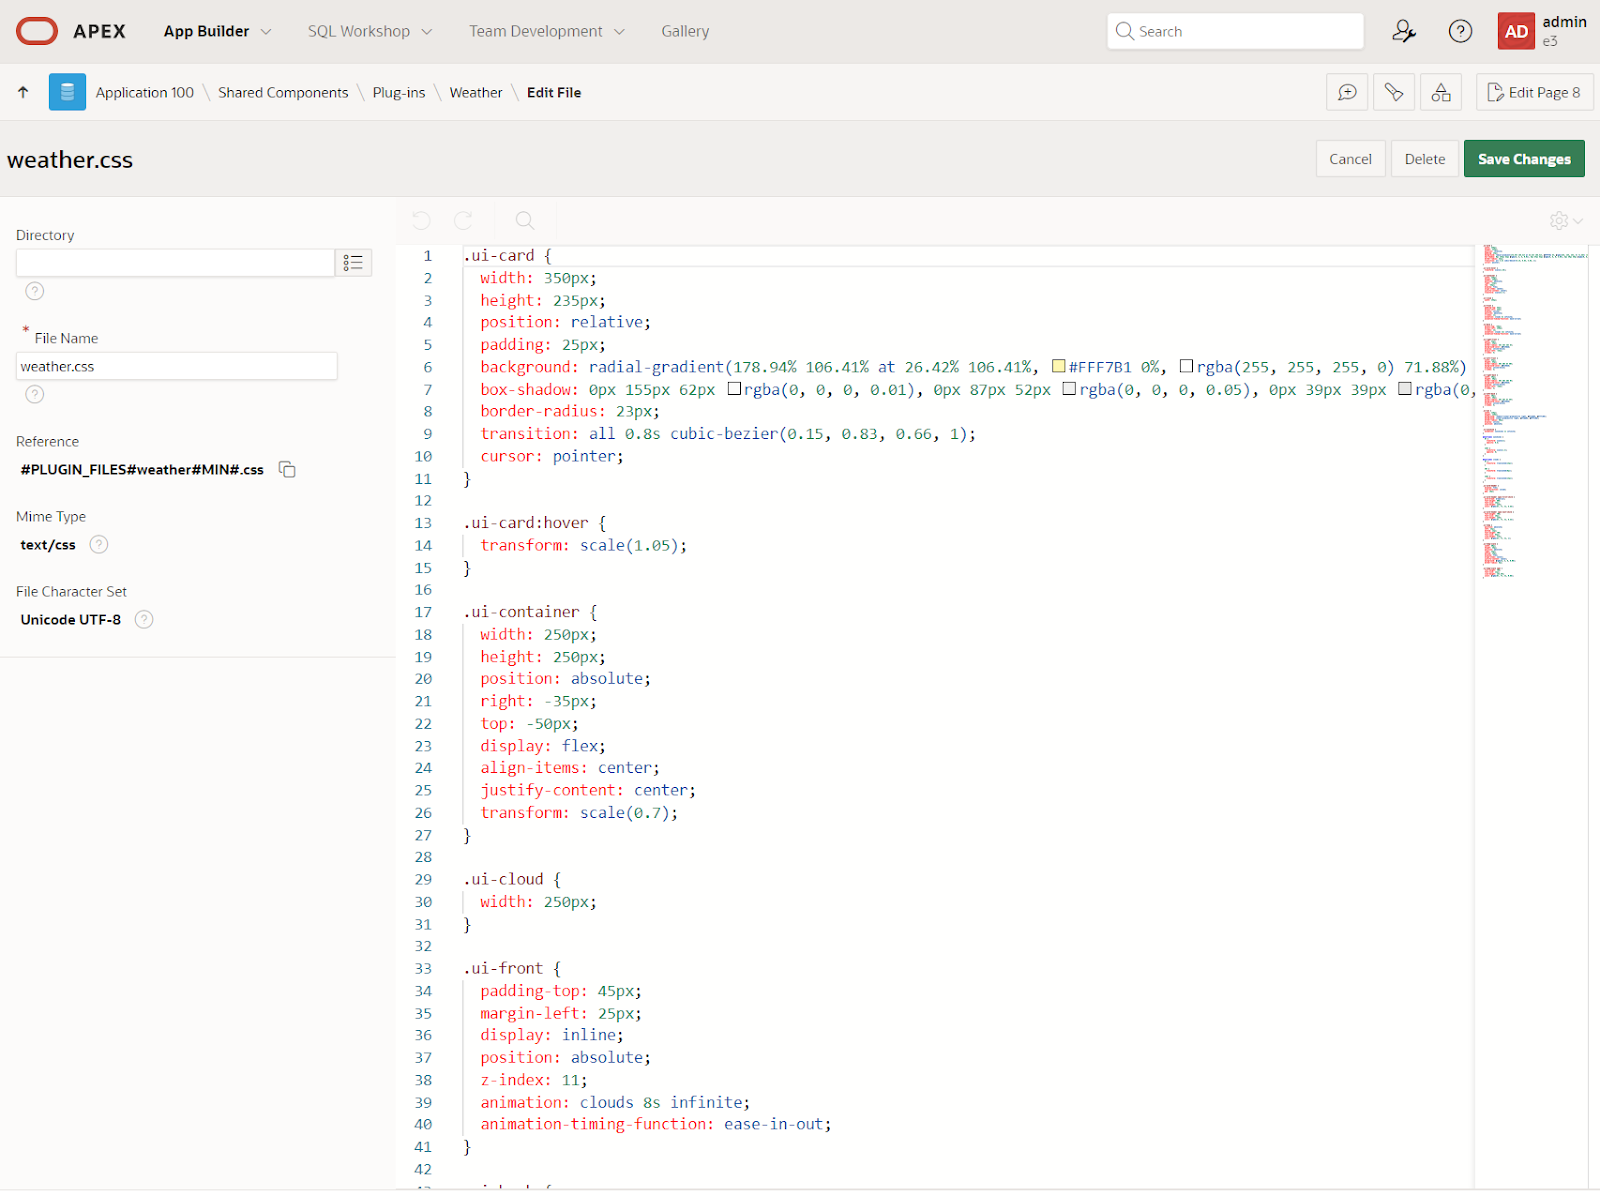
I save the file, and it’s also automatically minified, so I have two versions of it now. I choose the minified variant (but it can be either one) and load it by putting the following line under Cascading Style Sheet in the File URLs to Load tab.
#PLUGIN_FILES#weather#MIN#.css
This allows me to start using the Template Component straight away. I edit a page in Page Designer and look at that The Weather column I mentioned earlier. I want to modify it to use the Template Component. To do this, I need to select it as the Type from under Application Components (not Template Components, which is a bit confusing).
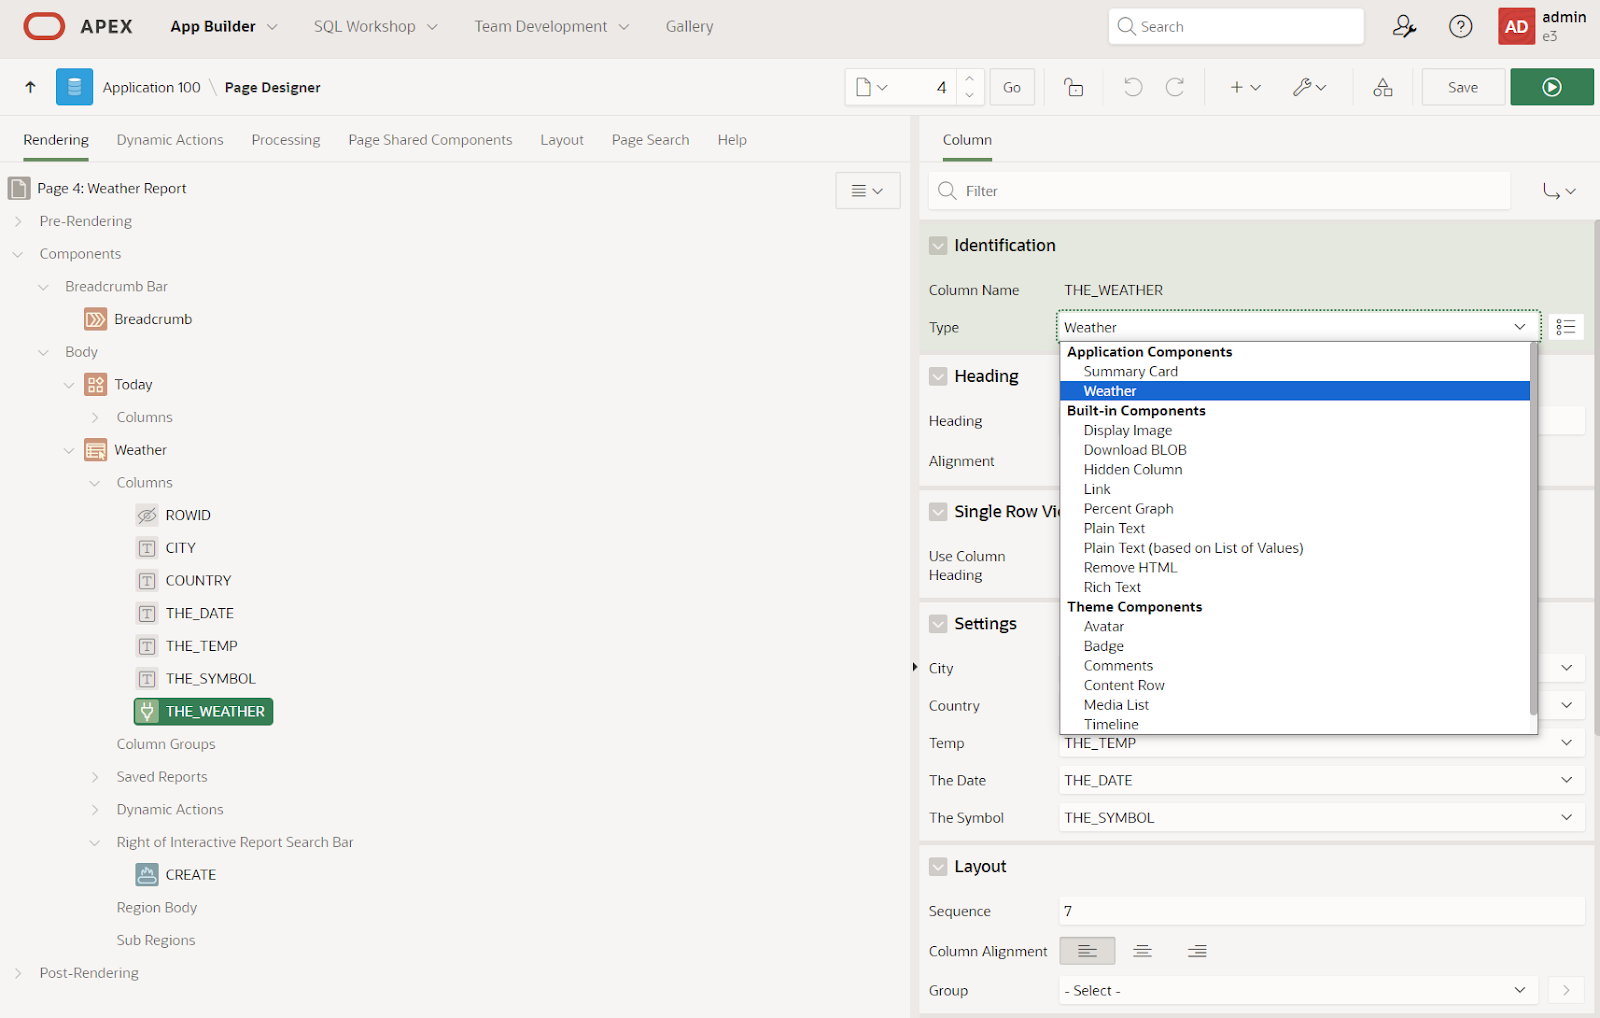
A quick mention here – you can also use so-called Theme Components, which are built-in Template Components for your theme. There are six: Avatar, Badge, Comments, Content Row, Media List, and Timeline. Each has a different purpose, so play around with them to see what they do.
However, for this demo, I simply chose the freshly created Weather template and save the page. The result looks like this:
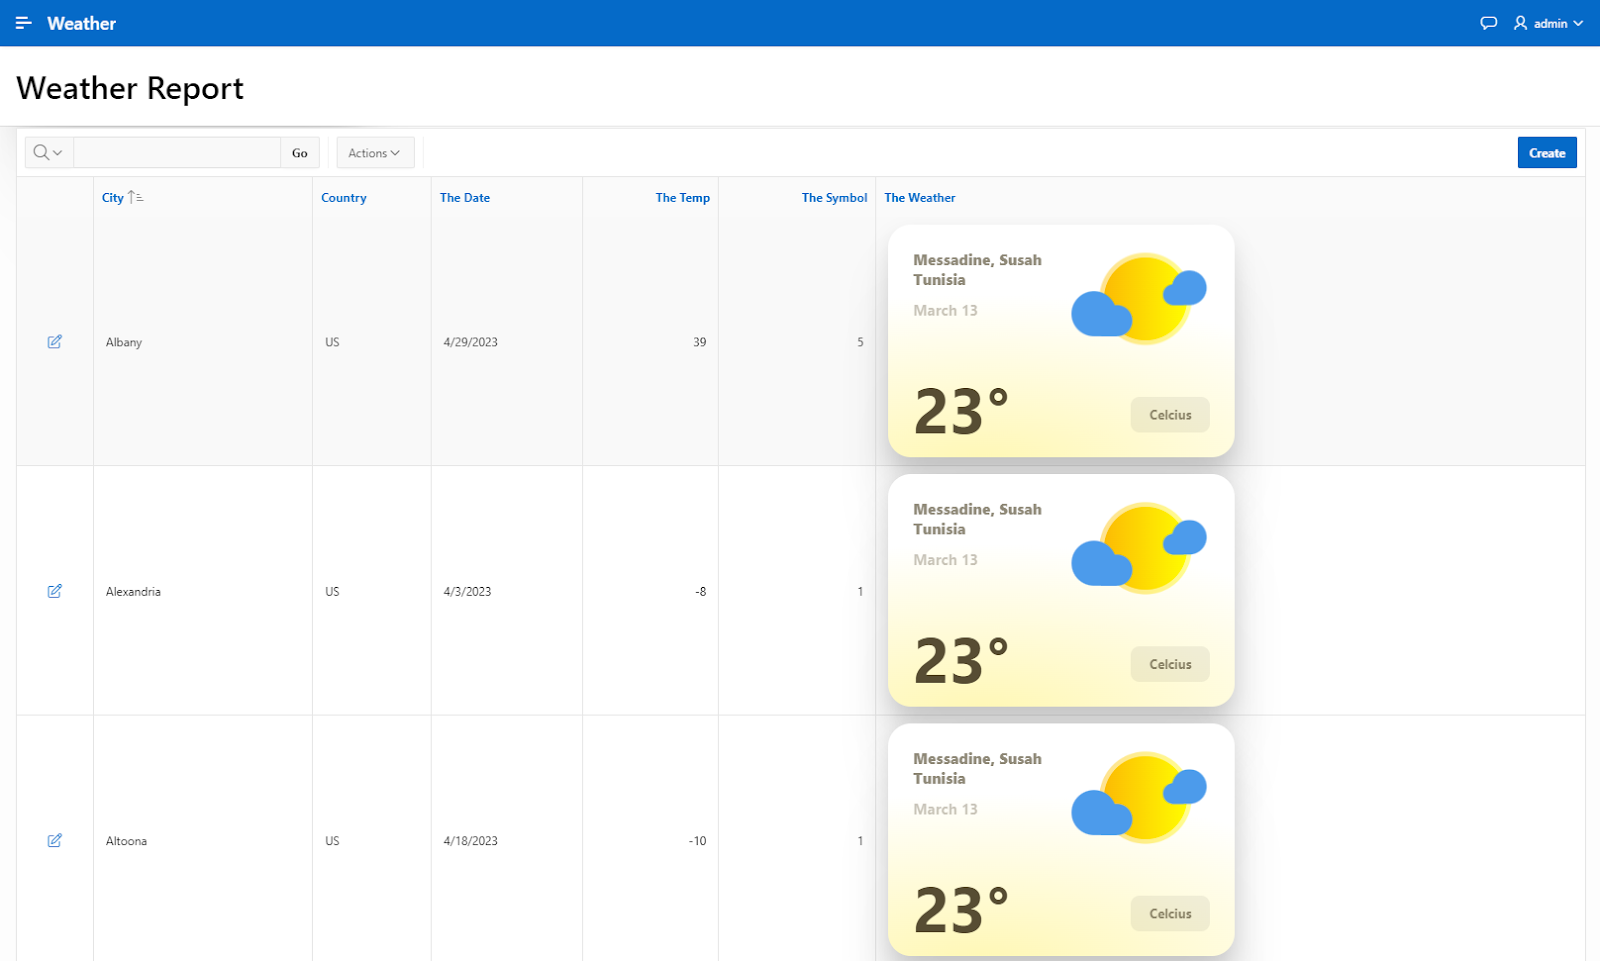
As you can see, there’s a problem – every entry shows the same image. To fix this, I need to replace the Messadine, Susah, Tunisia and March 13 entries in the partial with #CITY#, #COUTRY# and #THE_DATE# – custom attributes, which will allow the Template Component to use data from my own system.
Of course, for this to work, I need to create these custom attributes, but the cool thing is that I don’t need to do this manually – I can just press the Synchronize from Templates button to strip them directly off the partial. Now, I need to assign these parameters to the Template Component. I select them from drop-down menus under the component’s settings in Page Designer and save. The Weather Report looks much more varied now:
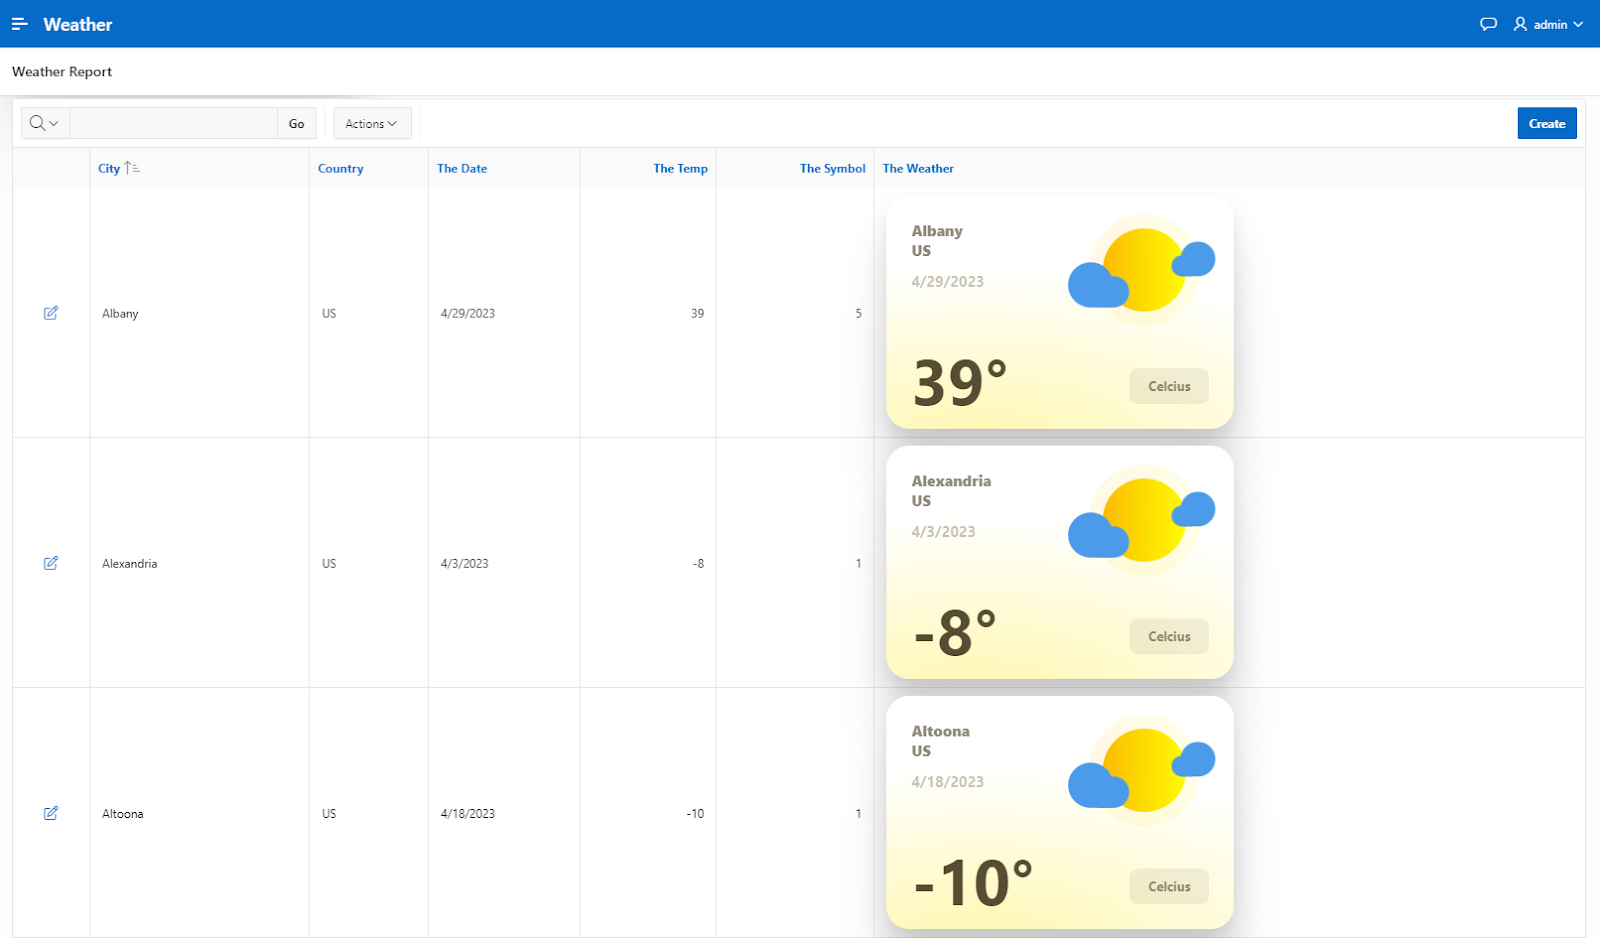
Now, there’s a final problem to solve – the app uses the same image in all instances (the one with the sun and clouds).
To fix this, I need to go back to the plugin, and change the partial once again – this time, I add Template Directives and synchronize again.
The Template Directives use the If X/ (ITEM/, VALUE/, etc.) syntax to allow me to specify conditions under which different images will be displayed. I simply use the data from my Symbol column to do this – the image displayed for a given entry will depend on the THE_SYMBOL value.
I set it up in the Template Component just like I did with city, country, temperature and date.
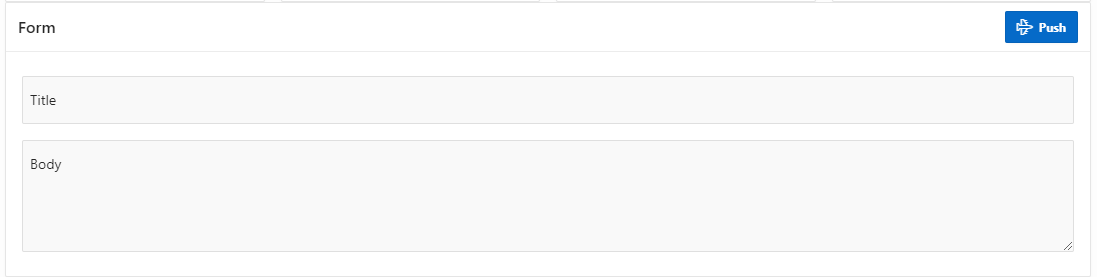
PWA Push Notifications are another feature I want to look at. To do this, I need to create a Form region in the App Builder, along with two Page Items – P1_TITLE and P1_NEW – and a Send button. For the latter, I choose Edit as the Position and Text with Icon for Button Template. I also specify an icon to be used.
However, to be able to send notifications, I first need to modify the application so it can do so. I go to Application Definition -> Progressive Web App. The first thing is to make sure Enable Progressive Web App is checked – it enables advanced queuing and it also enables several other options, including the Push Notifications switch. I can generate some credentials, which I do.
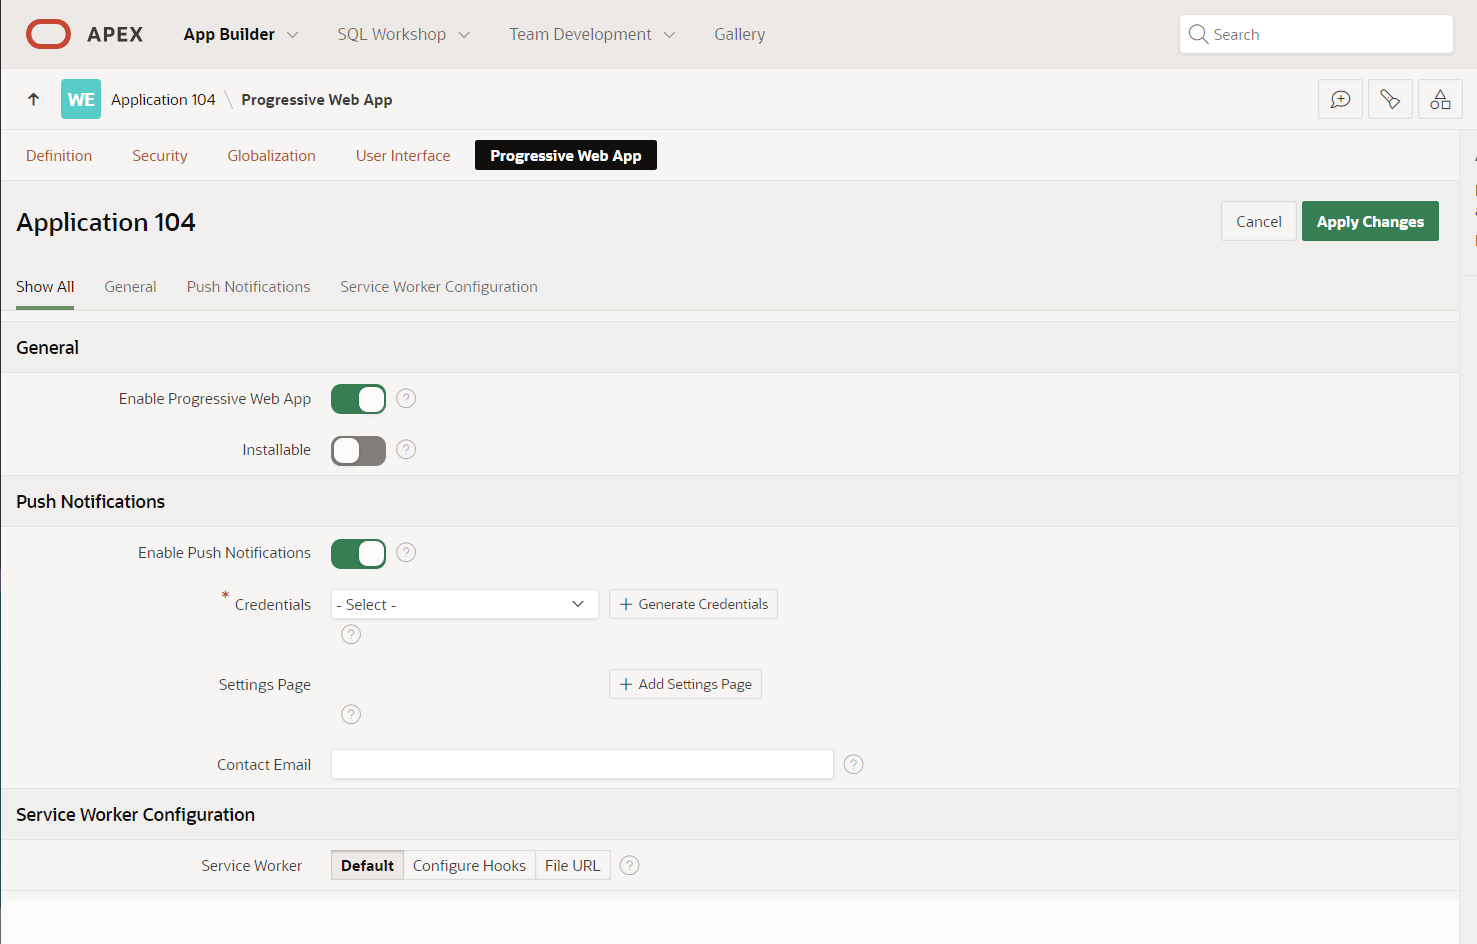
After that, I click the Add Settings Page button and click Create using the default settings for both pages.
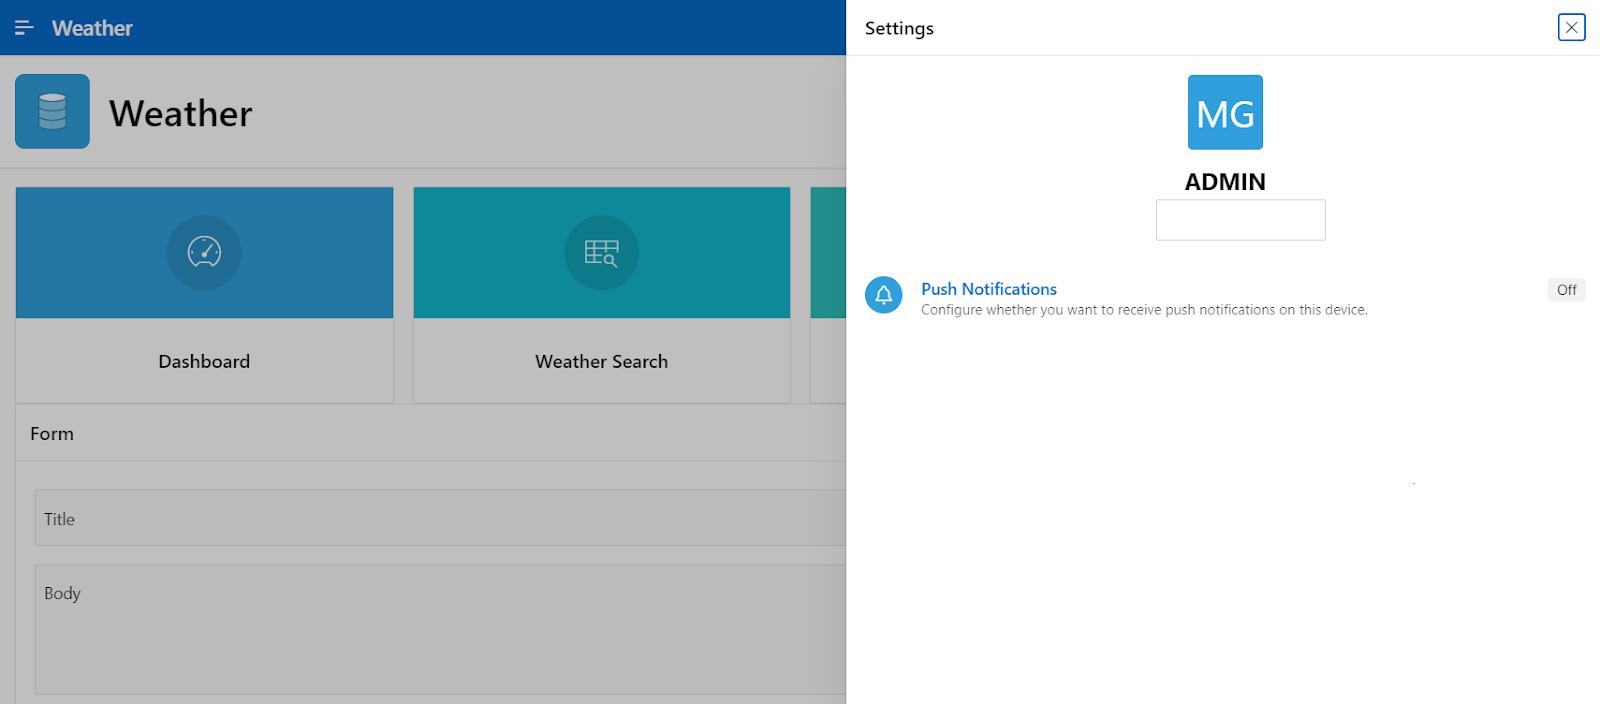
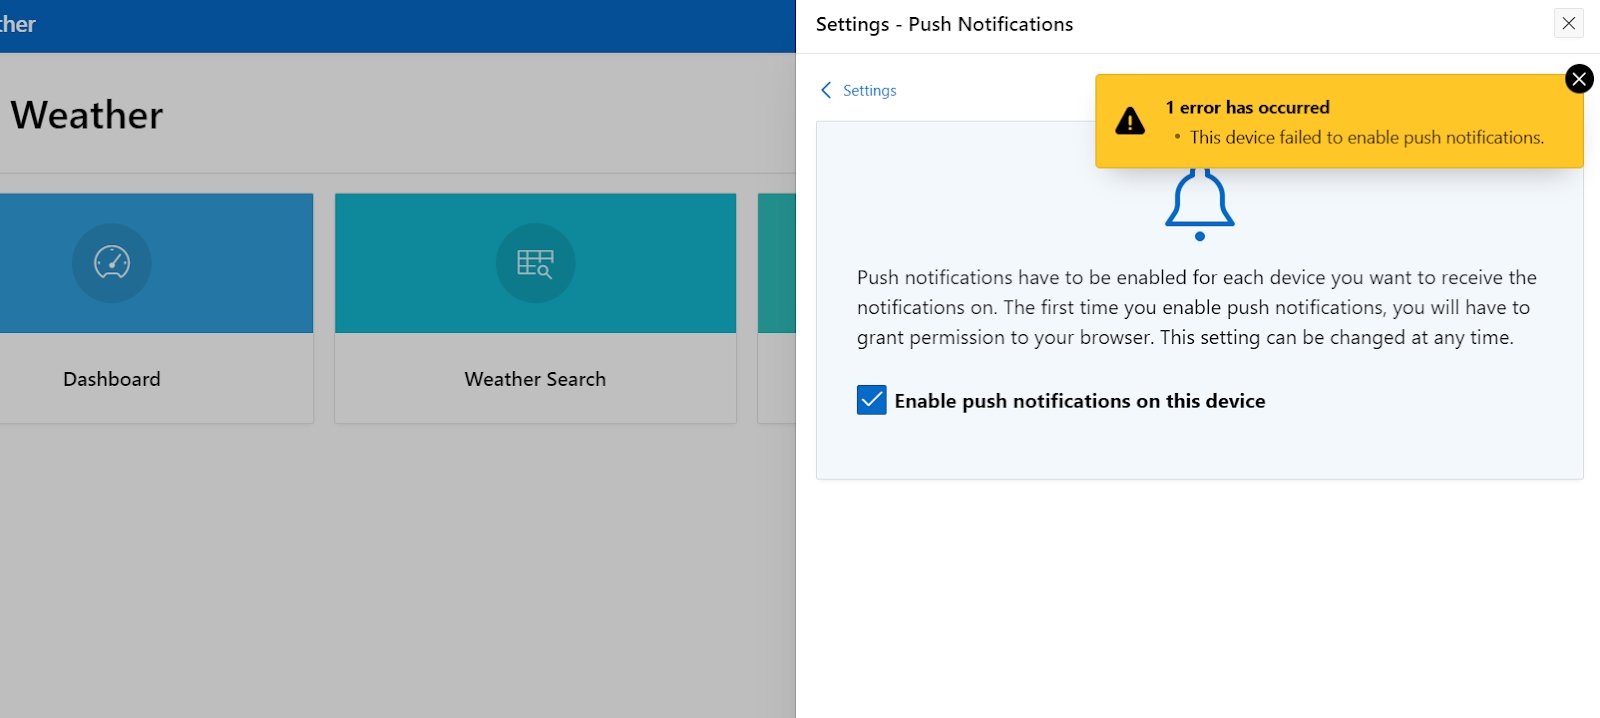
Now, when I go back to my app, I have a settings page with a Push Notifications switch. It’s worth noting that it needs to be enabled for each device/browser separately.
My browser also needs to allow notifications on a global level – otherwise, I’ll encounter an error like the one below.
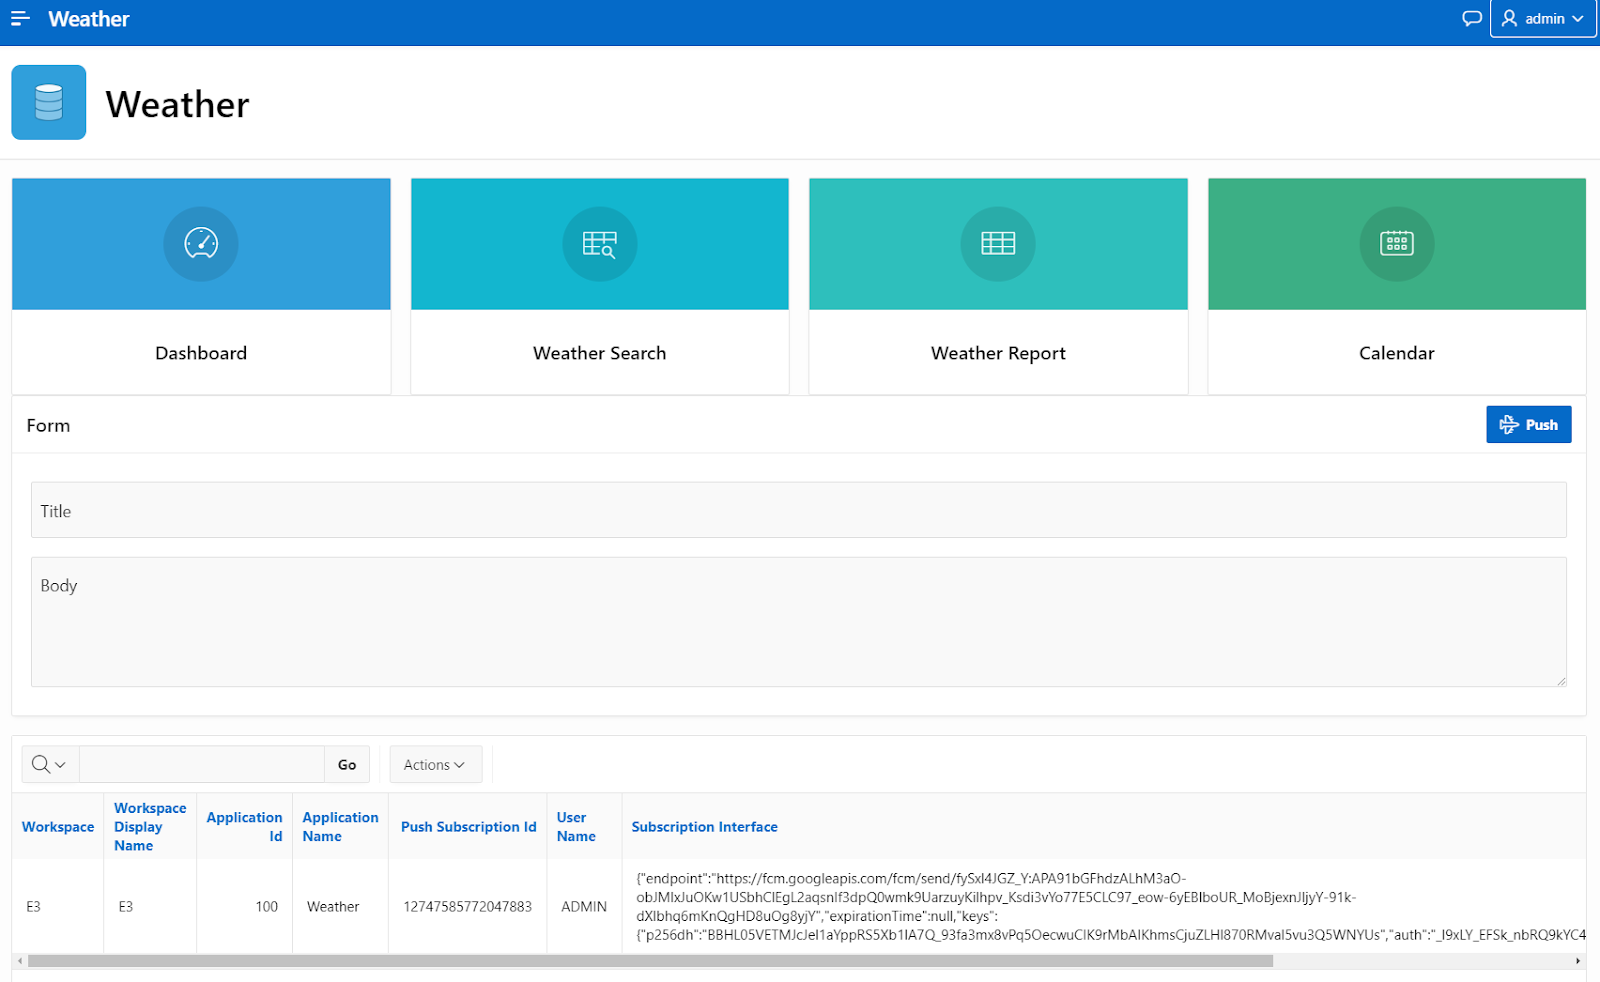
To show you that it works, I go to my page and create an Interactive Report region called Subscriptions. I choose SQL query as Type and paste in:
SELECT * FROM APEX_APPL_PUSH_SUBSCRIPTIONS WHERE application_id = :APP_ID
When I save it, a subscription for my user name to this application is shown on the page.
Now, I can go back to Page Designer and create a process for pushing notifications called Push It. I specify the Type as Send Push Notification, and decide it should be sent to me (it can be any user) by putting &APP_USER in the To field in the Settings. I also fill in the Title and Body fields with &P1_TITLE and &P1_BODY, respectively.
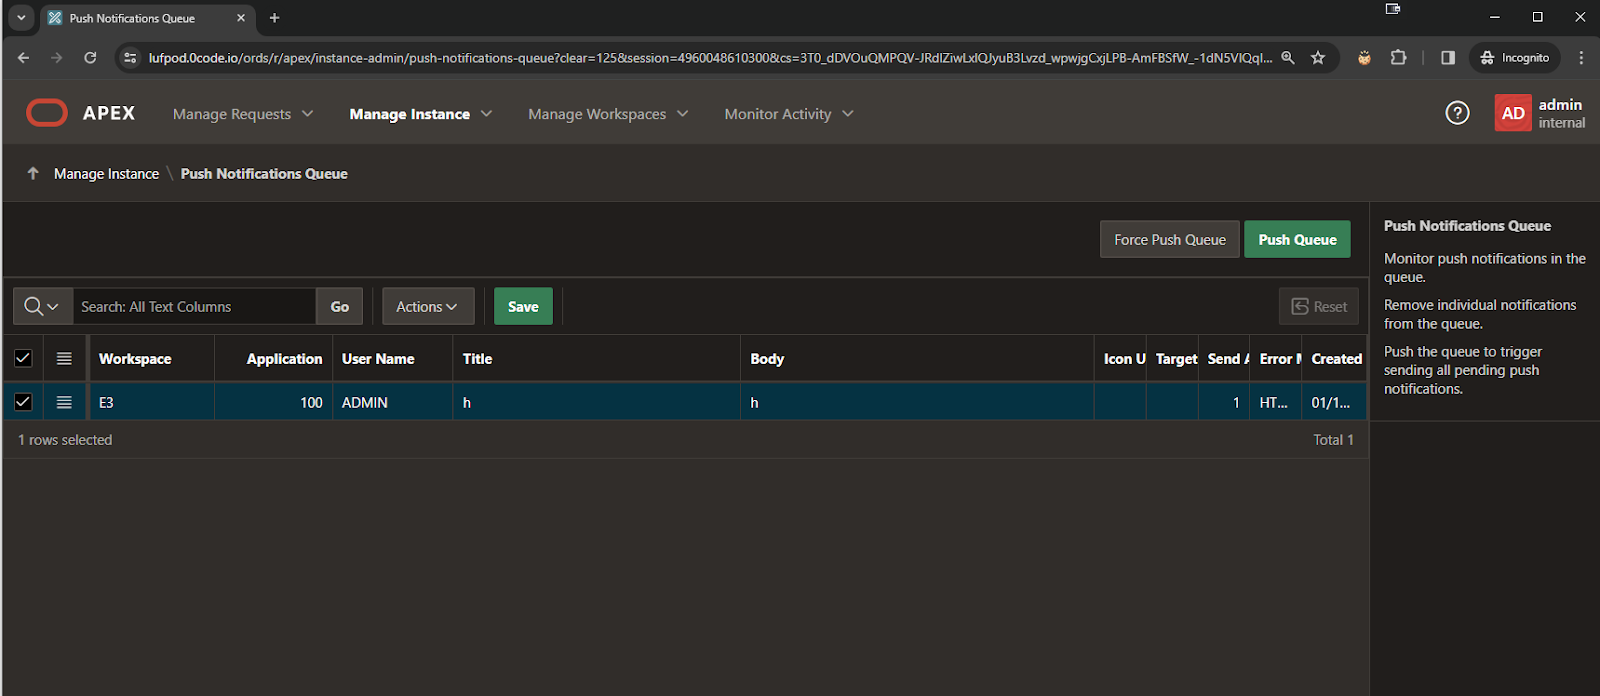
And that’s about it – my send notification process is ready. When I switch to my app, type something in the Title and Body sections of my app, and press Send, it works as it should and the notification is shown on my device. I can check this by verifying the entry under Manage Instance -> Push Notification Queue.
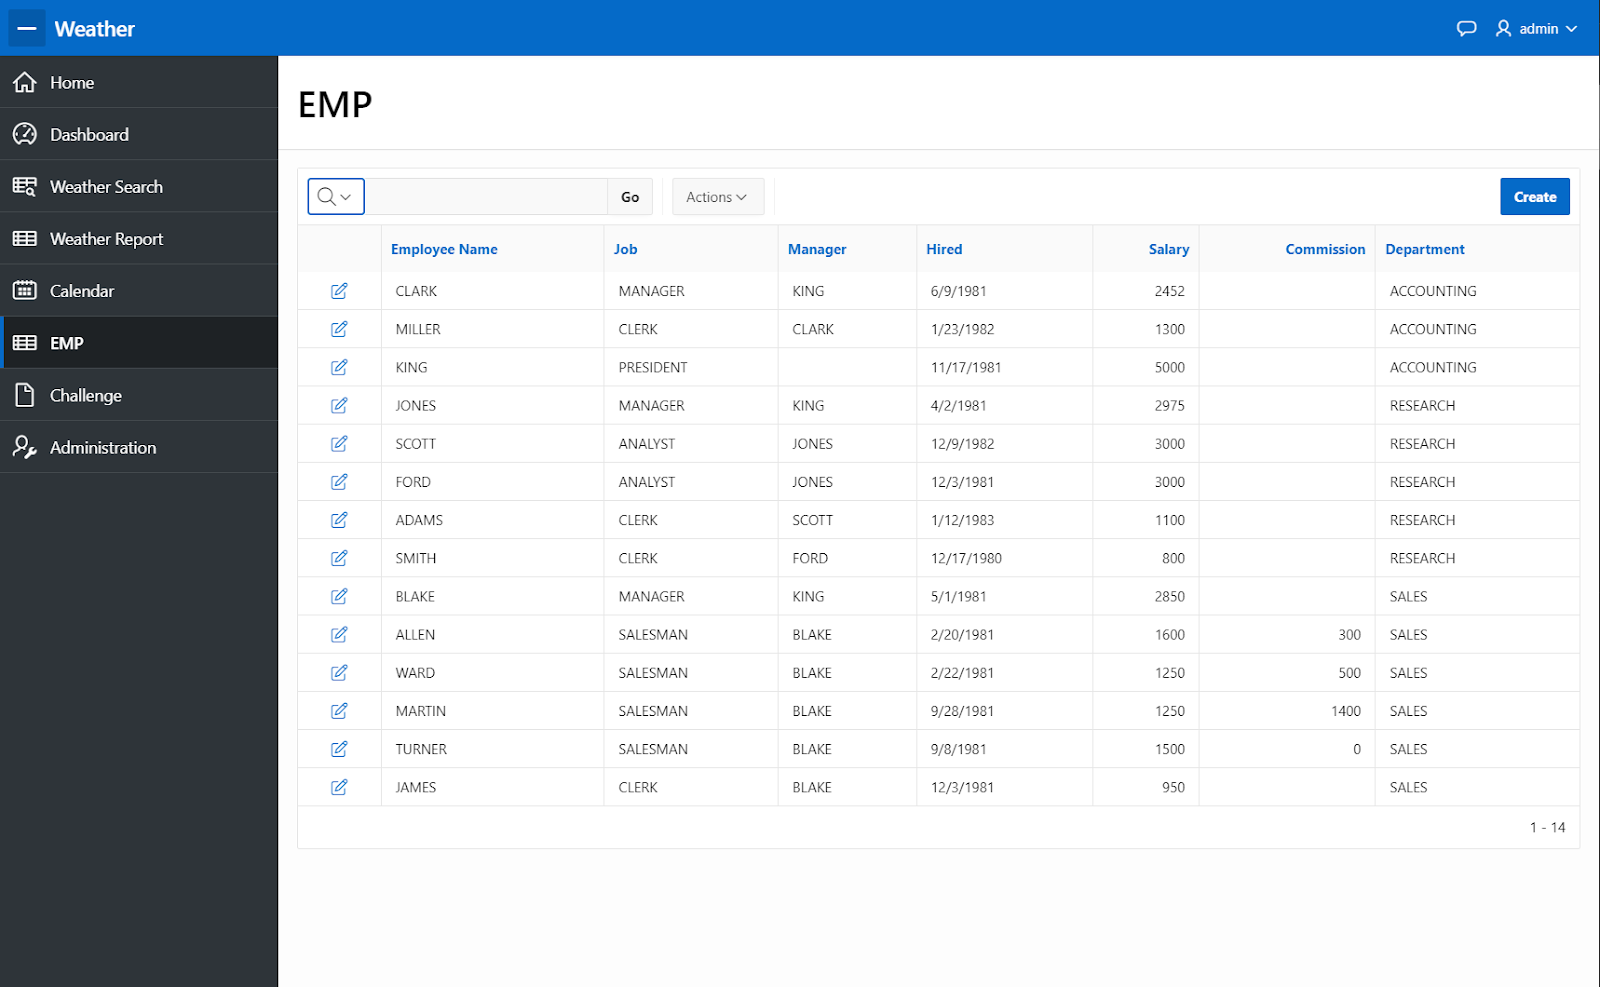
Now, let’s talk a bit about Background Processes and Execution Chains. To demonstrate this, I’ll create a pair of pages – an interactive report that shows employee data (names, positions, departments, hire dates, salaries, etc.) and a form that will allow us to edit this data. The first page looks like this:
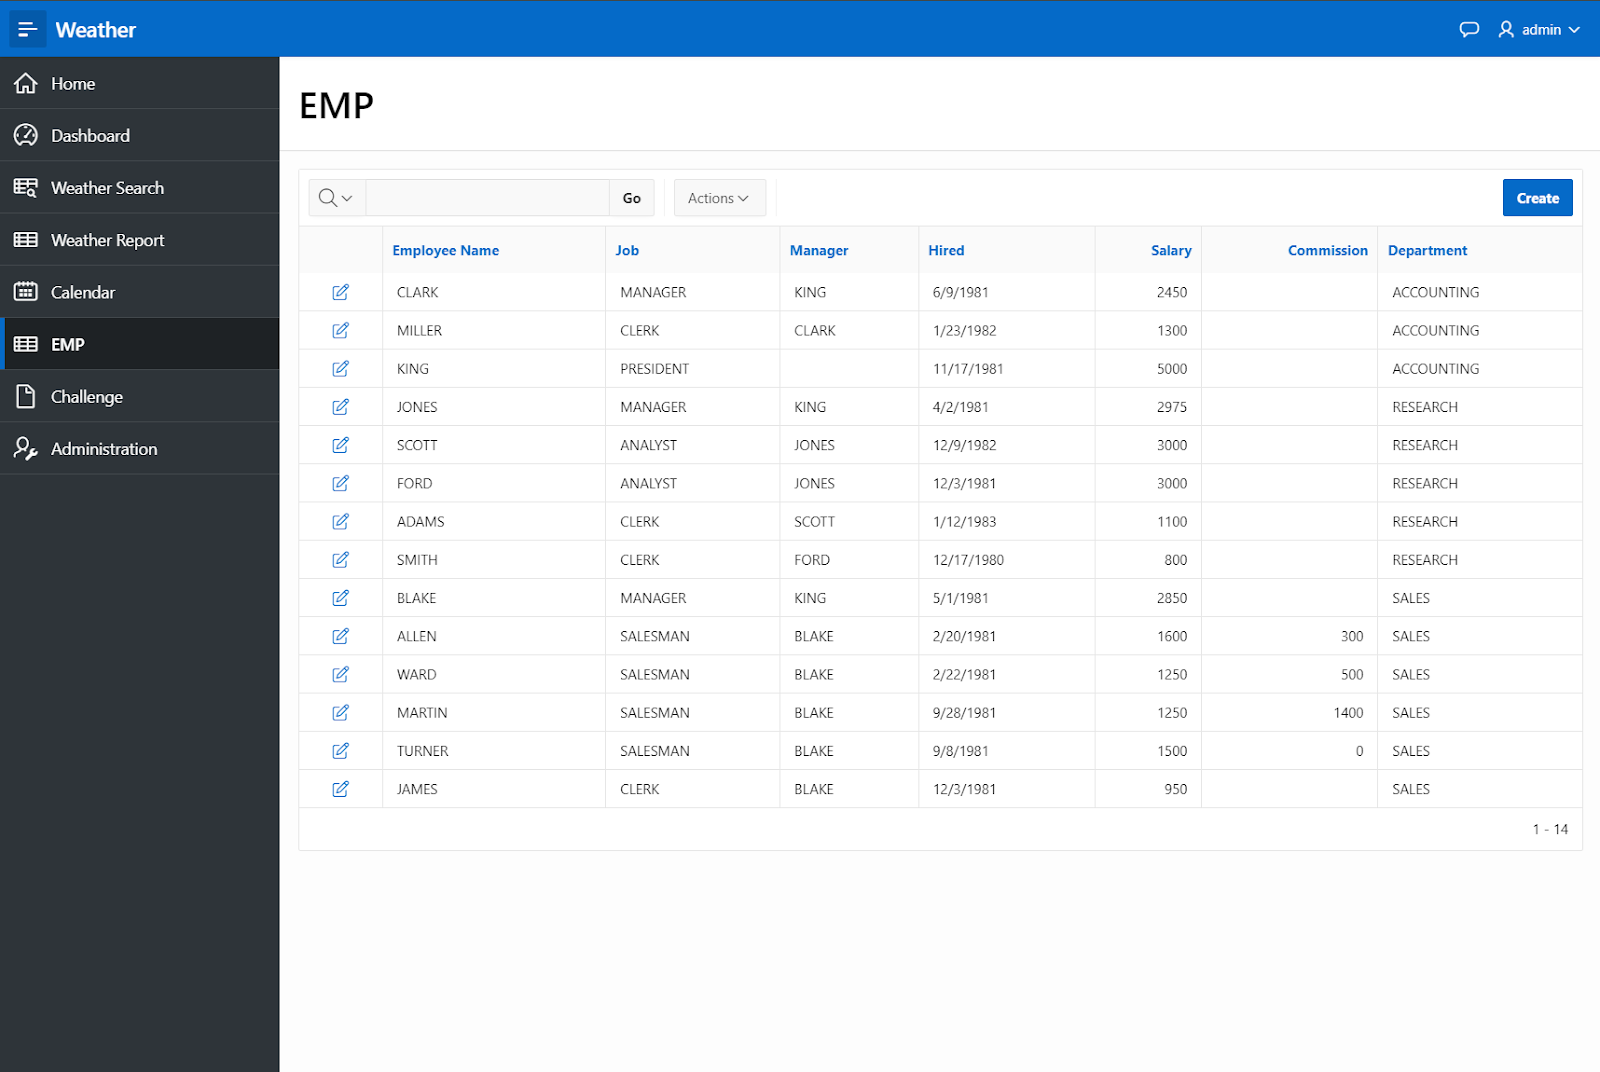
Now, if I want to change the name of the first person on the list – Manager Clarke – I need to click the icon next to his name. Another page appears, which allows me to change details.
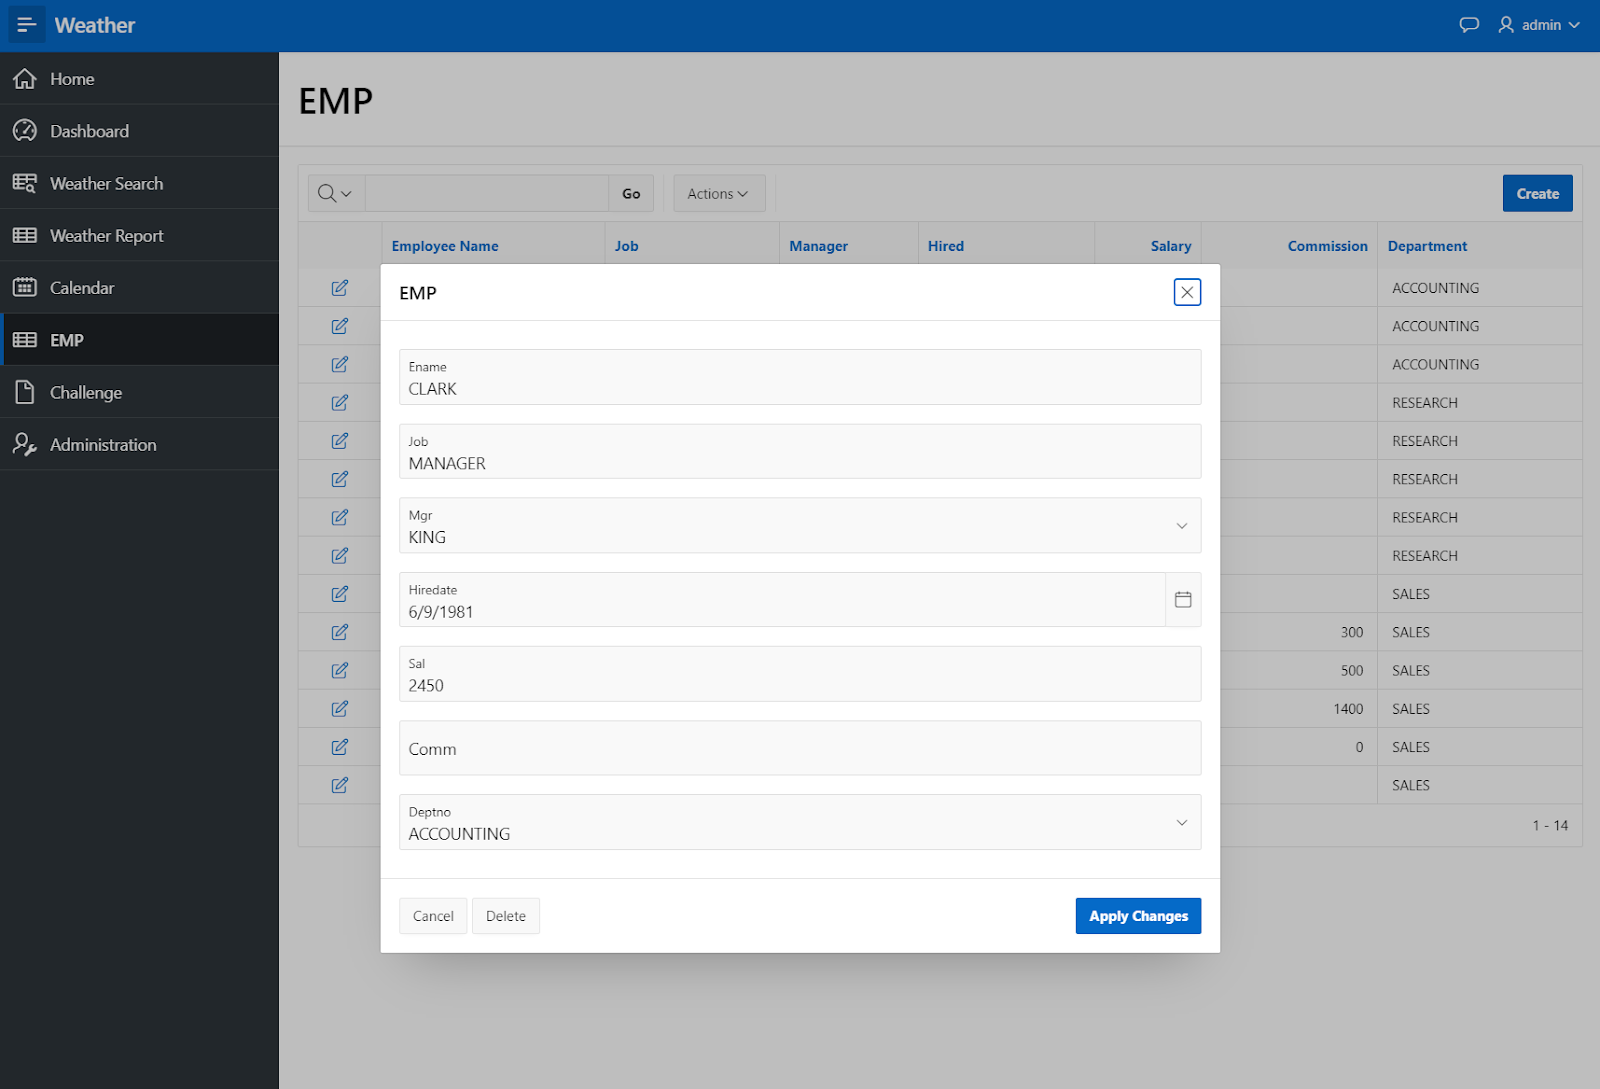
I’ll change his name to Clarky and click Apply Changes. What this is doing is submitting the page, updating the database, and refreshing the interactive report. That’s how the automated DML process works – cool.
But that’s not all. We’ll leave that interactive report for now and create another process in the Page Designer. It’ll be called Update Salary.
I’ve created some PL/SQL code you can use to update the salary by $1. Here’s how it looks:
UPDATE EMP SET SAL = SAL + 1
WHERE empno = :P8_EMPNO;
Let’s go back to the Interactive Report. Our Clarky’s salary is now at 2450. When I apply the changes, it rises to 2451. It works exactly how I wanted it to.
And what happens when you want to group some of these processes into some kind of a chain? This is also possible. Let’s try again.
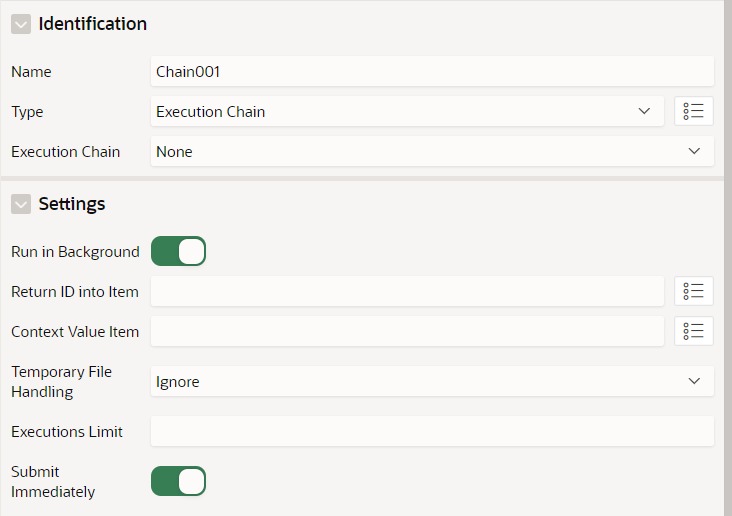
I created a process called Chain 001 and changed its Type to Execution Chain. I can then assign processes – like my Update Salary – to this Execution Chain by using the drop-down menu.
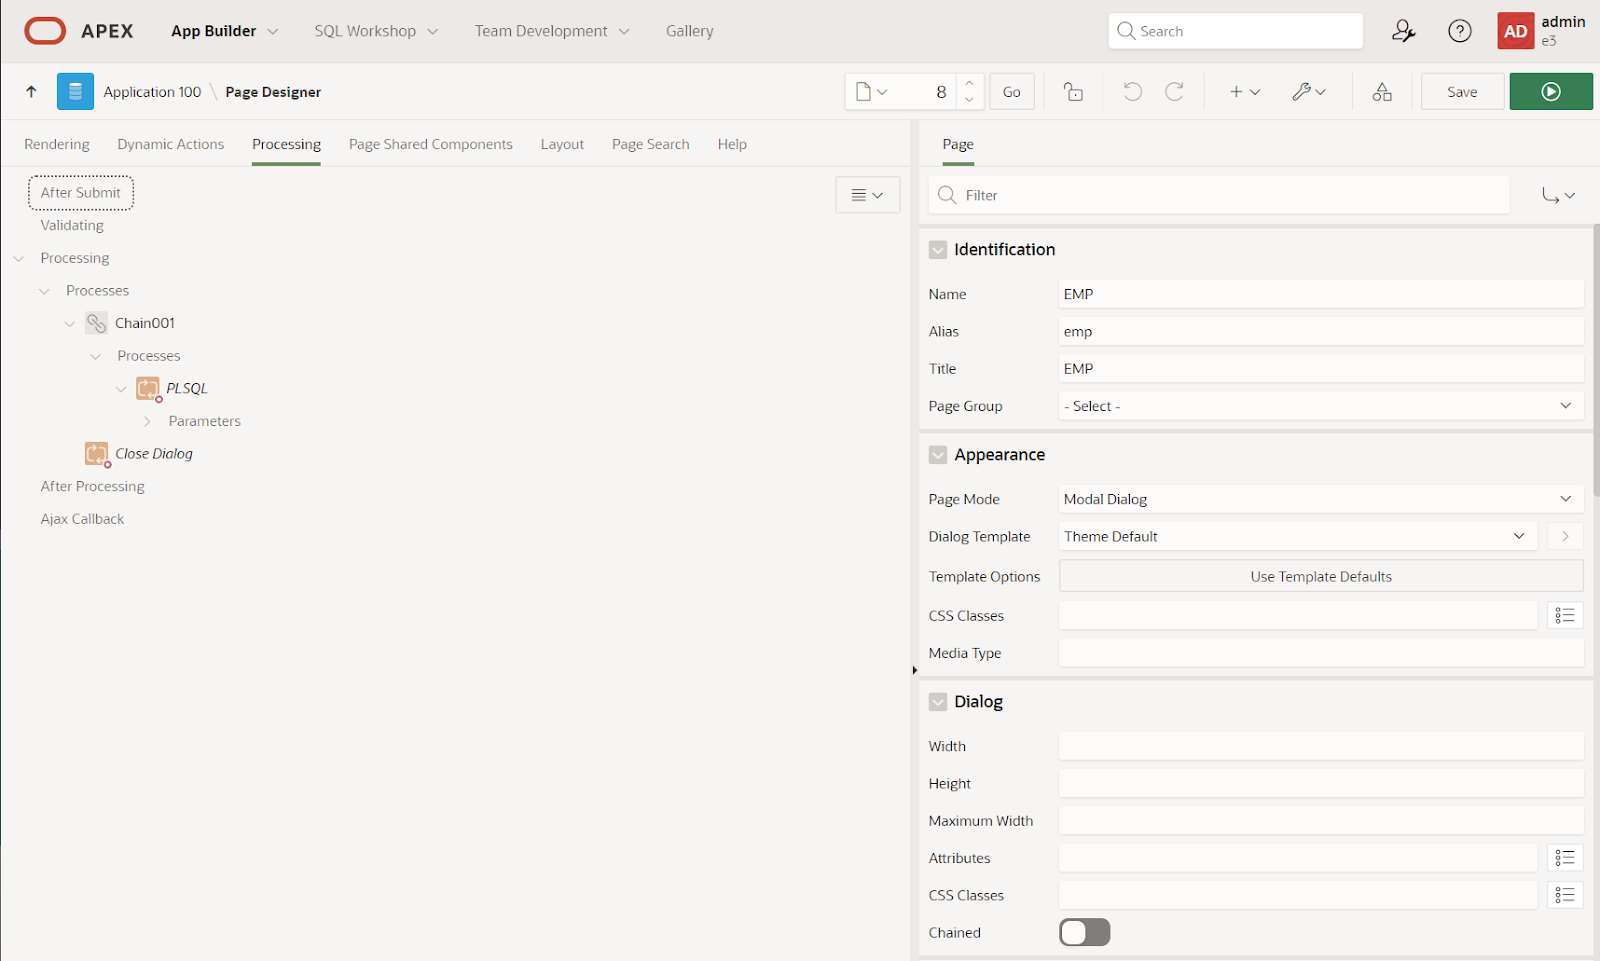
I can group other processes up. For example, I can create another process, or even another execution chain, with its own process, etc. I can nest all my groupings/chains this way.
When I refresh my app page, Clarky’s salary is updated to 2452.
Now, you can make the process run in the background – useful when, for example, it takes ages to run. Simply check the Execute in Background option in the Settings.
Now, every time I press the Apply Changes button in my app, it makes a copy of all the information from the session – all my application items, substitution strings, collections, etc. It copies everything apart from temporary files. In other words, it spawns another APEX session in a background DB process and runs it in the background while I can do something else.
I know it copies everything because I’ve tested this. I’ve created a collection with 500 members (rows), and I put a 1MB blob file in each of these 500 records – so nearly half a gigabyte of files. When I clicked Apply, copying everything into this background session took a long, long time.
This isn’t a comprehensive list, there are other interesting new features in the 23.1 update, such as invoking API on REST Endpoints, APEX Administrator, new Save and Run Page button, exporting/importing themes, etc. See my Oracle Apex 23.1 – a deep dive into the biggest new features video on the Pretius YouTube channel for a more detailed take on some of them.
Oracle APEX version 22.1 is the largest update so far. It’s quite monumental and contains a record number of bug fixes. It also offers some cool new features.
The Data Generator feature lets you easily and quickly generate some test data for your tables. I’ll show you how it works, but first, let’s take a lookthe table I’ll use in my demos.
I’m going to use Quick SQL in my example. It’s fantastic for generating tables. I’ve typed the word “passengers” to create a table that looks like a list of passengers on a flight. I’ve got first and last name, an airport column, passport number, class, and so on. I’ve used the indent system by putting the name of the table, followed by space, and the columns I want.

As you can see, the columns were automatically created. I’m also using /insert 10, which is a table directive that tells Quick SQL “please create 10 inserts with random data ”. Thanks to this, it generatedcolumns with fitting data, such as first name and last name, and even fake email addresses made based on these names. You can also use column directives such as vc64, which gives it a varchar2(64 char) limit.
When it comes to the date of birth, Quick SQL doesn’t recognize “dob”, so you have to follow it with “date”. It sets it to sysdate – 29, which makes it a date in the past. It’s enough for the purpose of this example.
Things are more complicated when it comes to more complex types like baggage since Quick SQL doesn’t understand what it is, so it gave it a random Latin string. That’s not enough for me, so I trick it by setting a check constraint – Carry on, Large, Trolley, or Bag. That makes it pick one of these options. The Class works the same way – a check constraint with Economy, Business, and First options.
This is kinda a workaround, as I don’t really want these check constraints there. But it’ll do for now. I let it do the script and then I remove these constraints.
Passport numbers are usually big numbers, so I use a constraint that forces Quick SQL to choose a random number between 1000000 and 9999999. I will also remove that later.
The Airport column is an even bigger headache since I can’t create a check constraint with 42 000 options (this is how many airports there are, according to my Alexa). So I leave the Latin string in this case.
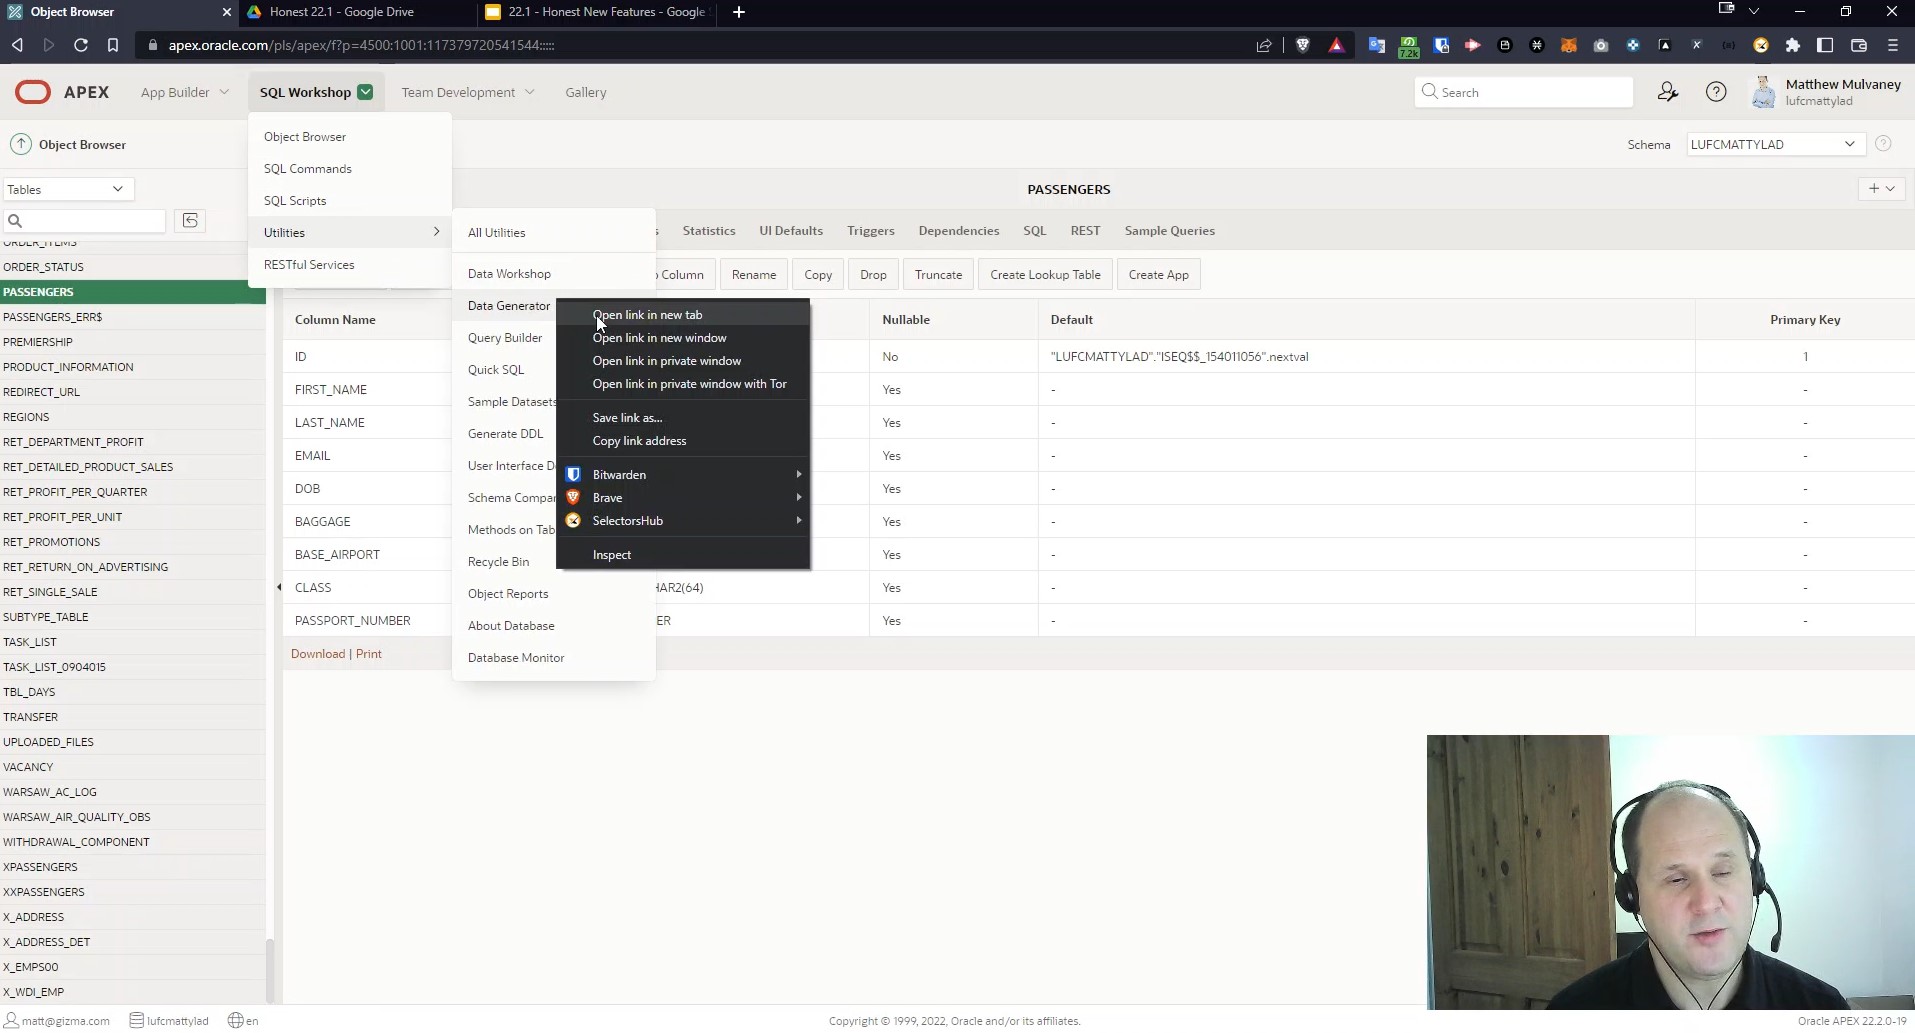
So, how to use this feature? When I have my table opened in the APEX Builder, I select SQL Workshop, Utilities, and then Data Generator.
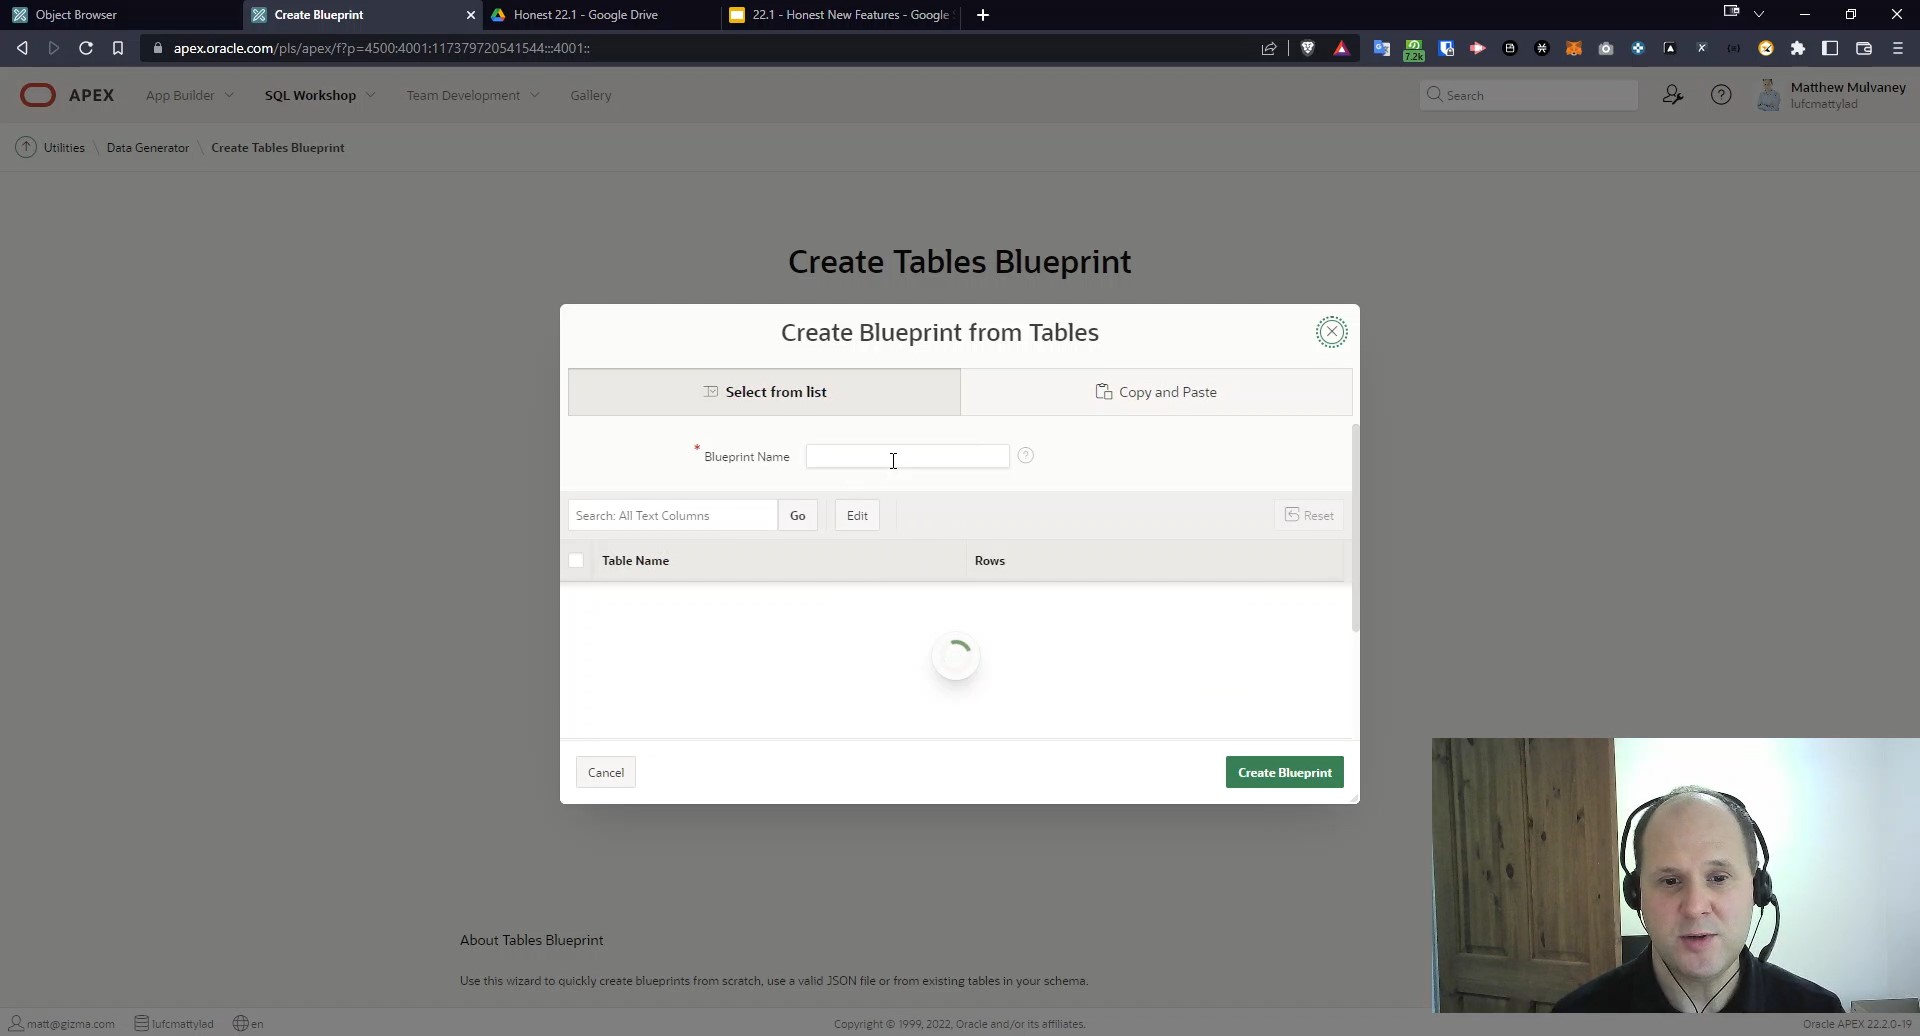
The next step is to create a blueprint – a JSON definition of how data should be supplied to that specific table. I can base it on an existing table or even a fictitious table. For example, you have a table, and I don’t have access to it. You tell me about it, and I create it for you and give you the blueprint, which you can upload to populate your table.
Aside from basing a table on an existing one, I can also build a blueprint from scratch or import it from a JSON file (of course, not just any, it has to be a valid blueprint). Well… at least in theory, because in practice, there are currently some bugs with importing JSON files, and it doesn’t always work as well as it should.
I’ve decided to create my blueprint from an existing table. It’s worth noting that I can copy and paste from a table or manually search for tables I’ve used previously. I can also change the number of rows. For the purpose of this demo, I’ve chosen the previously created Passengers table.
Creating the blueprint takes a lot of time, especially if you use more than one table as a source, so keep that in mind.
The blueprint has a name, a display name, and a description. There are also IDs and display names for tables and columns. I can also change the sequence (the order in which it appears in the table list) and the number of rows. Additionally, I can specify the data source (Built-in, Inline, Sequence, or Formula – in the last case, I have to enter it into a field below) and change various details.
I’d also like to mention that when it comes to the date of birth (DOB) column, I’ll have to use the same format mask (you can see it on the screen below) everywhere. Otherwise, it won’t work when I – or anyone else – try to import the CSV file later.
Another thing worth pointing out – one I don’t like very much about the Blueprint Designer – is that I can’t use drag & drop to, for example, change the sequence. I have to enter data manually for each column to change its place in the order.
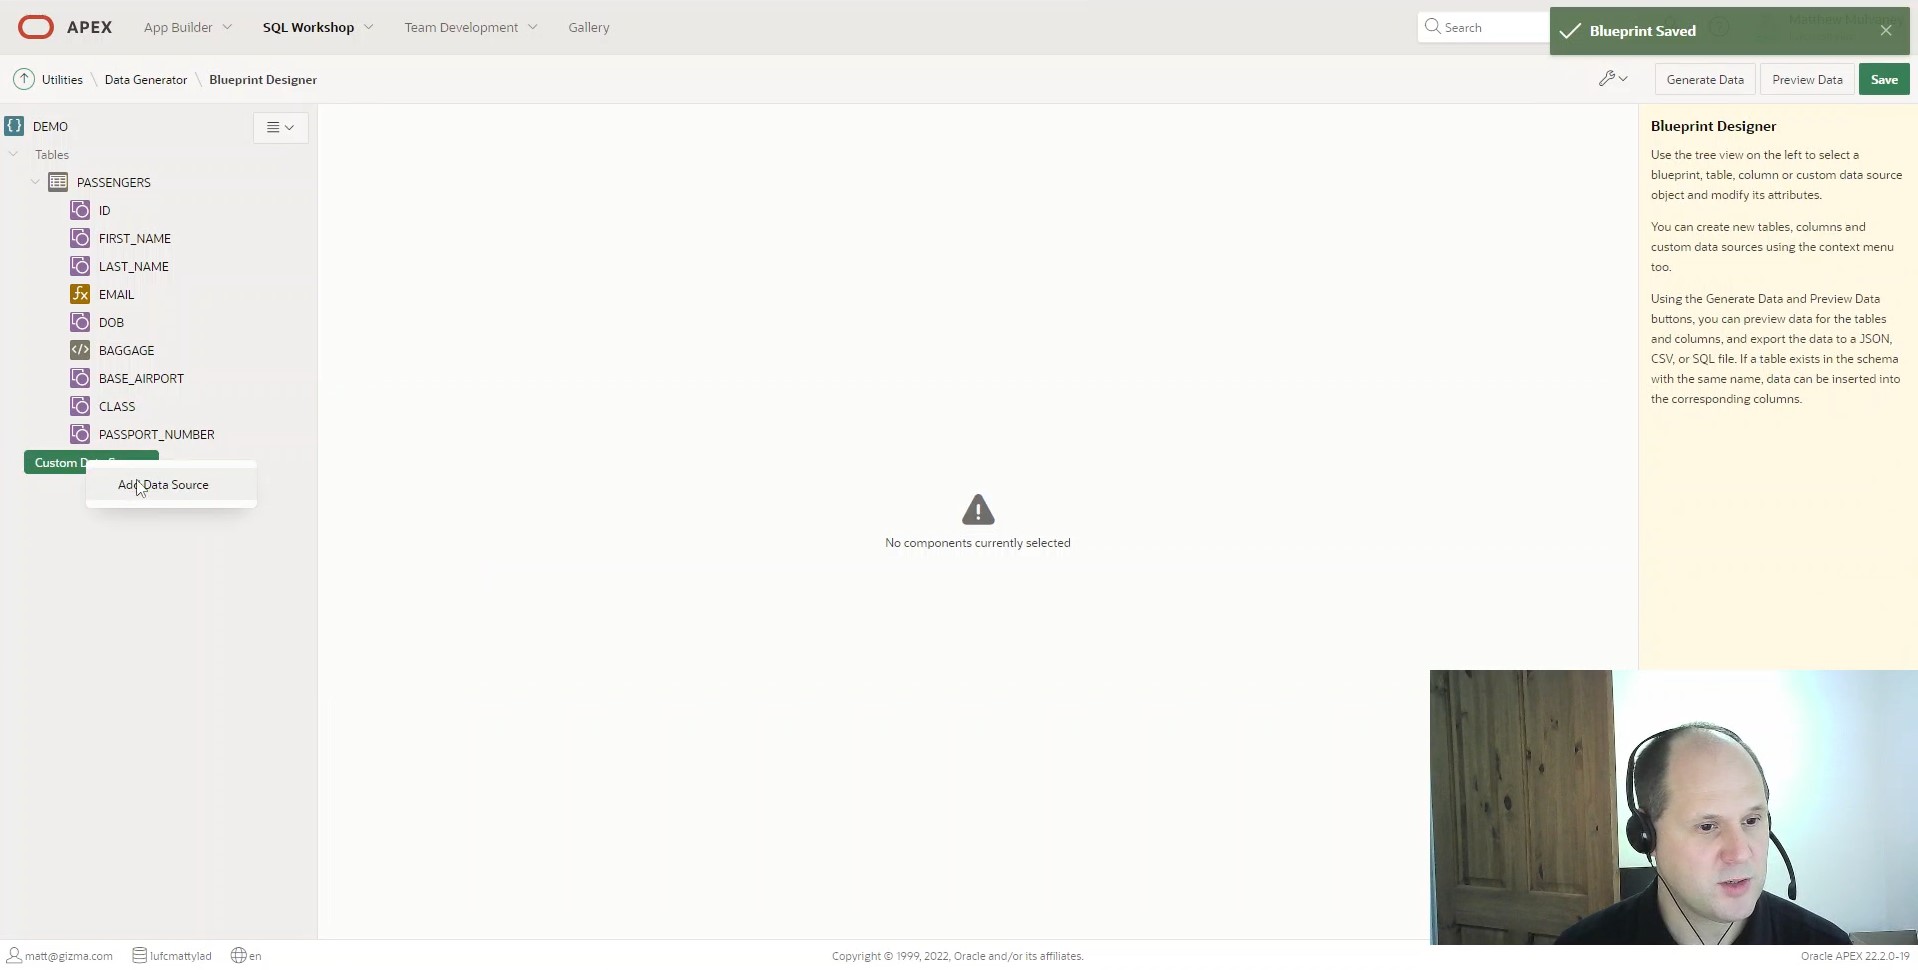
I can also create a custom data source which I did in the case of my Class column. I simply selected the Custom Data Source option, clicked Add Data Source, and entered the details I wanted.
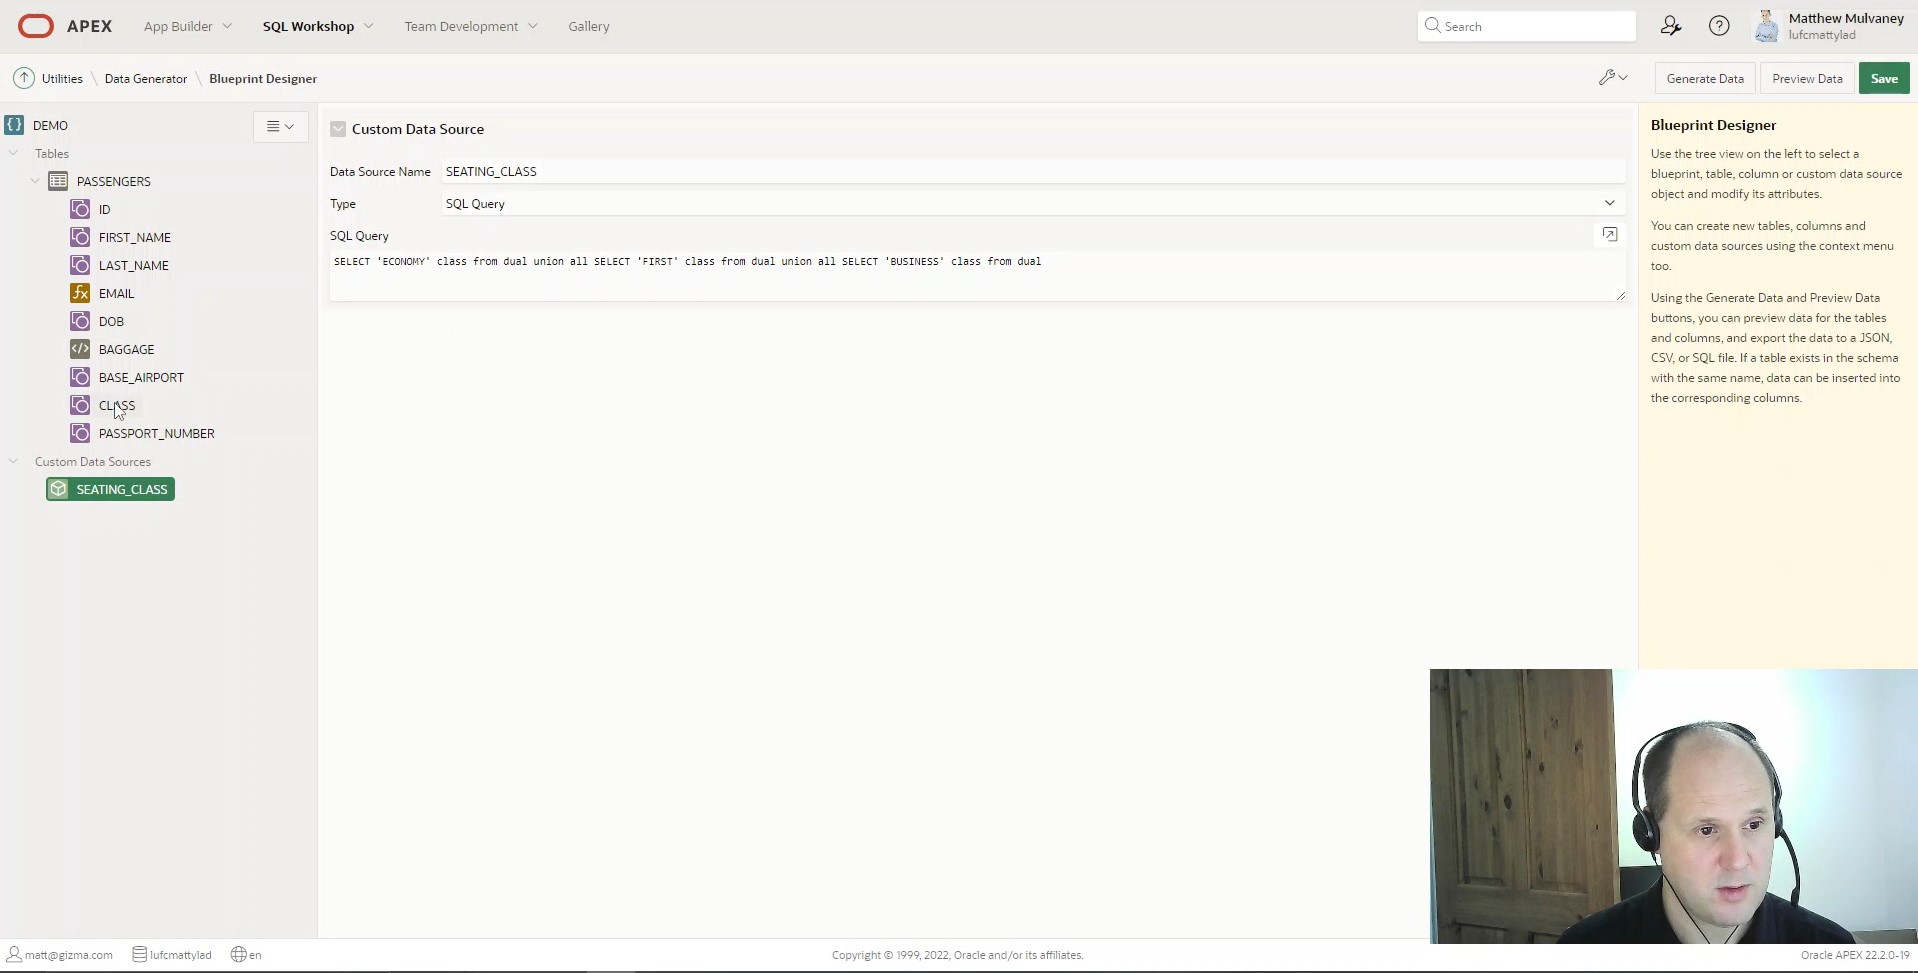
I’ve created a custom data source called SEATING_CLASS with the specification you see below, and I can now select it as my Custom data source.

I can export the blueprint as a JSON or a CSV file. I can also scale it to change the number of rows. Finally, data from the blueprint can be inserted into the database.
Another new feature is Task Definitions, also known as Human Tasks. To describe it in the simplest way possible, it’s a way to request something for your managers to approve so that you can move on with it. For further explanation, look at the following diagram.
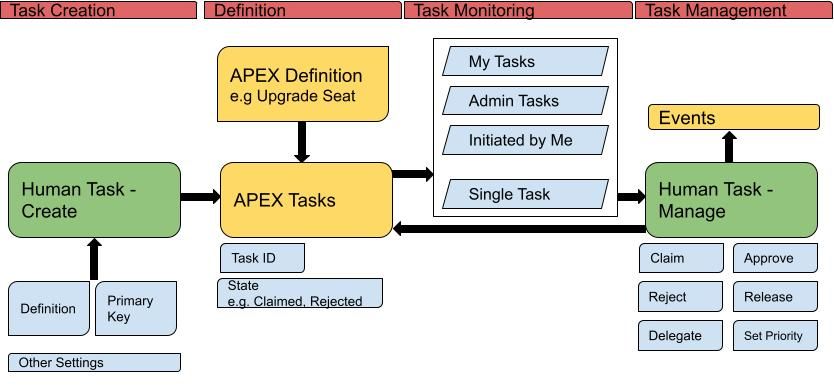
There are two tasks here (the green tiles). When you start to create a task, you specify what the primary key is, and the definition it’ll use. All tasks have an ID and a State (e.g., Claimed, Rejected). There’s also task monitoring. These, rather than views, are a set of pipelined functions that provide details about the tasks.
When you start looking at a task, there are severalthings you can do with it. You can Claim it (pick it up), Approve it, Reject it, Release it, set it as a Priority, or give it to someone else. These task-related activities are called Events.
Now, I’ll show you how to use the Task Definitions feature. We’ll start with the passengers table I’ve shown you before. When I open it in SQL Workshop there’s a Create app button right there. I click it.
I start with customizing my app’s icon, theme style (Redwood Light in my case) and navigation style (I’ve chosen Mega Menu and I encourage you to use that in your applications too – it’s great).
For features, I’ve selected Install Progressive Web App (you can read more about that in the next part of this article, where I talk about features introduced in version 21.2), and About Page. Then I simply clicked Create application. I found that it takes a little bit more time when you create an app through the table, instead of the standard page.
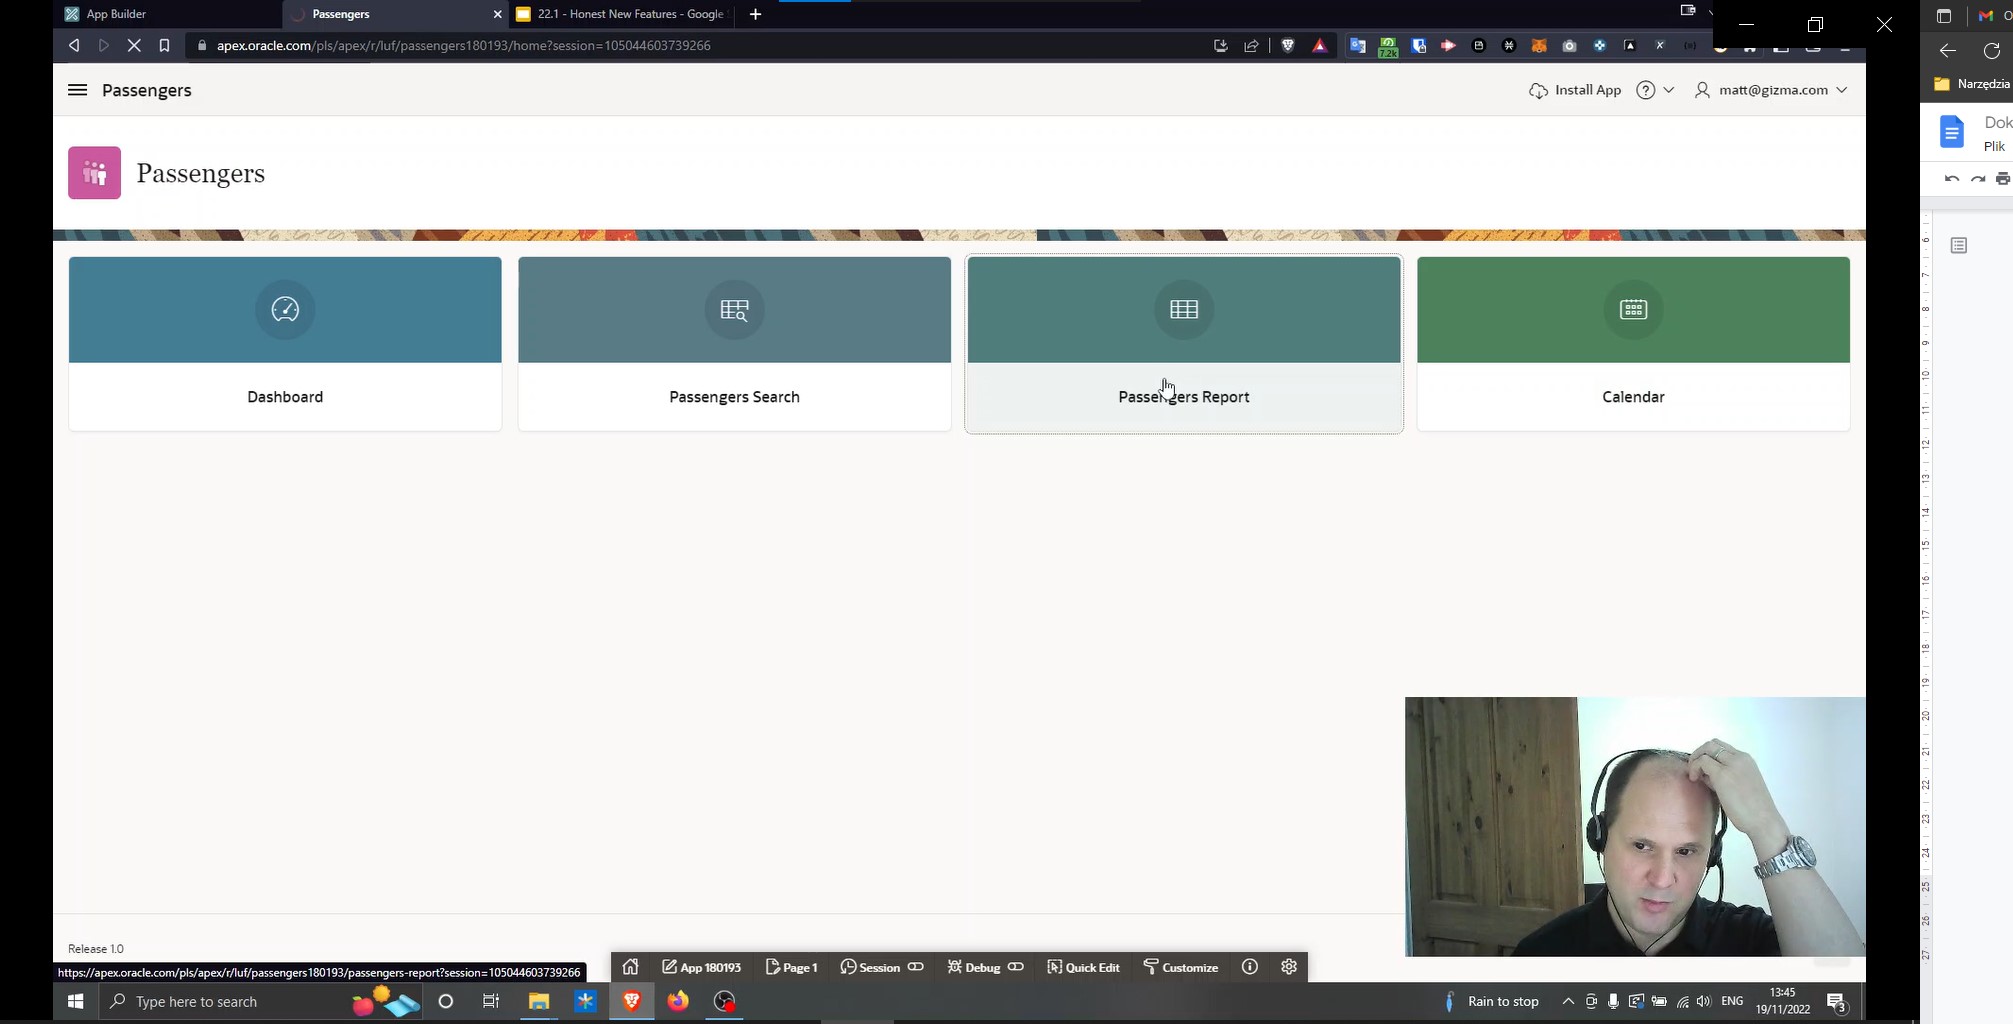
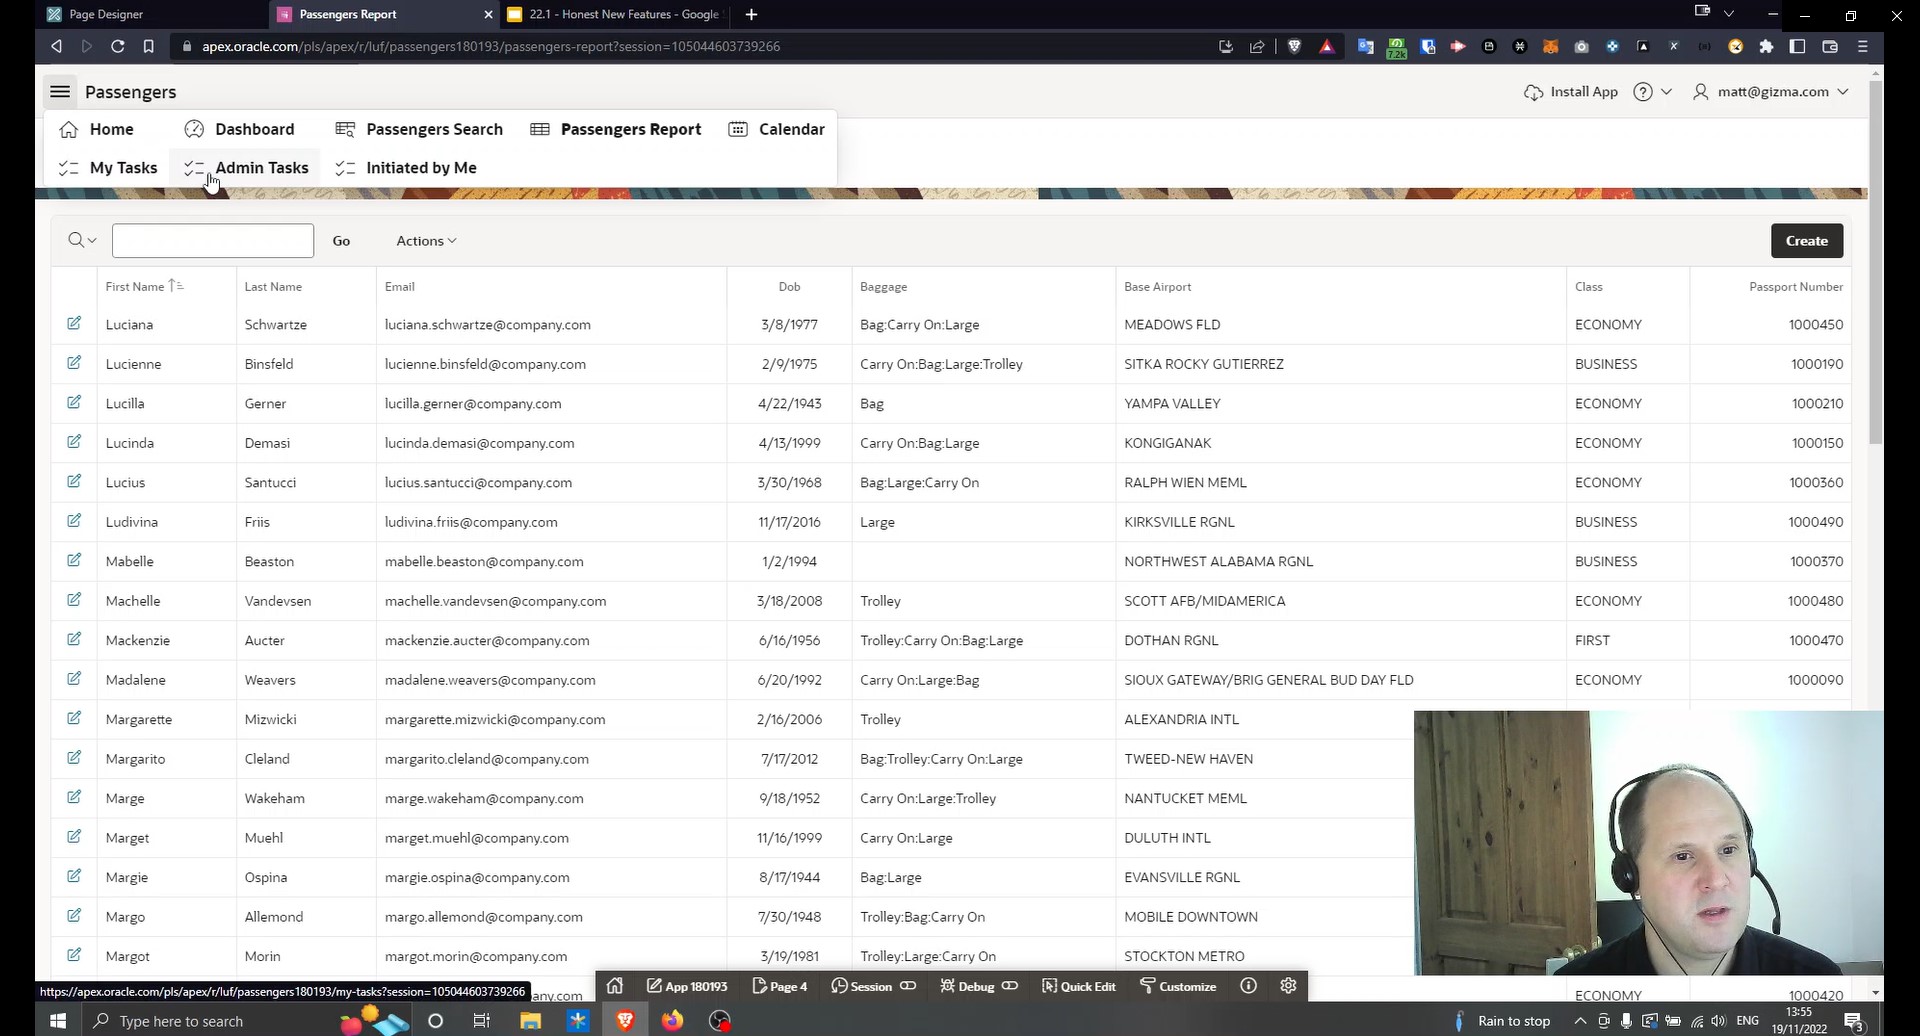
Next, I run my app and sign in. As you can see, the app has four main sections: Dashboard, Passengers Search, Passengers Report and Calendar (if you’re curious about that last element, I can tell you that it’s there because I’ve added the date of birth column to my table).
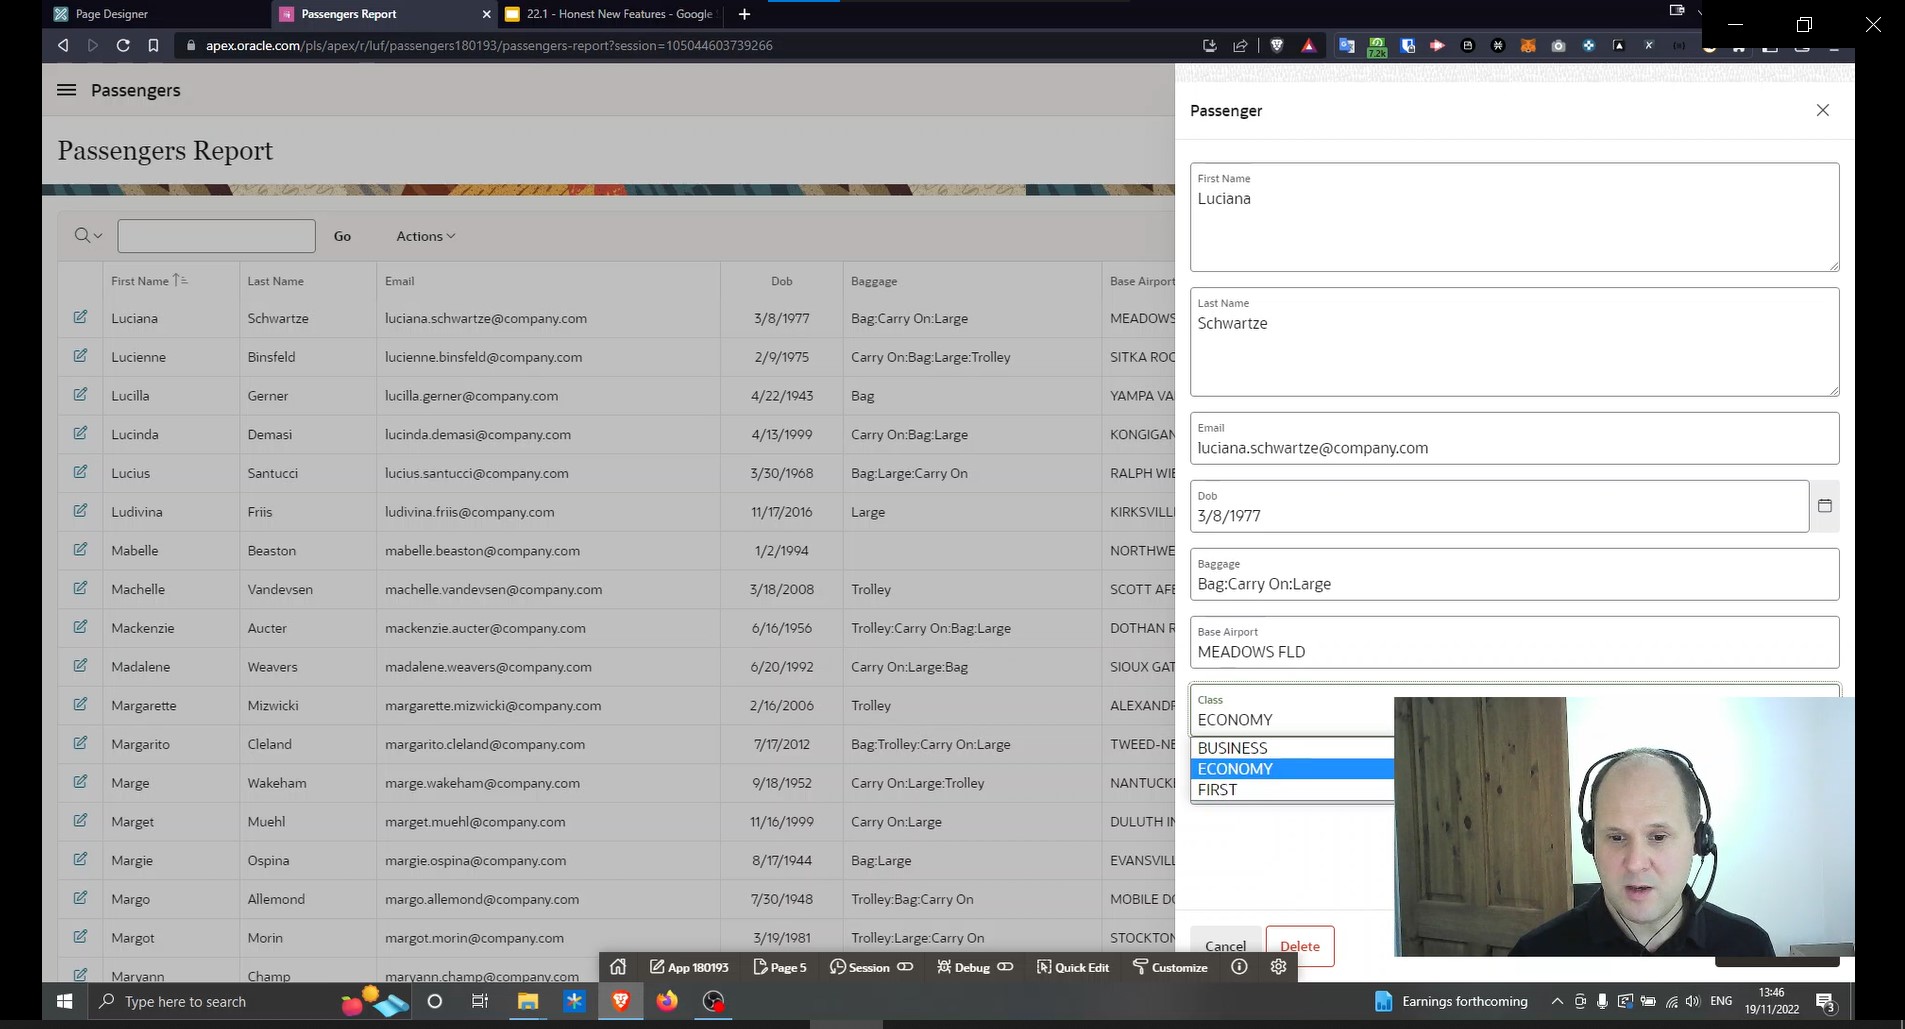
I take a look at the Passengers Report and check the first passenger on the list – a person called Luciana.

Luciana’s flying the Economy class, so let’s make her a Christmas present and bump her up. But I don’t want to have to type the class each time I upgrade a passenger, so in order to do that, I quickly edit the Class field and change its type to Select list. I also have to specify a List of Values for it to work, so I choose Static Values, define them as Economy, First and Business.
After saving the changes and refreshing the page, my app has a drop-down list in the Class field.
However, when I hit the button and apply changes, APEX will have to process the form to update the data, and I want to change this to an approval step.
I click the button next to Type under Server-side Condition and select Never – this deactivates the process. Next, I create a new process, which will be my “Human Task – Create”. I need to provide the Task Definition, however I don’t have one yet, so I’ll need to create that next.
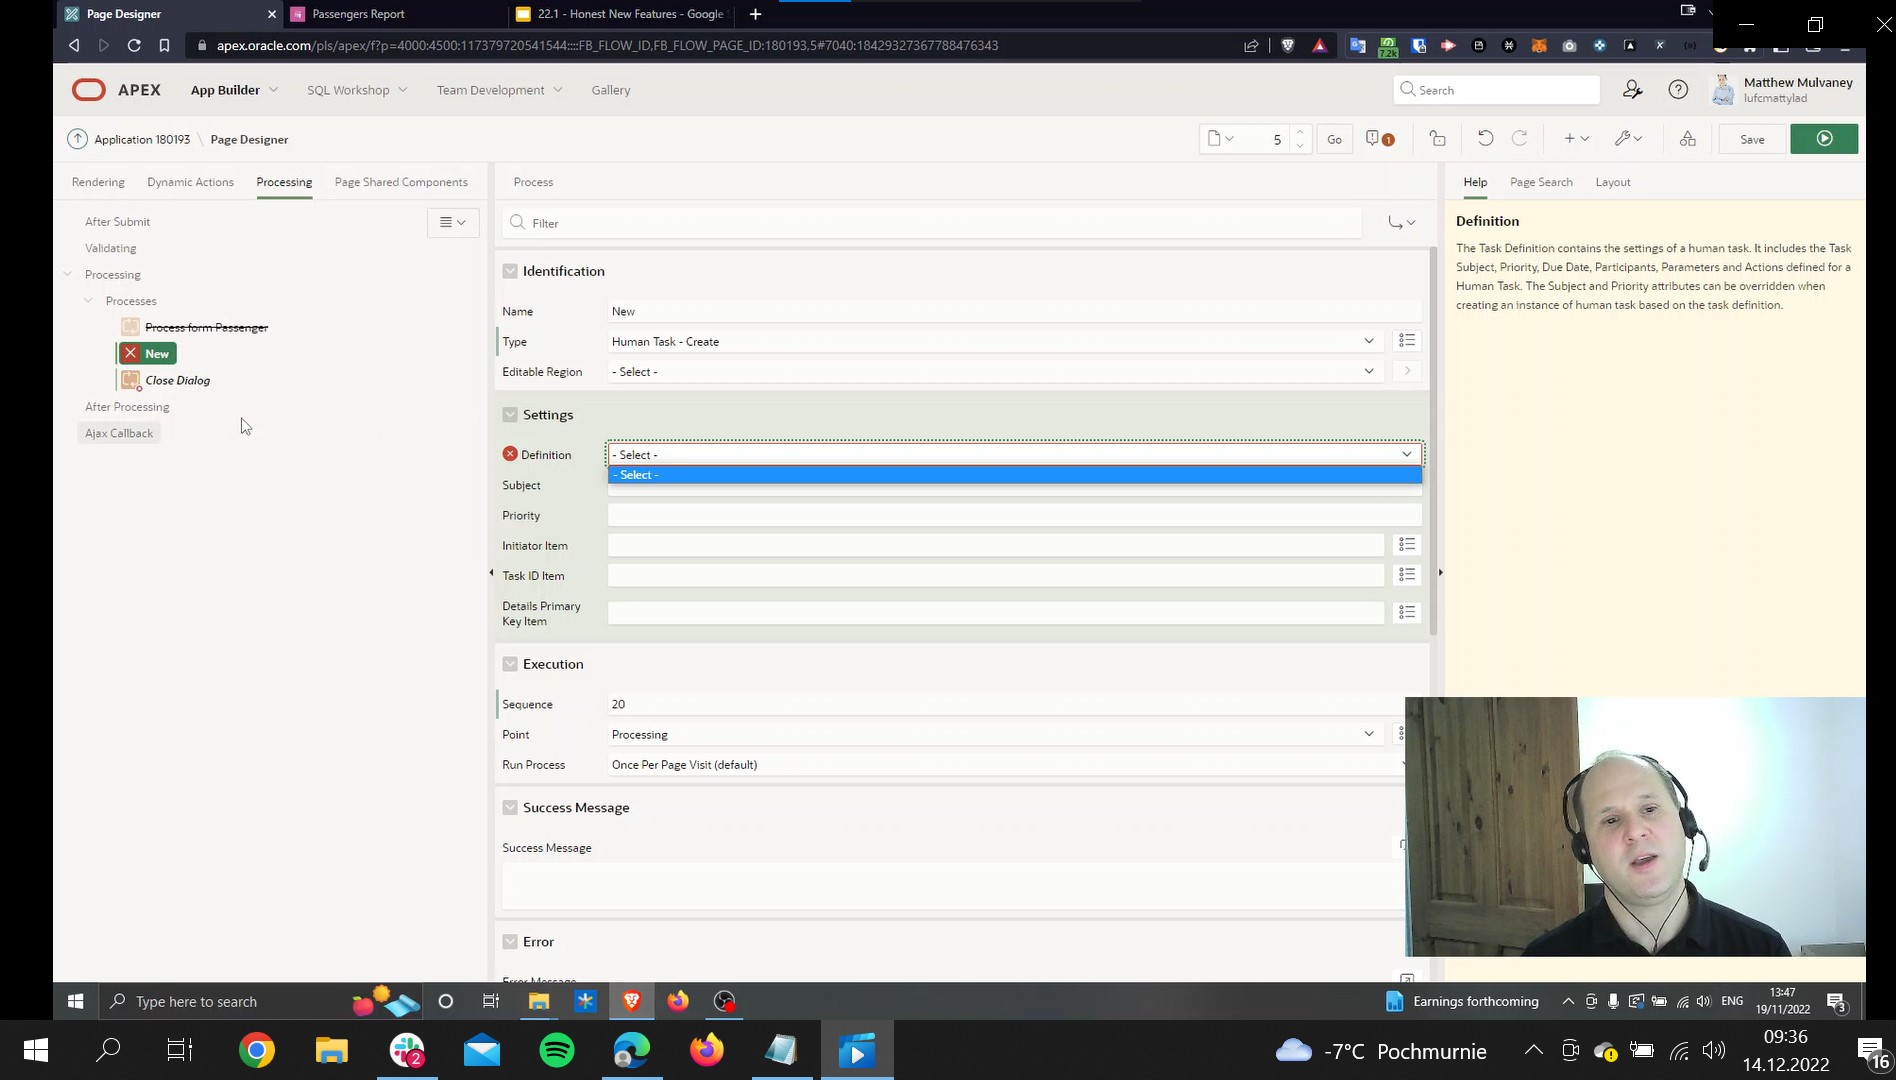
To do that, you need to select Task Definitions from the App Builder’s main page and then click the green Create button.
I name it Seat Change, specify the Subject as “Upgrade of &PASSENGER. from &OLD_SEAT. to &NEW_SEAT.” and give it a Static ID: “SEAT_CHANGE”. I also set the Priority to 3-Medium. When I click Create, APEX tells me that I also need to create Participants to assign additional owners and parameters for the task. I’ll do that soon, but first, let’s look at the task details page.
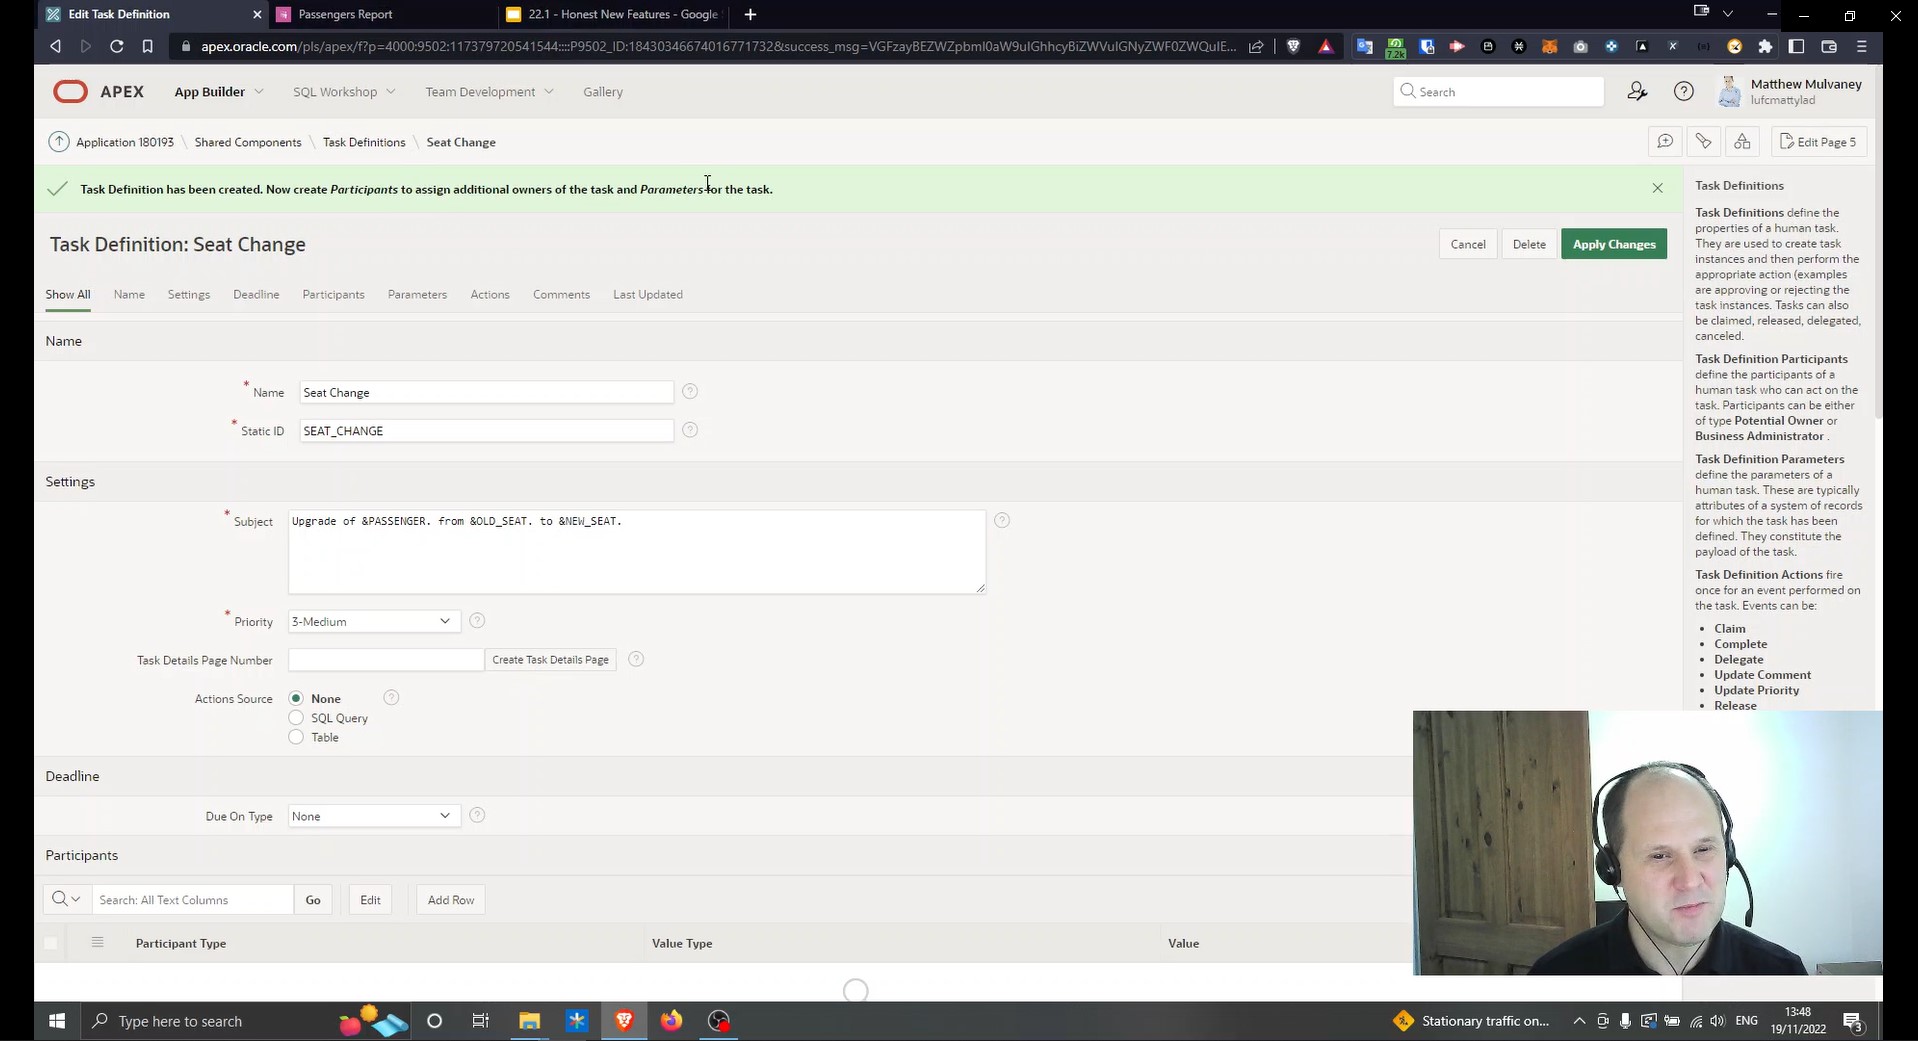
When someone is working on a task, you probably want to display important information on the Task Details Page if you have one. I want one, so I click the Create Task Details Page button and let APEX assign it the next available page number.
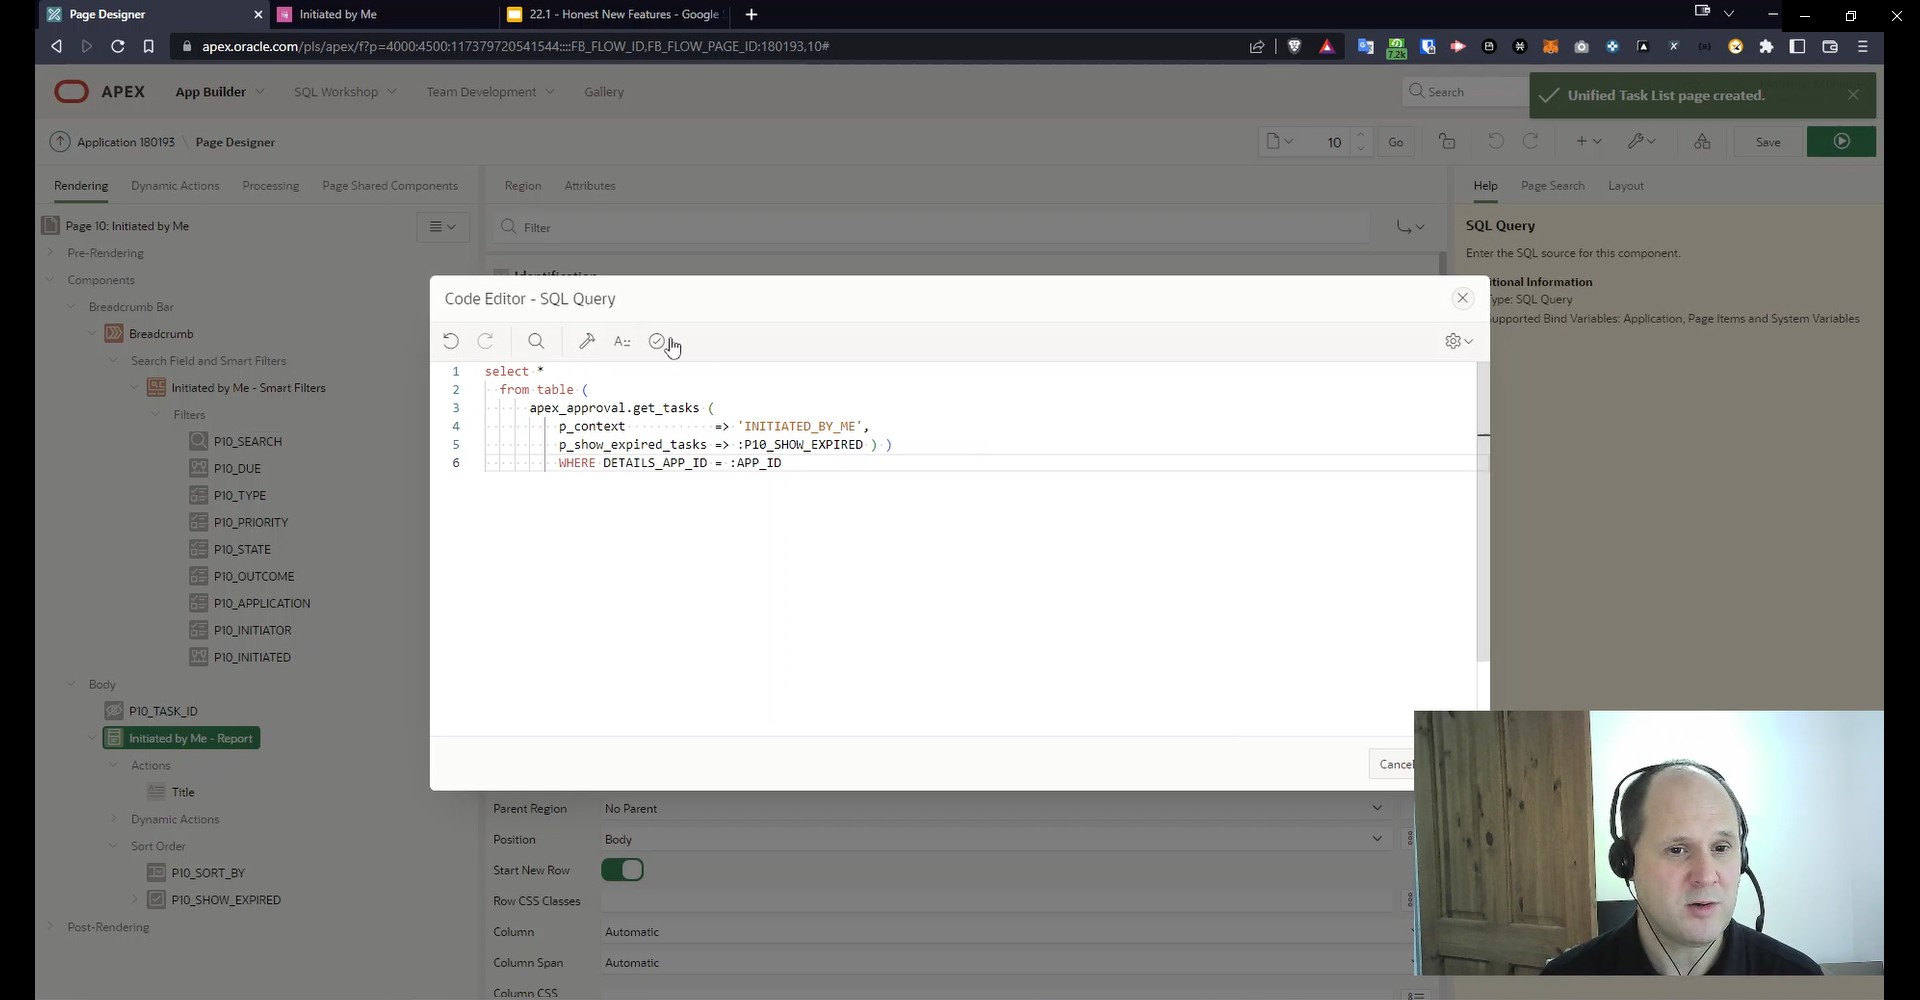
In the Settings there’s also the Action Source field. Actions have to work on some kind of data, so I have to specify what that data is. I can pick a table manually, but I can also select SQL Query, which is the option I decide to use. I type in the query you can see on the screen below. It basically tells APEX to pick data from the Passengers table, where the ID is “:APEX$TASK_PK” (if you want to know why it had to be written that way, you can see details on the help page).
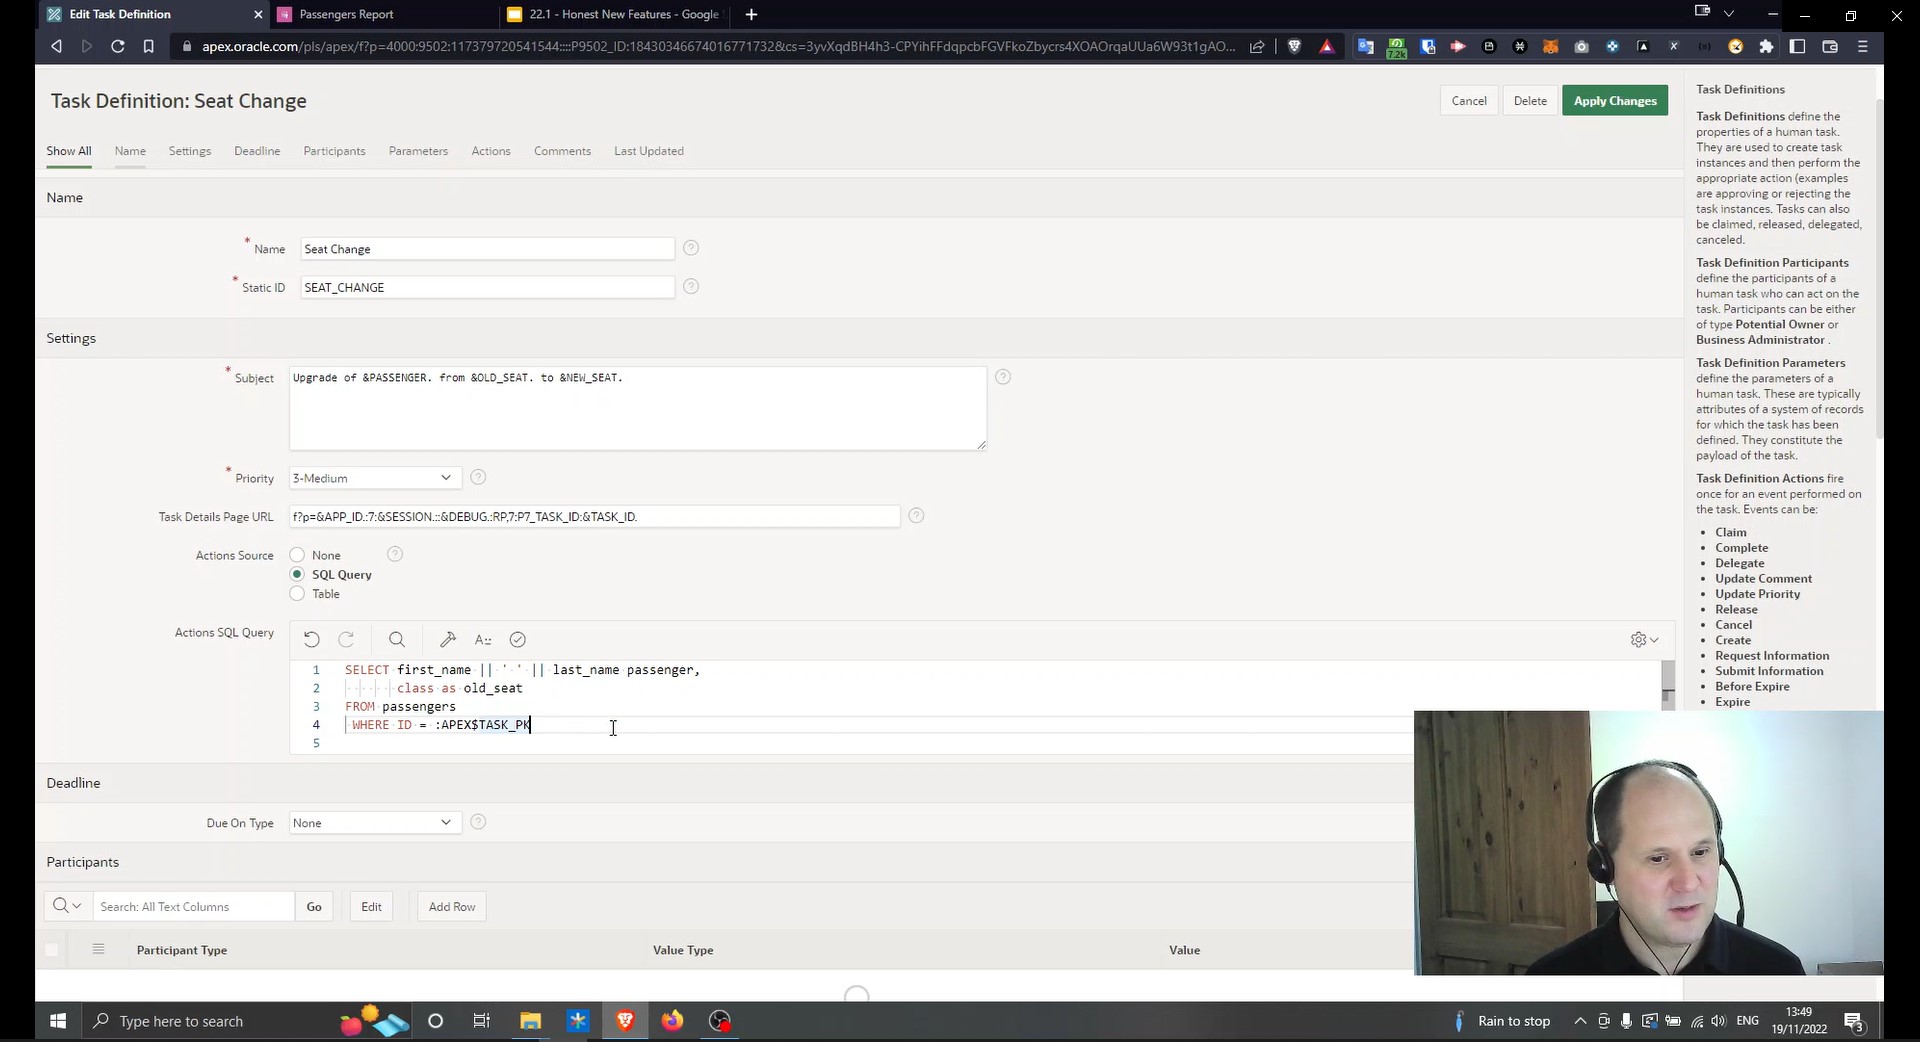
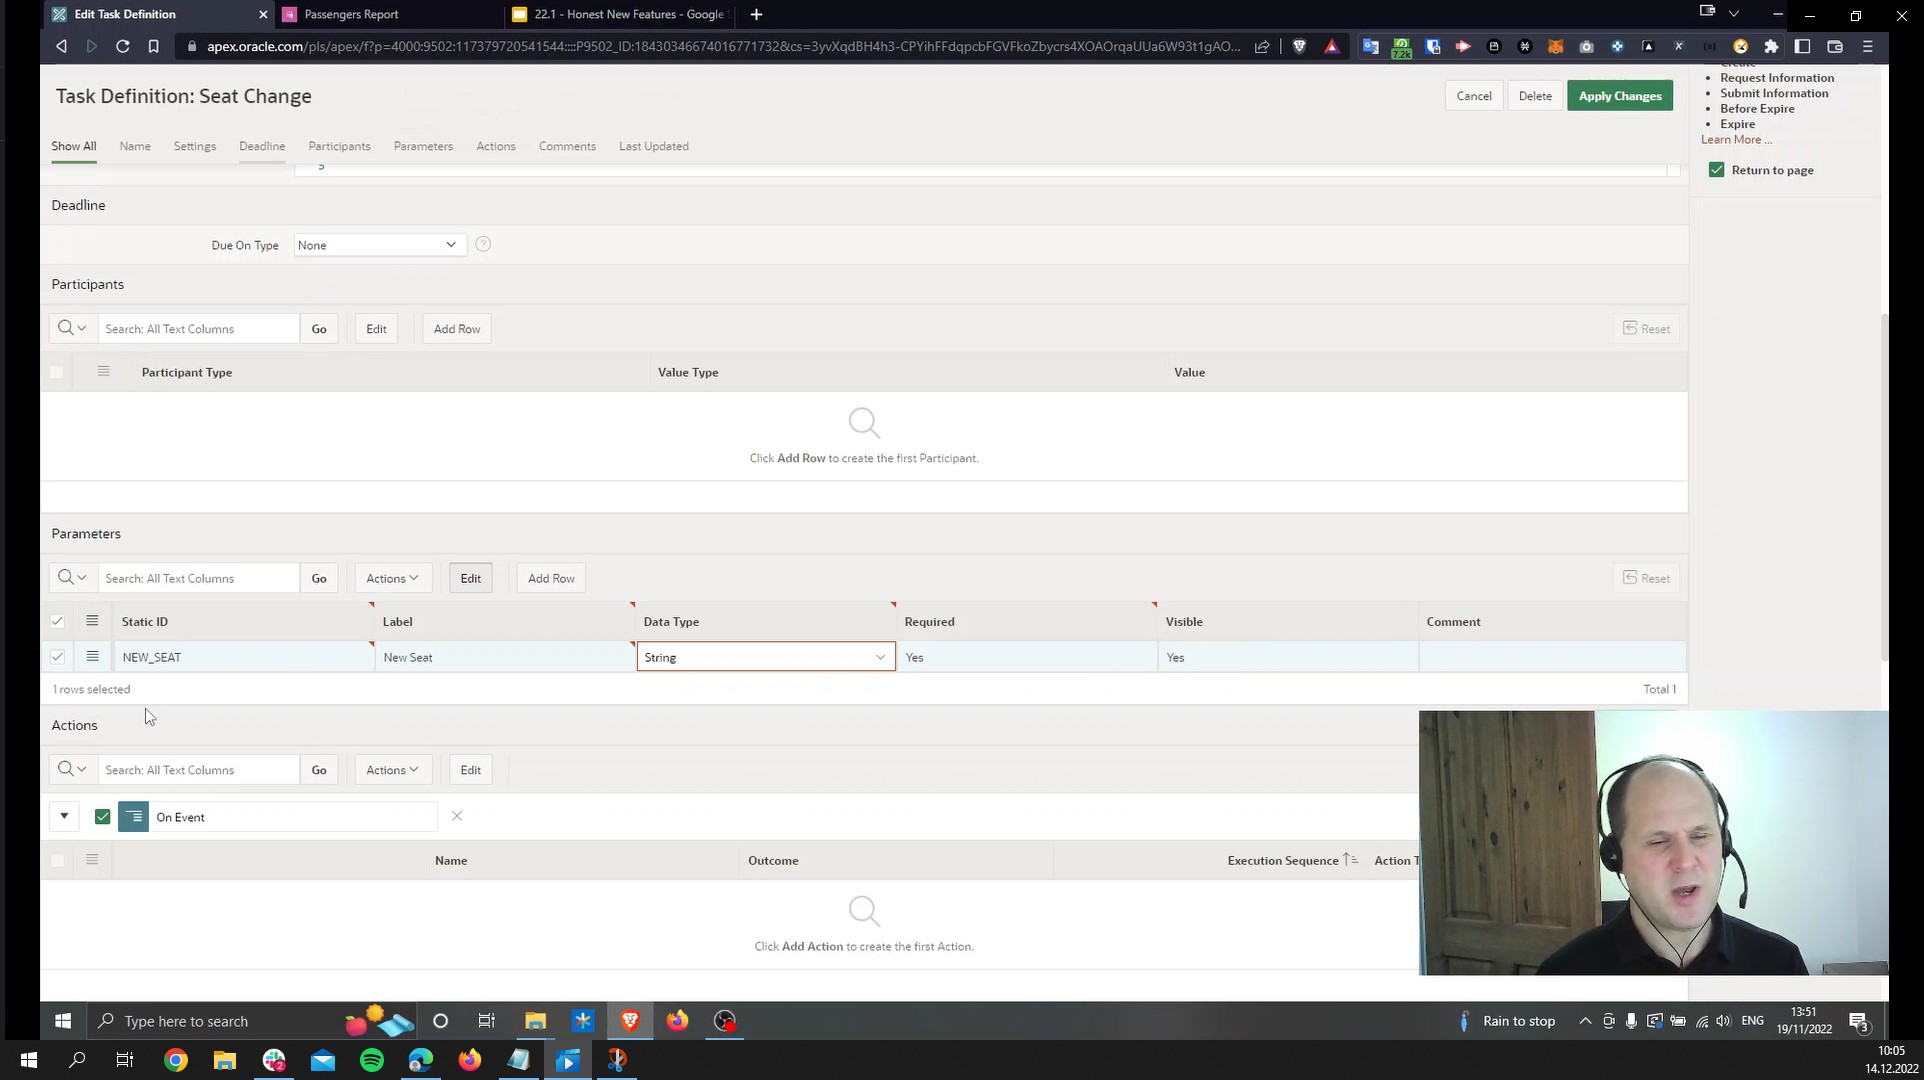
The query also needs to set a NEW_SEAT parameter, so let’s set that up now. I enter the required details in the field below. I select String as the Data Type and label it as Required and Visible. The former means I won’t be able to start a new task without this parameter, and the latter specifies that the task owner will be able to see the parameter on the details page.
You can also set the Deadline by selecting from several Due on Type options (Interval, SQL Query , Function Body, Expression and Scheduler Expression), but I decided not to do that.
Now, it’s time to add Participants. I create a “Potential Owner” with a SQL Query Value Type and the Value of “SELECT ‘BO’ FROM DUAL UNION ALL SELECT ‘DEMO’ FROM DUAL” – you would normally use a user table. I also add a “Business Administrator” and this type uses a Static Value Type – I enter my e-mail address as the Value.
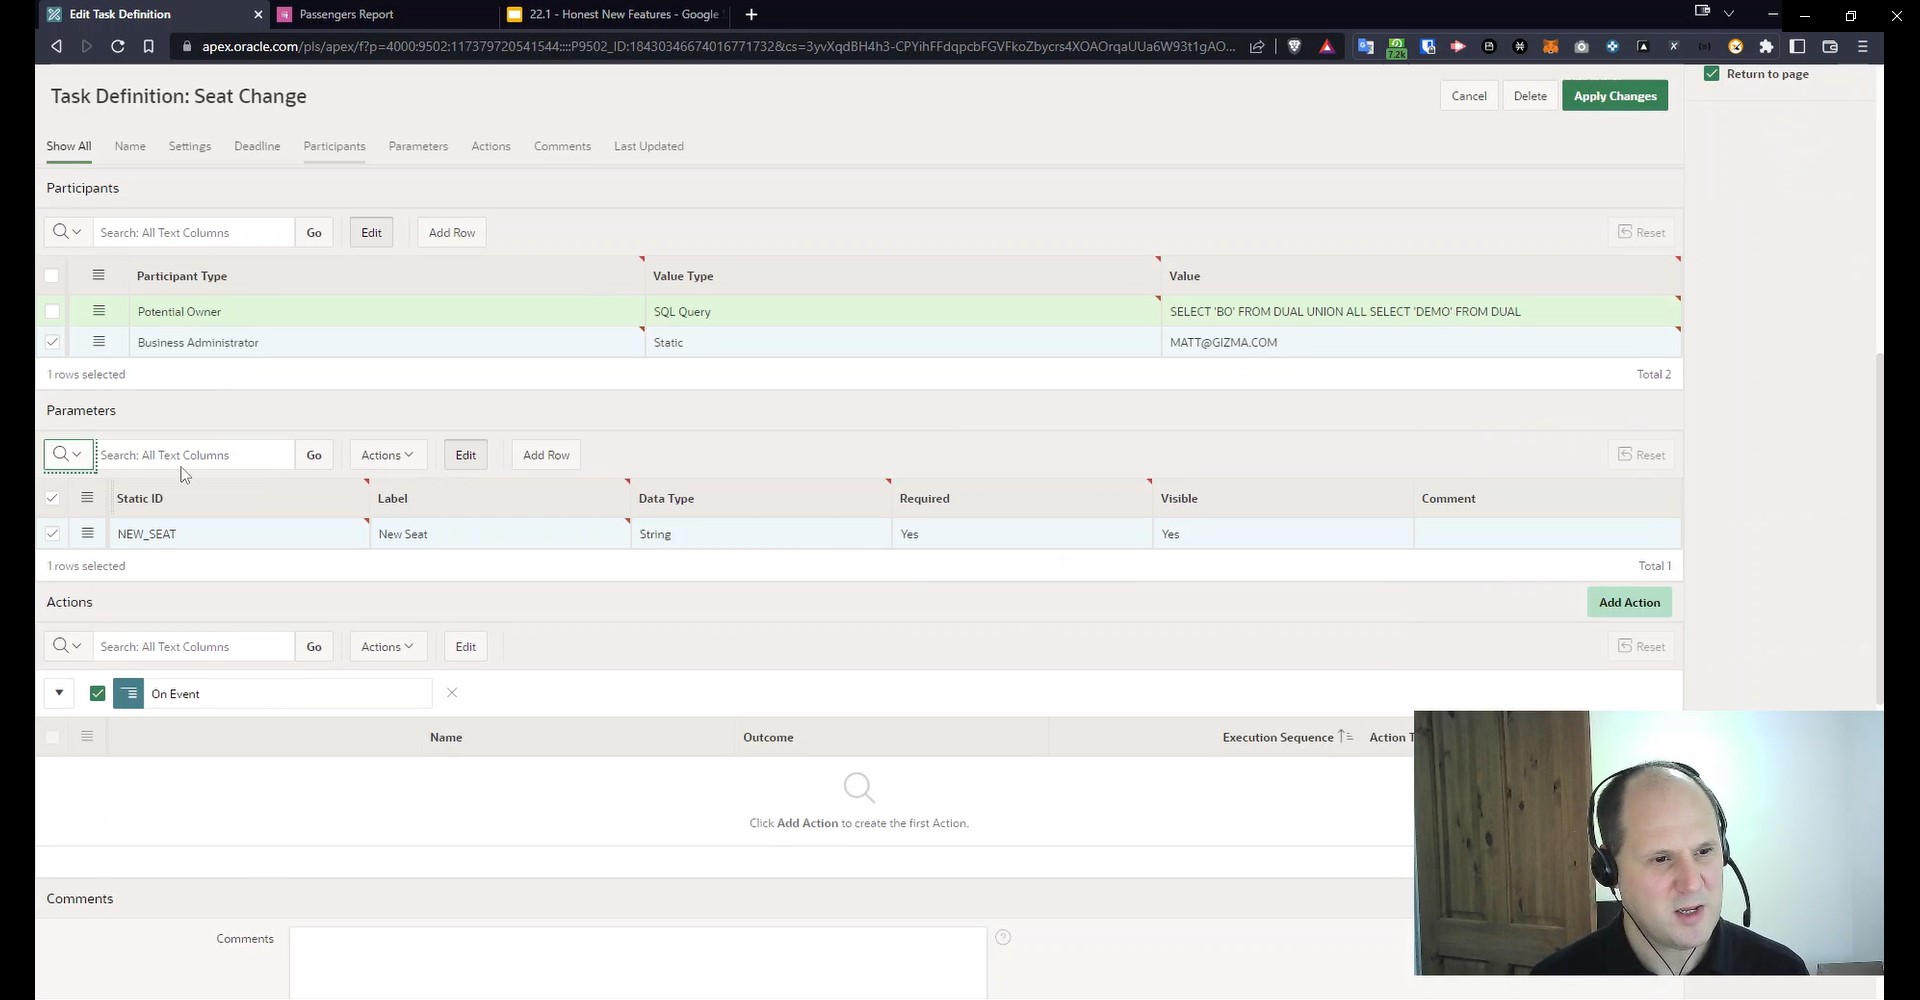
I save the changes and then proceed to add actions by clicking the Add Action button, which takes me to another page.
My action is called “Upgrade”. I can either run some code (the Execute Code option) or Send Email. I choose the former and select Complete from the list of On Event options. I specify the Outcome as Approved and enter the Success Message.
Under code I type in “update passengers set class = :NEW_SEAT WHERE id = :APEX$TASK_PK;” and my task definition is done.
We can go back to editing the page in App Builder. Now, when I click Create Process, I can select “Human Task – Create” under Identification -> Type and set the Definition as “Seat Change”. To get everything working, I also need to enter the Primary Key (“P5_ID”), change the New Seat parameter’s Type to Item and point to the “P5_CLASS”.
Now, when I apply all the changes and go back to Luciana’s entry in my table, I can finally bump her up to first class. However, this change doesn’t happen automatically – it has to be done by a human, so it isn’t visible in the table yet. Clicking Apply simply means my Human Task was started behind the scenes.
How to see if it works as it should? Well, if I want a visual representation of this task – and I do – I’ll need to create a new page.
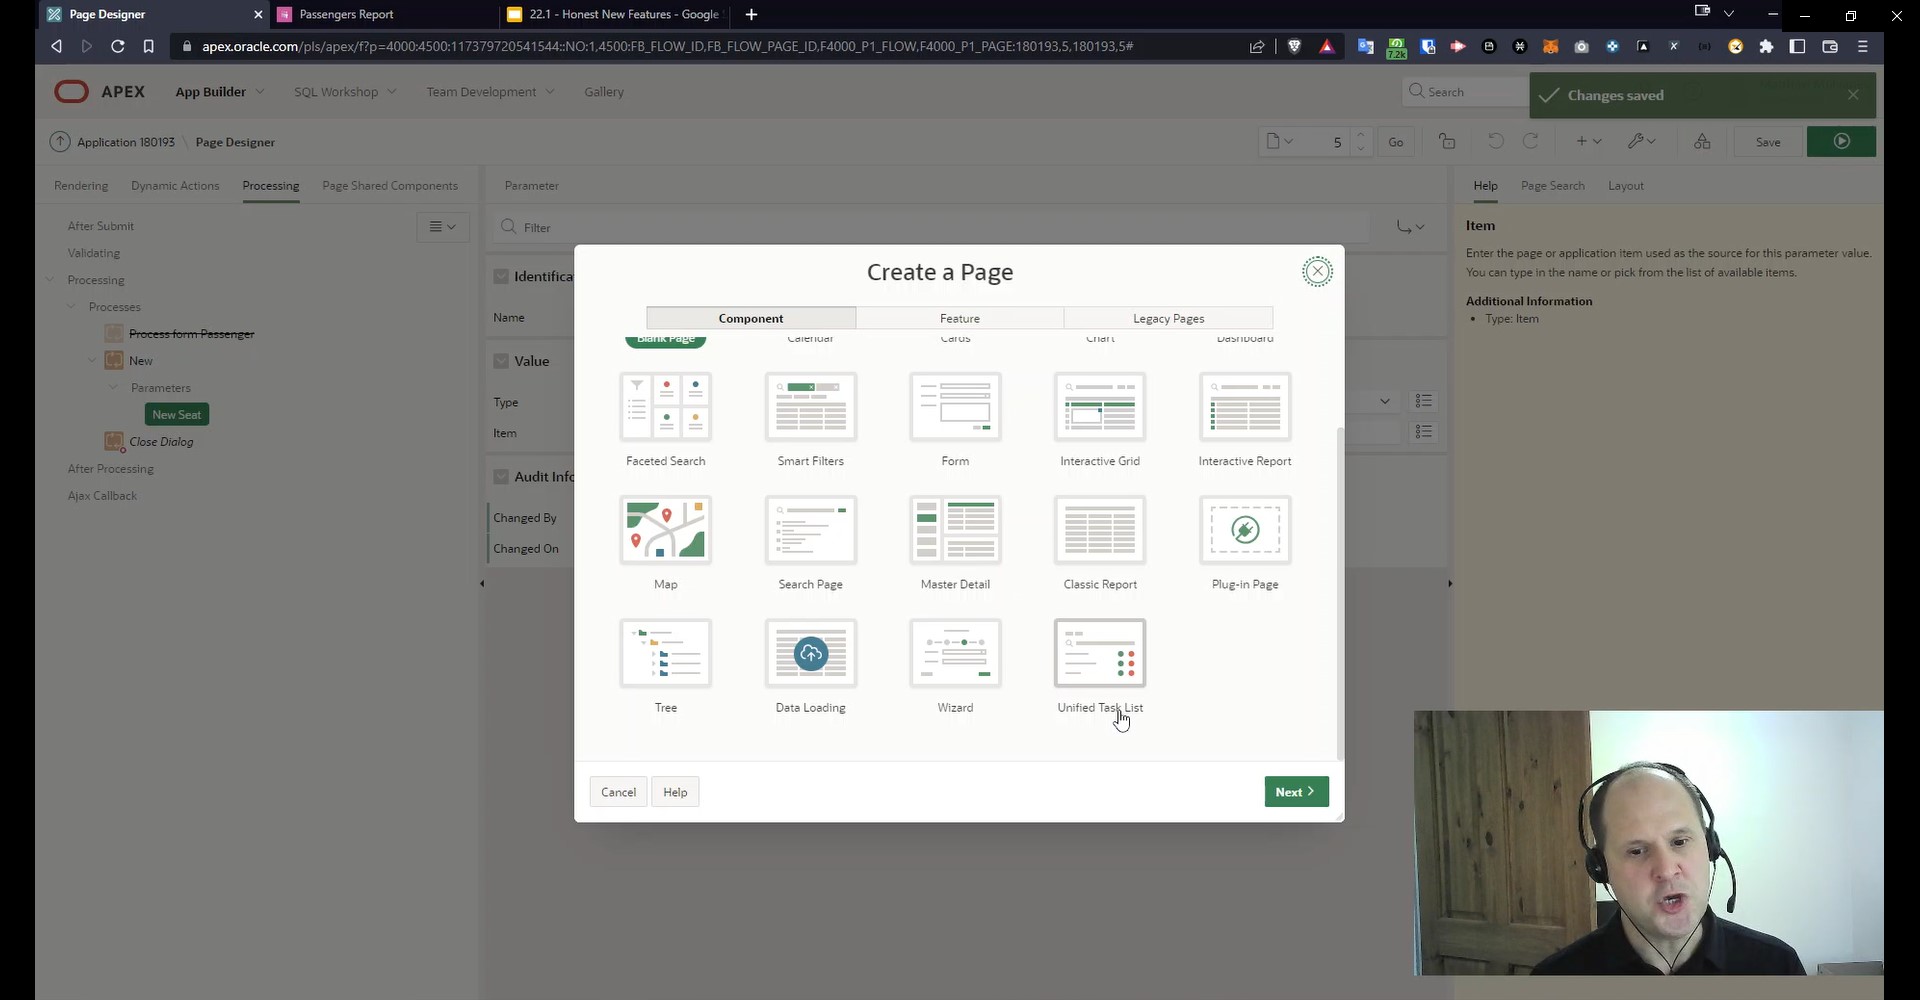
I choose the Create Page option and select Unified Task List from the menu – this allows me to use one task list in all my applications. I name it “My Tasks” and specify My Tasks as Report Context. I do this for all three of these unified tasks lists.
Now, when I check the mega menu of my application, I can see three types of task lists: My Tasks, Admin Tasks and Initiated by Me. I select the last option.
As you can see, Luciana’s upgrade to first class is the first position on the list. However, there’s a problem – the task hasn’t been assigned to anyone yet, so the poor passenger could be waiting forever! We’ll help her out, but before we get to that, let’s address the issue you’re probably wondering about: what are the other entries on the task list?
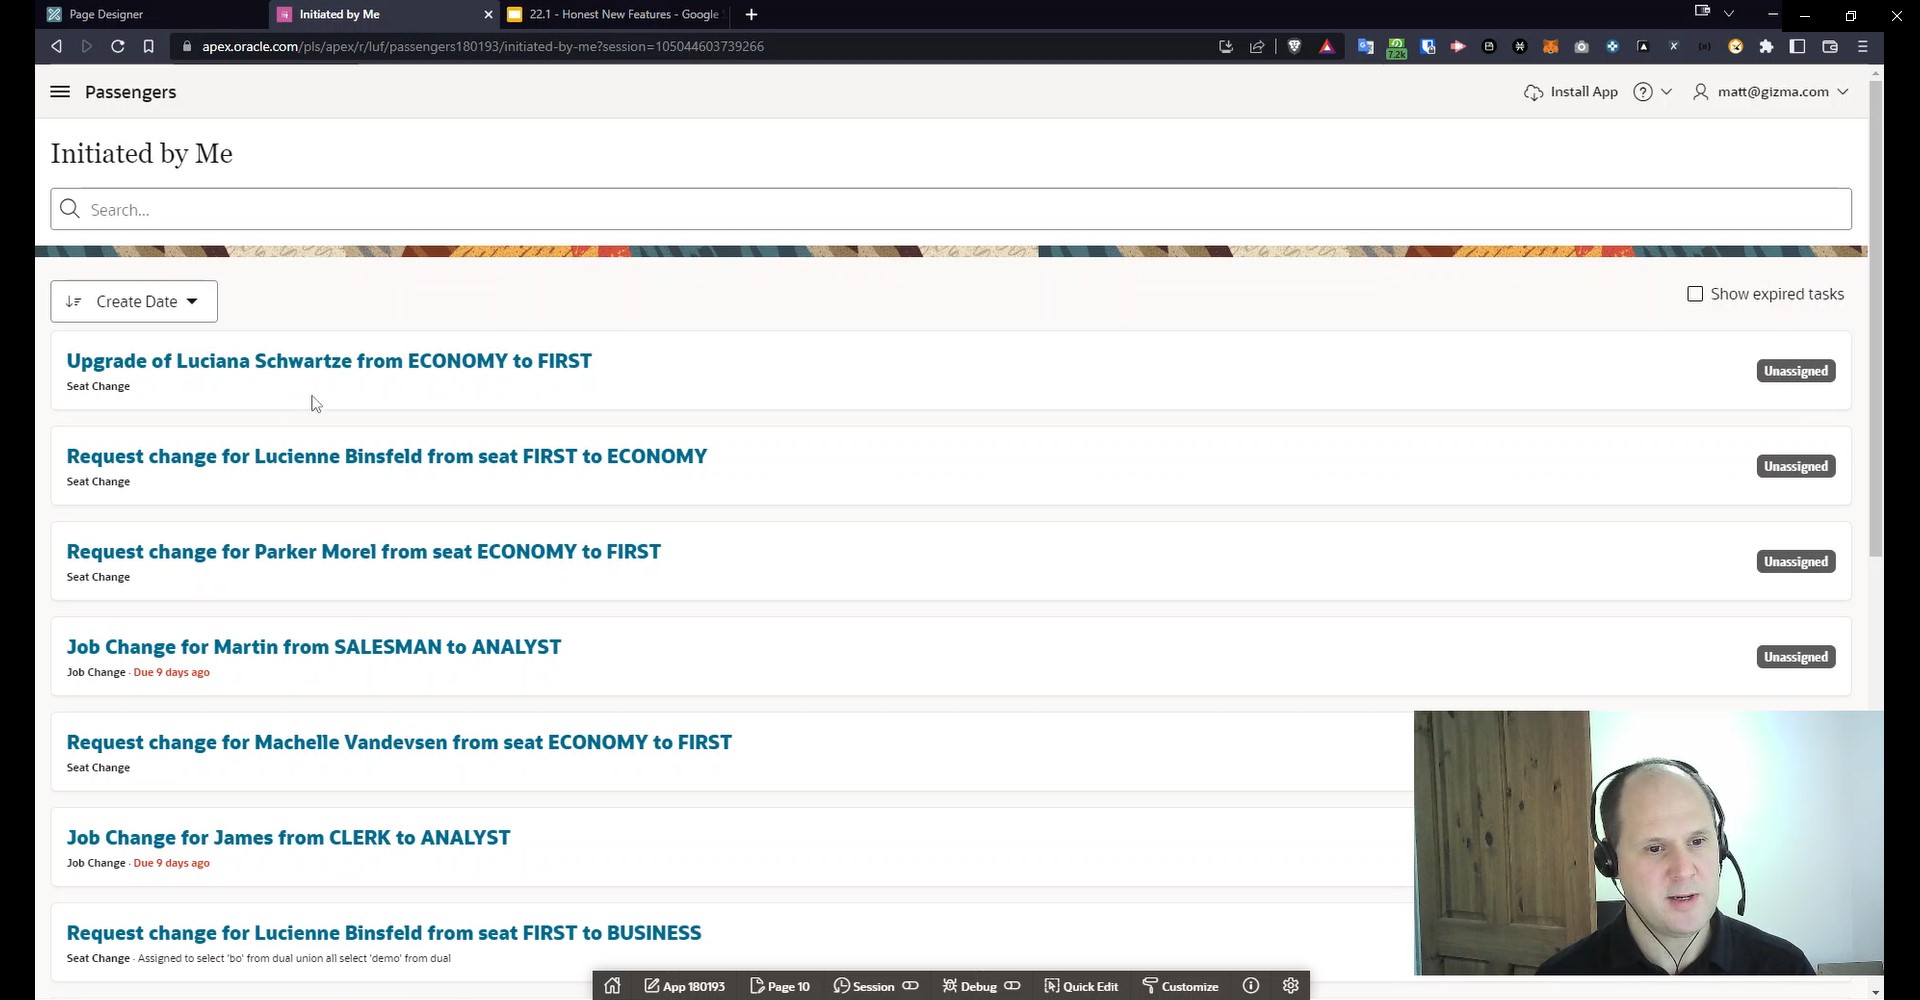
These come from my other applications. If I don’t want to see them here, I’ll need to change my pipelined function by adding a “WHERE DETAILS_APP_ID = :APP_ID” line into the SQL Query to hook the DETAILS_APP_ID. I’ll need to do that on all my pages to change this. So, word of caution: try not to use the APP_ID column if you want to avoid such problems.
Now, let’s get back to Luciana’s task. To see how everything works, I need to log in as a second user – the Potential Owner called “BO” I defined before – in a different browser.
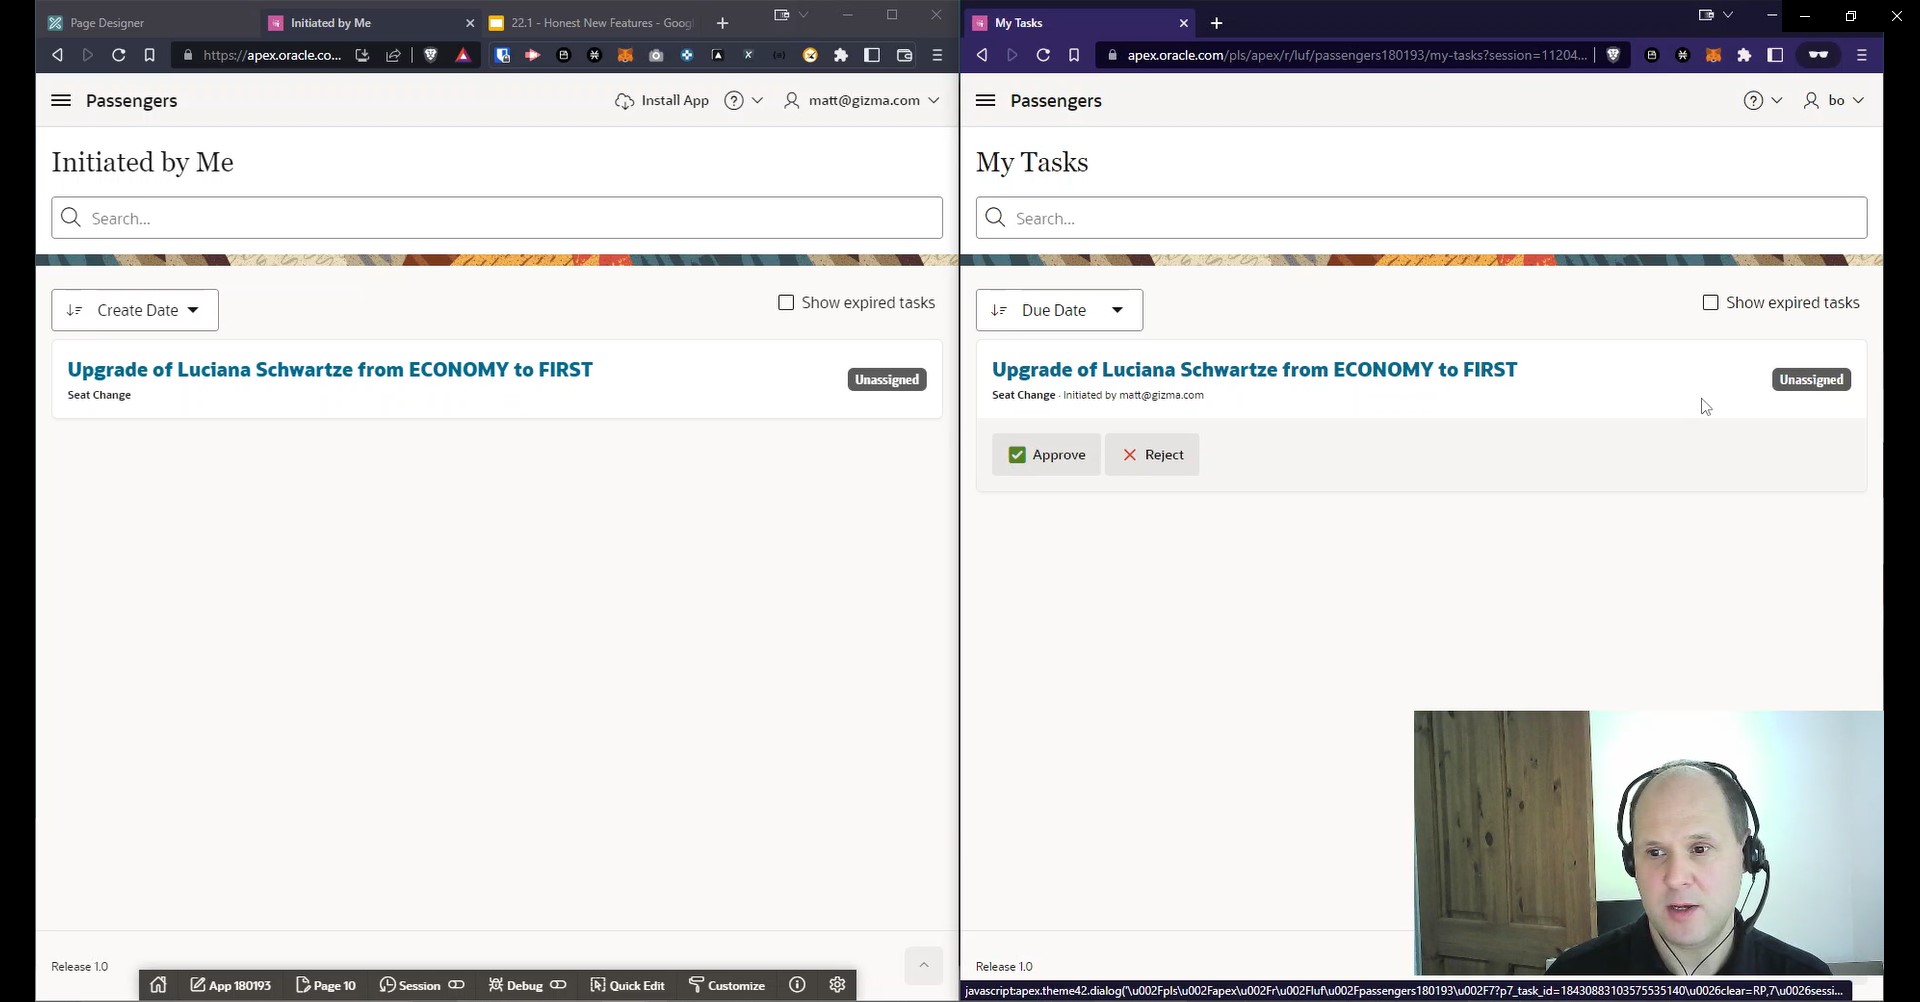
That user – on the right – now sees the task and can either Approve or Reject it. They can also enter Task Details to see the relevant information, leave comments or request additional info. As you can see, any changes made to this task are visible for the other Participant (on the left) and vice versa. The task is switching between them.

Everything seems to be working correctly: in a fictional place, a fictional employee is now working on changing the flight class for my fictional person. After a short exchange between my two alter egos, Luciana’s class is finally changed. Lets hope she enjoys her flight!

Overall, I think Human Tasks are a really great feature. I haven’t found too many problems with it, and I like that It’s possible to customize the app to see the details page. It simplifies work on workflows substantially, so I recommend using it. I think it’s a welcome feature for Oracle APEX.
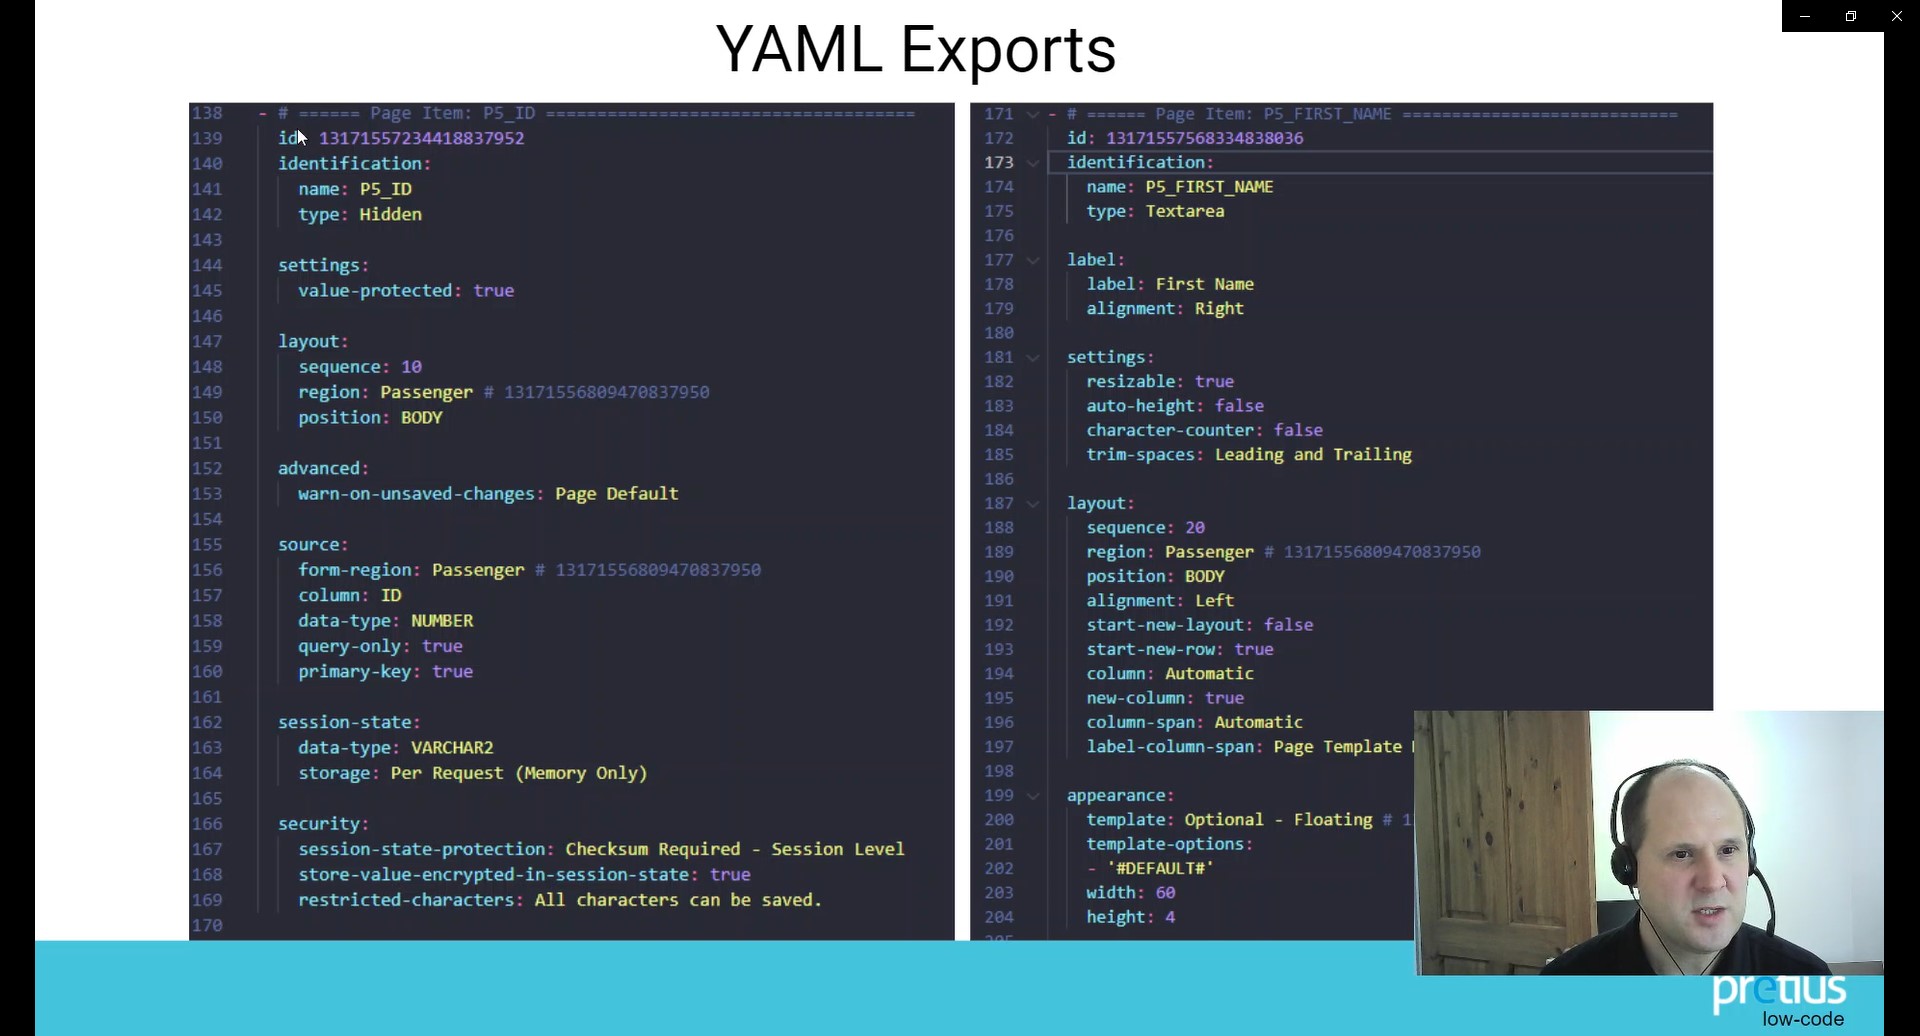
The last big feature I’d like to mention is the YAML Export which allows you to export your application into a readable YAML format.
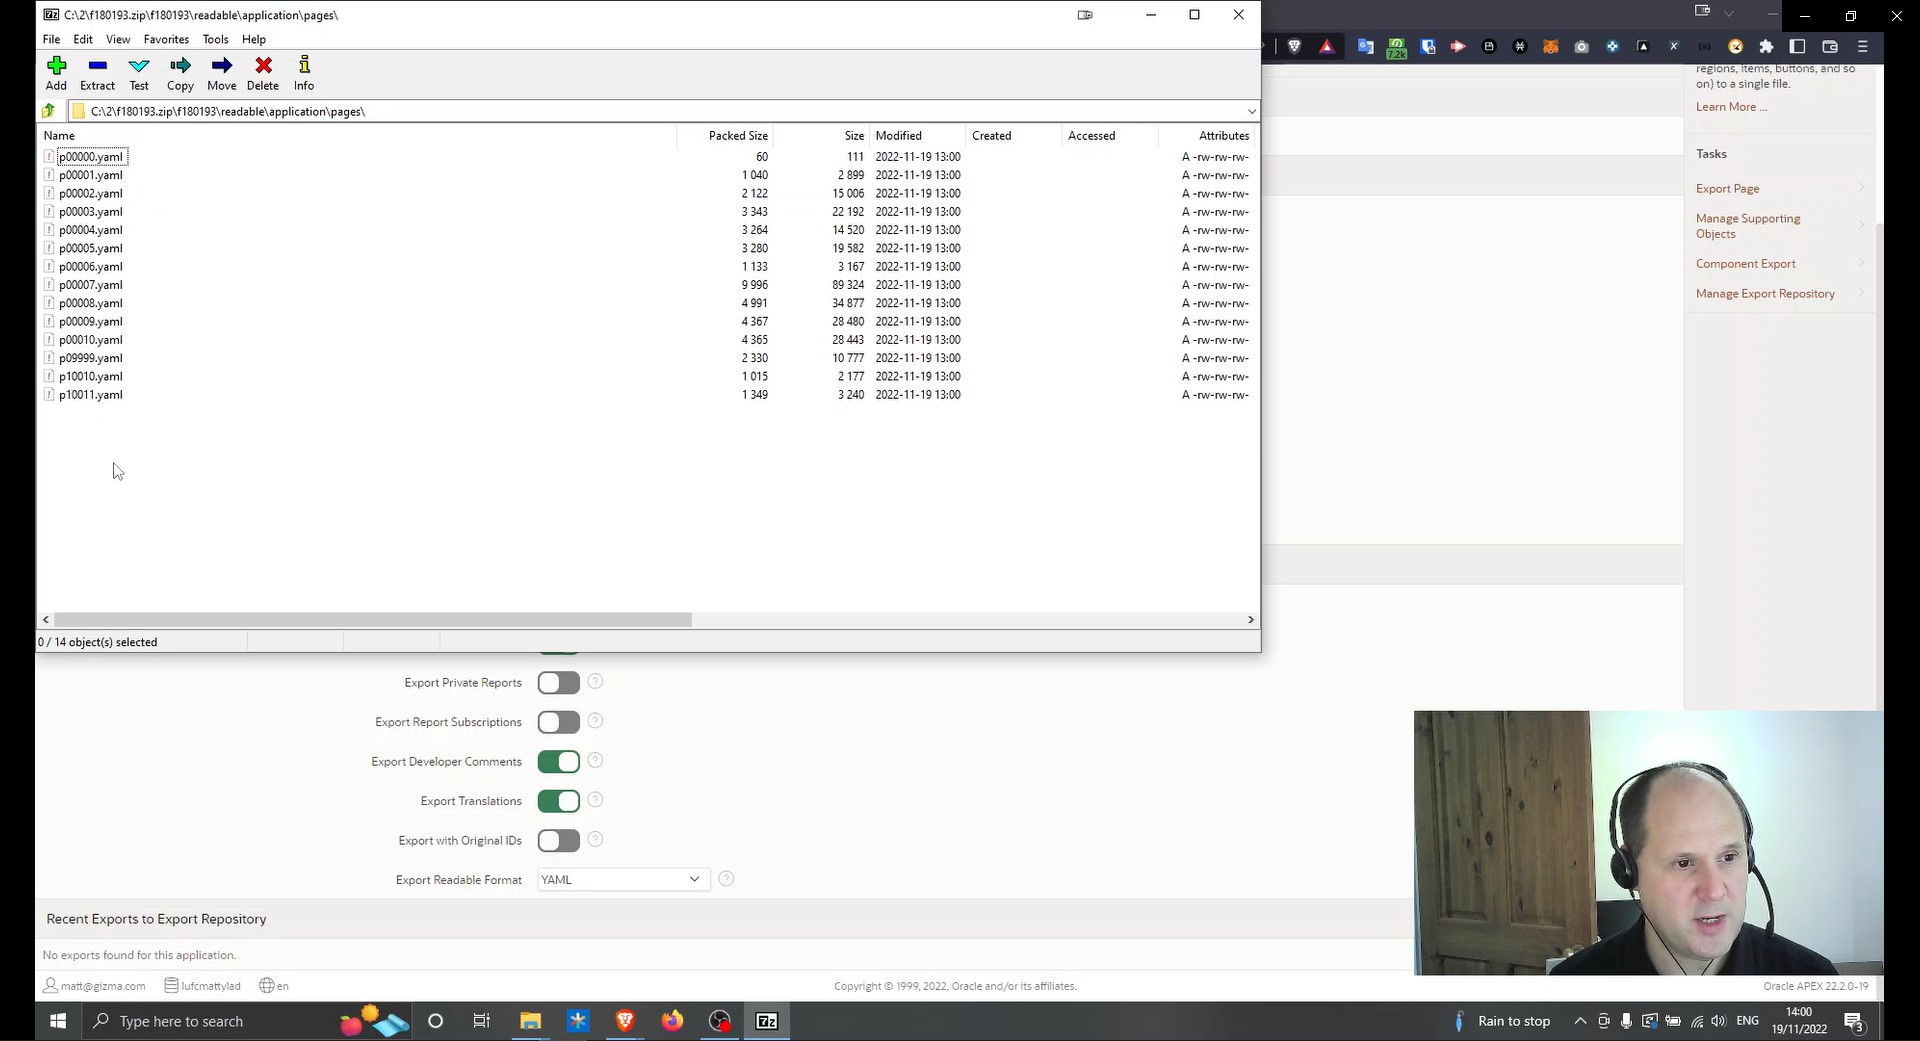
To test this, I click export, download the package that contains my app and look inside. There’s my app split into pages, the installation file, but there’s also a separate “readable” folder which contains a set of YAML files – one for each page.
When I open the task_definition.yaml file in the Visual Studio Code, it looks like this:
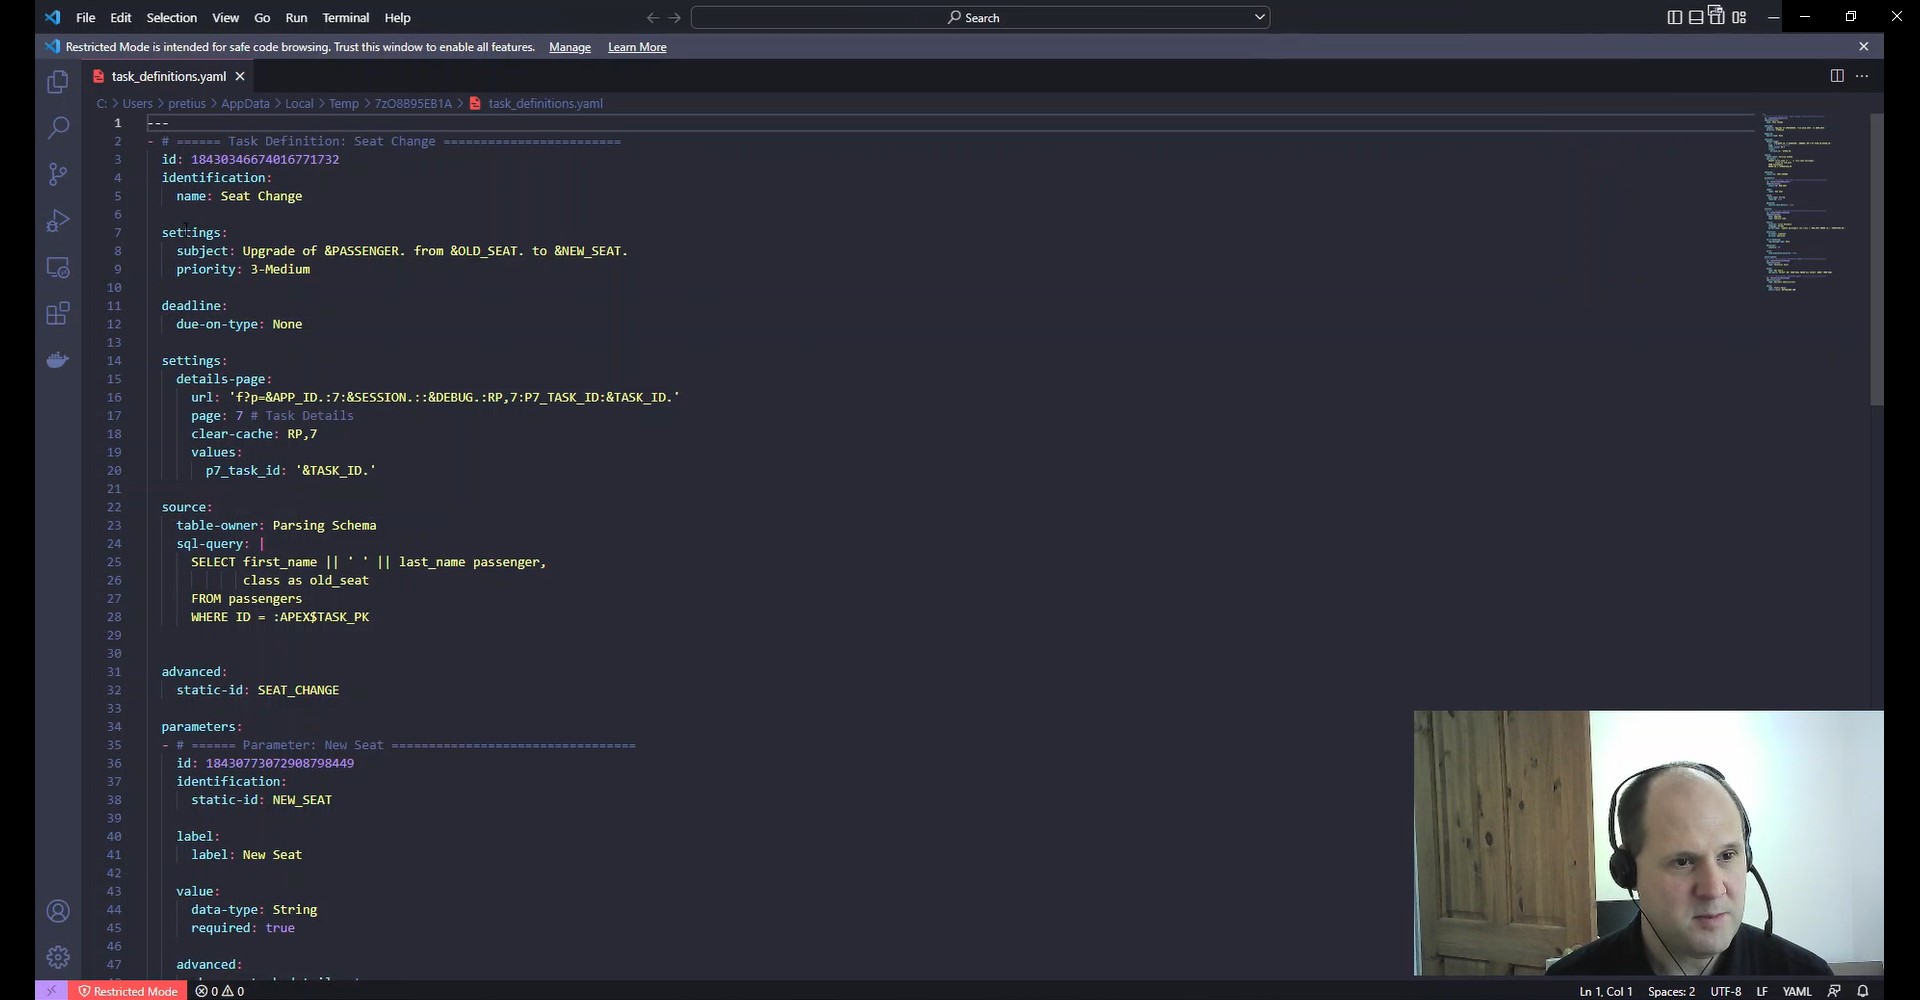
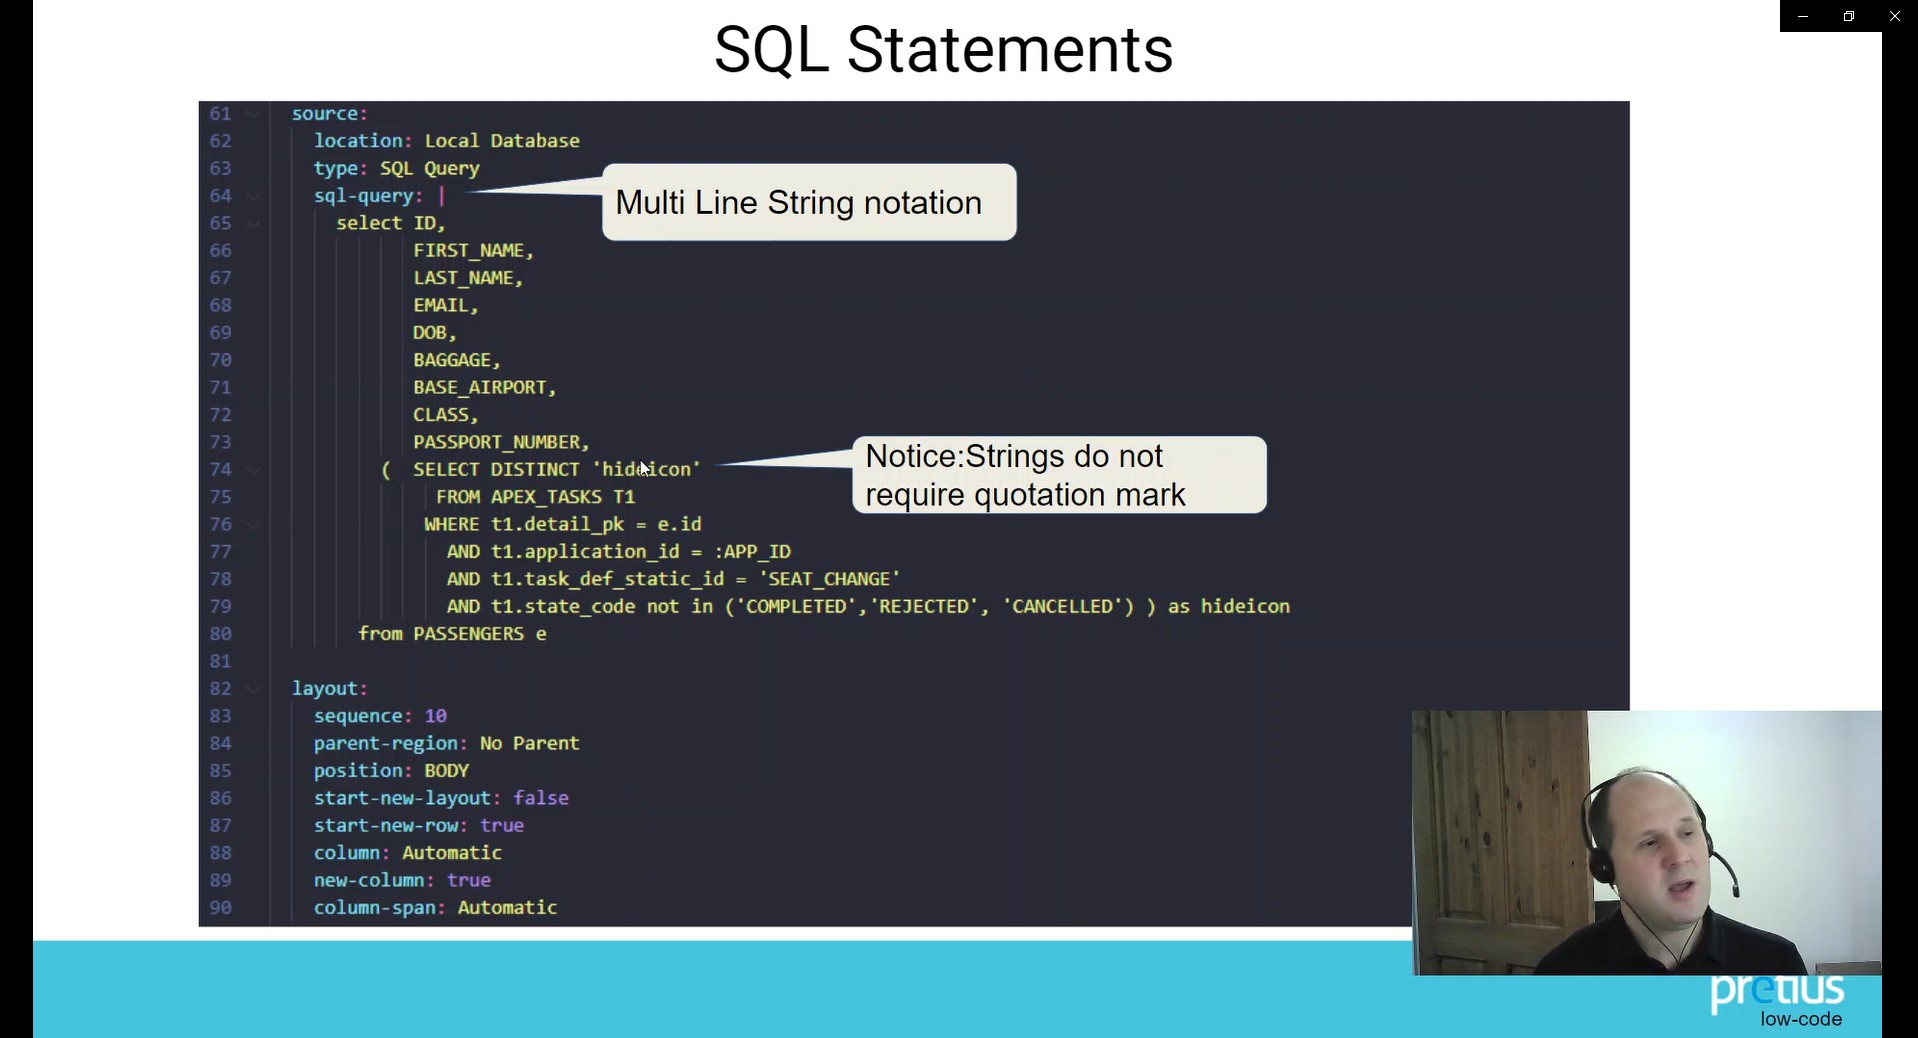
There are headings by column, I have SQL queries, nothing is quoted, and everything looks very readable.
YAML allows you to do comparisons very easily. You’d normally download SQL as your file format which is kind of readable, but far from perfect to work with.
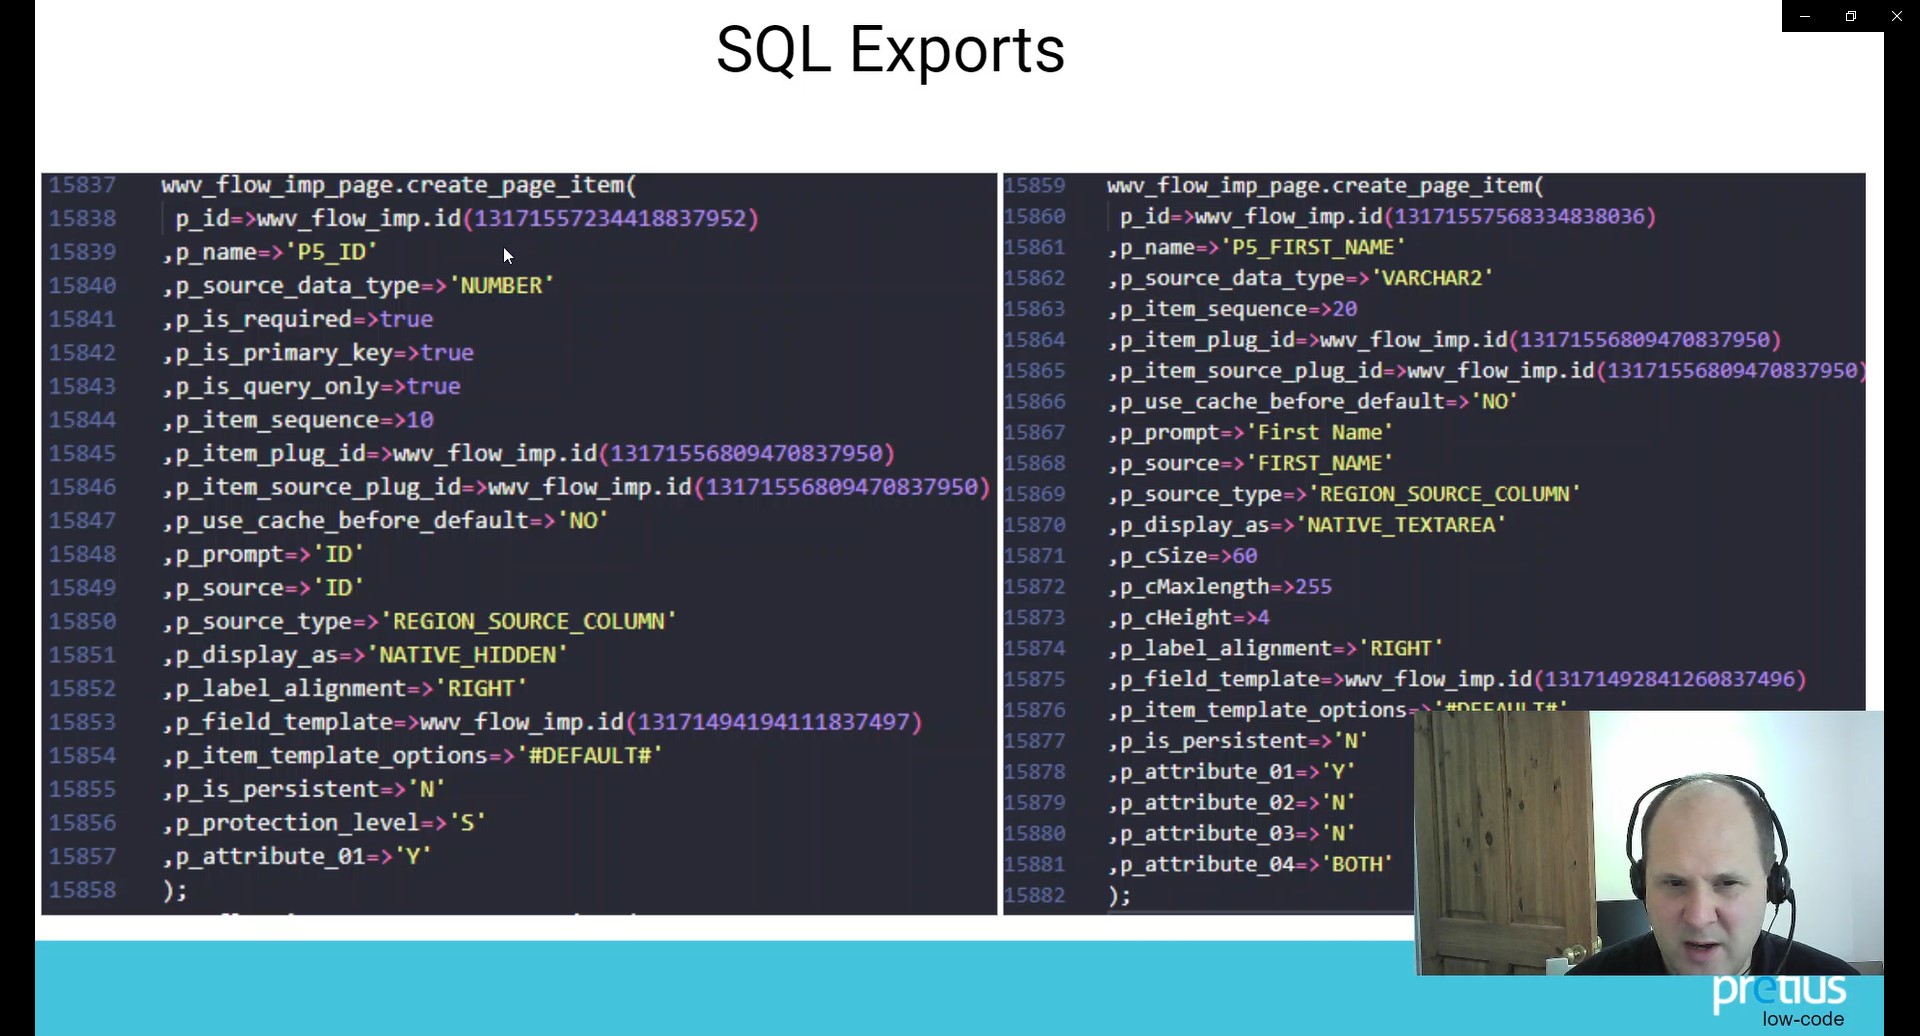
Now, look at how clear and understandable YAML is by comparison. It’s a night and day difference.
Using VSCode to compare the files makes noticing differences even easier. I’ve changed some details in the file to highlight how it works.

Finally, SQL Statements are unquoted within the YAML notation. This makes copying entire SQL queries easier.
YAML Exports are very handy and useful indeed. I have a couple of observations that should help you understand when and how to use it:
Overall, this is probably the future of APEX imports and exports, as it should allow faster and easier merging and maybe even possible backporting.
Finally, here are some additional smaller features in version 22.1 that are worth mentioning.
Oracle APEX has changed in considerable ways with the launch of the latest version, and even the version before it. It’s already a pretty powerful low-code solution, but the team behind it is still working on new things. As new features are released, I’ll also keep you up to date with the most important changes. I also encourage you to try out the features I showed so far. I hope this article inspires you to learn more about Oracle APEX and perhaps consider it for your business application or another low-code project in the future. Feel free to tweet or e-mail me if you have any questions (contact details are below – in my bio).
Pretius Low-Code has a deep understanding of low-code platforms, and Oracle APEX development is our specialty. If you’re interested in a powerful app or system created with this technology, drop us a line at hello@pretius.com (or using the contact form below). We’ll get back to you in 48 hours.


