
As I’ve mentioned in the first post about my path to certification, one of the steps taken towards achieving the goal was building a basic application. The idea was to become more familiar with and put into practice the knowledge acquired during the course. It turned out to be the perfect approach, and I would recommend it to everyone. It allowed me to quickly learn how to better use Service Studio and gain confidence in my skills.
Over the next few entries, I will share my experience with building the first application in OutSystems. I’ll also try to describe in my own words, how the most important elements I used during the design phase operate. The entire topic will be divided into several entries. In this first one, I will focus on the first steps – the database, creating pages, using widgets, and calling the data to display.
If you want to know about the advantages of low-code in comparison to traditional software development, you can always check out one of the previous articles on the Pretius blog.
From the outset, the application I built was meant to be only an internal project, for the purpose of learning OutSystems. I had to use something as an example, and I’ve decided to utilize the requirements that were specified by Pretius Low-Code during a past project. I’ve created my simplified version of the app based on these requirements – I only needed some basic features, there was no point in building a complete, highly developed application.
The first step was to put myself in the shoes of an owner of a publishing house, with operations in two countries – France and the USA. This publishing house was responsible, among other things, for organizing the promotional campaigns for the books it was publishing. To do this, the company cooperated with its partners – stores that took an active part in the campaigns by organizing individual events.
My app was meant to make these business processes easier to handle. In order to properly manage the data about my campaigns and partners, I needed a CRM application that would allow me to save the information about the campaigns, the stores, and their employees, the history of their correspondence, as well as the events organized by them. Considering the context and purpose of the application, I made the following assumptions:
Partners (shops)
Campaigns and events
Additional requirements
Note: as I’ve mentioned in my previous entry, working with OutSystems requires mastering the vocabulary, which is a bit different from the one you normally have to deal with when working with databases. Both in this post, and the next ones, I will use the vocabulary I encountered in OutSystems. So let me remind you that when I write about “Entity” I mean “Table” when I talk about “Attribute” I mean “Column”. Additionally, “Aggregate” is “Query”, and “Record” replaces “Row”. Also, I will use the term “Identifier” instead of “Primary Key” and “Reference Attribute” instead of “Foreign Key”.
To start a new project, select New Application after turning Service Studio on. A new application window will appear, which will present you with a choice – you can either start an application from scratch or create it on the basis of an existing one. I decided to build mine from scratch, and in the next step, where you specify the type of application to be built, I chose Reactive Web App. I gave my project a name, set the application logo, and clicked Create App to finalize the process.
The first module of the application is created automatically – you only have to select its type (in my case it was Reactive Web App). After opening the module, I could start building the application. Because of its simplicity, I decided to create the whole app in one module, but it could just as well be divided into several, each of them serving a different purpose (for example, you can separate different levels of the application this way).
With the module already in place, the next step in building the application is to create the entities in the database on which the application is to be based. This requires identifying the primary entity or entities from which the building should start. In my case, there were two main entities – plc_STORE (containing information about our partners), and plc_CAMPAIGN (containing information about our campaigns).
In addition to these, I created entities plc_STORE_CONTACT (it contained contact information for each partner and was linked to the plc_STORE entity by the Reference Attribute), plc_STORE_INTERACTION (containing a history of correspondence with each partner, it was linked to entities plc_STORE and plc_STORE_CONTACT). Finally, I also needed the entity plc_EVENT which held information about events organized by the partners and linked the main entities together.
The exact structure of my database is shown in the diagram below. What was the reasoning behind such relationships between entities?
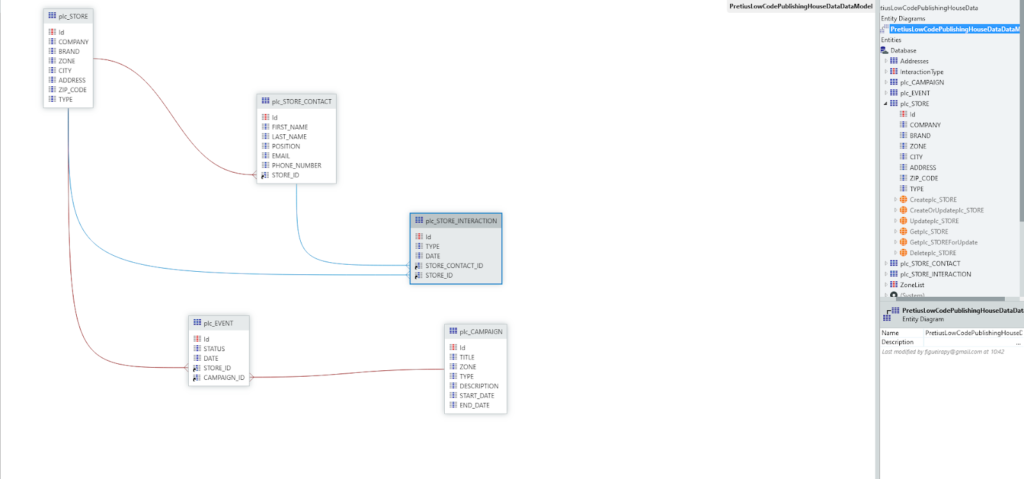
Database scheme.
Let’s start with plc_STORE and plc_STORE_CONTACT. Considering the requirements I specified above, we can assume that each partner employs a group of people, in which some are our contacts. There may be more or less of them, depending on the store, but each contact is assigned specifically to one store. Hence, the relationship between these entities takes the form of 1-to-many. The relationships between entities plc_STORE_CONTACT and plc_STORE_INTERACTION, as well as plc_STORE and plc_STORE_INTERACTION, work on the same principle.
However, a store can take part in multiple campaigns, and multiple stores can participate in the same campaign. This required the creation of a many-to-many relationship between entities plc_STORE and plc_CAMPAIGN, for which entity plc_EVENT was used – each item stored in it refers to an event held at a specific store, connected to a specific campaign. Information stored in the entity includes store names and addresses, campaign descriptions and dates, contact names, etc. – all of them can be found in the diagram.
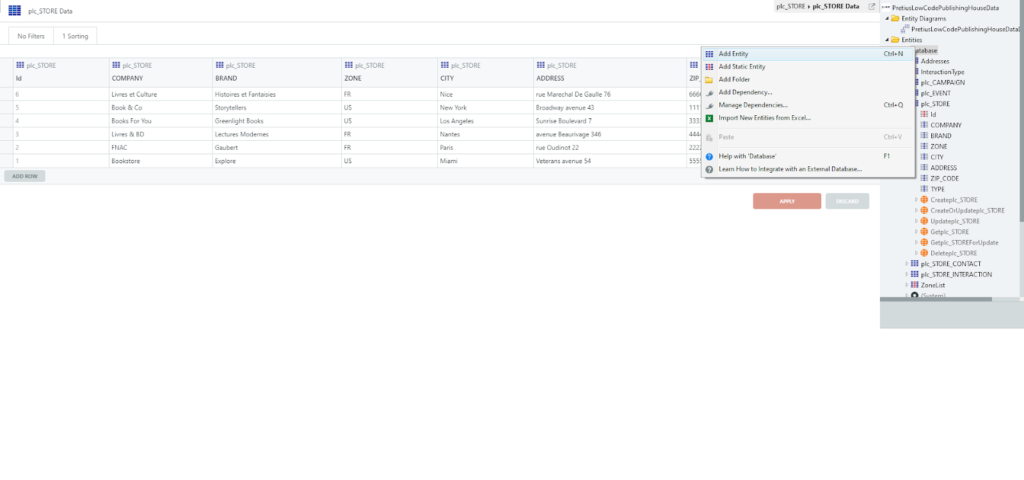
How do we add a new entity to the database? This requires a few simple steps. First, in the upper right corner of the development environment, select the Data tab, to gain access to the database level. In the tab, there are files, from which we select Entities. In that file, there is an entry called Database. To add a new entity to it, you need to click on it with the right mouse button and choose Add Entity from the list. In OutSystems, the identifier of an entity is added automatically, and the data type Long Integer is assigned to it.
Also, by selecting this entity you can check its properties at the bottom of the screen. Pay attention to the Is AutoNumber property, which in the case of an identifier is set to “yes” by default. That means – as the name suggests – that for the next records this field will be filled in automatically. It’s worth noting that OutSystems doesn’t offer the option to use more than one attribute as an identifier.
This is how you add entities to the database.
As you can see, the first steps you need to take to build an app aren’t difficult. It’s literally a matter of a few mouse clicks, and the same can be said for defining attributes of your entity. Creating a new attribute also requires a right-click – this time on our new entity. After that, all you have to do is to select Add Entity Attribute and the new attribute will be created.
Every step of the way, you are assisted by artificial intelligence, and this moment is the first time you can see how it works. When you set the name of a new attribute, its data type will be automatically set to the most suitable, based on the context outlined by the selected name. For example, specifying the attribute name as Price will set the data type to Currency, because the name suggests that this attribute will store information related to currency trading. Of course, the automatic selection of the data type is only a suggestion – you can change it, if necessary.
The data stored in the newly created entities will need to be managed while using the application. Thankfully, OutSystems helps with that too. Along with the entity, the so-called Server Actions are created. In one of the future articles, I’ll tell you all about them, and show you how I used them in my app. For now, let’s just say it’s a logic that allows you to manage the application at the database level. You can create your own (this is the approach I chose), or use one of those that are available by default when you create a new entity. There are six of them:
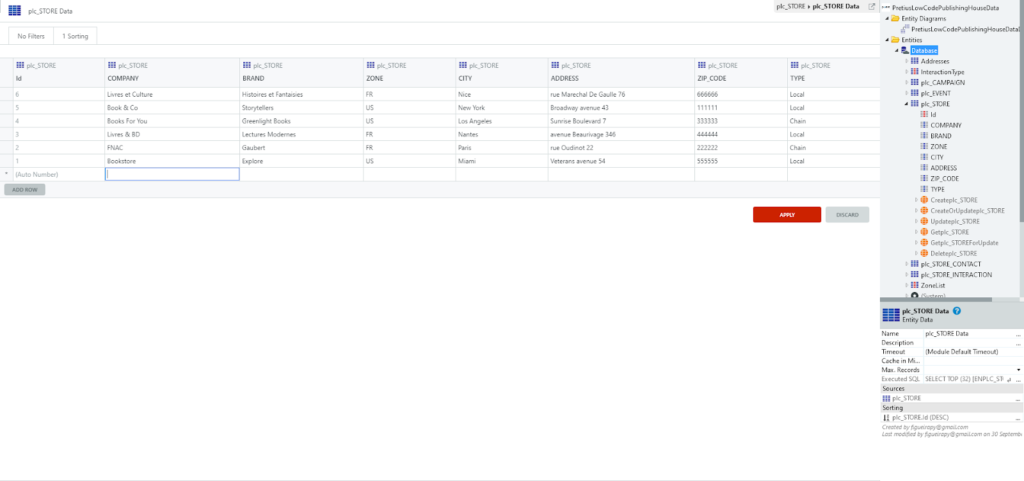
The final step in building my database was to populate entities with data. The information I’ve used is imaginary, but I decided to enter it anyway – for clarity and to simulate the conditions of real application use. How to enter new data to the entity at the database level? It’s a bit like filling in a worksheet in Excel. Underneath the entity, there is an Add Row button. When you click it, you can enter new data directly into the cells of the newly created record. After saving and clicking the 1-Click Publish button, the data is entered into the database and you can use it.
This is how you add attributes to a table.
The database exists, the initial data has been entered – all that remains is to take care of the UI. First, you need to add pages, which your application will consist of. In the Interface tab (the upper right corner), there is an entry called Main Flow. This is where the interface elements created by you will be stored. You can add a new page at any time by right-clicking this entry and selecting Add Screen. You can also add a new page by double-clicking the Main Flow entry and dragging the Screen entry from the left panel to the main panel.
In the case of my application, I started with the store information page. When creating the page OutSystems suggested me I should use an existing template. However, I chose an empty page, because I wanted to build it from scratch. I didn’t want to spend too much time figuring out a concept for this page, however, so I’ve decided to use existing interface elements.
I specified the page title in the appropriate field and dragged the Master Detail widget from the left panel to the main content area (I will describe the setup and use of the Master Detail widget in more detail later in this article). The idea was to base the whole page on it and use the same approach in the case of the campaign information page. It’s a simple concept, but it was enough for the purpose of this application, and it allowed me to focus on the functionality of the app.
My front page was quite simple – just a few sentences with information about what the app does, along with links to pages with partner and campaign details.
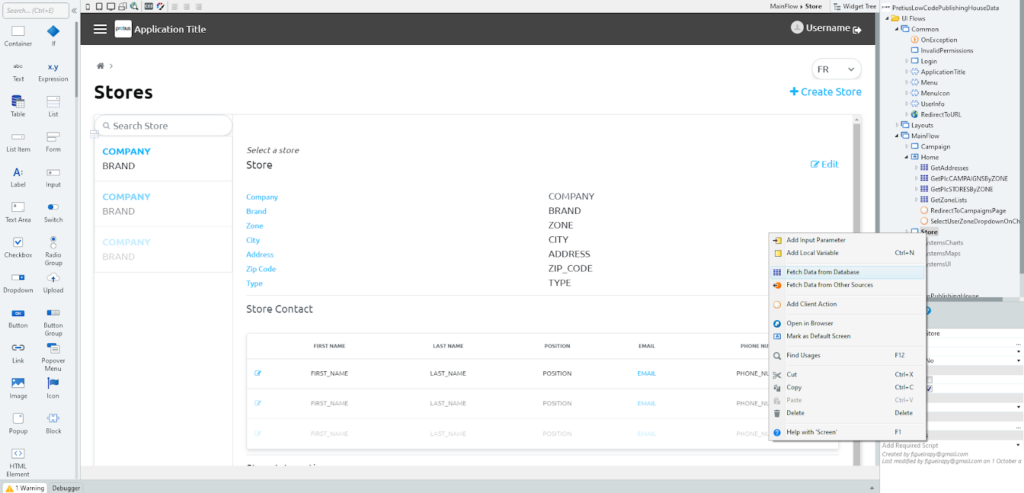
The interface elements that are supposed to display the data need a defined source. It’s required so that everything works properly, and the changes in the application can be compiled. For this purpose, you need to build a query that will retrieve the data, and – as I’ve mentioned before – in OutSystems these are called “Aggregates”. To create a new aggregate, just right-click on the page and select Fetch Data from Database.
This is how you add a record to the entity.
You will be redirected to the aggregates wizard, where you can define your query. First, you need to specify the sources from which the aggregate will retrieve data. After clicking the Add Source button, a window will appear, as shown below. Here, you can specify the names of one or more tables that store the data you need. If you use more than one table, you can choose the type of connection between them – select between Only With, With or Without, and With. These correspond with Inner Join, Left Join, and Full Outer Join in SQL.
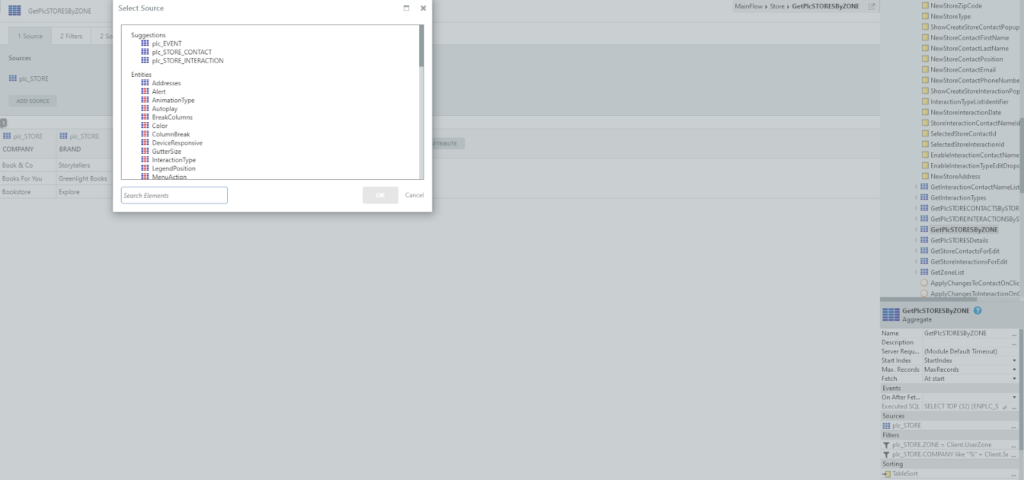
Choosing a source (table) for the Aggregate.
Moving through the tabs adjacent to the aggregate source, you can set filters (visible on the image below) and sort your data. You also have the option to test your aggregate. Just like in the case of adding a source, after clicking the Add Filter button, a window will appear, where you can define your filter. It’s similar to the process of adding a “where” element in an SQL query. I will tell you more about the aggregates I used, and the interface elements to which they were assigned.
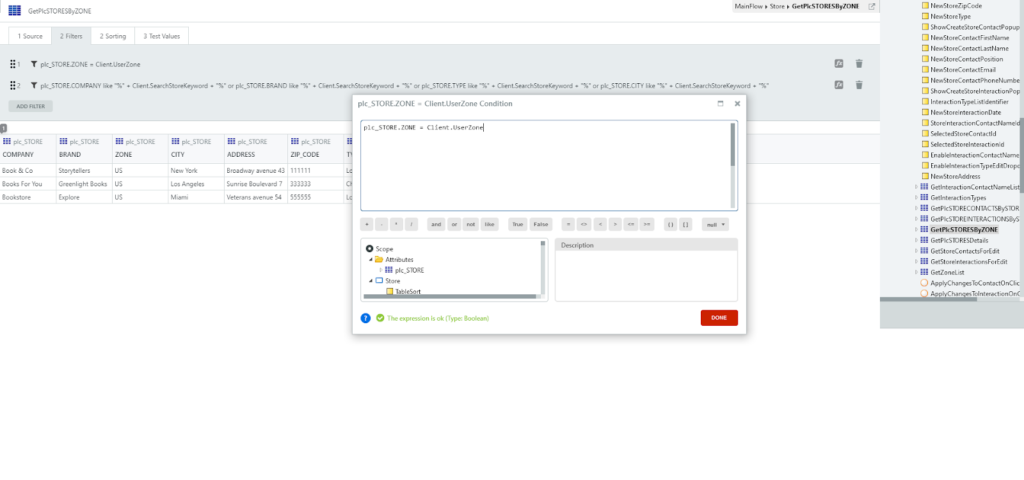
This is how you create and define filters.
I based the appearance of my application on the default settings. I only made minor changes with the use of the Theme Editor, which is found above the main panel – I chose a color set, default distance between elements, shadow effect, etc. Such a small level of personalization was enough for me. However, OutSystems gives you more advanced options to influence the appearance of the UI – you can define your own CSS classes on an existing theme, or even build your own theme from scratch.
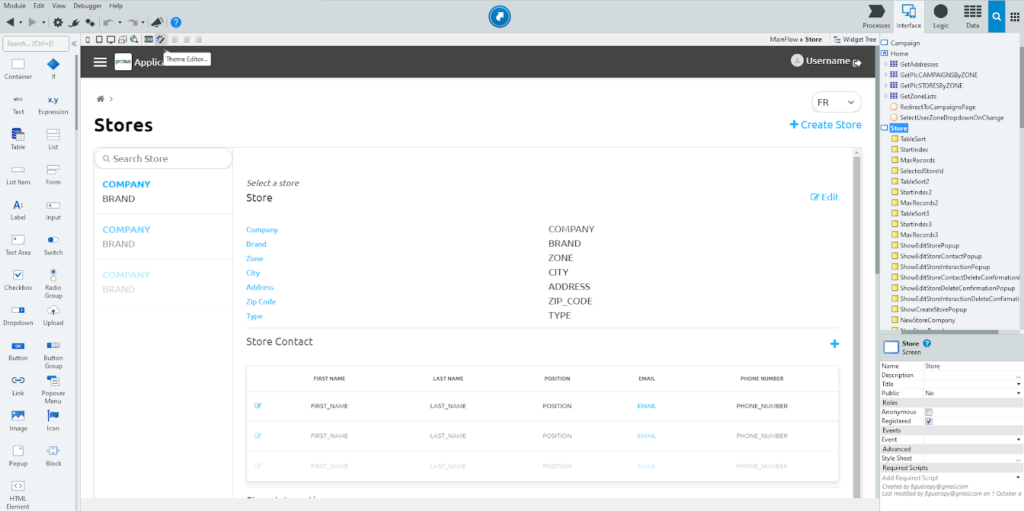
Turning Theme Editor on.
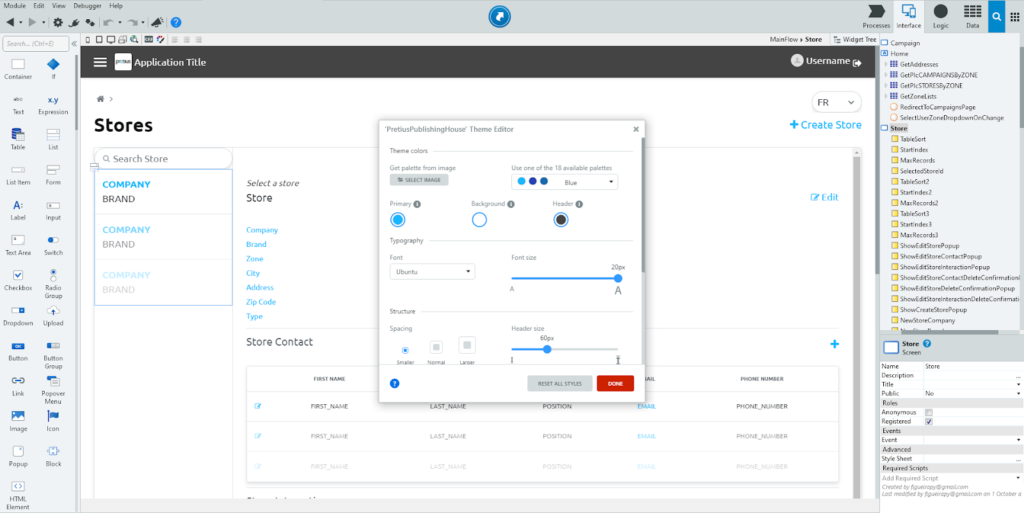
Theme Editor window.
Want to use the OutSystems platform to create applications in one of our great, low-code development teams? 🔥 Check out the job offers on our website.
To add the Master Detail widget to the main content, you have to drag it there from the left panel. The widget is divided into two parts – left and right – and in the case of my application, the contour of the left area has instantly lit red. It indicated an error, resulting from no data source assigned. This is the area where I needed to put the names of the stores – clicking on them would display details on the right side. So, I had to define an aggregate that would bring up a list of all our partners. I’ve created a new aggregate on the Store website (as described above) and selected entity plc_STORE as the source, in which I wanted to store the names of these partners. For the purpose of readability, I’ve also added sorting by store name, so that the list displayed them alphabetically.
To assign a source, you need to go back to the widget and double-click the left area to open the source selection window. There, you need to choose your new aggregate and click Select. The data will then be added to the area. That made the error in my app disappear, and I could now compile the application to save the changes. As I only wanted to display the store name and brand here, the rest of the information displayed in the list could be deleted.
There’s also a second way to add an aggregate to the area where its result is to be displayed – you can just drag it from the right panel.
The next step was to display the details of the selected store. I needed some additional aggregates to do this. The first one was also required to get data from the plc_STORE table. As I was only interested in the information about the item selected from the list in the left area, I’ve added a filter to the new aggregate, the purpose of which was to select only store data with the same identifier as the store selected from the list. To do this, I needed to pass the value of this identifier. This is a good example of using the so-called Local Variable in OutSystems, so I’ll show you how I did it.
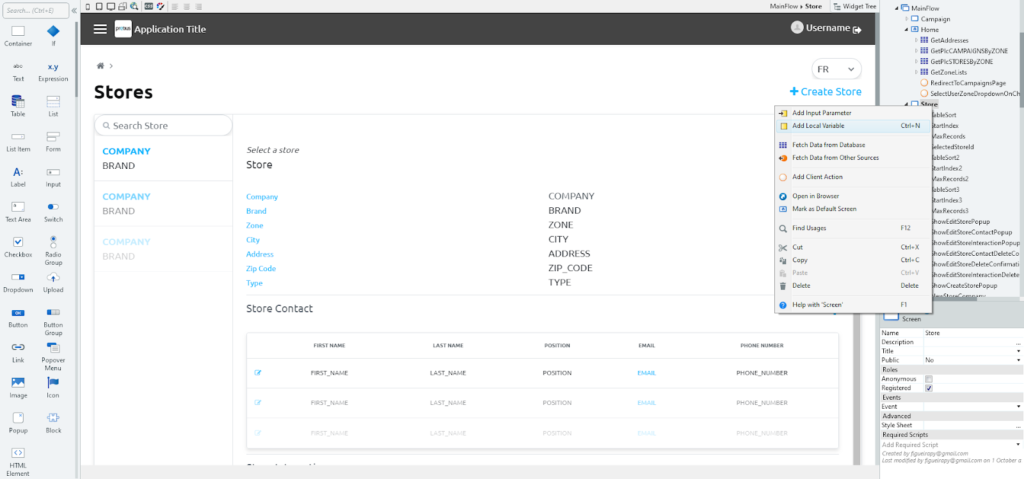
In the simplest of terms, a local variable allows you to store information so that you can pass it on or use it elsewhere on your website. To create a local variable, in the right panel right-click the name of the page on which you’re operating, and select the Add Local Variable entry. There’s a reason why these are created directly on the website – the local variable, as the name implies, works only within the page on which it was created, and does not go to any other pages of the application – if you switch to another page, the saved value will disappear.
Creation of a Local Variable.
Before assigning a value to your variable, you need to define its data type. This is done in the local variable properties under the right panel. In my case, I wanted to use this variable to pass the identifier of the store selected from the list, so I chose the data type plc_STORE identifier. I named it “SelectedStoreId” and my variable was ready to be used.
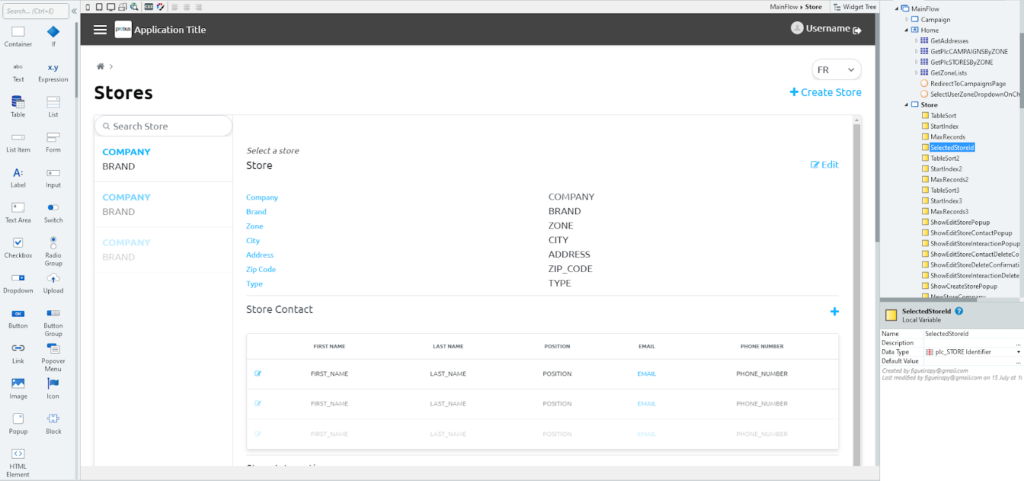
My new Local Variable.
I wanted to present the information on contacts representing the selected partner, and the history of correspondence with them, using the “table” widget. Like with any other widget, you can add it by dragging it from the left panel, or by opening the widget tree in the upper right corner of the main panel and adding a new widget by clicking the right mouse button. My aggregate for the table with contacts was based only on entity plc_STORE_CONTACT, but in the case of correspondence history, I’ve decided to create an aggregate based on several sources – that was because I wanted to add the name and surname of the contact with whom the correspondence was conducted. In both cases, I was only interested in the information related to the shop selected by the user, so I’ve added a filter similar to the one described above to both aggregates.
Before we move on to assigning a value to the new variable, I’ll show you how to create a link that will initiate this process. I’ve added such a link to the name of the store on the list in the left area – so that clicking it would display the details in the fields prepared on the right side. The link is one of the widgets on the left panel. You can add it by dragging it from there, and entering the text. You can also create a link from an existing element by right-clicking on it and selecting Link to. If you open the link’s properties, in the Events area, there is an On Click entry, where you can define what will happen when the link is clicked. You can choose a logical action, another page of our application, or an external URL. There are also shortcuts there, which you can use to create a new page or a new action.
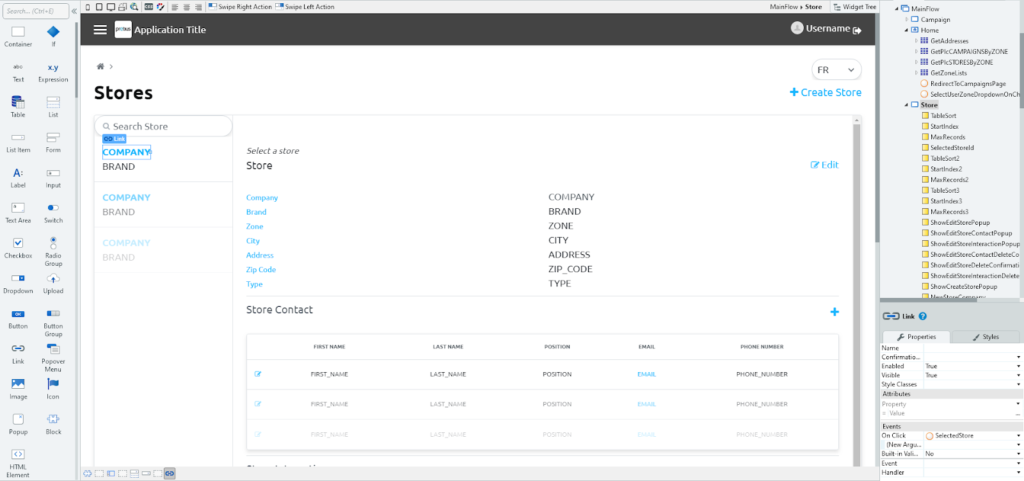
Creation of a link to display shop details.
Assigning a value to a local variable requires defined logic. You can define that logic at different levels of the application – from the database to individual pages. To assign a value to the local variable, you need logic at the page level – so-called Screen Action. A new Screen Action is added by going to the Interface tab, and right-clicking on the page on which it’s to be created. This will redirect you to the logic diagram builder. However, Screen Action can also be created when you select the above-described shortcut in the link properties (the buttons also work the same way). I used this option.
You can use the Assign element to – you guessed it – assign a value to our variable. To add it to the schematic, just drag it from the left panel. You’ll have to fill in two fields in the properties. The first is the name of the variable to which you want to assign a new value. In my case, it was my new local variable “SelectedStoreId”. In the second area, you have to enter the value to be transferred. Double-clicking on the expression symbol “x.y” next to this field will open the expression edit window.
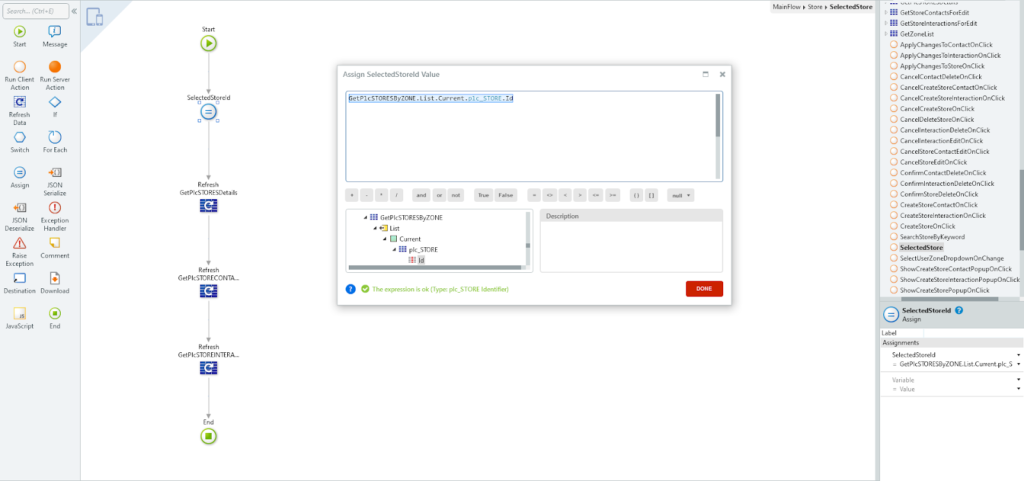
Expression edit window.
The value of the variable can be entered manually or selected from the values already existing on the page. In the lower-left corner, you will find a list of all the elements that are currently on your website. There I found the aggregate which brings the data to the left area of my Master Detail widget and unfolds it. I chose List → Current → plc_STORE → Id. What did that do? It specified that the aggregate’s result was to come from an entry on a list – specifically one that was currently the user’s choice. The result was to be an identifier of the plc_STORE entity called “Id”. To put it simply, it works like this:
With a value assigned to the “SelectedStoreId” variable, the filters in my aggregate could finally start working properly. But in order to make them work, I needed to call my aggregates again. You can do this while still remaining in the same logical scheme, by using the Refresh Data element, and assigning an aggregate that is to be refreshed. In my app’s case, I refreshed the aggregates in this order: store data – contacts – correspondence.
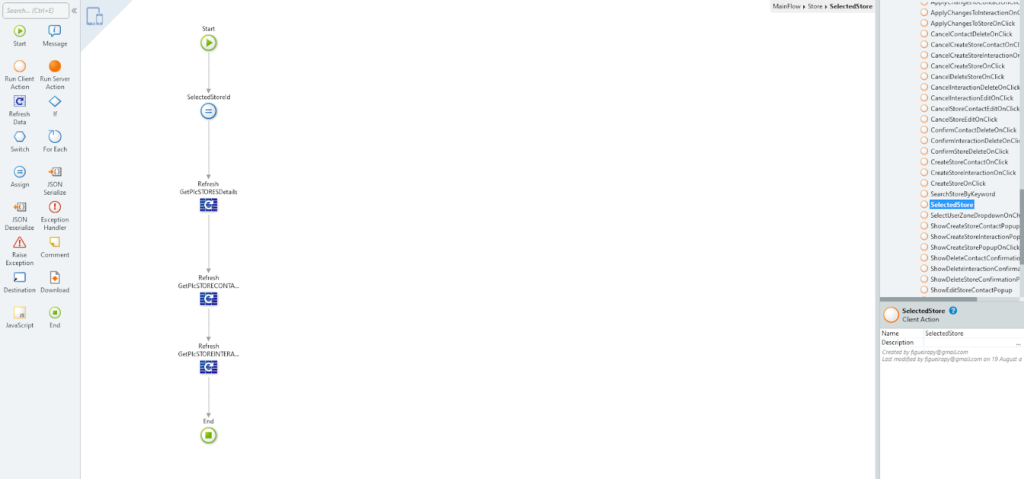
Assigning values to Local Variables – logic.
And that’s it for today. I will describe the further steps of building my test application in future articles, so stay tuned. However, even these few first steps I’ve shown you today should be quite enough to visualize how quick and easy it is to develop applications in OutSystems. It really is something worth looking into, especially considering the huge software development talent shortages companies currently face. If you’re interested in this platform, check out my other two aritcles dedicated to this subject:
Low-code gives companies a chance to achieve a massive competitive advantage and remains one of the top things worth looking into in the IT world in 2022 and beyond. At Pretius we know this better than most. If you’re looking for a development team specializing in low-code – or would like to join one – drop us an e-mail at hello@pretius.com.


