


During one of my recent projects, I had a requirement for an APEX application to change authentication schemes dynamically. I decided to write a blog post about such a scenario.
The example I use in this article is based on the following assumptions:
Every environment differs in authorization endpoint URL (it’s set in APEX authentication_scheme). My App has two authentication schemes:
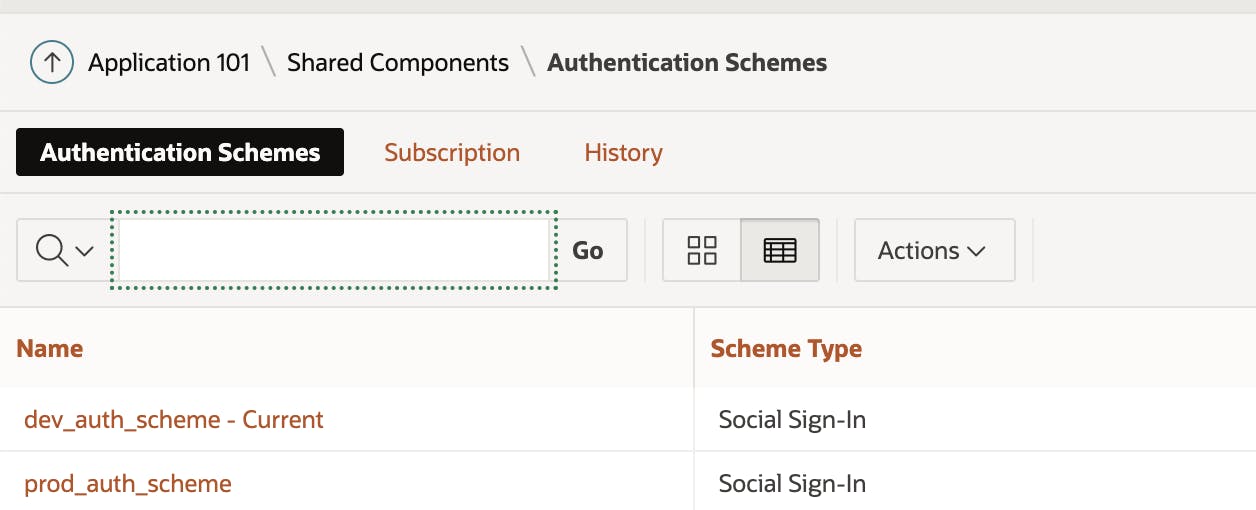
When the app is ready, I want to export it from DEV and install on PROD. Up until now, after every installation at PROD, I had to switch the authorization scheme from dev_auth_scheme to prod_auth_scheme manually.
It’s not a huge problem, but will I – or any other developer, for that matter – always remember to switch the current authorization scheme on the PROD environment manually? Sooner or later, someone will forget, and users won’t be able to authorize.
That’s why I decided to automate the process.
There are two slightly different options you can use, so let’s look at them in more detail one by one.
You’ll need to add a few lines of the script before installing your app (assuming you install using a command line like SQLcl)
declare
  l_env_type   application_params.value%type := null;
  c_dev_env    constant application_params.value%type := 'DEV';
  c_prod_env   constant application_params.value%type := 'PROD';
  c_prod_auth_scheme constant varchar2(100) := 'prod_auth_scheme';
  c_dev_auth_scheme  constant varchar2(100) := 'dev_auth_scheme';
begin
  --param table definining your environment type
  select value
    into l_env_type
    from application_params
   where code ='ENVIRONMENT_TYPE';

  apex_application_install.clear_all;
  apex_application_install.set_workspace('MYAPP');
  apex_application_install.set_application_name('My APP');
  apex_application_install.generate_offset;
  apex_application_install.set_schema('MY_APP');

  if l_env_type = c_prod_env then
     apex_application_install.set_authentication_scheme(p_name => c_prod_auth_scheme);
  elsif l_env_type = c_dev_env then --in case of installing on DEV
     apex_application_install.set_authentication_scheme(p_name => c_dev_auth_scheme);
  end if;
end;
/
@f101.sql
To use this option, you’ll have to create a supporting objects script that will be installed during APEX installation. The authentication scheme will be updated automatically during the installation of APEX through APEX Builder or SQLcl.
1. Step 1 – create a procedure and deploy it on the SYS schema (or ADMIN if you use OCI). Use the following code:
create or replace procedure sys.p_change_authentication_scheme(
  pi_app_id in number)
as
  l_authentication_scheme_id my_app.application_params.code%TYPE; --authent. scheme ID that should be set
  l_apex_schema dba_registry.schema%TYPE; --current schema used by APEX
  l_update_sql VARCHAR2(4000);
begin
/* Make sure to insert value to your param table before exec this proc.You can get authentication scheme id from APEX_220100.wwv_flow_authentications */
  select value
    into l_authentication_scheme_id
    from my_app.application_params
   where code   = 'AUTHENTICATION_SCHEME_ID';
-- adjust your param table if you have more than 1 app

--get current APEX version schema
  select schema
    into l_apex_schema
    from dba_registry
   where comp_id = 'APEX'
   order by schema desc
   fetch first 1 row only;

  l_update_sql := 'update '|| l_apex_schema || '.wwv_flows '|| 'set authentication_id = ' || l_authentication_scheme_id || ' where id =' || pi_app_id;

  execute immediate l_update_sql;

end p_change_authentication_scheme;
/
2. Step 2 – grant execute to the newly created procedure to your parsing schema MY_APP. Use this command:
GRANT EXECUTE ON
SYS.p_change_authentication_scheme to MY_APP;
3. Step 3 – create a supporting object script for your app 101 -> App Builder -> Supporting Objects -> Installation Scripts

Choose Create and then Create from scratch. Use the following details:
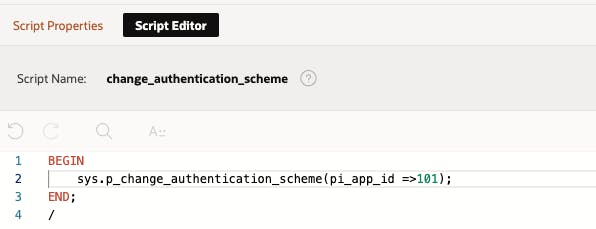
When everything is done, save your script.

4. Step 4 – don’t forget to set Include supporting object definitions in export. Look at the screenshot below for more details.

All that’s left is to export your app from the DEV environment and install it into PROD. Don’t forget to check “Install supporting objects” at the end of your installation. Your authentication schema will be updated automatically. This was pretty easy, wasn’t it? If you also want to switch your authentication scheme in session, take a look at this blogpost. And if you want more practical tips and in-depth articles, check out my other contributions to the Pretius blog:

