
Liquibase is a great tool, but it can be made even better by partnering it with other solutions, to allow some additional functionalities. Rolling back is a great example. Liquibase doesn’t offer that option, because it doesn’t store executed code, only file checksum. That can be a bit troublesome, but there’s a pretty easy workaround. You can increase the potential of Liquibase thanks to the use of Jenkins – and in this article, I will show you precisely how to do that.
If you would like to know how to set up a deployment environment with Jenkins, please read my previous article on continuous deployment in Oracle APEX, because I won’t repeat that information in this blog post. Instead, I’ll focus on extending this setup for smart rollbacks.
One more thing before we begin: setting up rollbacks for objects without the or replace clause is quite easy. The problems start with those that can be overwritten. That’s where something I call “smart Liquibase rollback” comes in handy. What I mean by that is that I would like to have the latest successfully compiled version of my objects – so, the last successfully executed Jenkins build is my target.
There are a couple of steps you’ll need to go through to achieve the desired result. You’ll have to install some plugins (Conditional BuildStep and File Operations, to be precise), modify the Jenkins Deployment Project, create the Jenkins Rollback Project, and finally modify the changesets’ code for replaceable objects. So, let’s begin!
Now that you have the plugins installed, it’s time to make use of them. To show you how to do that, I will continue to use the example of the project I made for the purposes of the aforementioned article on CD using Jenkins and APEX – UAT_DEPLOY. However, this time I will focus on the Build section only.
So, you need to start by going to the Build section of your project, and the first thing you’ll have to do is a step you already know from my previous article – “Update the build name”.

The next step is new – and it’s also conditional. Before you make a copy of the repository for the rollback, you should make sure that your last deployment worked like a charm. 😉 To do this, in your condition you can execute a simple Shell script, like so:
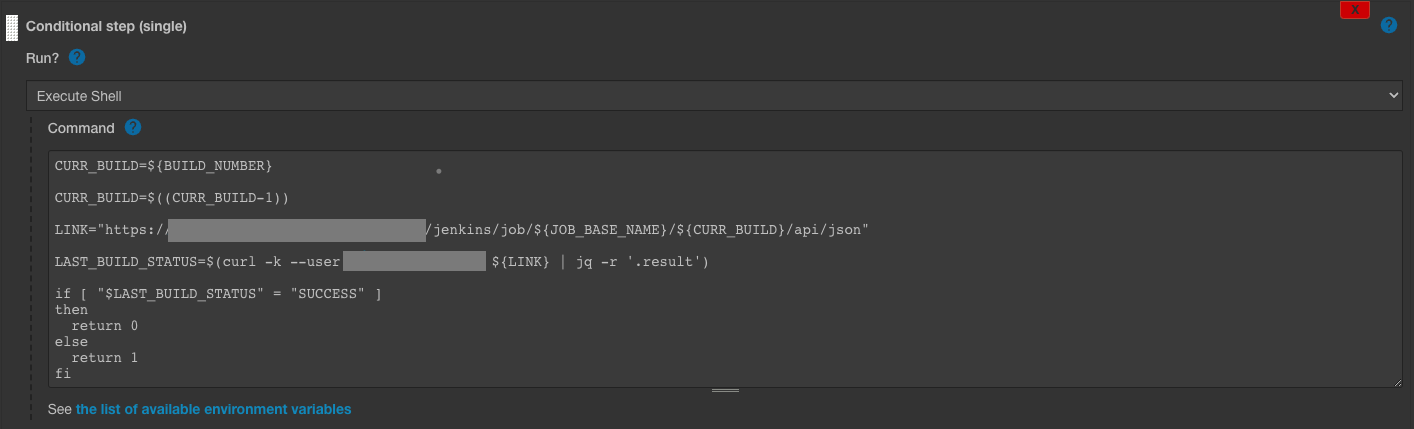
CURR_BUILD=${BUILD_NUMBER}

CURR_BUILD=$((CURR_BUILD-1))

LINK="https://<jenkins_server_address>/jenkins/job/${JOB_BASE_NAME}/${CURR_BUILD}/api/json"

LAST_BUILD_STATUS=$(curl -k --user <jenkins_user_name>:<jenkins_user_password> ${LINK} | jq -r '.result')

if [ "$LAST_BUILD_STATUS" = "SUCCESS" ]
then
  return 0
else
  return 1
fi
In the to execute field, you have to choose File Operations. After that, you’ll have several things left to do.
First, backup the repository to last_version subdirectory, and then delete unnecessary subdirectories in the last_version.
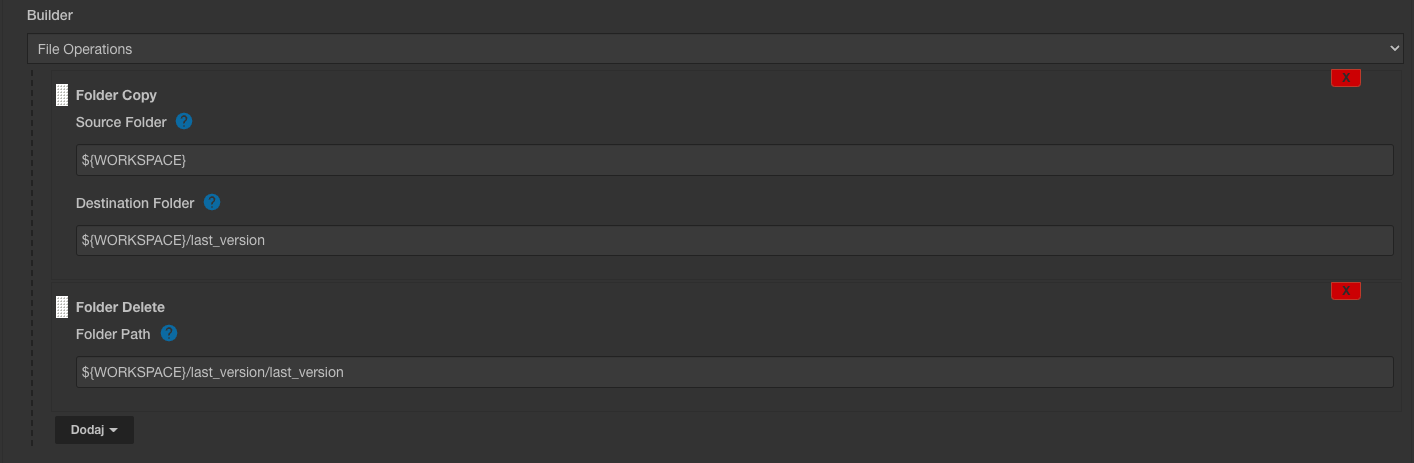
To clarify: ${WORKSPACE} is basically a directory where Jenkins downloads your repository from GIT.
And, finally, the last step is something that should also be already known to you from the first article – invoking Gradle:
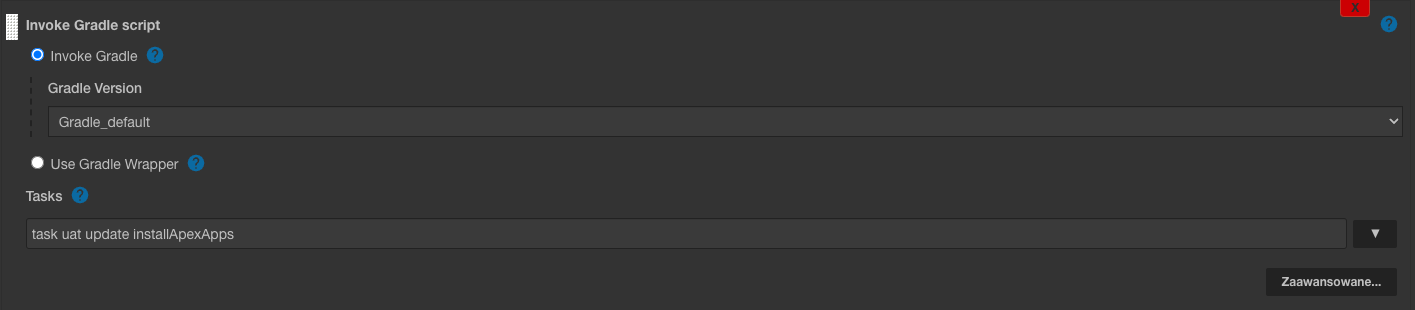
Please keep in mind, that you shouldn’t execute the task with Gradle in the conditional step. The whole idea of a backup is that you do it when conditions are met, before running actual deployment. You don’t want to automatically create a backup at the end, every time, because it will ruin your backup.
I’ll use an example to illustrate what I mean. Imagine that you’re making a deployment, and Gradle succeeded, so instantly, a backup of your last_version is created. Then, for whatever reason, a teammate asks you to undo your deployment. You can’t simply do the rollback because you have just overwritten your last_version by successful deployment. So, important thing, do the backup before deployment!
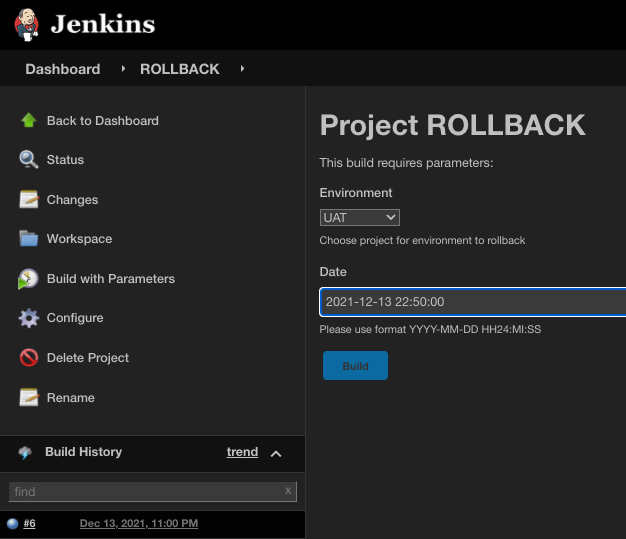
Since Jenkins is used for backups, the latest version of files is only available in the Jenkins workspace. If you need to use these files, they have to be requested from there. This will require one additional Jenkins project. In my case, it’s called ROLLBACK.
What I like to do with such projects is to parametrize them. I want to be able to choose the environment and the date to roll back. Of course, there are a few rollback options like e.g. rollbackCount which specifies the number of operations to be undone, but I found dates to be much clearer. It’s simple: everything that was executed after a certain date will be undone.
For the environments, I like to create a select list, and a text field for the rollback date. It should look like this:

When it comes to the build section, you only need to execute one Shell Script:
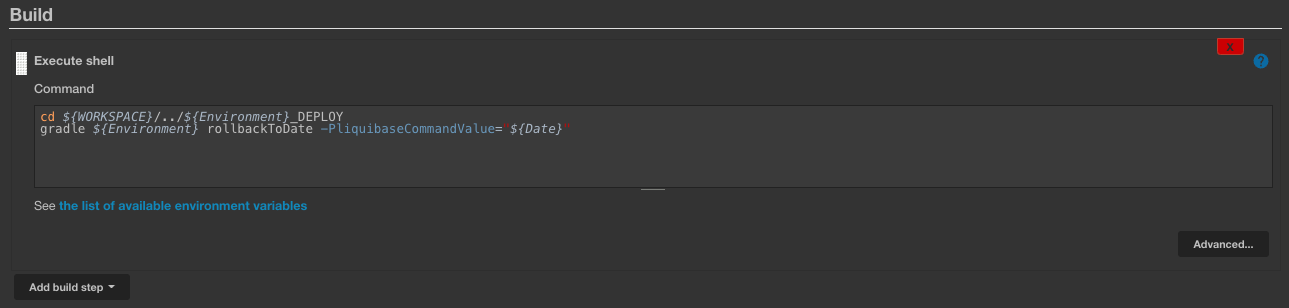
cd ${WORKSPACE}/../${Environment}_DEPLOY
gradle ${Environment} rollbackToDate -PliquibaseCommandValue="${Date}"
Jenkins uses separate workspaces for each project. So, first you need to change the directory to your environment repository with the cd command, using your defined parameters. The names of system directories for workspaces are the same as the names of the projects in Jenkins, so in my case, I could only type environment names in the select list parameter, because all my deployment projects are named using a pattern which is ENV_DEPLOY. Having an environment name from a variable I can just concatenate the _DEPLOY string. Thanks to that, choosing parameters is much clearer. If your projects don’t follow a pattern, just enter project names, instead of environment names, in the select list parameter. In such a case change the cd command to:
cd ${WORKSPACE}/../${Environment}
The second command in the script is used to execute the roll back in the proper directory. Now, with my project configured, I can do rollbacks using Jenkins – just by running it and meeting the defined parameters. 😉
Now that we know when and how to back up the repository, it’s time to tell Liquibase how to make use of it. I like to keep my replaceable object changesets in the XML format, so I will use it as an example.
It actually may look a bit weird to you in the beginning, because I have 2 changesets for one object. One has the postfix _NEW and the other has the postifx _LAST. There’s a simple reason for that – when I’m compiling something for the first time, I don’t have the last version of that file, and therefore my rollback would be a drop command.
If you adopt the same method as me, you can use a precondition to check if a certain object was already compiled in the past or not. Look into your DATABASECHANGELOG table and search for an object with the _NEW postfix. If it exists, you’ll execute the _LAST changeset to have the previous version. If not, you’ll drop the object on rollback.
<!-- BEGIN: SAMPLE_PACKAGE_PKG -->
<changeSet id="SAMPLE_PACKAGE_PKG_LAST" author="lkosiciarz" runOnChange="true">
  <preConditions onFail="WARN">
    <sqlCheck expectedResult="1">
      select count(1) from DATABASECHANGELOG where ID = 'SAMPLE_PACKAGE_PKG_NEW';
    </sqlCheck>
  </preConditions>
  <sqlFile splitStatements="false" path="./latest/package/SAMPLE_PACKAGE_PKG.pks" encoding="UTF-8" />
  <sqlFile splitStatements="false" path="./latest/package/SAMPLE_PACKAGE_PKG.pkb" encoding="UTF-8" />
  <rollback>
    <sqlFile
      splitStatements="false"
      path="./last_version/latest/package/SAMPLE_PACKAGE_PKG.pks"
      encoding="UTF-8"
    />
    <sqlFile
      splitStatements="false"
      path="./last_version/latest/package/SAMPLE_PACKAGE_PKG.pkb"
      encoding="UTF-8"
    />
  </rollback>
</changeSet>

<changeSet id="SAMPLE_PACKAGE_PKG_NEW" author="lkosiciarz" runOnChange="true">
  <preConditions onFail="WARN">
    <sqlCheck expectedResult="0">
      select count(1) from DATABASECHANGELOG where ID = 'SAMPLE_PACKAGE_PKG_NEW';
    </sqlCheck>
  </preConditions>
  <sqlFile splitStatements="false" path="./latest/package/SAMPLE_PACKAGE_PKG.pks" encoding="UTF-8" />
  <sqlFile splitStatements="false" path="./latest/package/SAMPLE_PACKAGE_PKG.pkb" encoding="UTF-8" />
  <rollback>
    drop package SAMPLE_PACKAGE_PKG;
    drop package body SAMPLE_PACKAGE_PKG;
  </rollback>
</changeSet>
<!-- END: SAMPLE_PACKAGE_PKG -->
And that’s about it. Now you know how to use Jenkins to set up rollbacks in Liquibase. As you can see, it’s actually pretty easy. The configuration will only take you a moment, and you can save yourself a lot of time and frustration down the line – I’d say that’s a fair trade, don’t you think? Enjoy! 😉


