

Disclaimer: The first version of this tutorial was published on 24 February 2022 but, since then, it has been completely rewritten to include more up-to-date tips.
We will delve into Mendix’s technical foundation, offering a detailed overview of its key components and architecture. You will also learn in practice – by creating your first Mendix app step by step – the fundamental structure of Mendix applications, the roles of microflows and Domain Models, and how these elements facilitate robust data management and process automation.
If you want to read more about the very bascis of Mendix – its price, advantages, and possible use cases – please refer to our introductory article about the Mendix platform.
First, you must install a dedicated Mendix Studio Pro desktop application on your computer – this step-by-step tutorial will explain how to do that. Note, that prior to Mendix version 10 there there were actually two separate IDEs suitable for different teams: Mendix Studio and Mendix Studio Pro. However, in 2023 the team behind Mendix decided to merge them into one tool.
The platform’s architecture is based on creating independent, Java-based models (which makes upgrades very easy – in fact, the process is mostly automatic). The framework allows you to choose between multiple built-in low-level databases, so you don’t have to rely on a single, specific DB (as is the case with Oracle APEX, which was designed with Oracle Database in mind and requires it to work). Currently, you can choose between:
To start a project, you have to create a database schema for your app, which will then serve as a basis for various objects. Note that you can always change the chosen database in the settings of your application. This lack of dependence on an external database results in greater flexibility, and makes introducing changes in the code and project easier.
Working in Mendix is mostly about setting your application’s database up and expressing the logical processes of the app through so-called microflows – a visual representation of textual program code. You can also create the starting page and user interface using several pre-existing styles to determine the look of your buttons and texts.
To show you how Mendix works in practice, we’ve prepared a very simple sample application. It allows the user – a patient – to arrange a visit with a specific doctor, on a specified day. We used three entities to achieve this result: Patient, Doctor, and Appointment. The first two should be self-explanatory, and the third is the associative entity that connects them.
After you download and install Mendix Studio Pro, you can move on to creating your first application. To start, you have to set up your account, which is really easy and won’t take you more than a couple of minutes. After that, just sign in and visit this location to see the home screen with the list of all your apps.
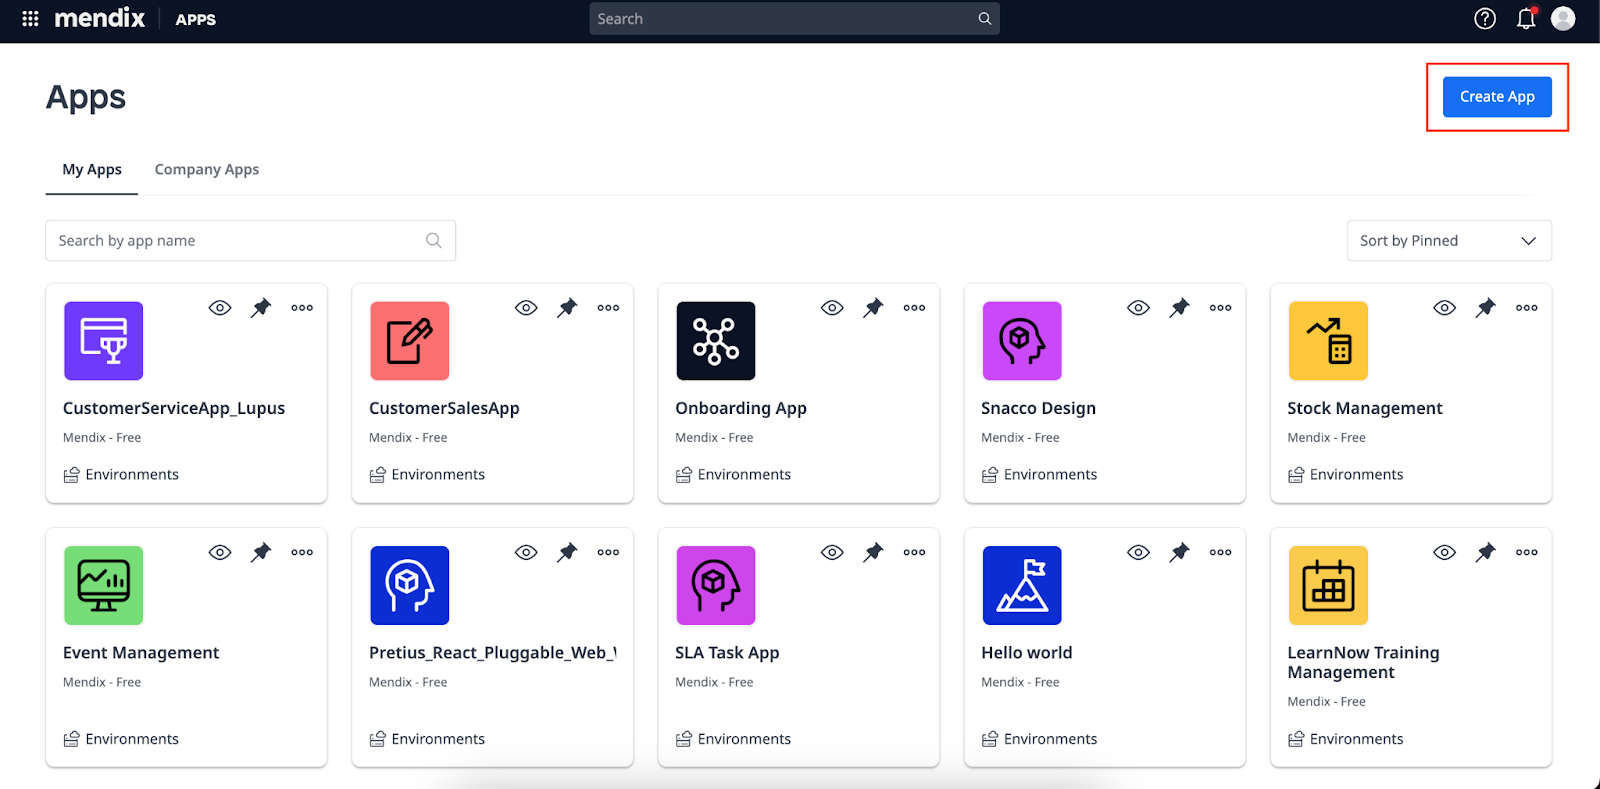
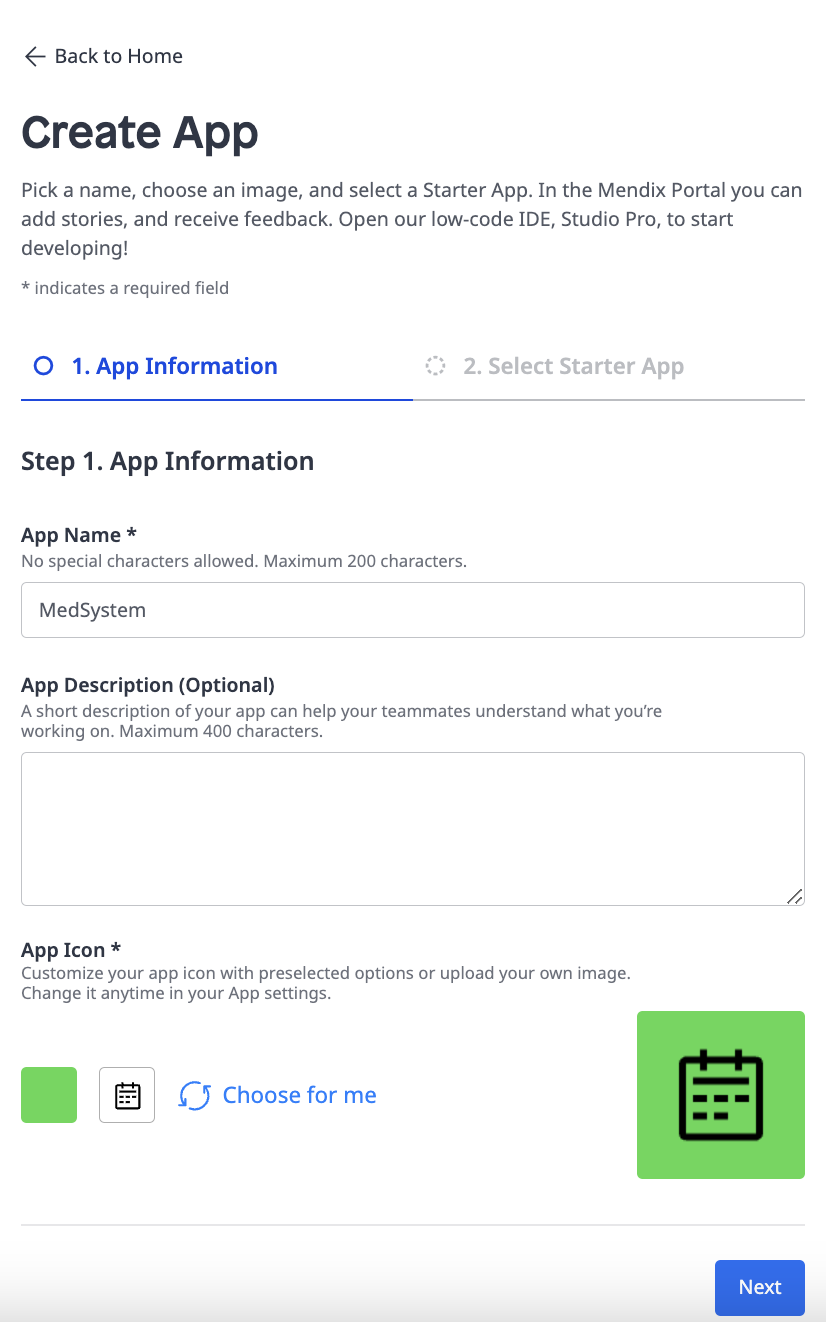
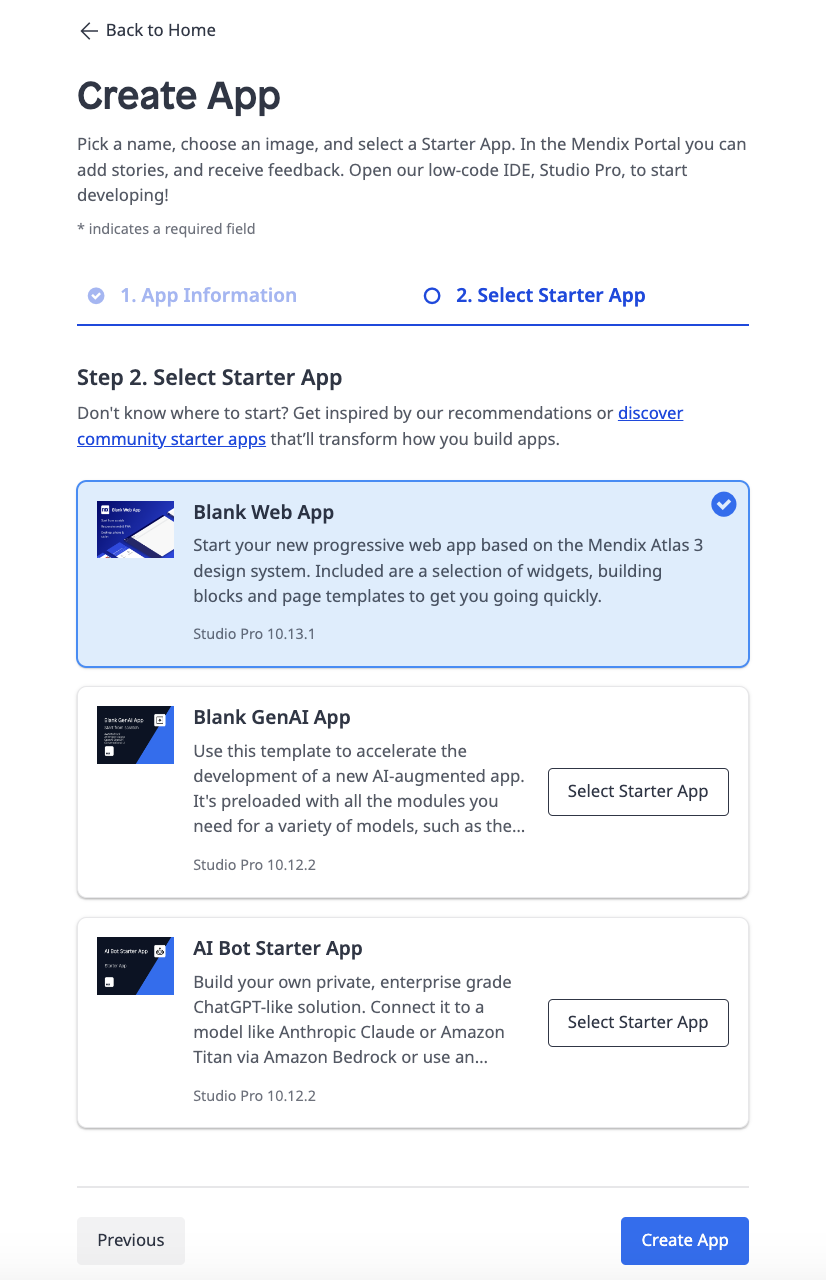
The next step is creating your new app. Click Create App in the upper right corner, and then, on the next screen, name your application. You can also choose a color and an icon which will represent it. Next, you need to select Blank Web App (it’s chosen by default) and finish this step by clicking Create app.
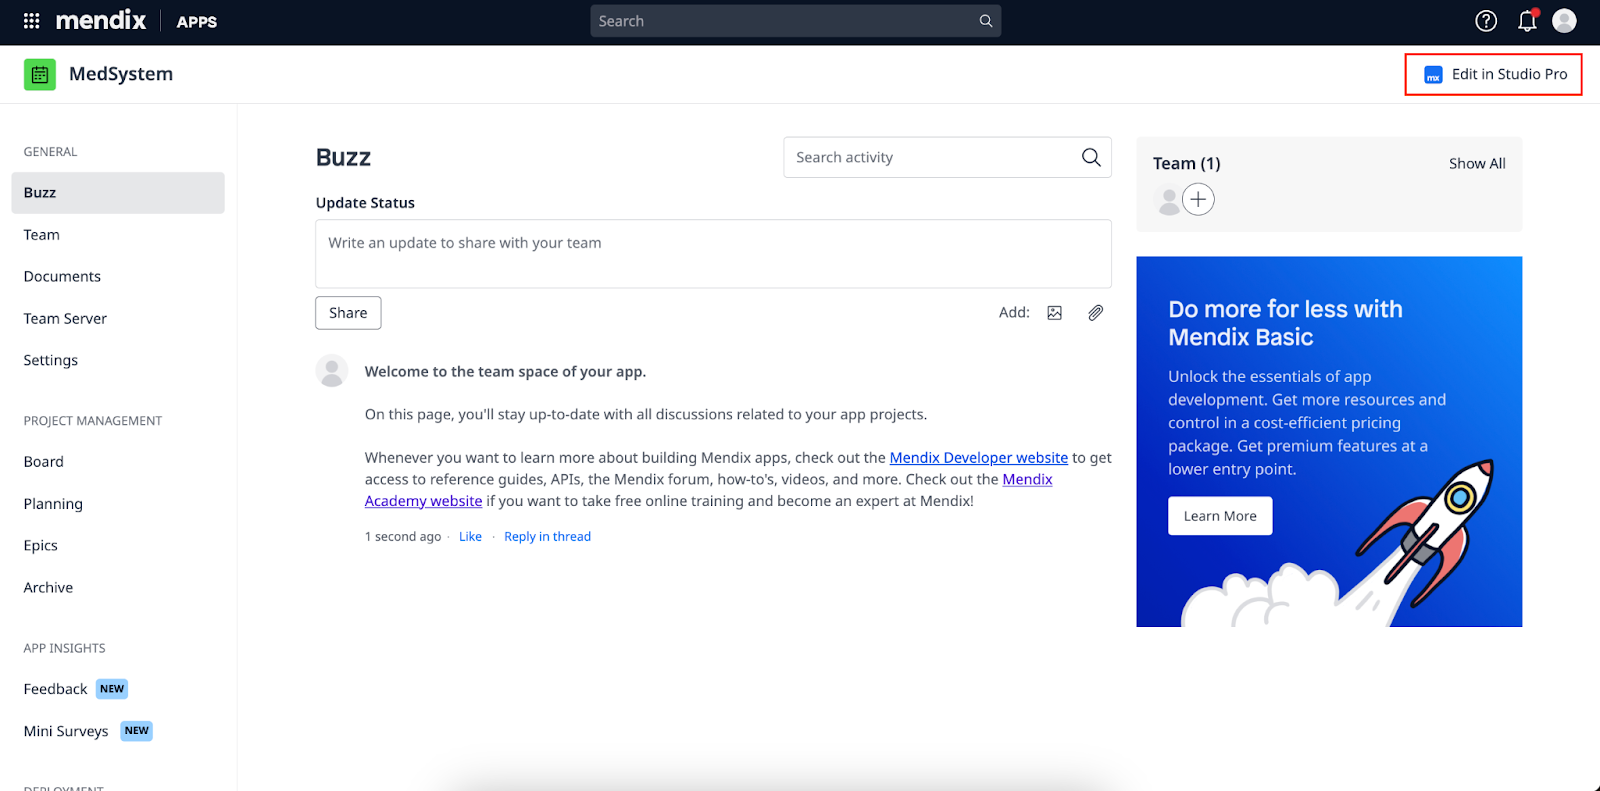
The process might take a short moment. When it’s done, you’ll be redirected to your app’s main screen, with an option to open it in Mendix Studio Pro. In order to proceed, you need to click on the Edit in Studio Pro button in the upper right corner:
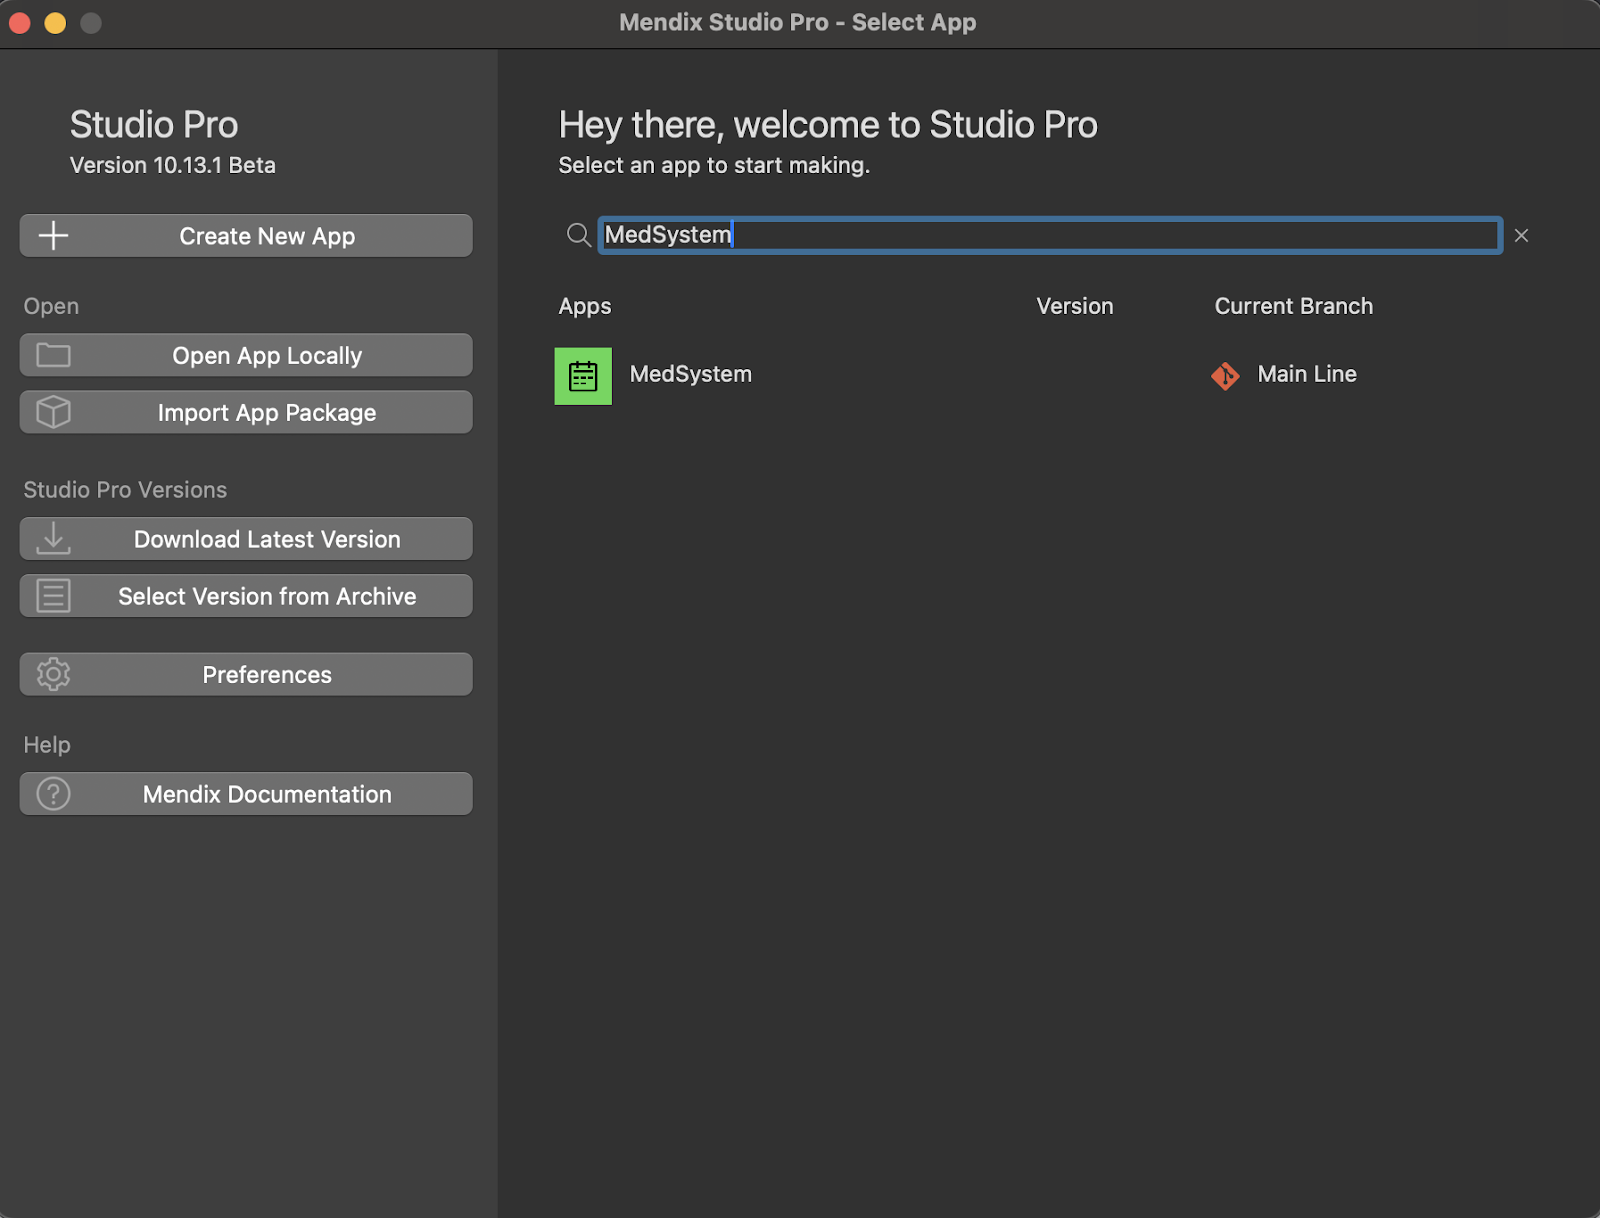
Alternatively, you can open Mendix Studio Pro and select your project. In this case, you will be greeted with a following screen:
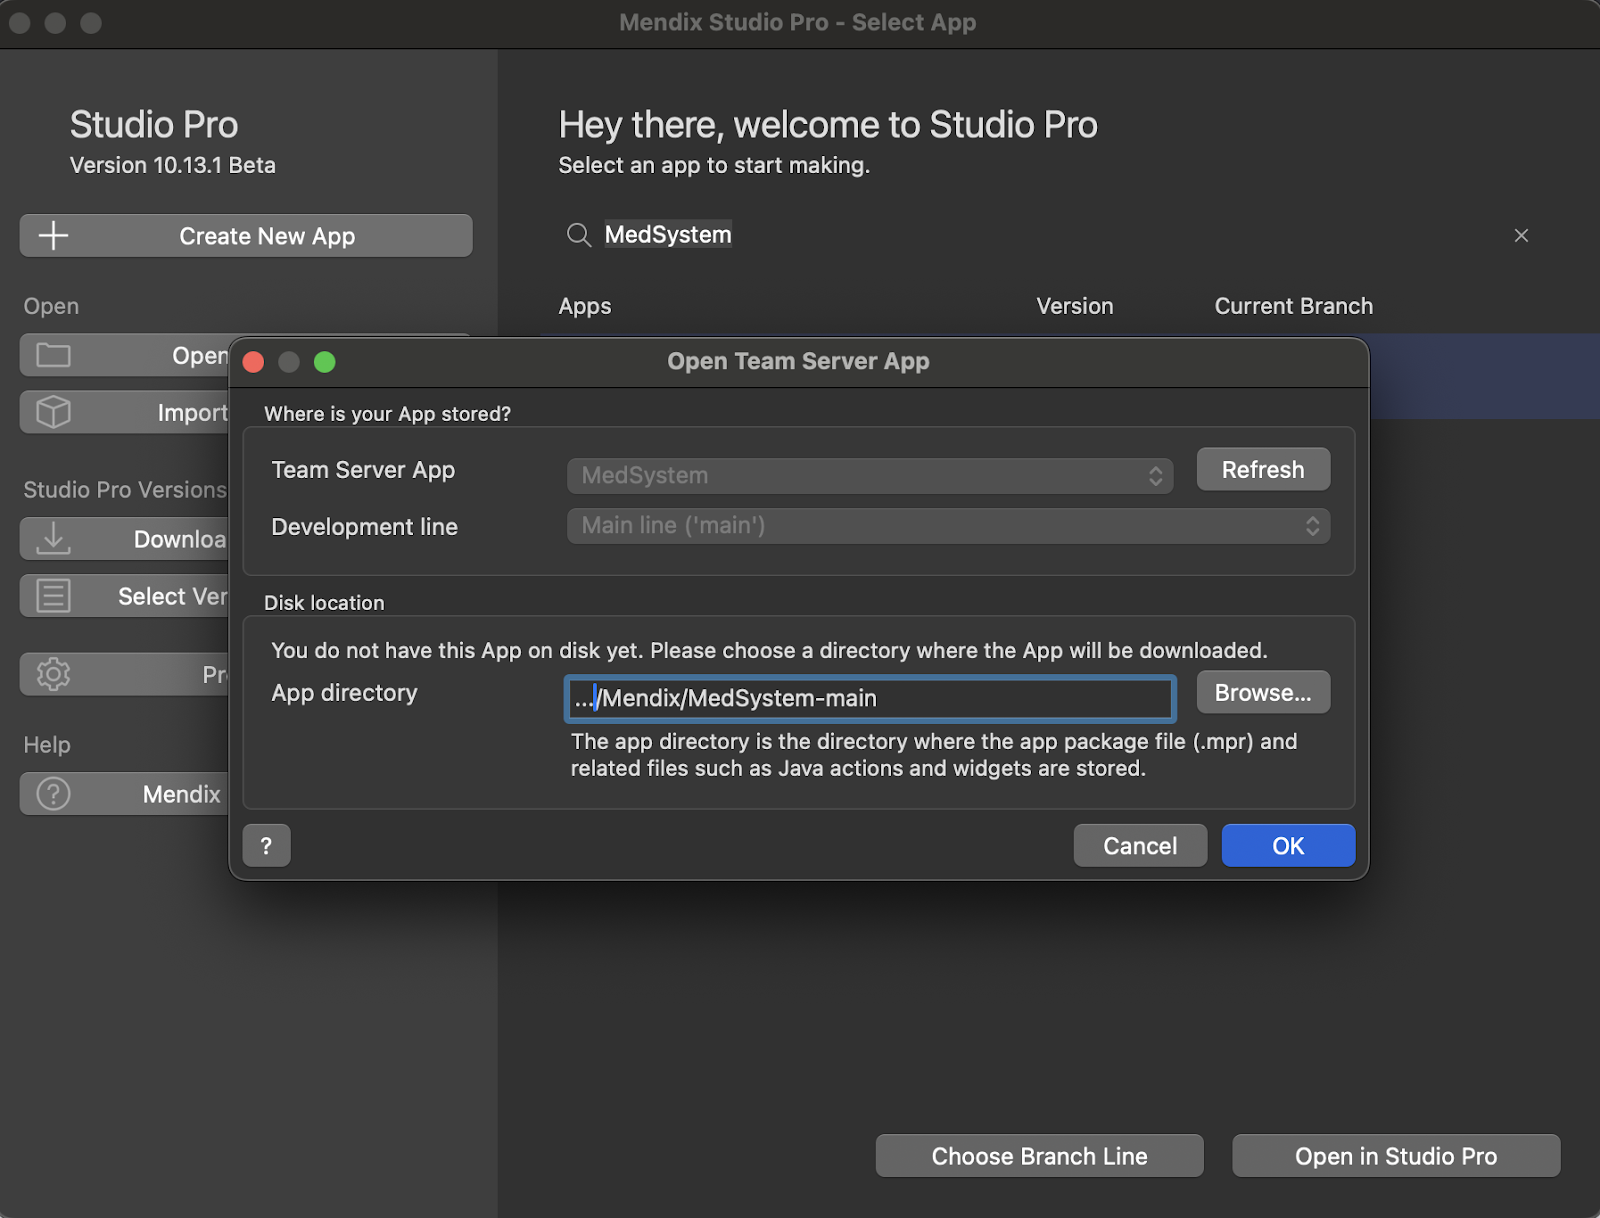
Please select your new project and when the popup opens choose the location in which your project is meant to be saved.
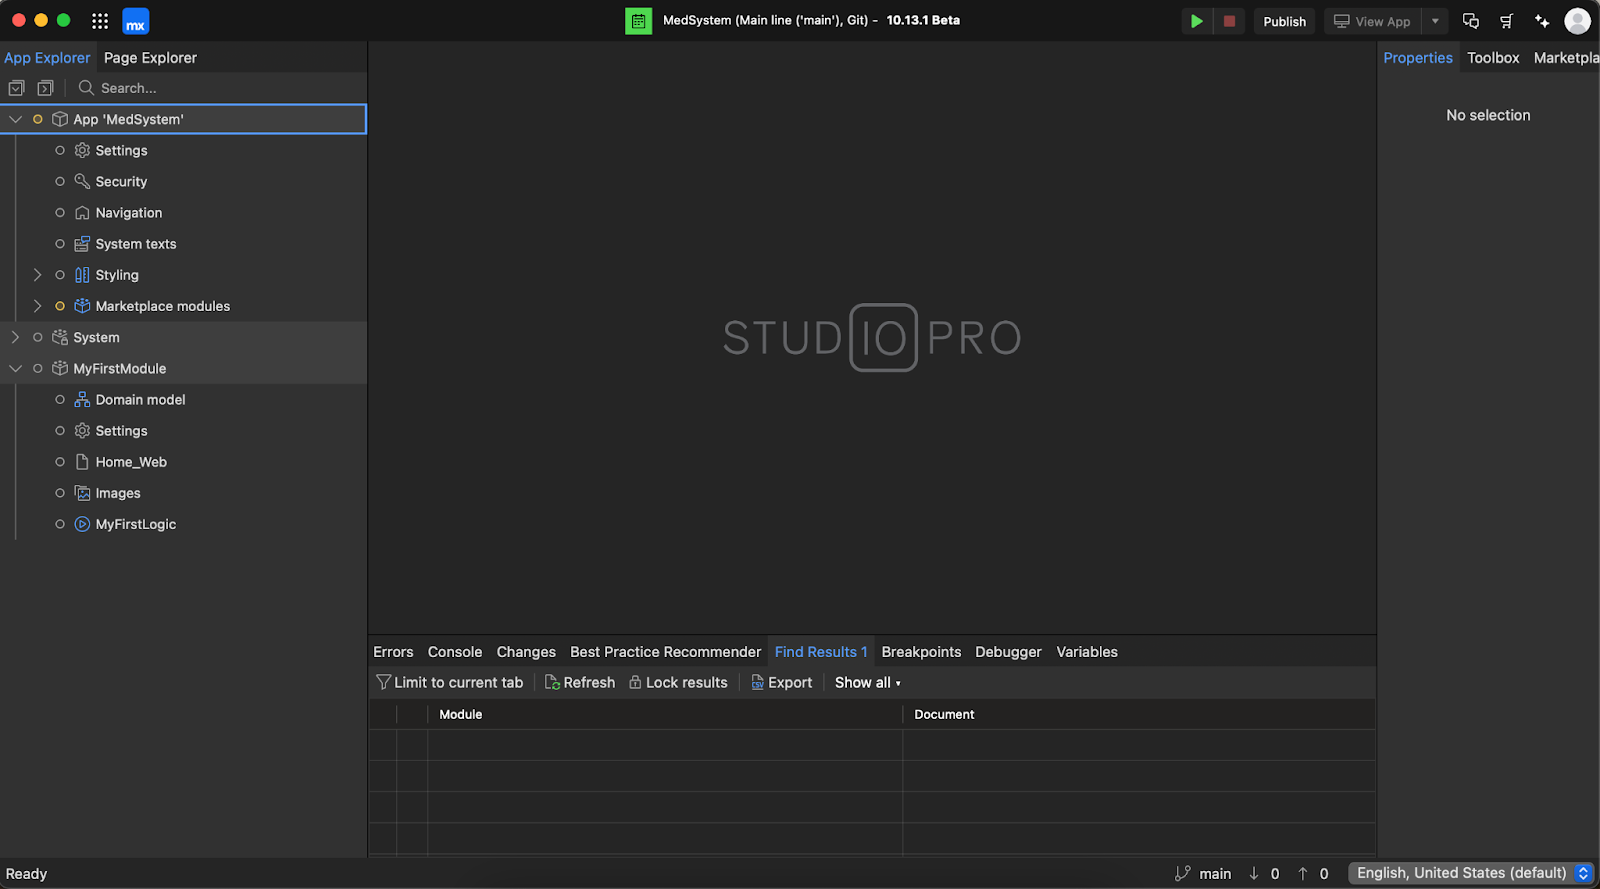
After you complete the above steps, you’ll see the following screen – this is where you will develop elements of your new application.
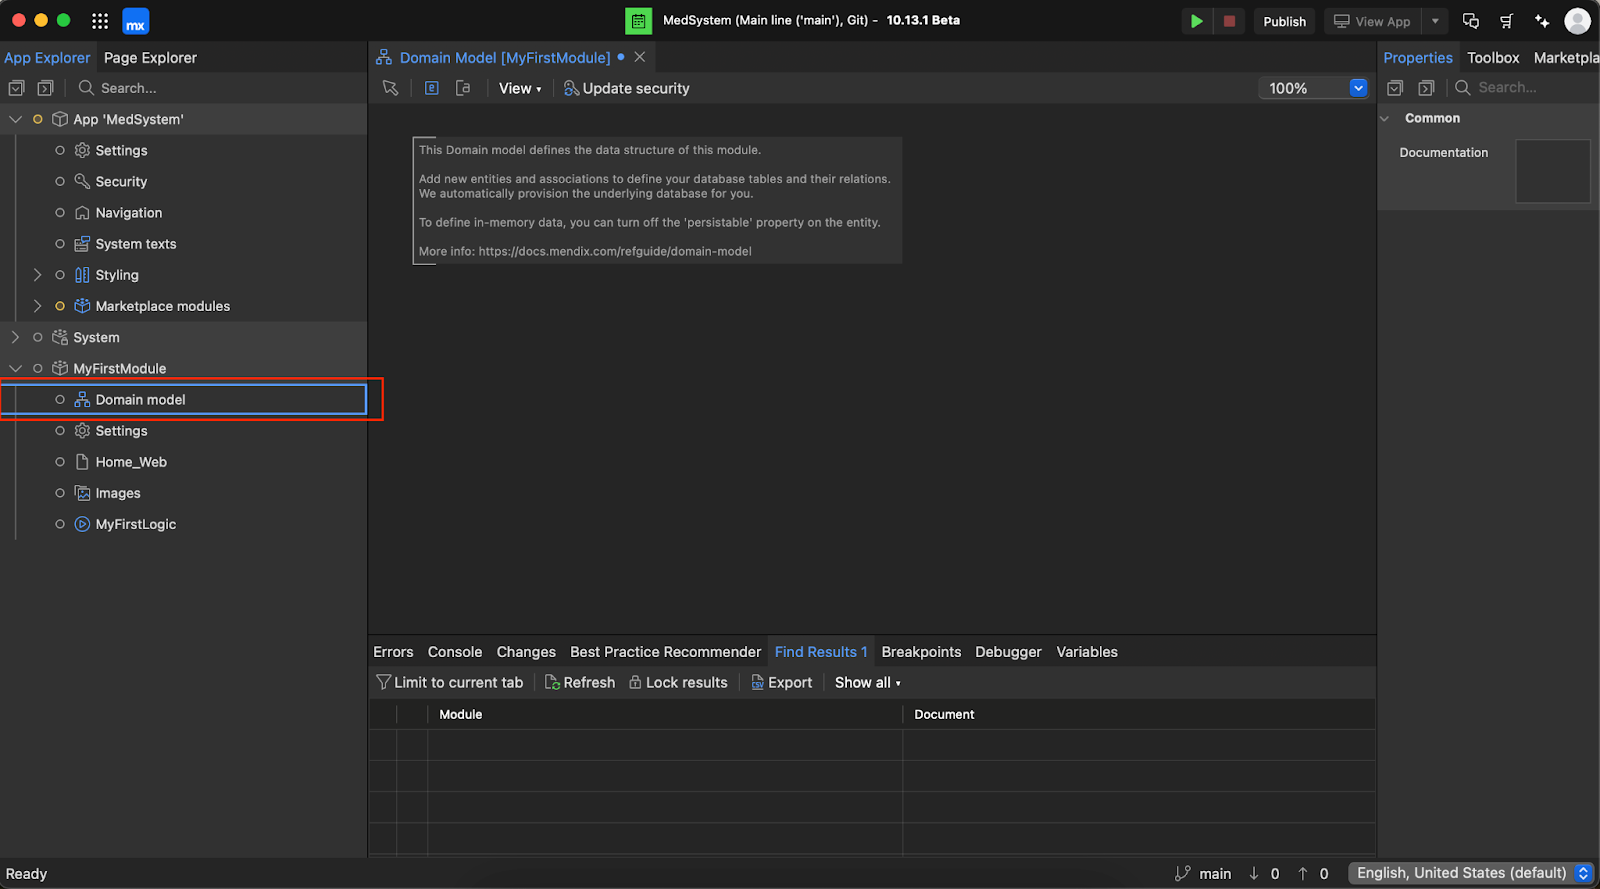
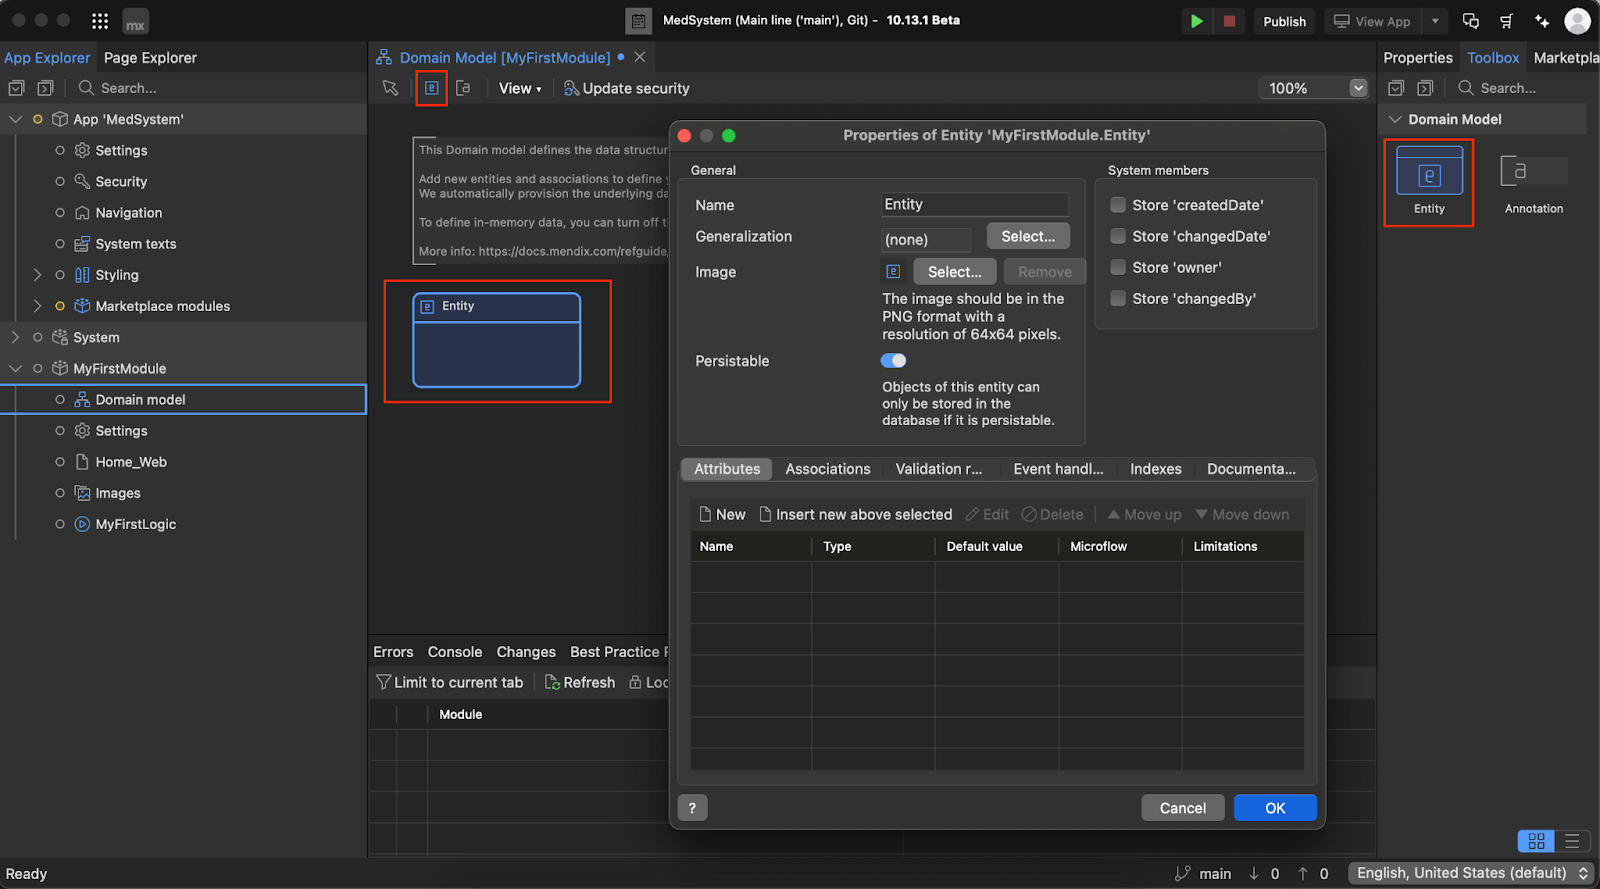
It’s a good idea to begin your work on a Mendix application by creating entities, attributes and associations in the Domain Model. This is where you will imitate real-life elements, known as entities, their attributes, and relations between them (associations) inside of your application. All of it can be built using Mendix’s interface and provided tools. To start working on your Domain Model, open it by clicking on the marked button in the Studio Pro:
To create a new entity inside of your Model, simply drag and drop it from the top bar or Toolbox sidebar on the right. After placing it inside your Model, double click it to show the properties popup.
Name your new entity and set appropriate attributes. To add one to your application, click the New attribute button and fill in all the necessary information as shown below.
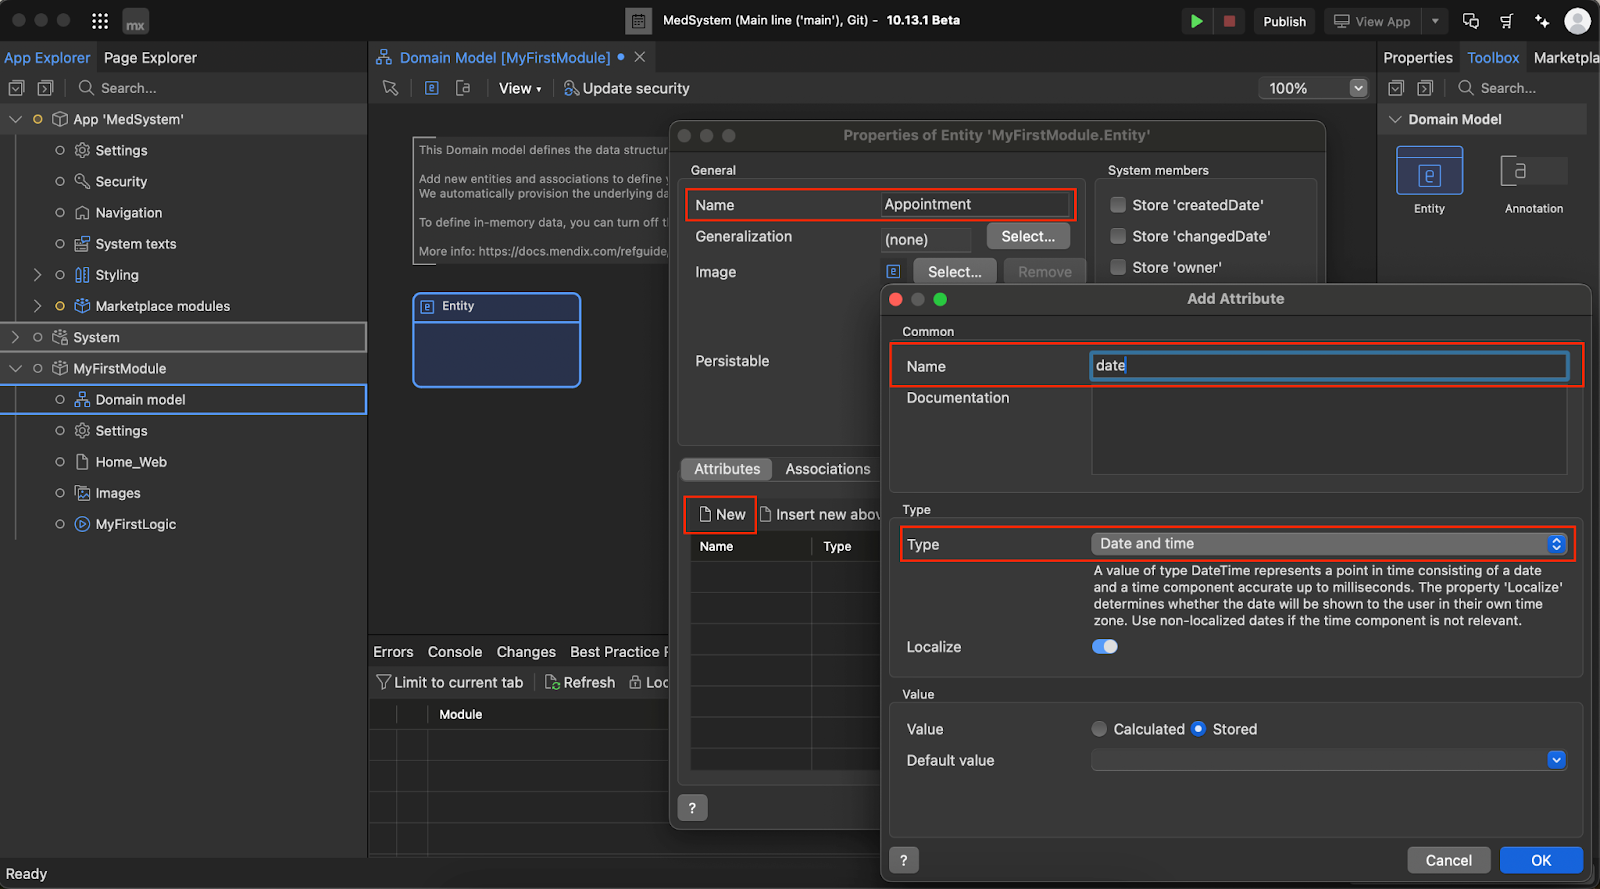
As you can see, each time you add a new attribute, you have to name it and choose its type. You can also create a default value for it, but it’s not mandatory. Now that you know how to create entities, feel free to make all that are required for this tutorial – as shown below:
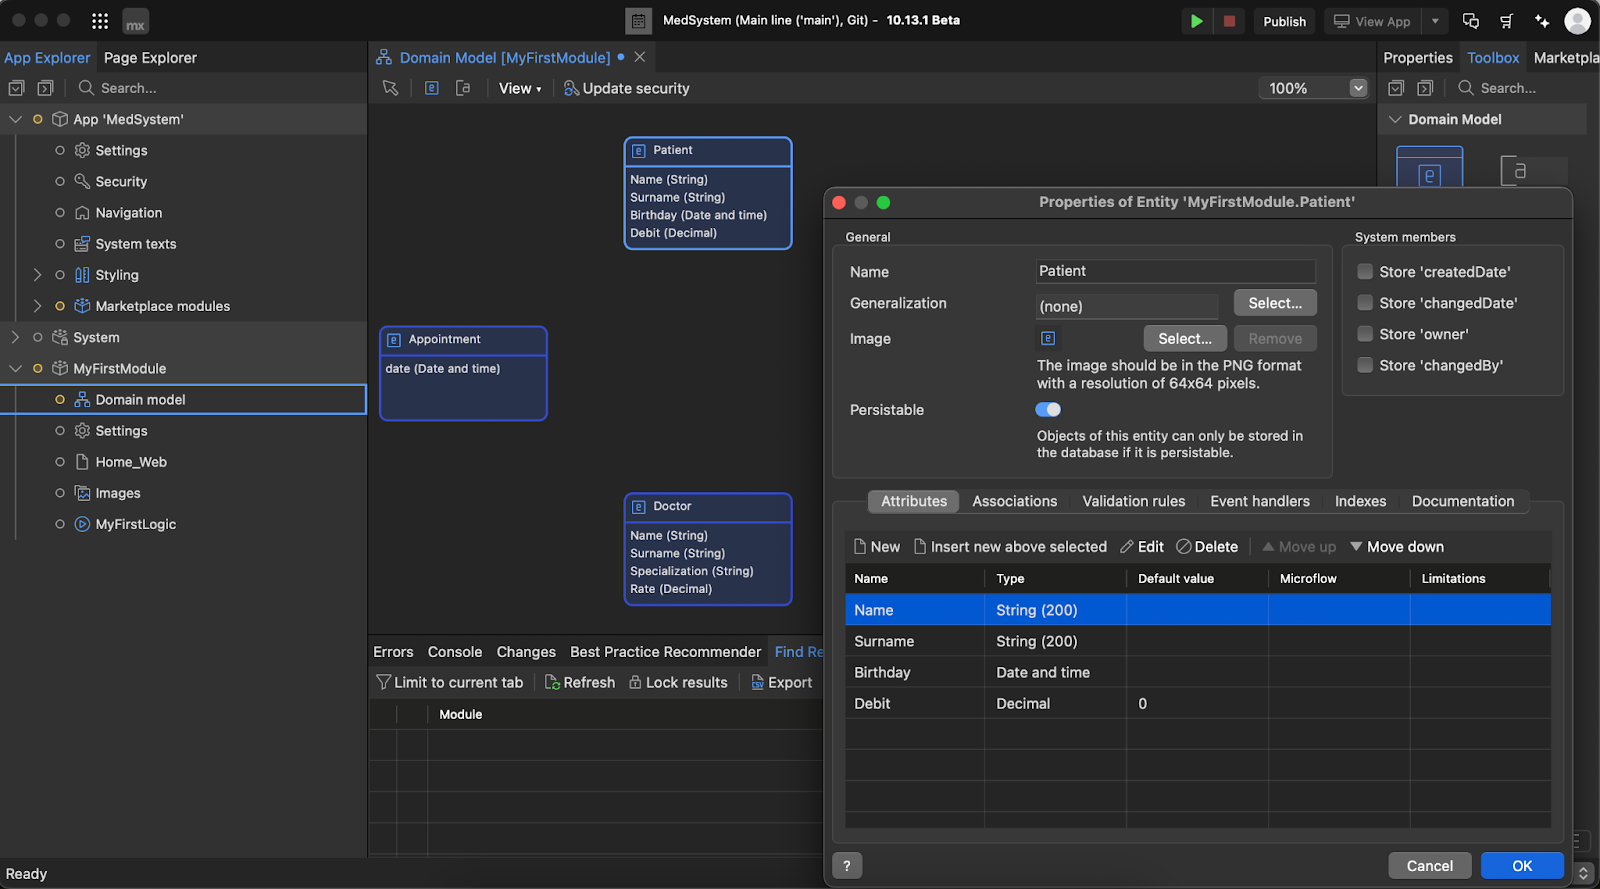
You have now created all of the necessary entities as well as their attributes – however, from this Model we can’t tell what are the relationships between each entity.
To properly display each relationship you need to drag an arrow between two entities, which represents the association between them in the Domain Model. An arrow can only span between two entities at once and the entity from which it starts is called the owner of the association. It means that this table is where the association will be stored, however we will not get too deep into this (it’s a slightly more advanced concept, better left for later). You can read more about associations and related topics in the official documentation. To progress with our tutorial, create the required associations as shown below:

As you can see, each Appointment is connected to both a Patient and a Doctor. Between each of them, there is a many-to-one association, which means there can be multiple Appointments related to both entities.
Congratulations, you have successfully created your first Domain Model. Now that your schema is completed, you can move on to modifying your app’s interface. To do that, open the Home_Web file, as shown below:
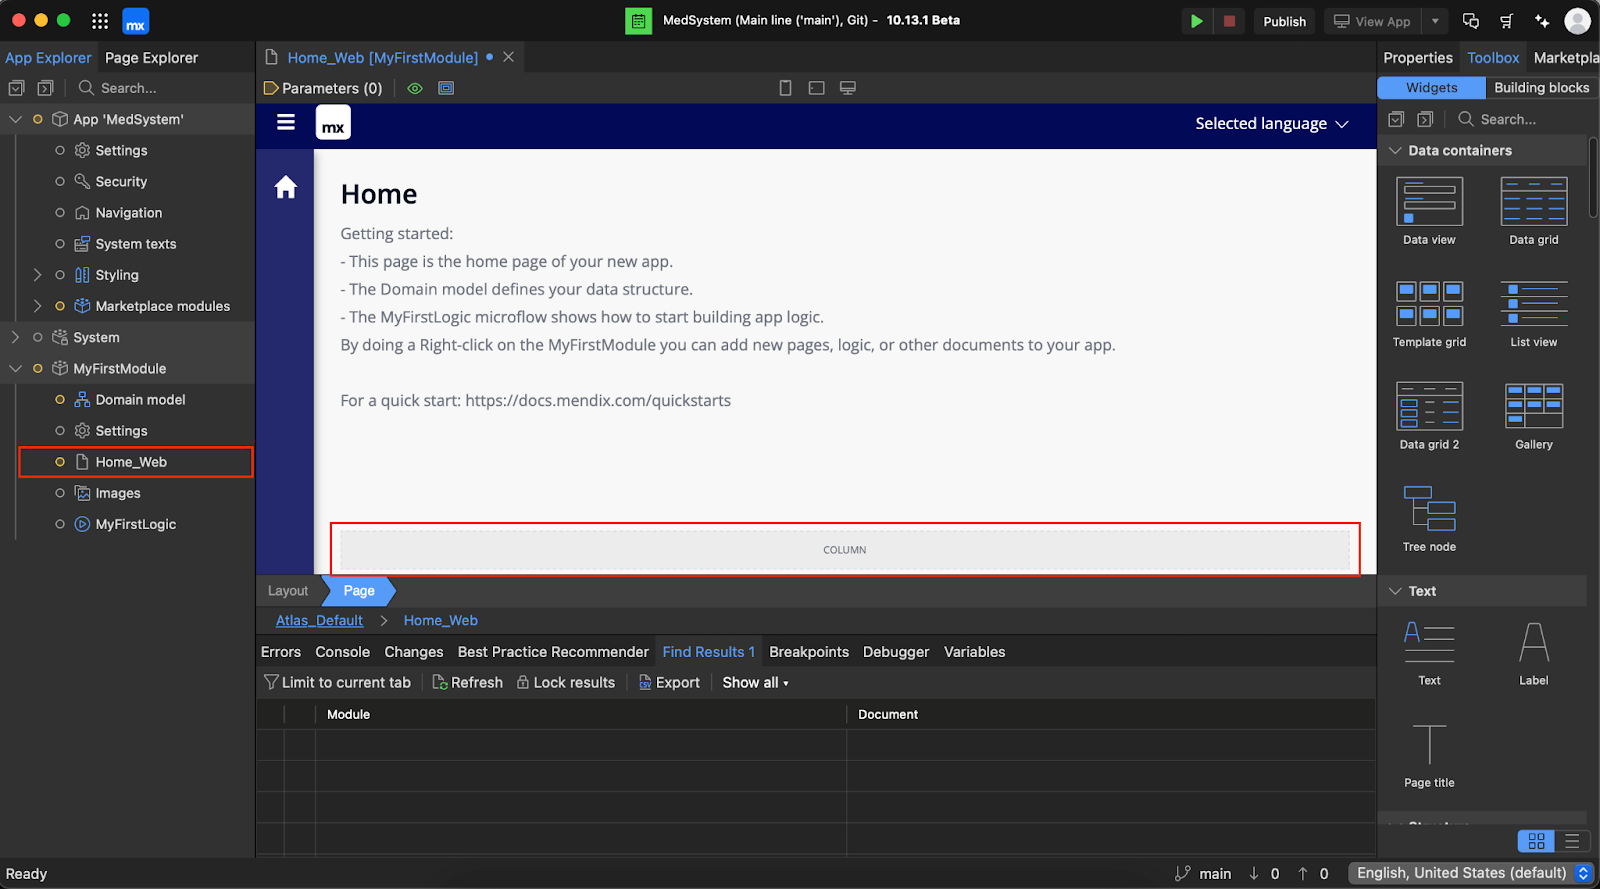
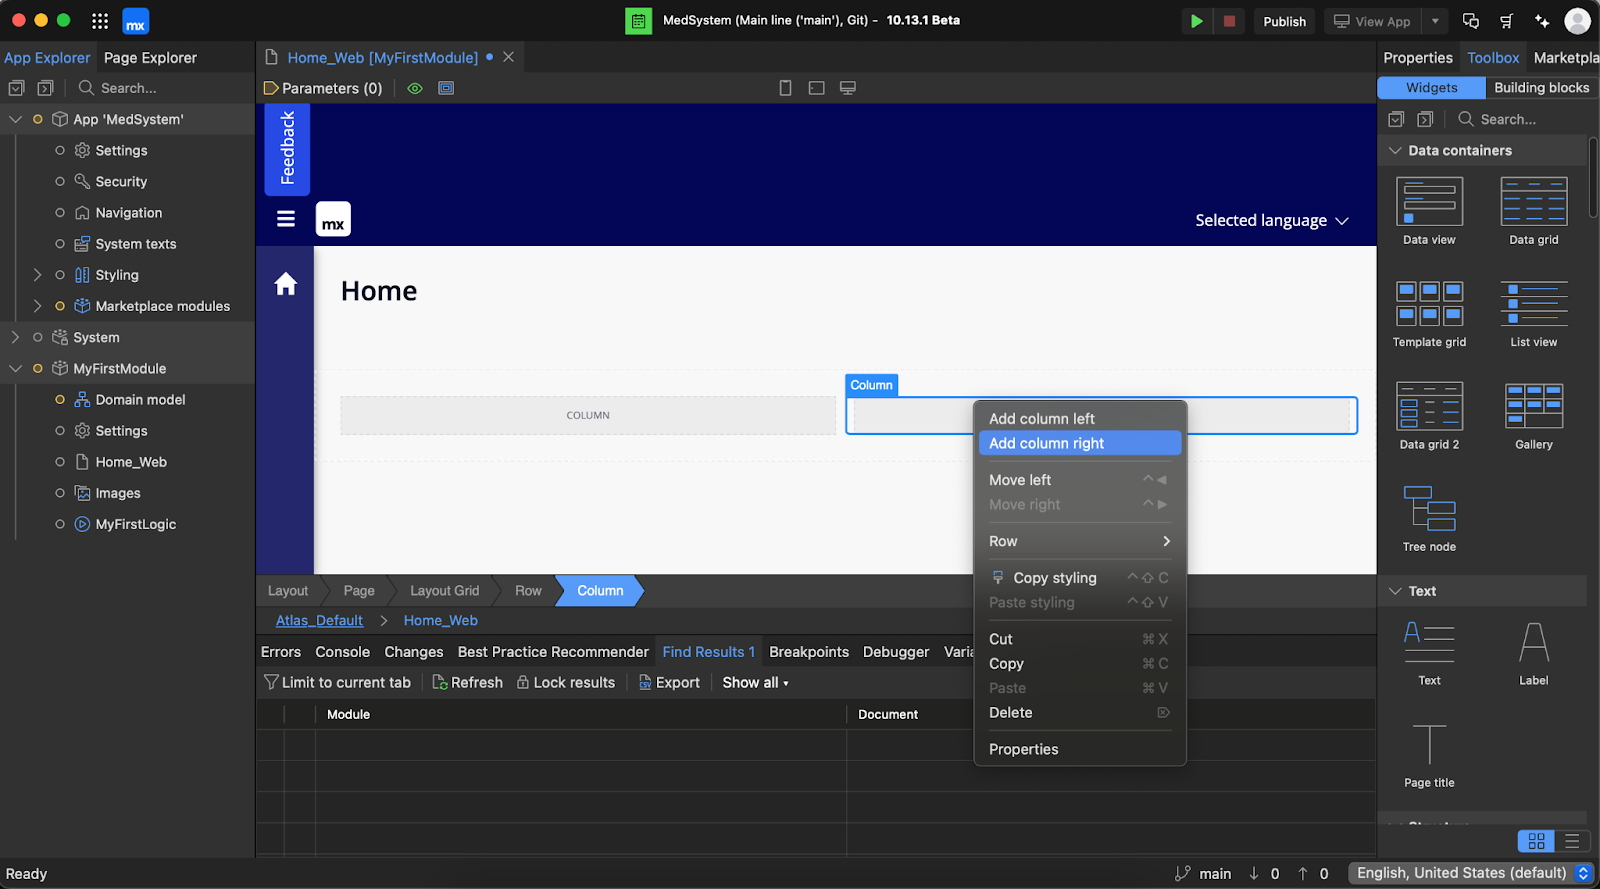
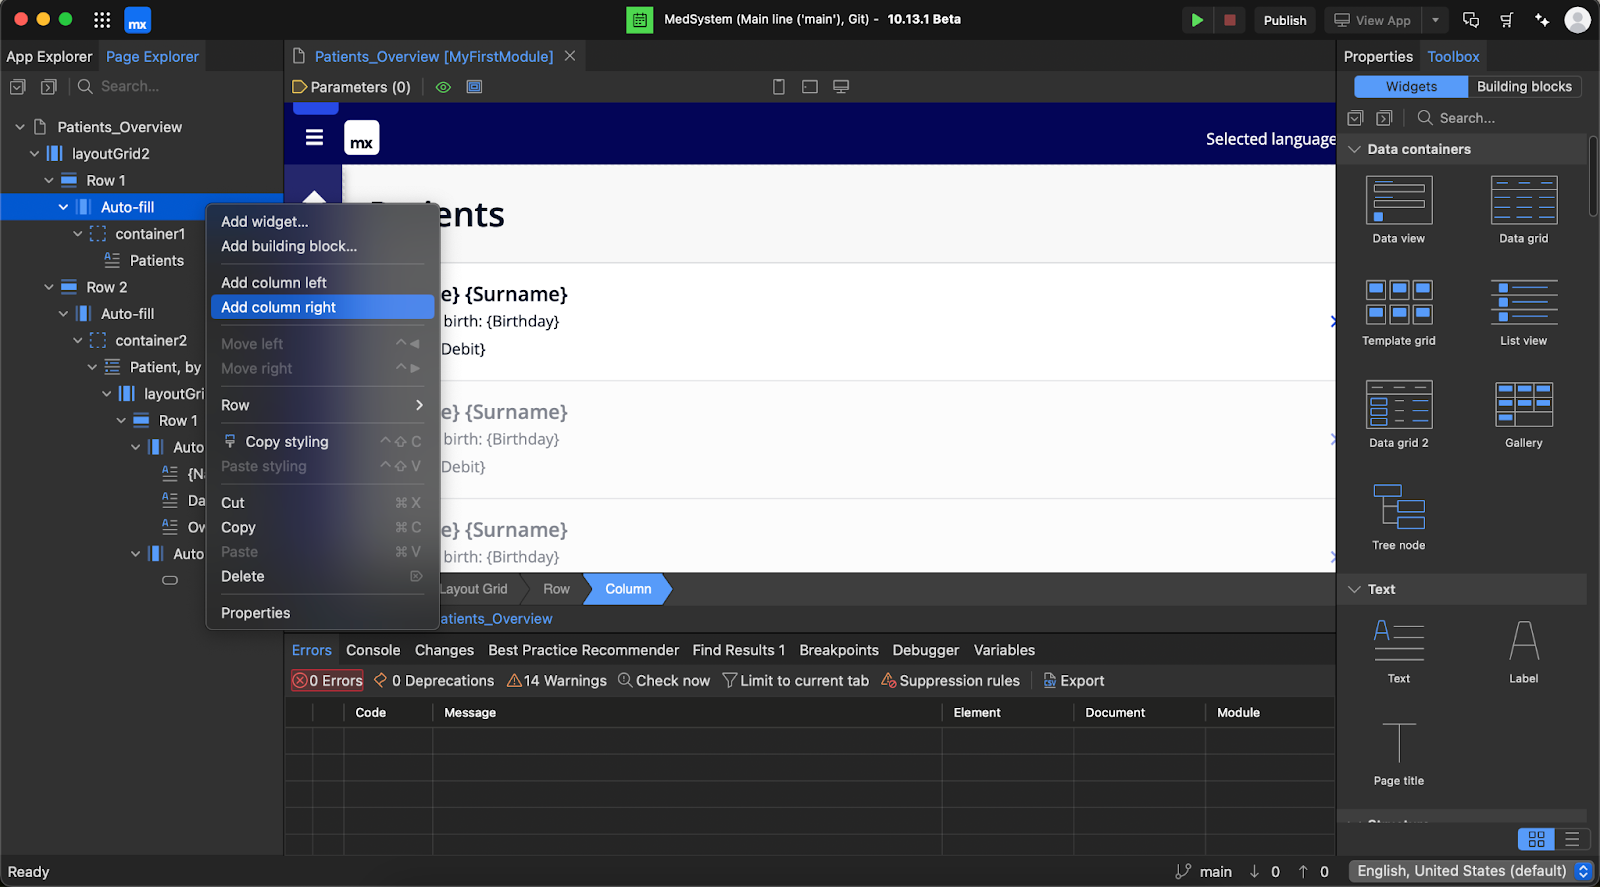
When it comes to the start page, our goal in this tutorial is to create three columns. Each will have a button pointing to the page with a List View widget of a specific entity’s objects. To achieve that, you need to add three columns. As you can see on the image above, the first column was added by default. You can add more by opening the Page Explorer, finding your Column element and adding more with right click options.
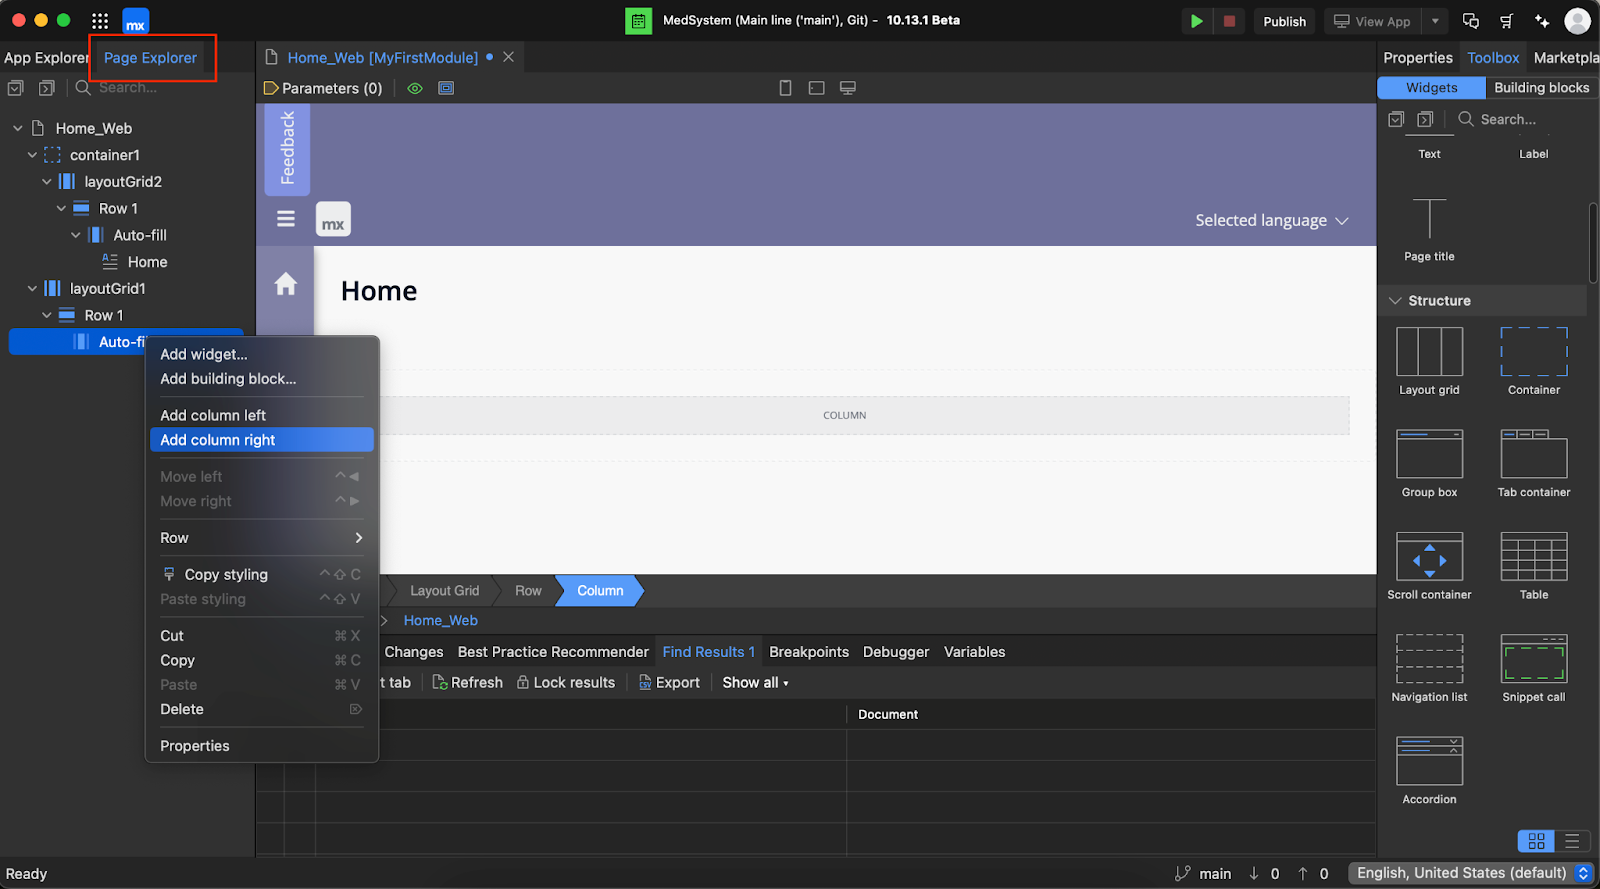
Alternatively, you can just right click the existing column in graphical representation of your app, right click it and add additional columns.
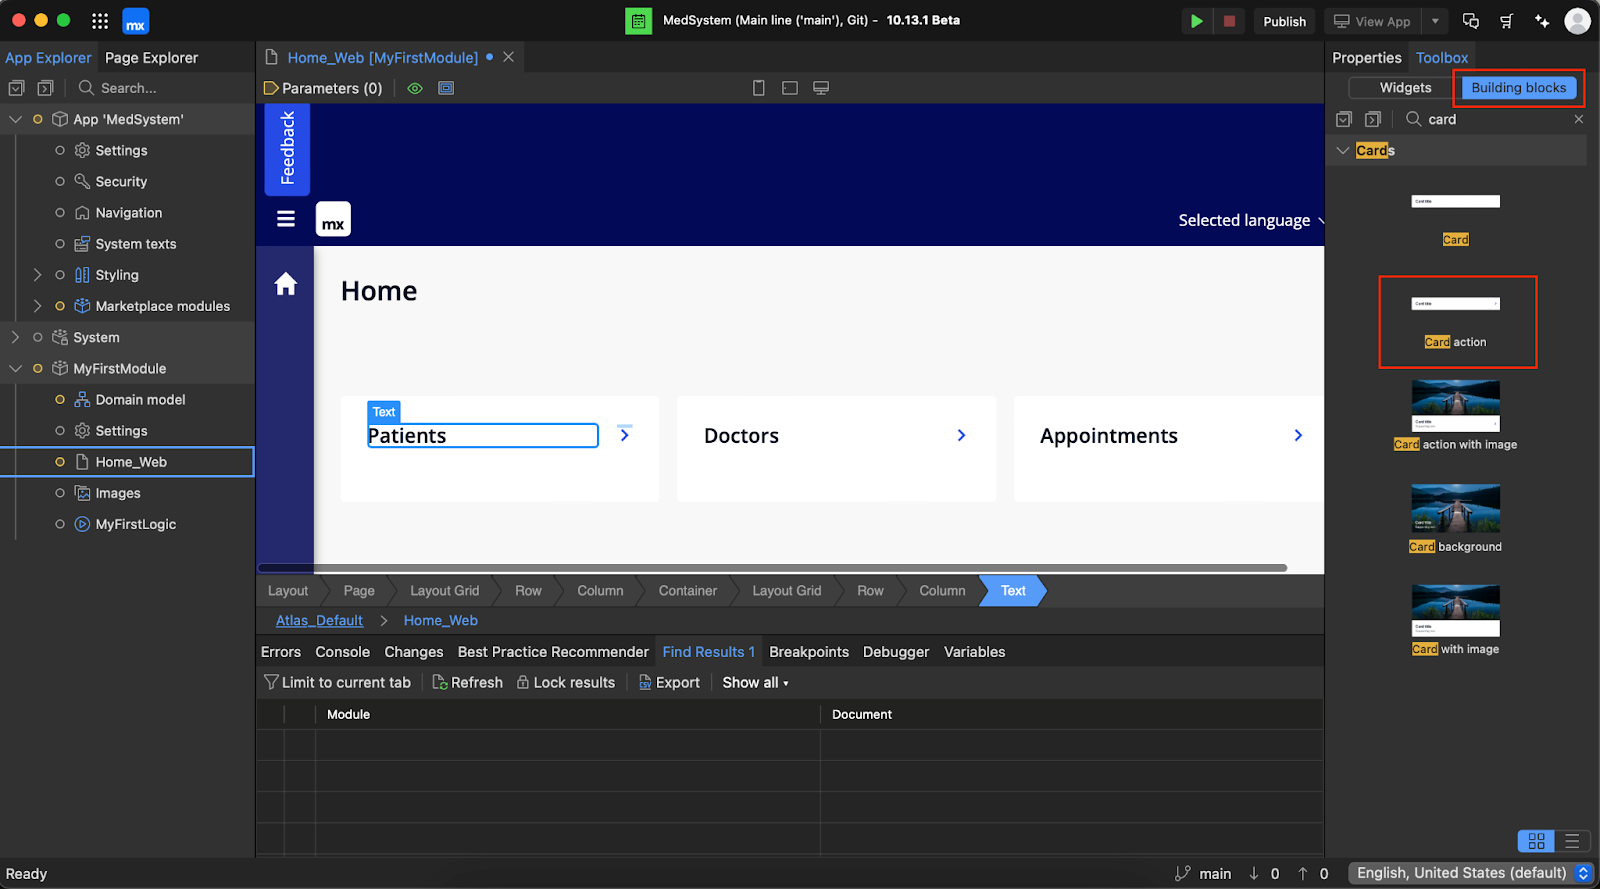
The next step is to drag a Card Action from the Building Block available in the Toolbox onto each column using the mouse (standard drag&drop functionality). Each of the Card Actions should consist of text and a button. You can simply edit the text to be displayed by opening its properties with a double click. As for the buttons, later you will change the On click event for the whole Card to show pages that you will create in a moment.
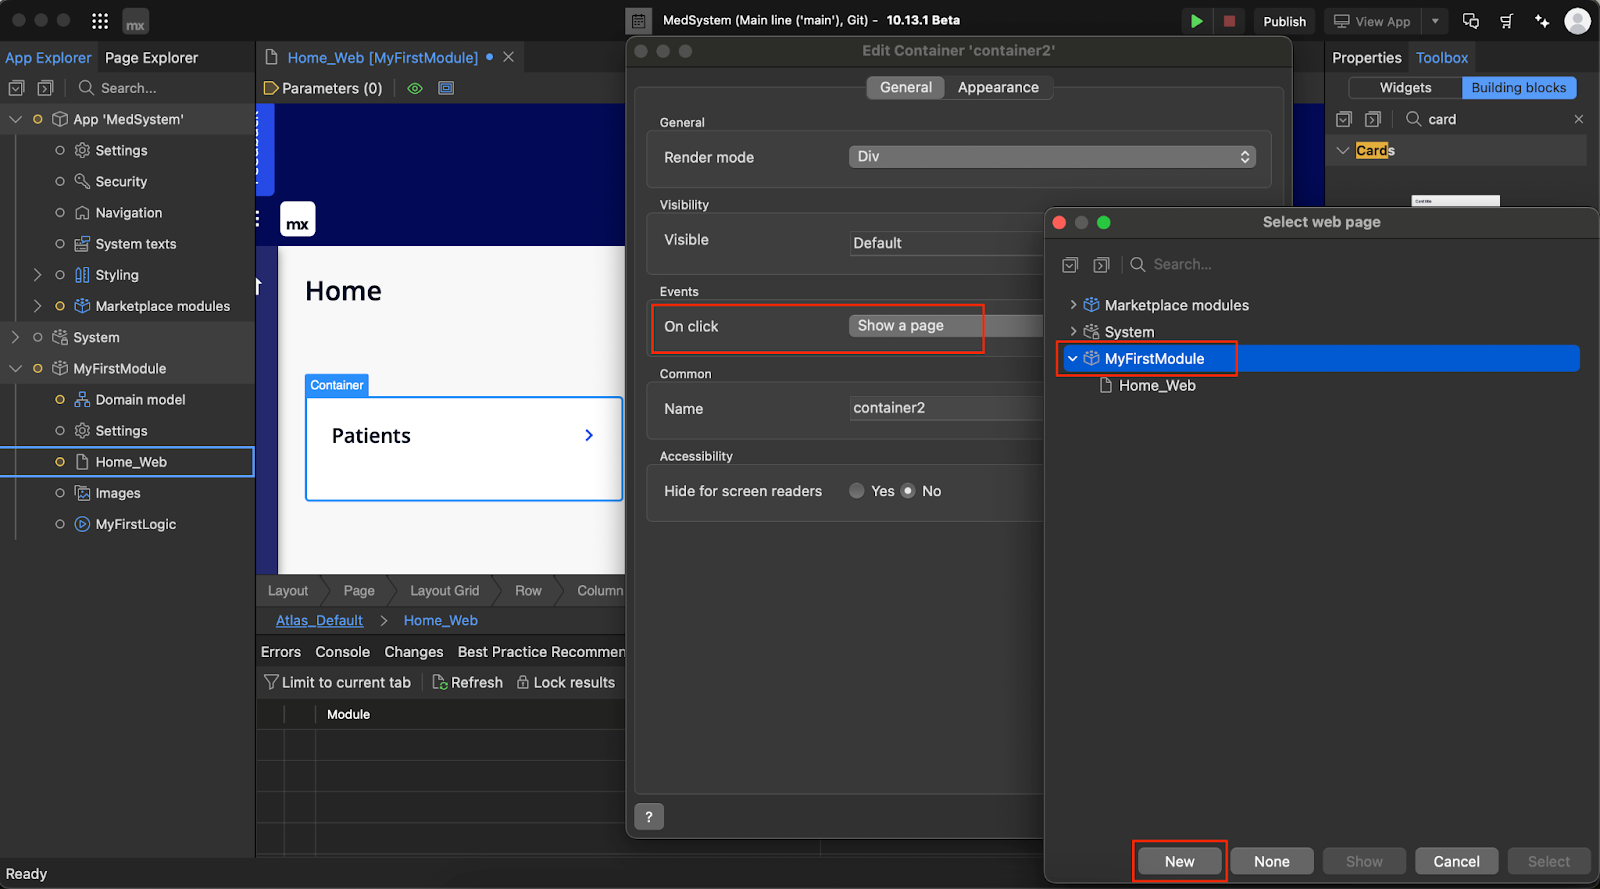
To add an action to redirect users to a specific page, you need to right click each Card and open its properties. Change the On click action to Show a page, select your Module and click the New button.
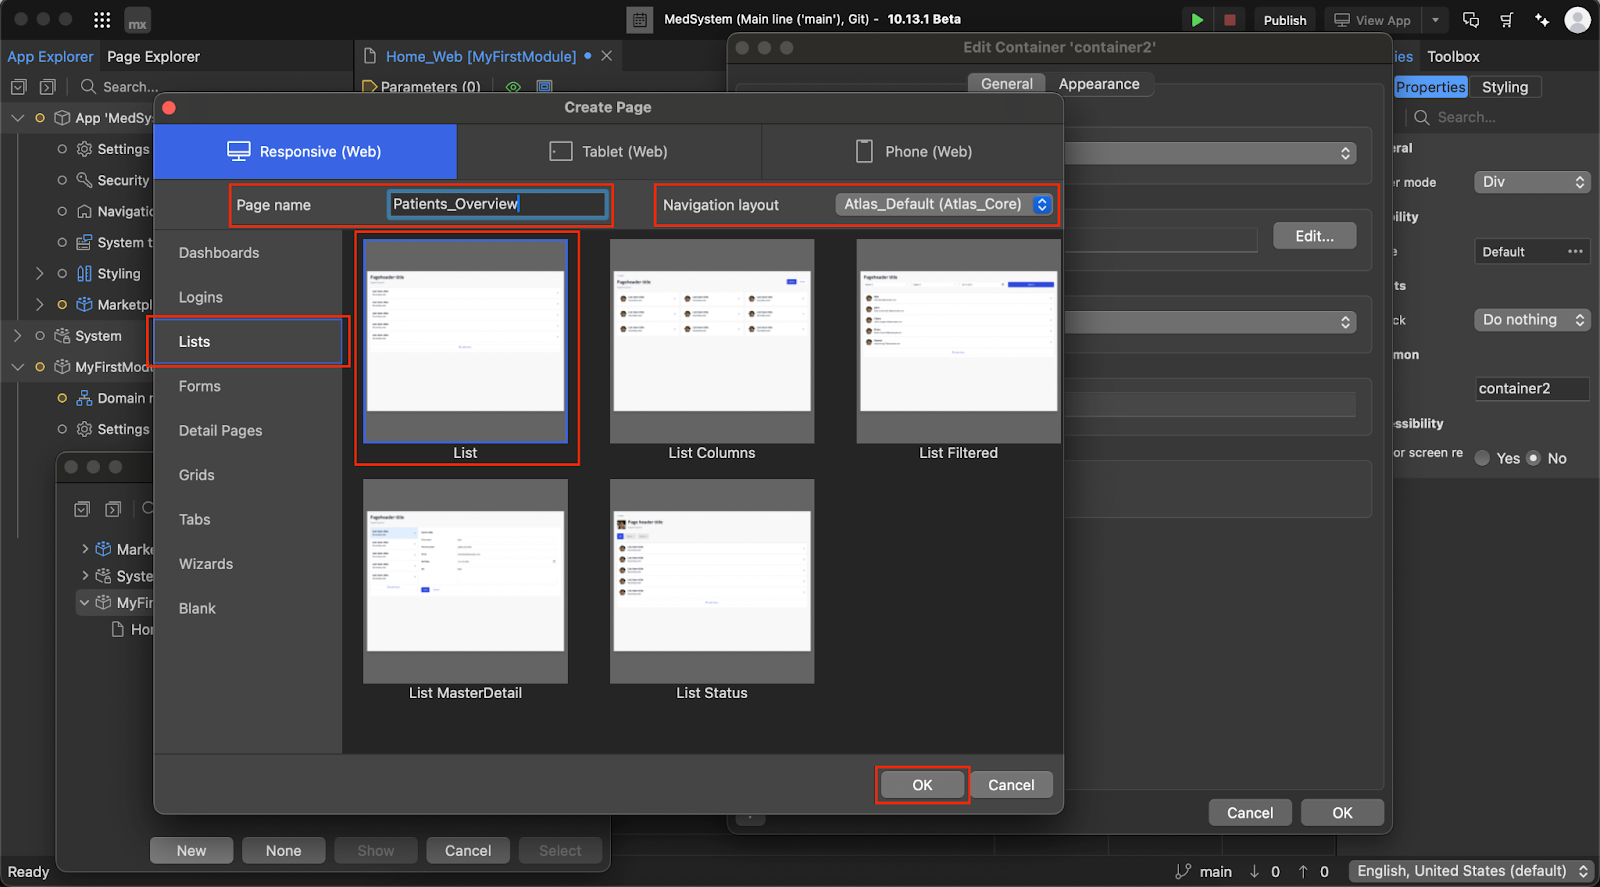
To create a page which will display all of the necessary information, you need to select a List template and give your page a meaningful name. Repeat these steps for each entity.
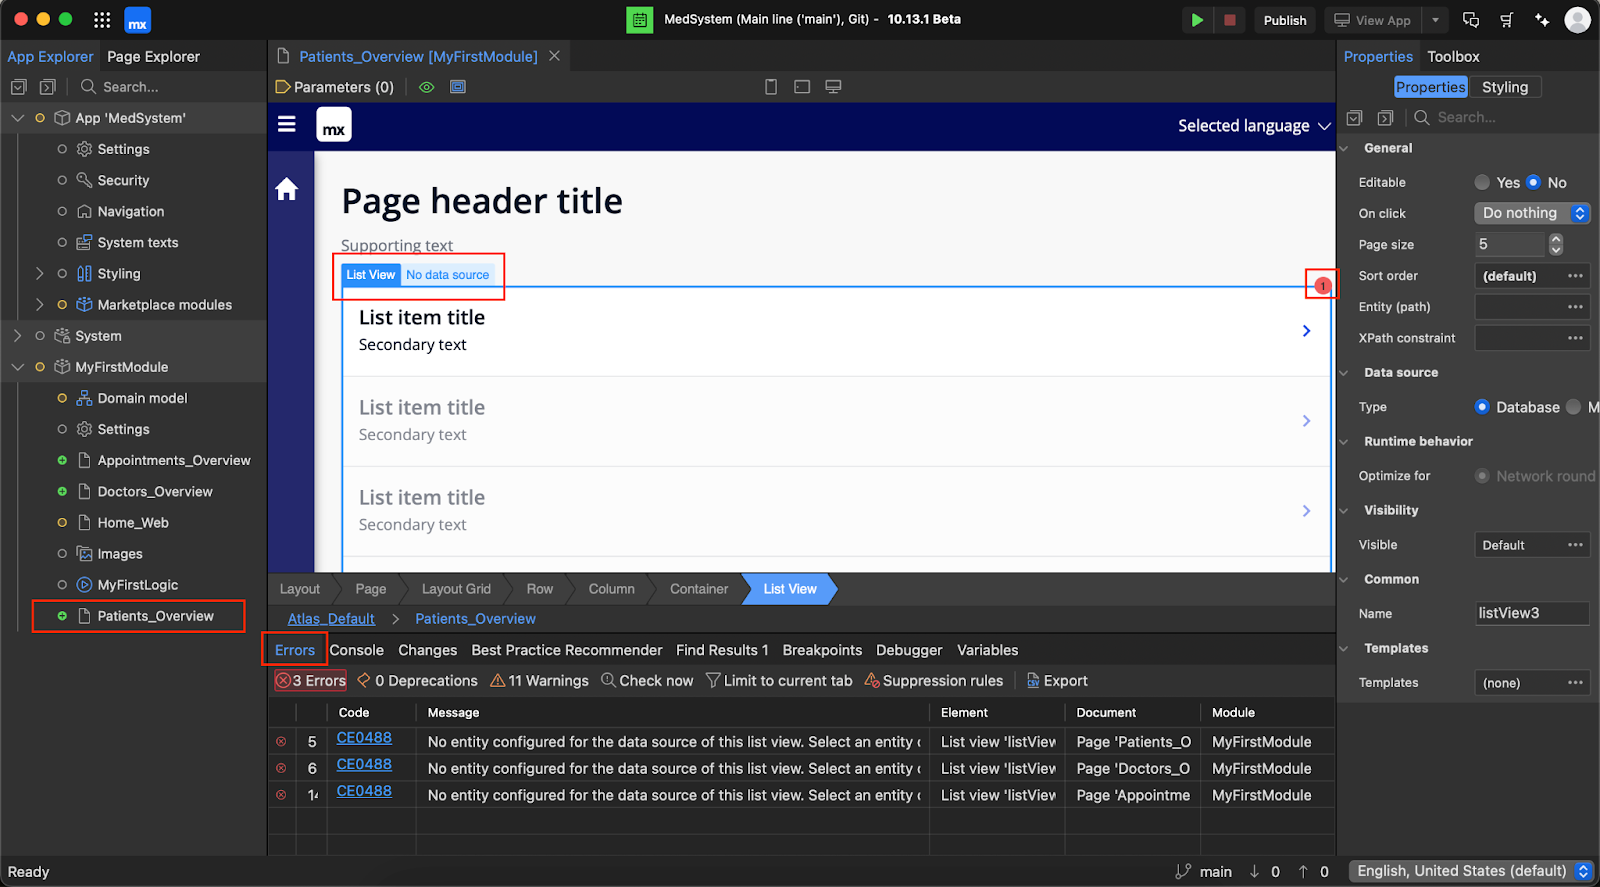
You should now have three new files, each representing your pages in the App Explorer. Please open Patients_Overview where you will see the default view of your new pages.
The most important part of them is the List View widget located in the middle of your screen. This is where you will display information about each entity stored in the database. At the top right side of the screen, you can also see a red circle with a number inside it. This indicates that there’s an error related to this component. If you open the Errors tab at the bottom, you can see that there are three errors related to the freshly created List View widgets. This is because you have yet to set a data source for them to present. Mendix displays such useful error notifications to help you remember important details.
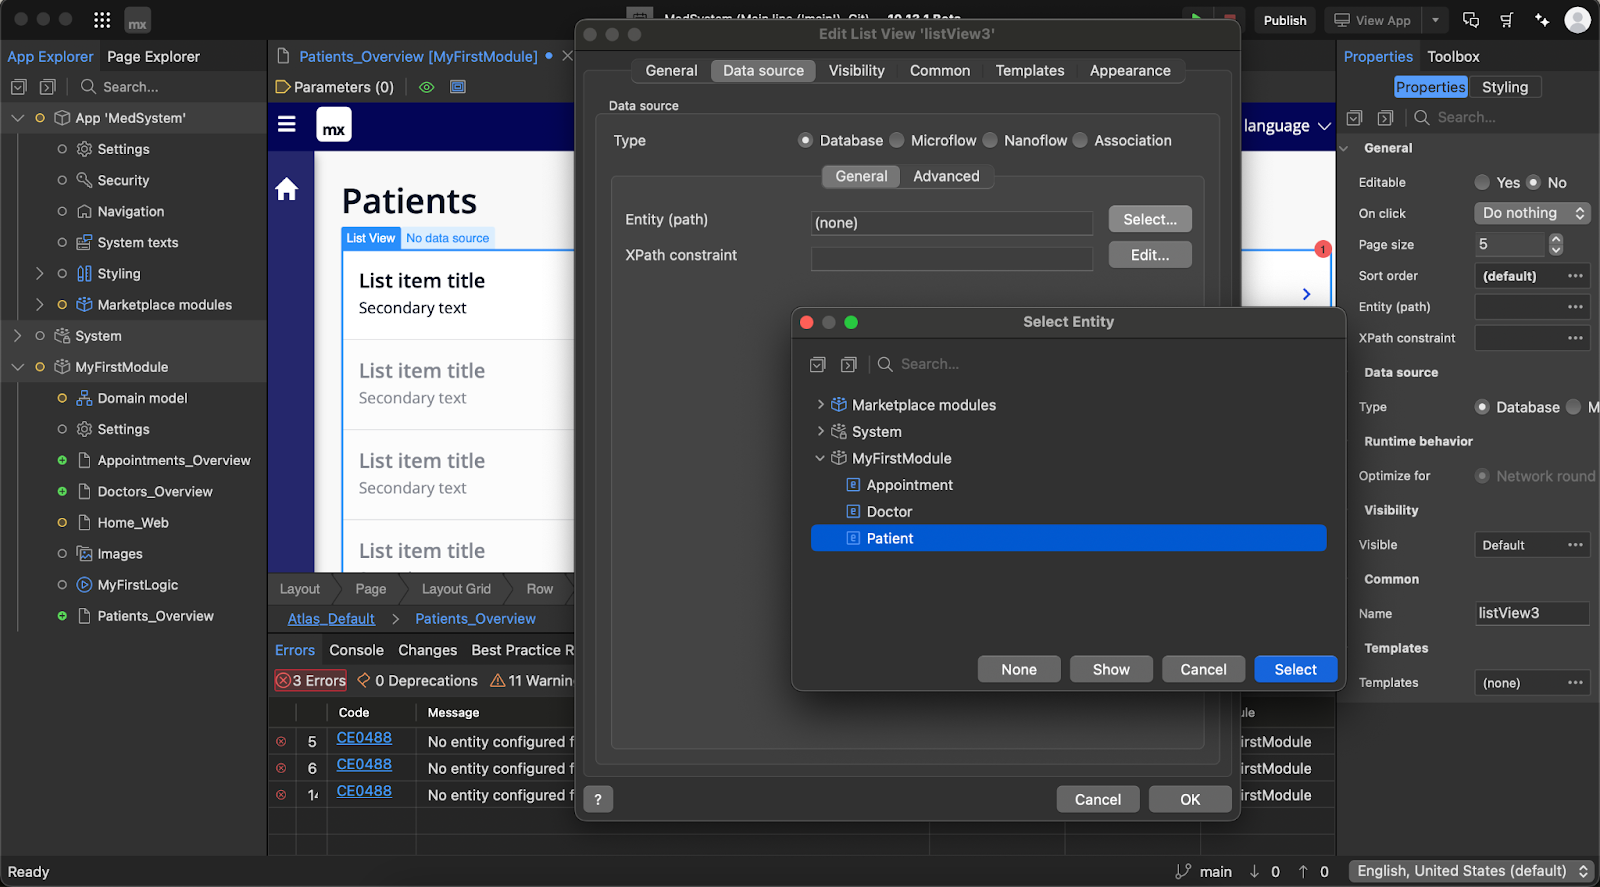
To solve the abovementioned errors, you need to connect the datasource of each List View to a given entity. Open the List View’s properties, move to the Data source tab and click the Select button next to the Entity (path) field. Now, you simply need to choose the entity you want to display, as shown below. When asked to “automatically fill the contents of the list view” select No – you want to fill them in yourself.
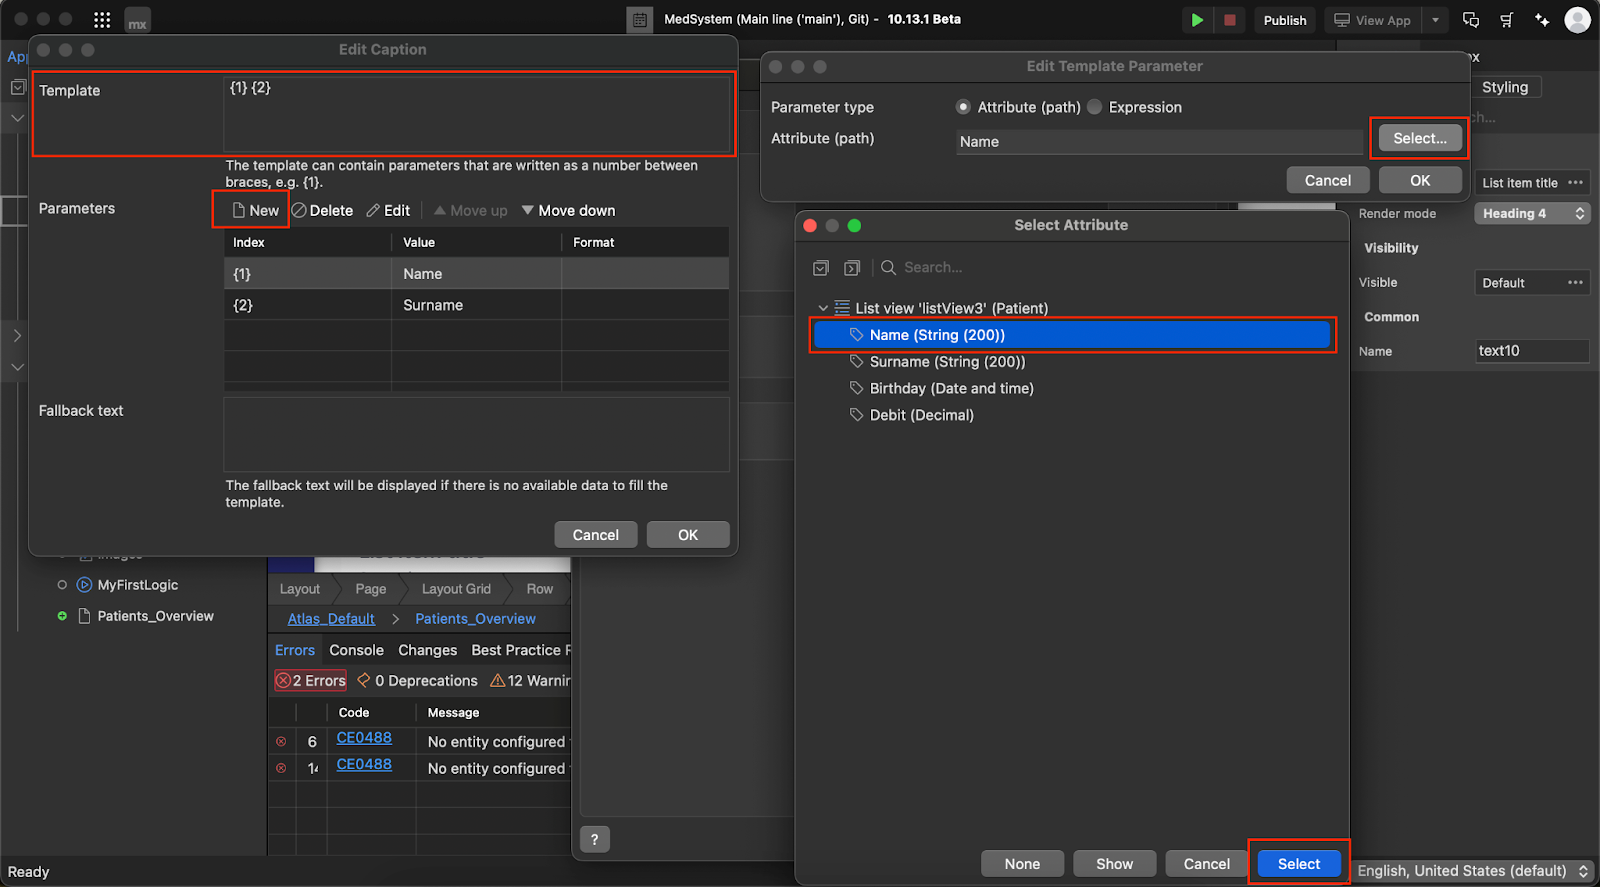
Now, you no longer get errors from this widget. You can move on to changing the way the data is displayed on your page. Open each Text widget’s properties and edit its Caption.
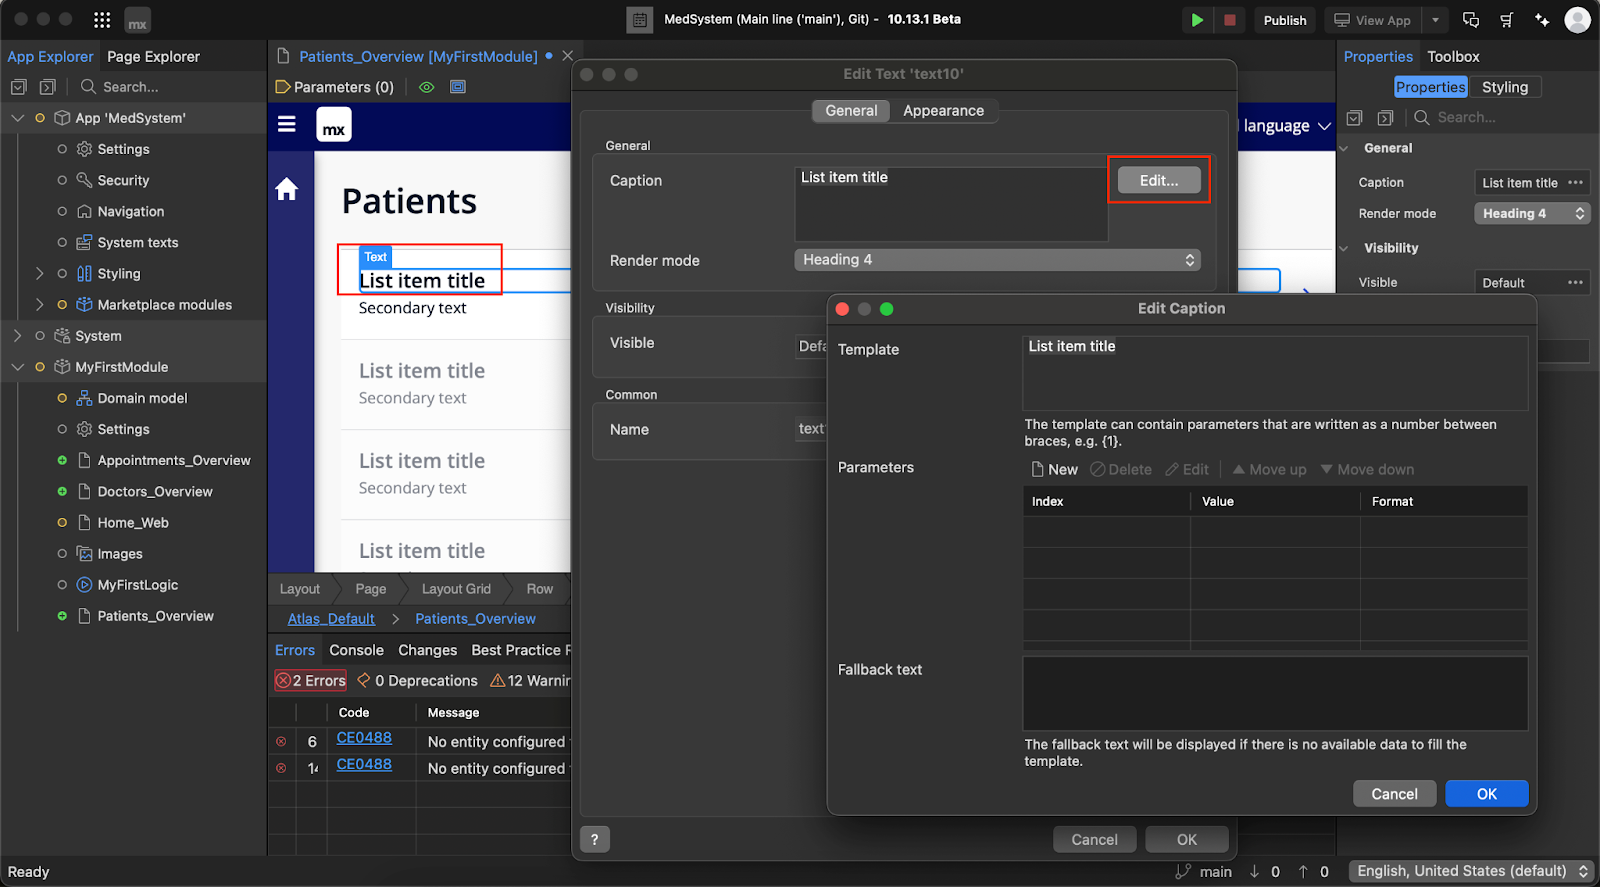
Mendix allows you to dynamically display data returned from the database in text fields. You can use that to display the information about each of your Patients. Simply add new parameters and place their indexes in the Template field, like it’s shown below:
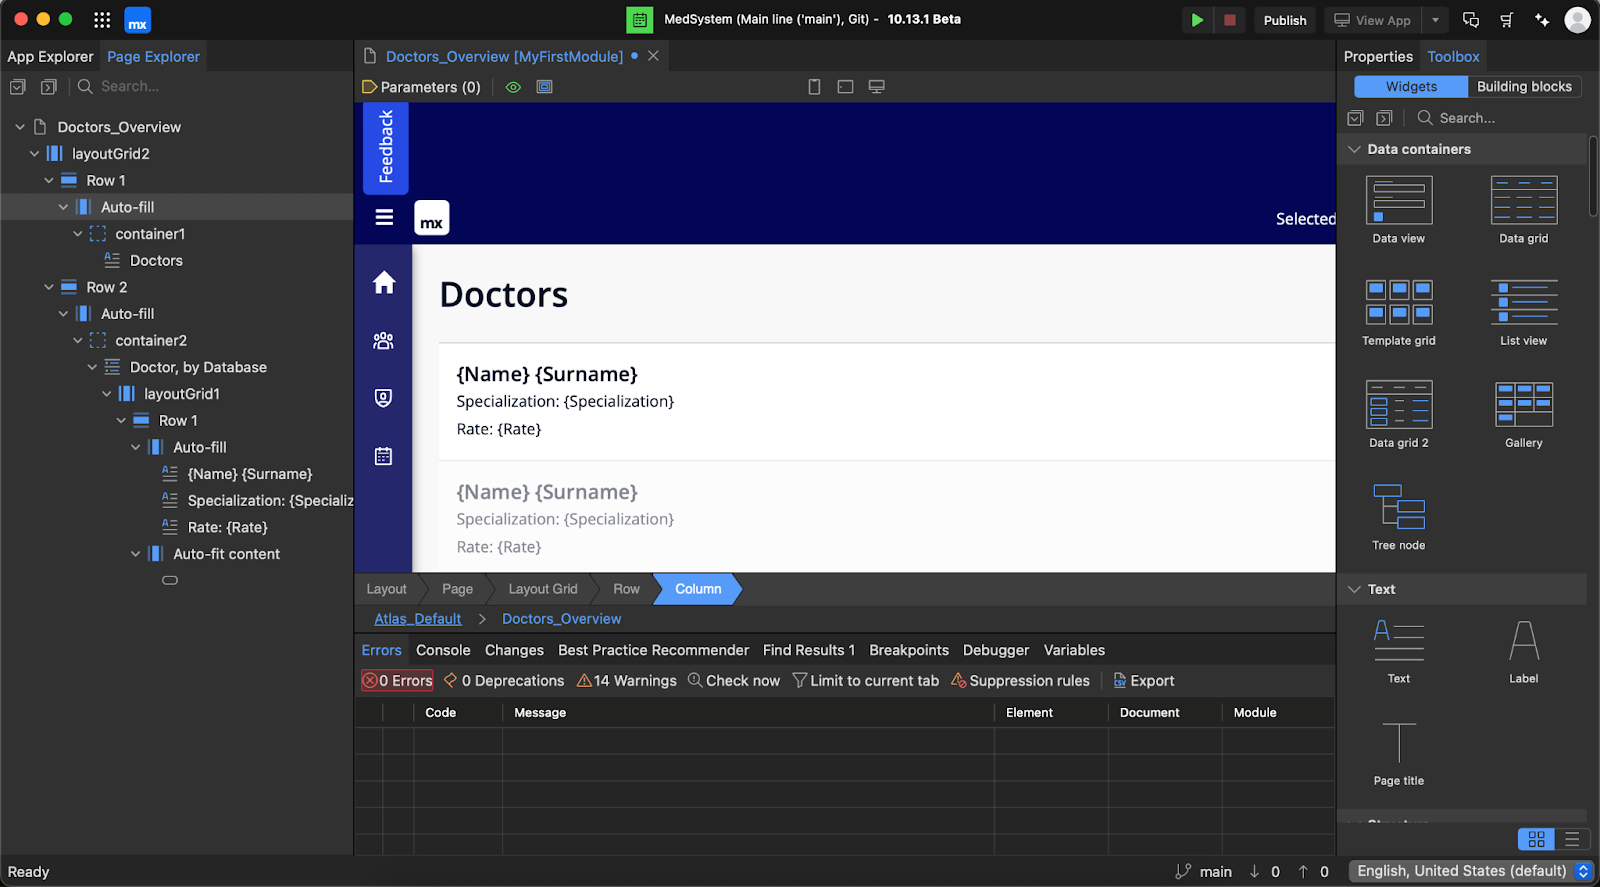
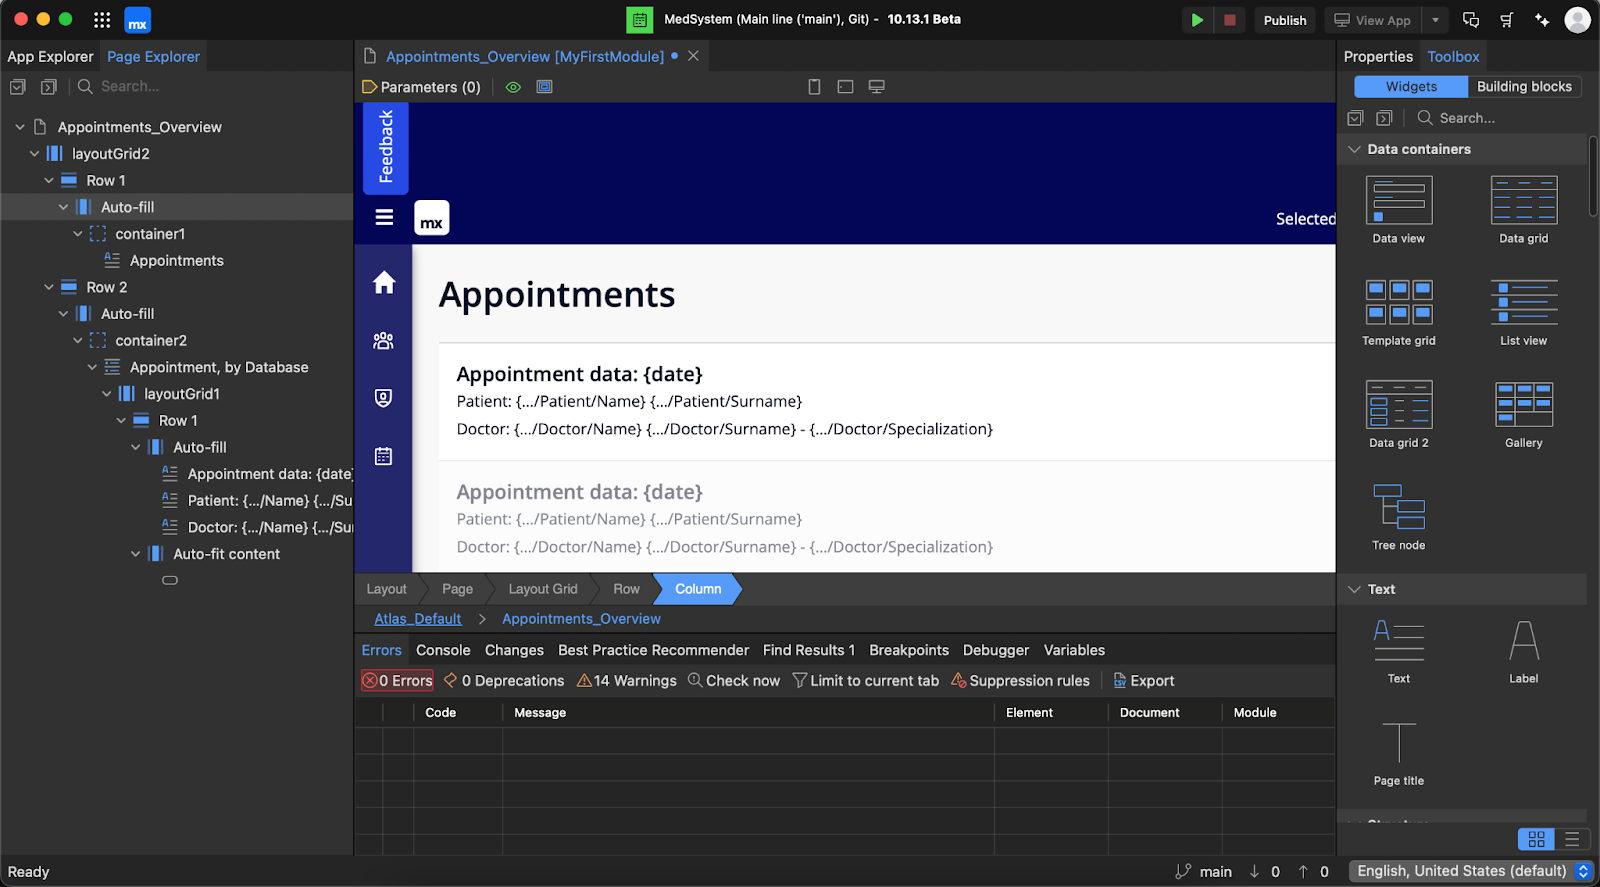
With this knowledge, you can go ahead and modify the List View row template to display all information about each of the entities. Here’s is how we have decided to do it on our pages:
Patients:

Doctors:
Appointments:
When all 4 pages are ready, it’s time to take care of something smaller, but just as important – the navigation menu. It’s the menu on the sidebar for the application’s user. This mechanism will allow people to easily visit a given application page any time they want. Go to the Navigation Menu tab and add new elements using the new item button you can find there. Of course, you should assign a page to each of the tabs, and provide a text description. It’s also a good idea to add a thematic icon.
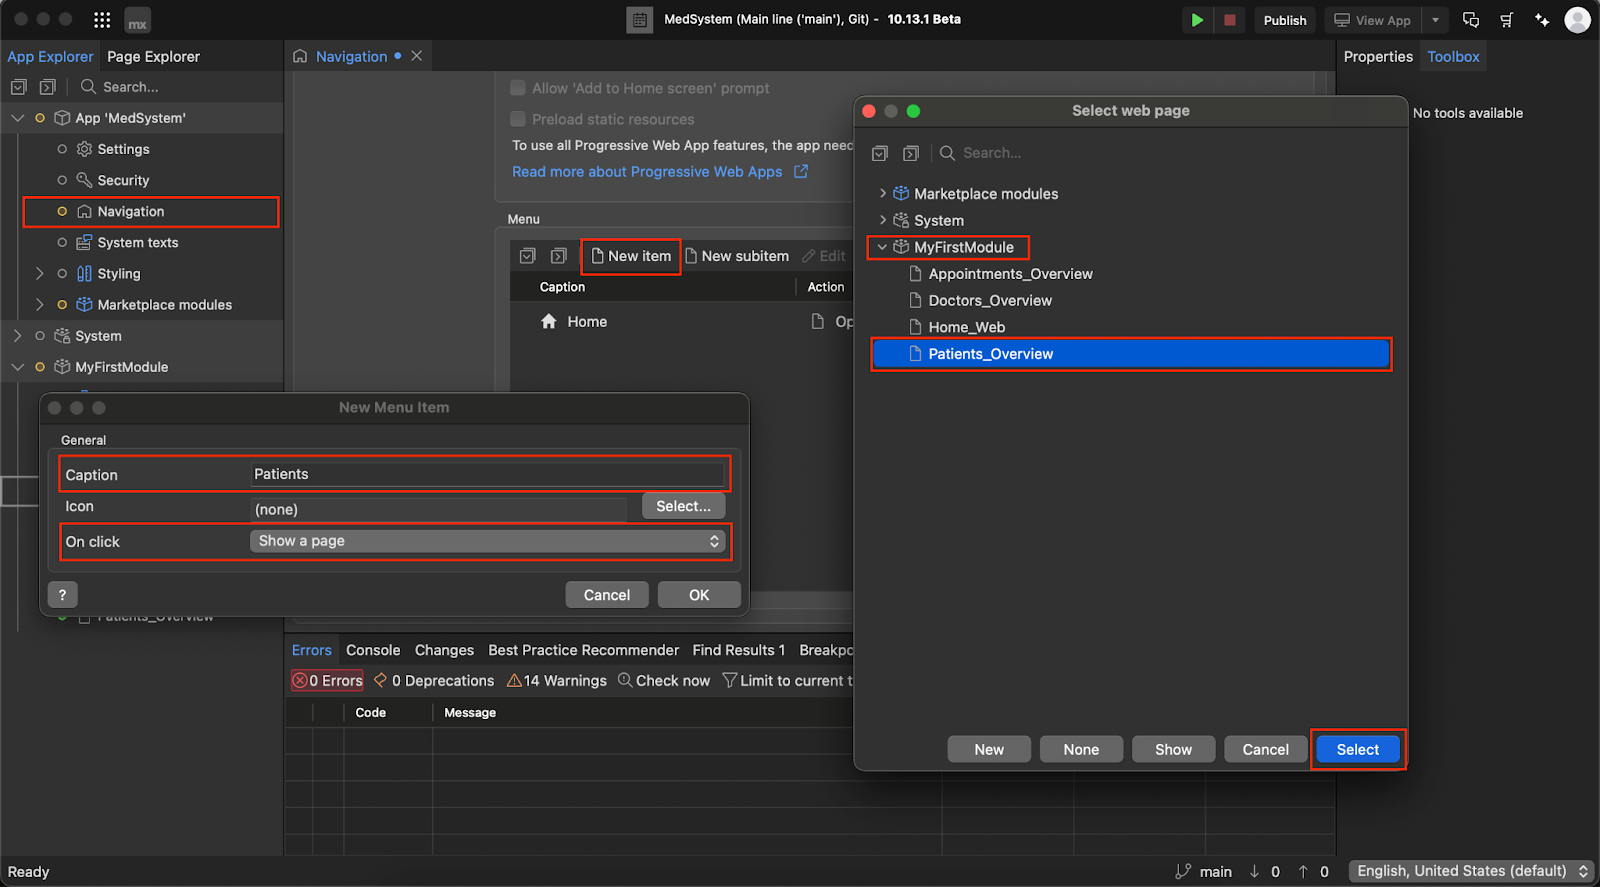
The end result should look like this:

Another important step is allowing the user to create objects (e.g., patient accounts and appointments). It’s quite simple in the case of Patient and Doctor entities, where you can just create a new column and drag a widget called Create Object Button from the Toolbox.
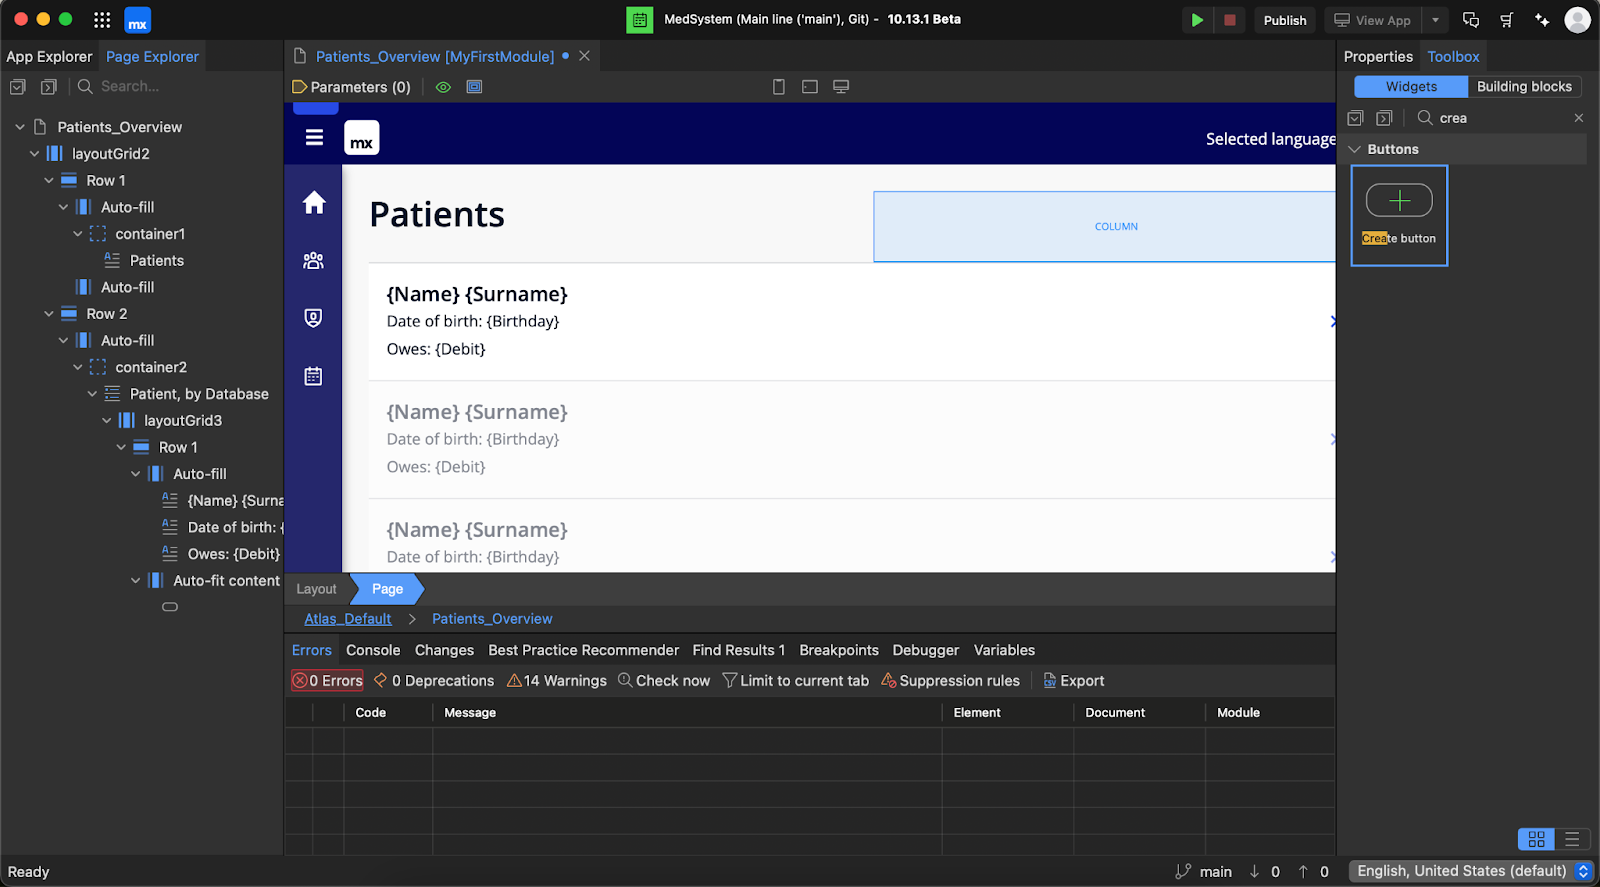
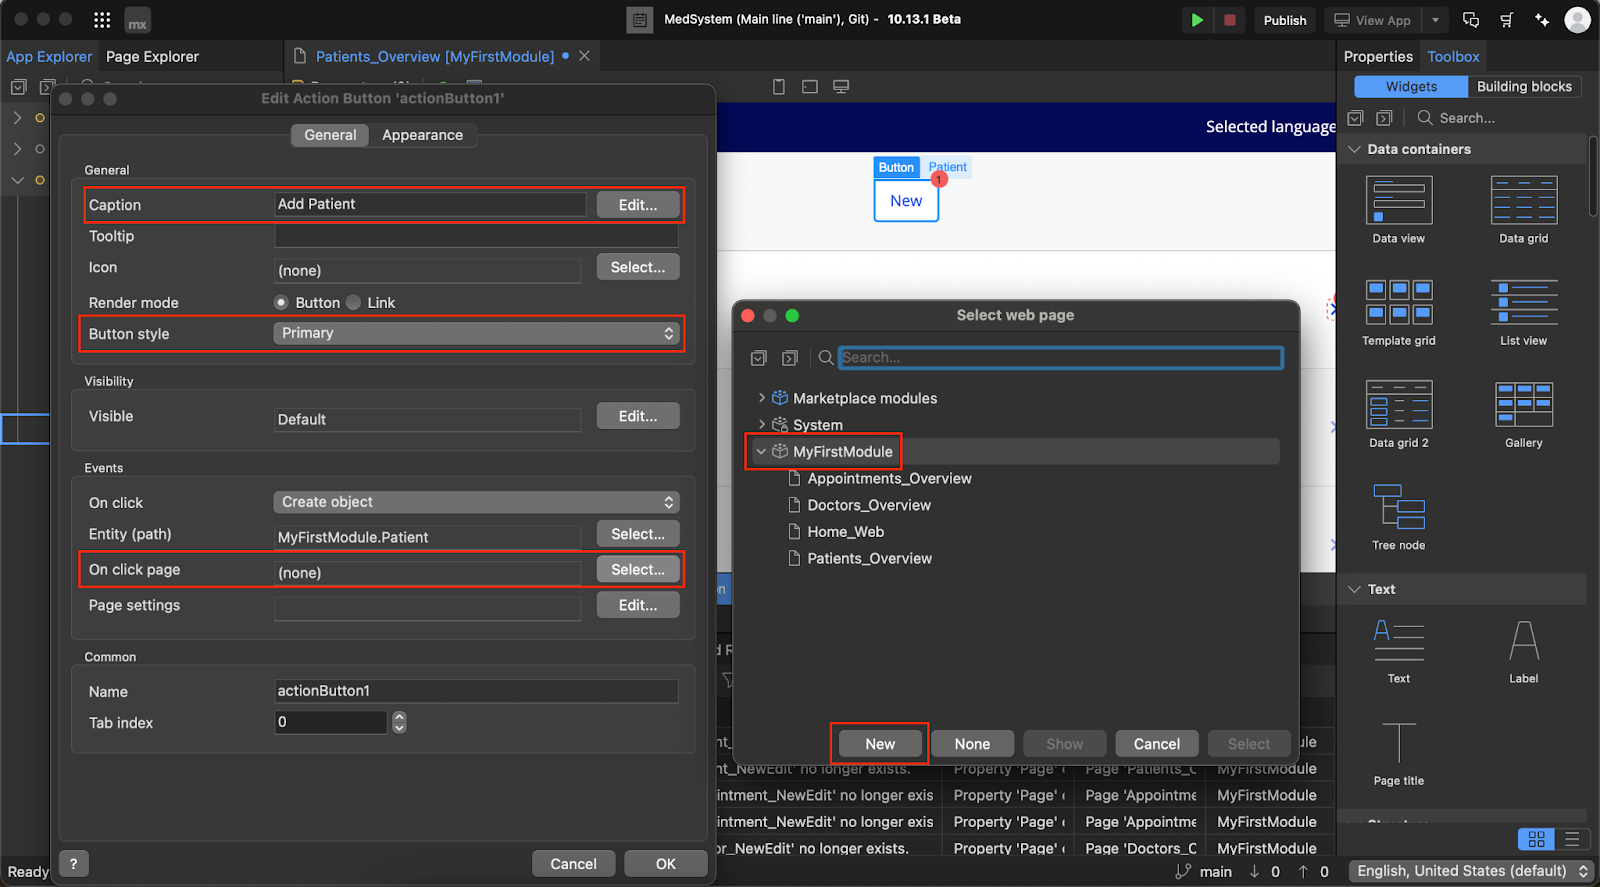
The button will create an object for a specific entity, and then redirect the user to this entity’s creation/edition page. When you drop the button in the desired place (in our case it’s the new column) you will be asked to choose an Entity. Since you are creating new Patients you should choose the Patient entity as a template. You will also need to create a page that will serve as your form to create a Patient. To do that, open the New button properties and choose the options shown below:
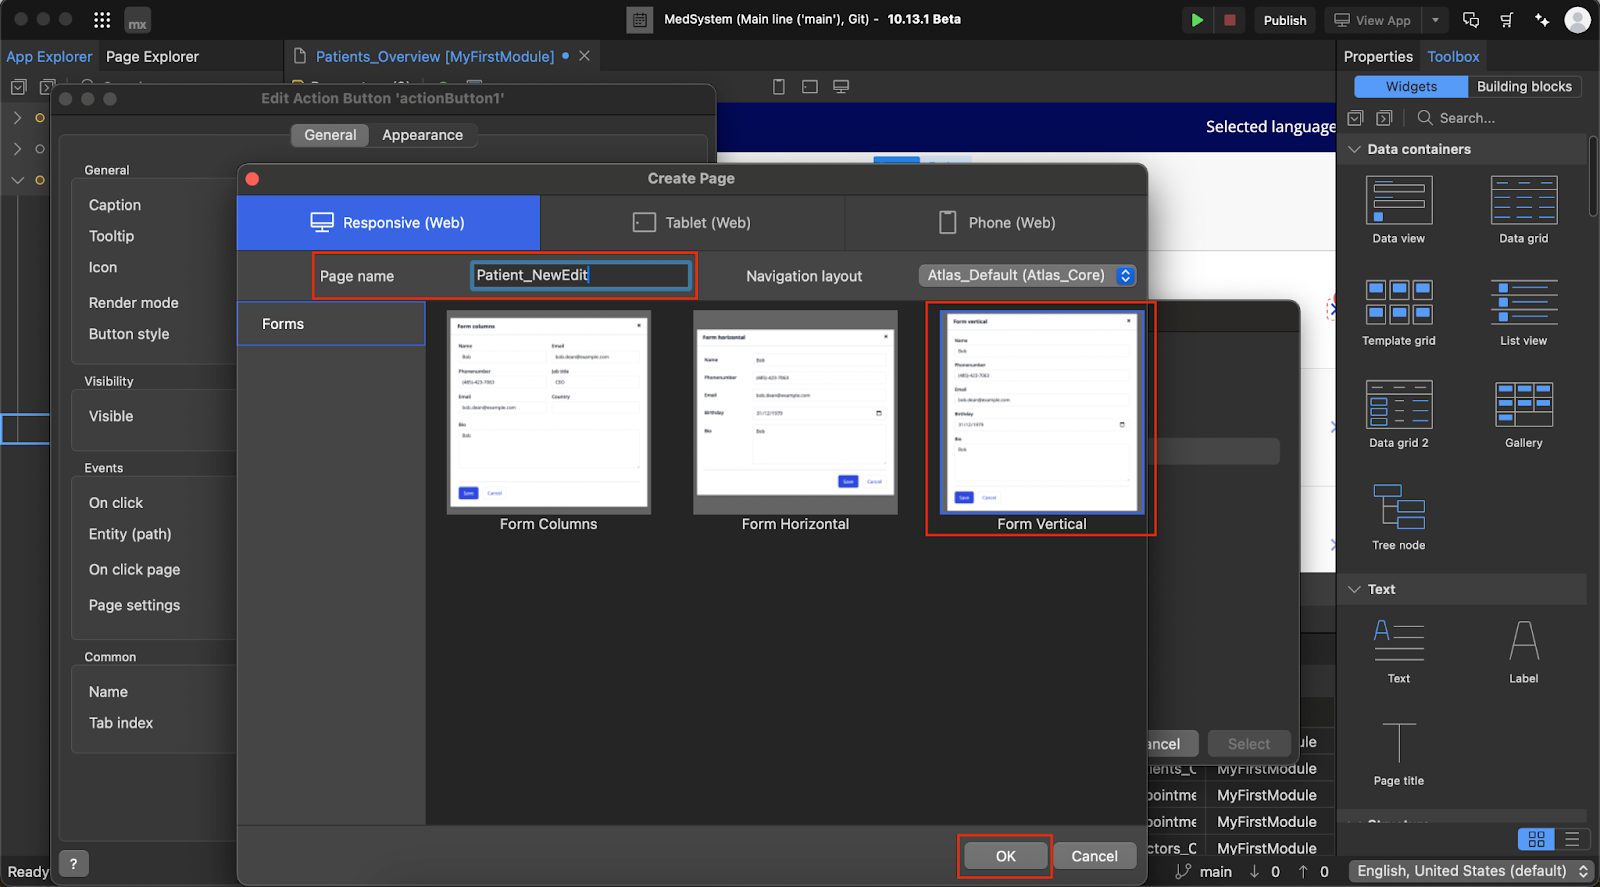
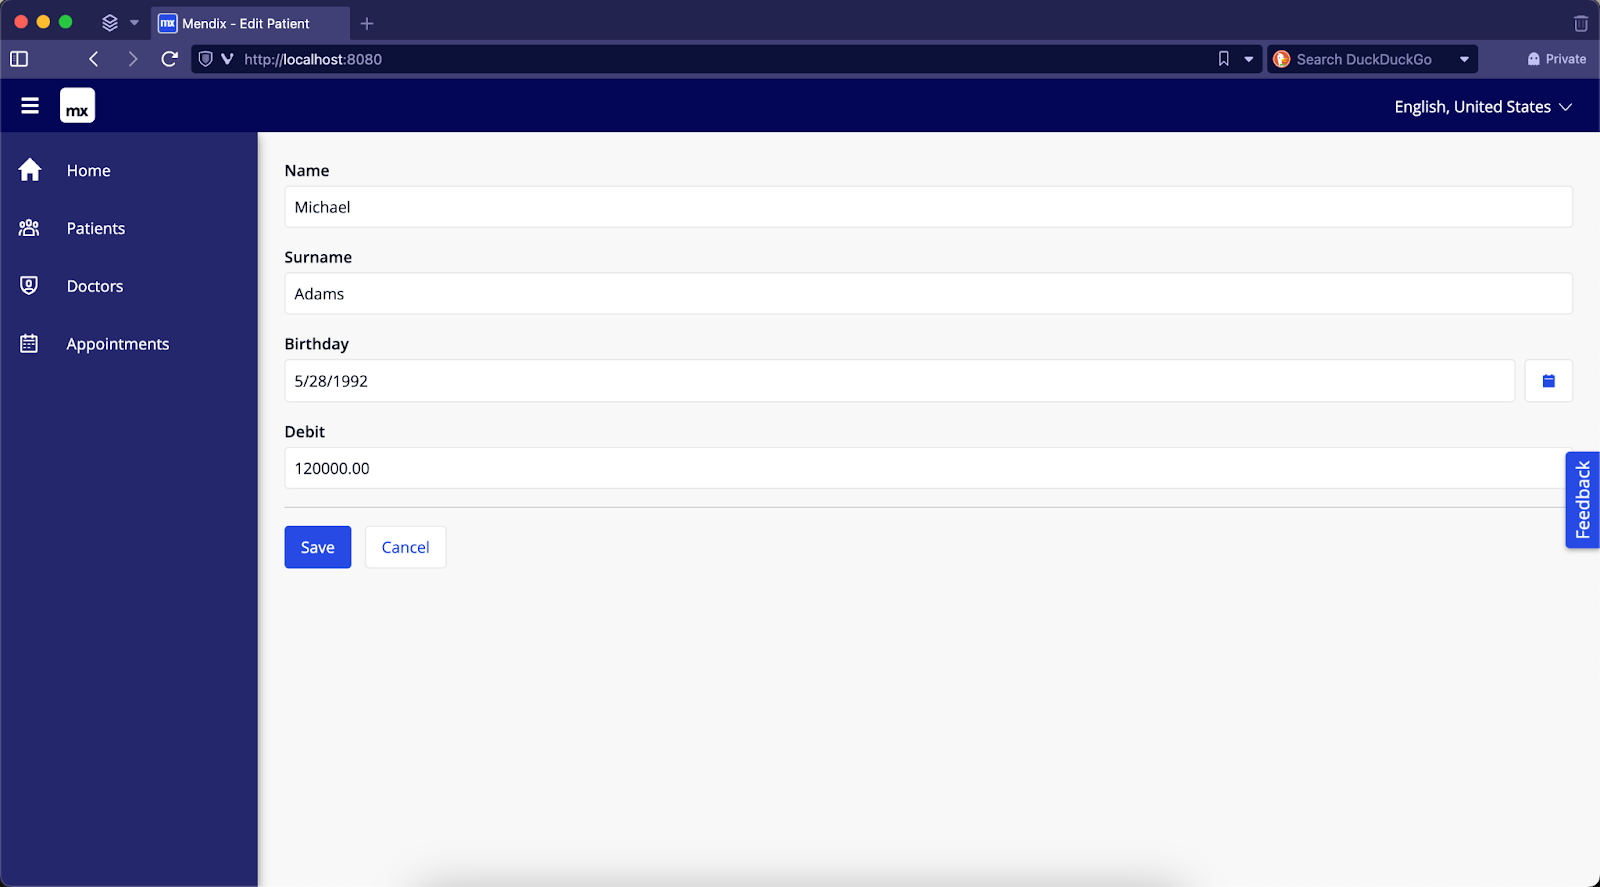
If you did everything correctly, you should have a new page looking like this:
The page with a form (visible above) requires the user to fill in the information for each input. As you can see, creating the forms is truly a trivial matter, because Mendix practically does everything for you – in this case, you don’t even have to change a single thing for it to work perfectly fine. Now, repeat the abovementioned steps for the Doctor_Overview page and configure a new Doctor_NewEdit page.
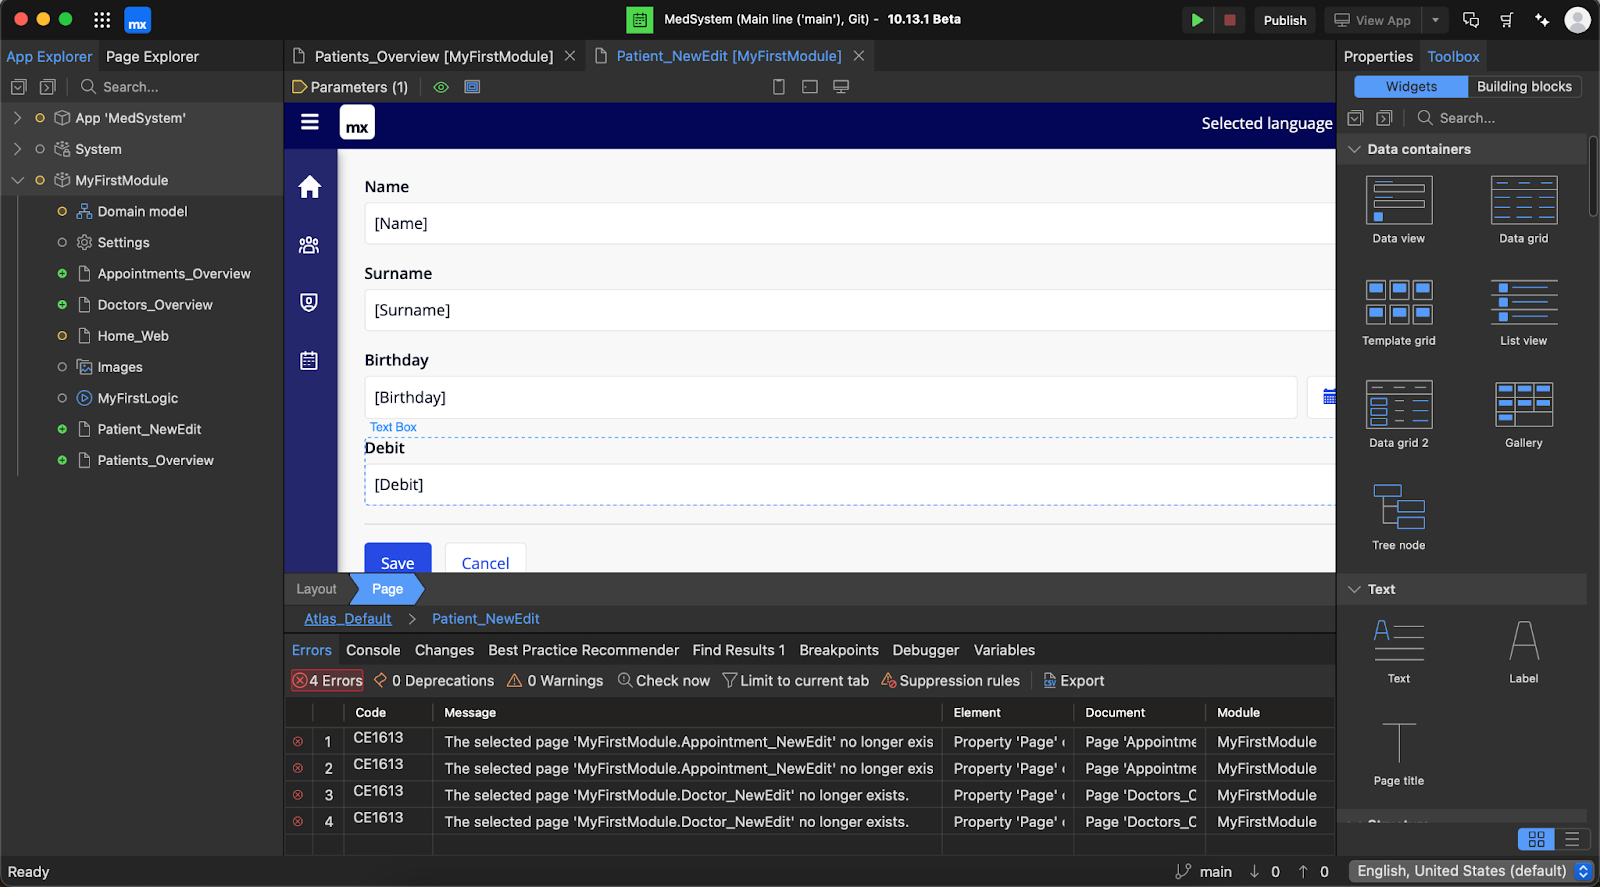
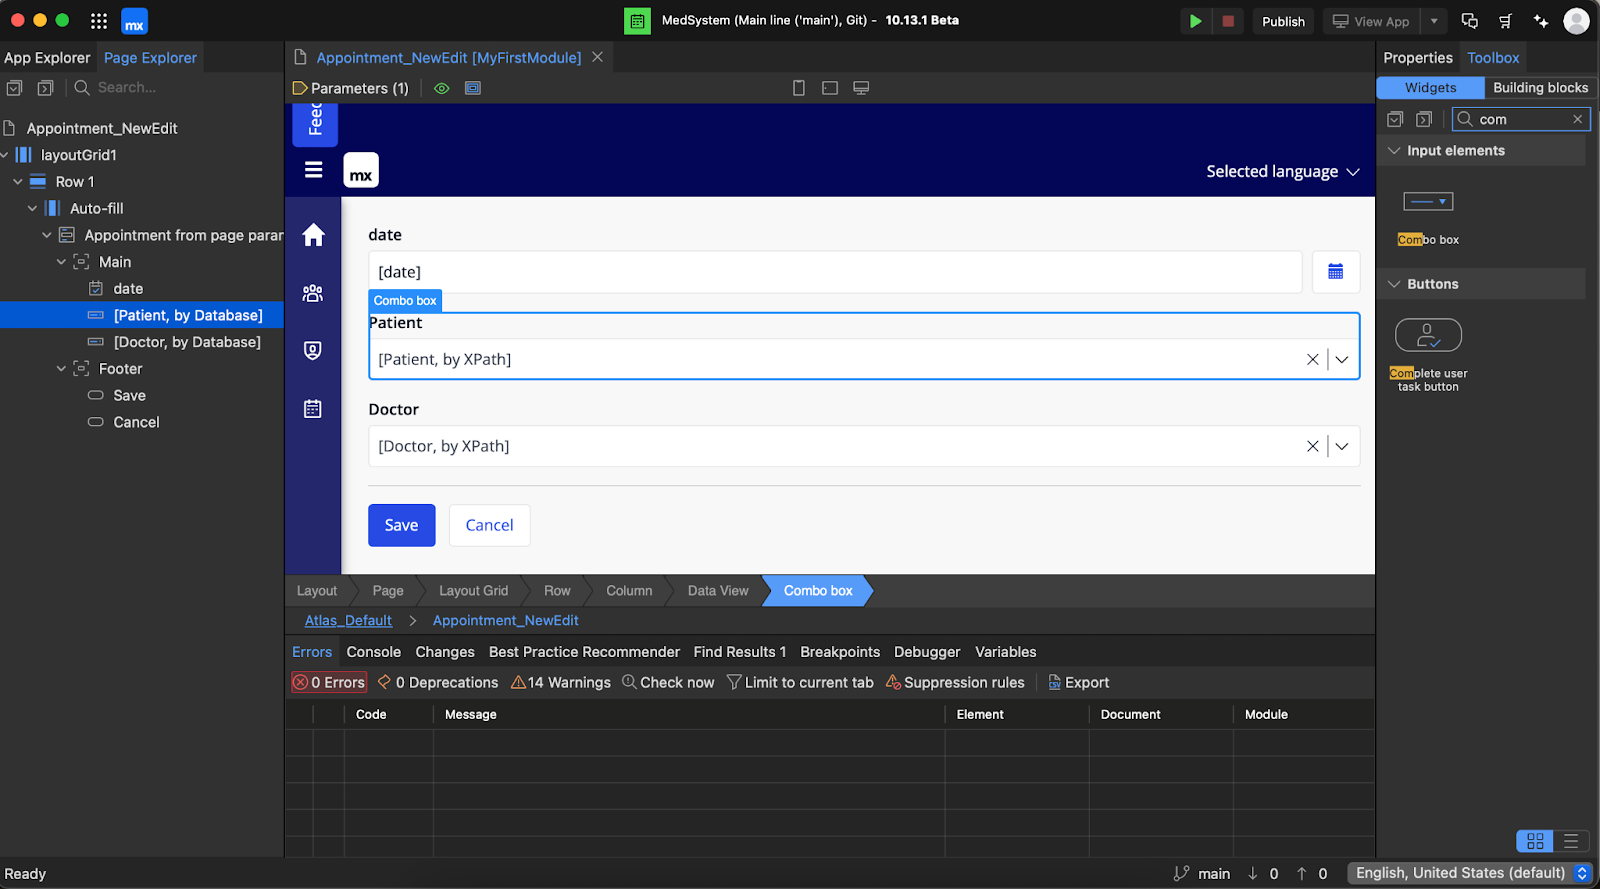
Of course, it won’t always be as simple as you see above. Sometimes, it can get more complicated – for example, in the case of the associative entities. In addition to the abovementioned steps for creating new objects with a form, you will also need to give the user the option to assign an association to a specific object. To do this, search for a widget called Combo box from the Toolbox, and then configure it to display information coming from the association. A scenario where you will have to use this is the Appointment_NewEdit page where you have to choose both Patient and Doctor via the association. Luckily this part was already done for us by the Mendix Studio Pro.
Unfortunately, there’s a small problem with these preconfigured fields. When you open the properties of such a field and look at Caption, you can see that it’ll only display the value stored in the entity’s Name field. You can probably already guess what the problem with this approach is – it’s highly likely that you will eventually have multiple people with the same name. Luckily, there are multiple ways in which you can solve this problem. This is a great opportunity to introduce you to XPath. While we won’t delve deep into this topic, we will show you how to use it to easily solve problems like the one mentioned above.
XPath is one of the query languages designed to retrieve data which can be used both in Mendix Studio Pro and directly in the code of the Java files (just to remind you: Mendix is based on the Java programming language). XPath allows you to select data of Mendix objects, their attributes, and associations through the use of path expressions. An example of the XPath use is a situation where you want to specify a constraint on data used by a widget or when you want to limit the data retrieved in a Retrieve microflow activity (don’t worry: we’ll talk more about microflows in a minute).
In your case, you want to use XPath to concatenate (join together) two string values – Name and Surname – from Patient and Doctor entities. You can do this easily by changing Caption type to Expression and then writing the following expression:
$Appointment/MyFirstModule.Appointment_Patient/MyFirstModule.Patient/Name + ' ' + $Appointment/MyFirstModule.Appointment_Patient/MyFirstModule.Patient/Surname
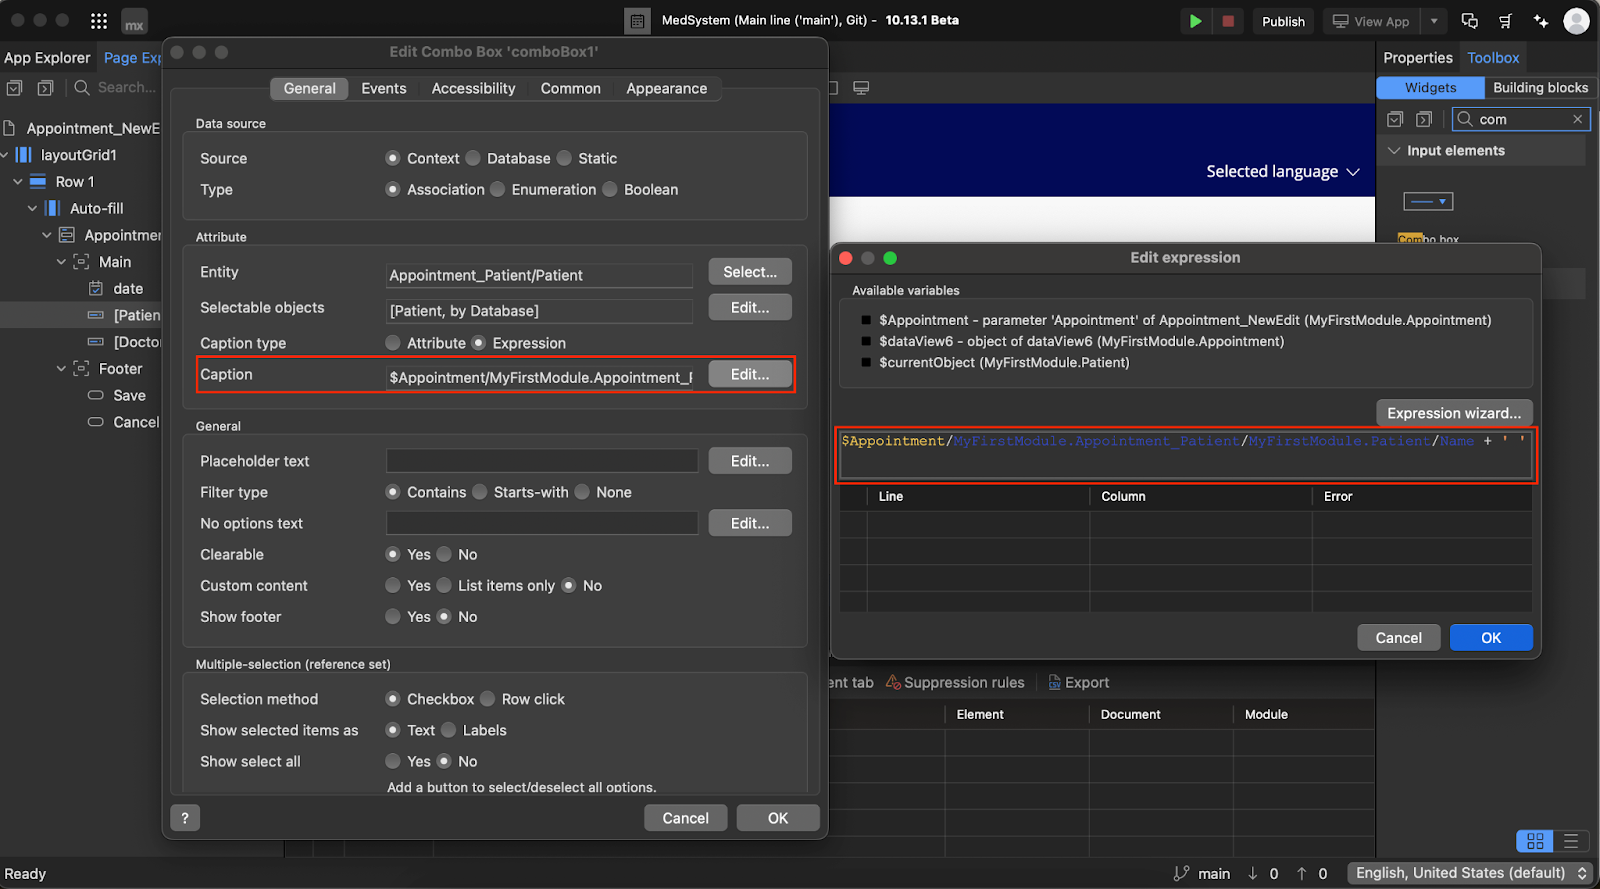
This way, when you launch the app, instead of seeing only the person’s first name, you’ll see their full name.
Now that you know how to display and create data, you can go ahead and run your brand new application. Simply press the green arrow in the top right corner, as shown below:
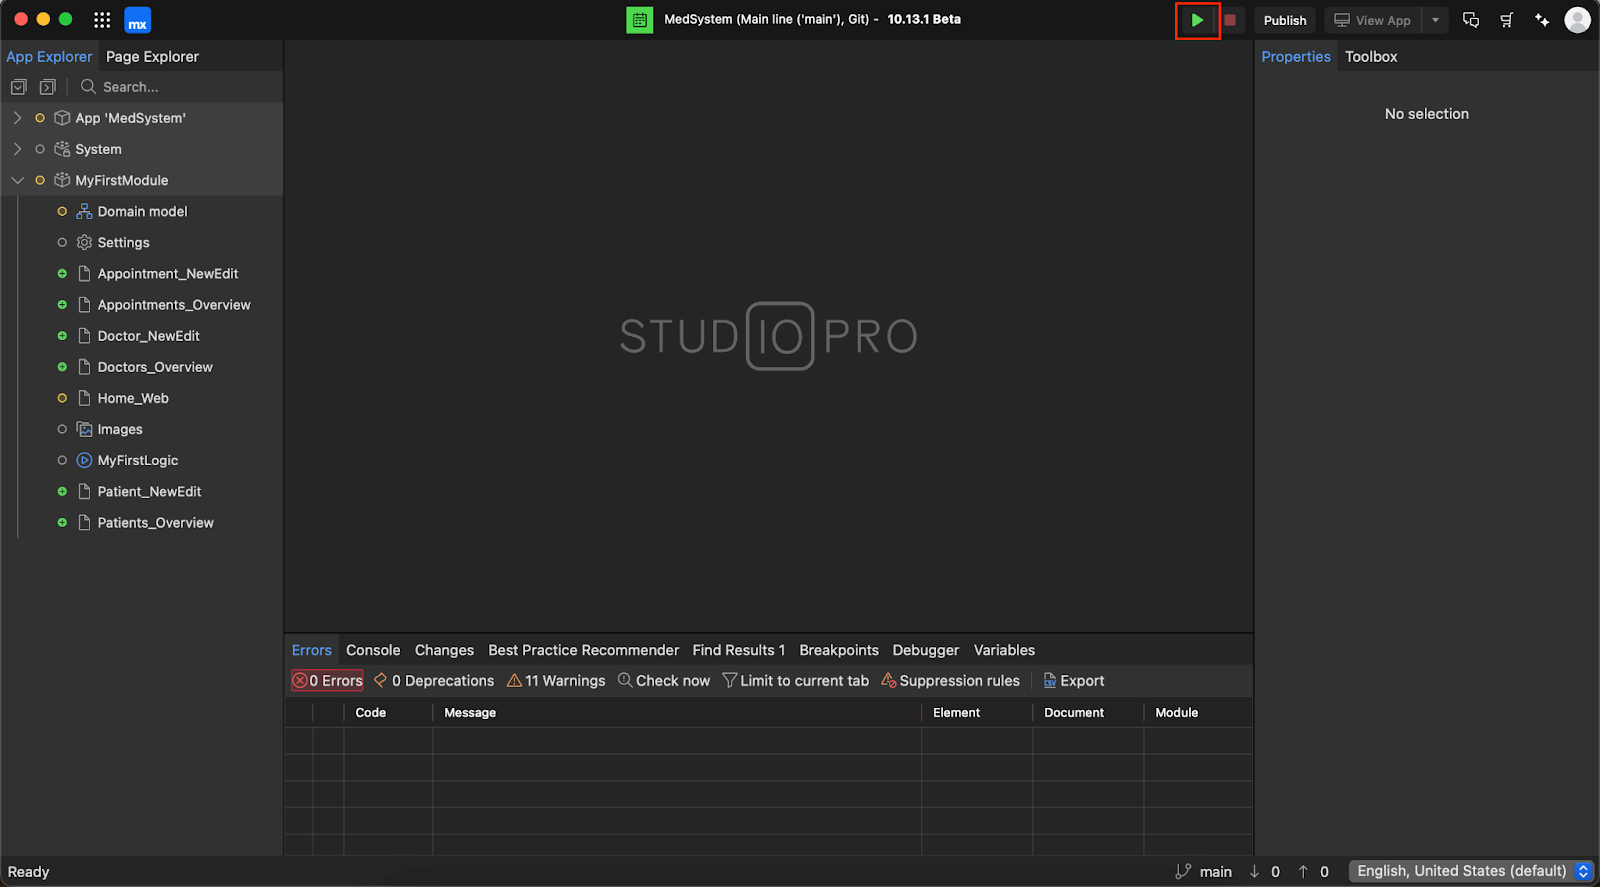
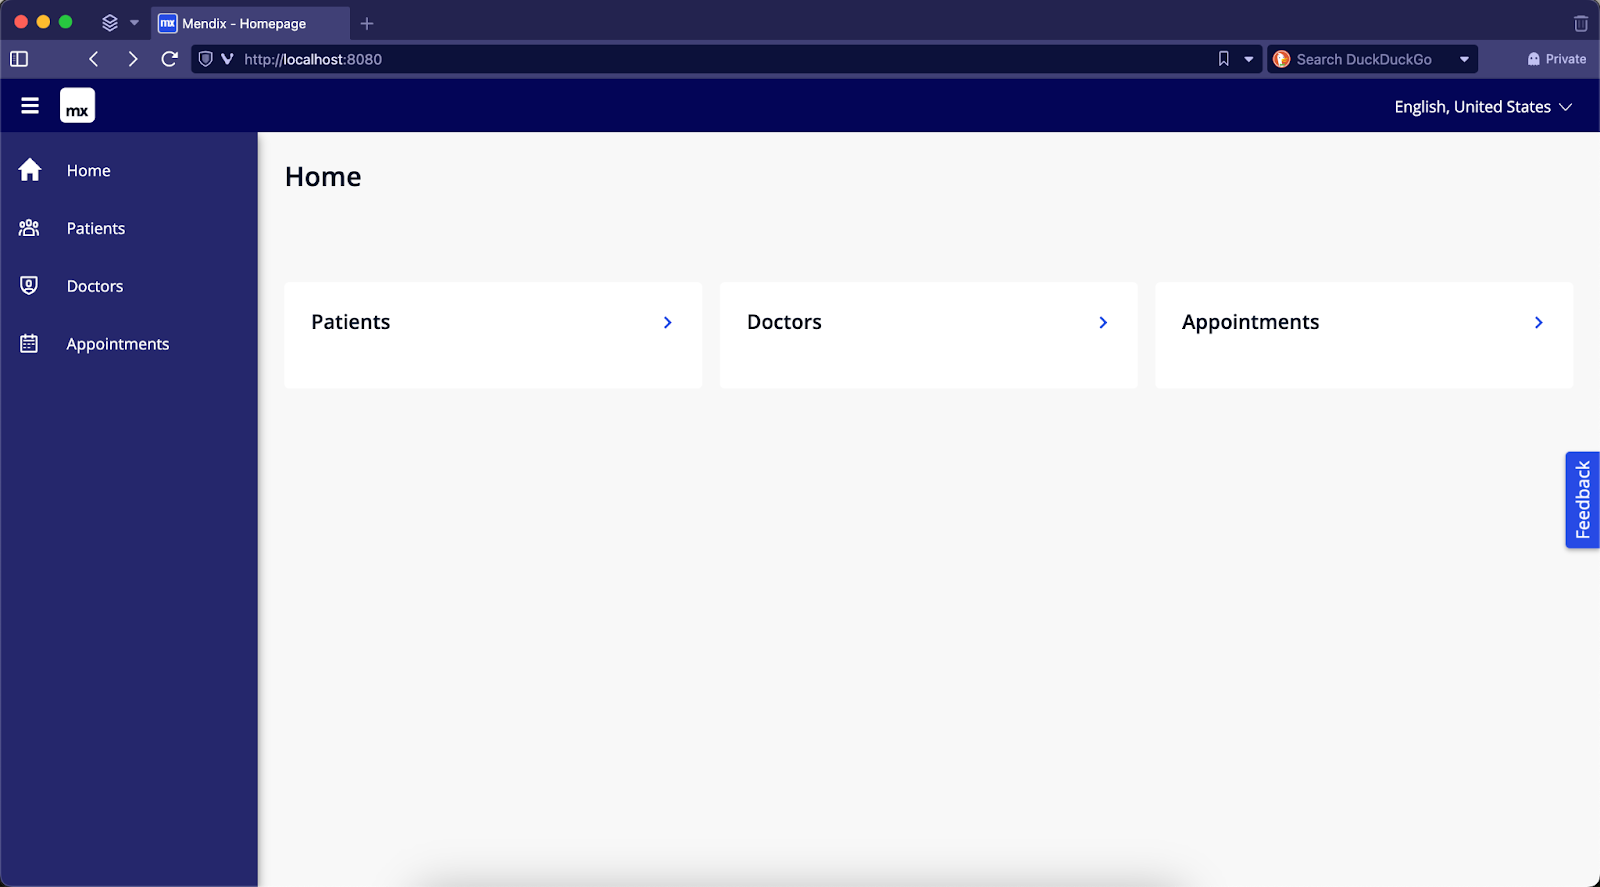
After a short while, you will be prompted with a message that your app is running. This means you can open http://localhost:8080 where it’ll be presented to you. If you have followed this tutorial to the letter, it should look similar to the image below:
Now, try to open one of the available pages, starting with the Patients page. Click the button either on the Patients or in the navigation menu in the left sidebar. You should be redirected to a new page with a list of Patients.
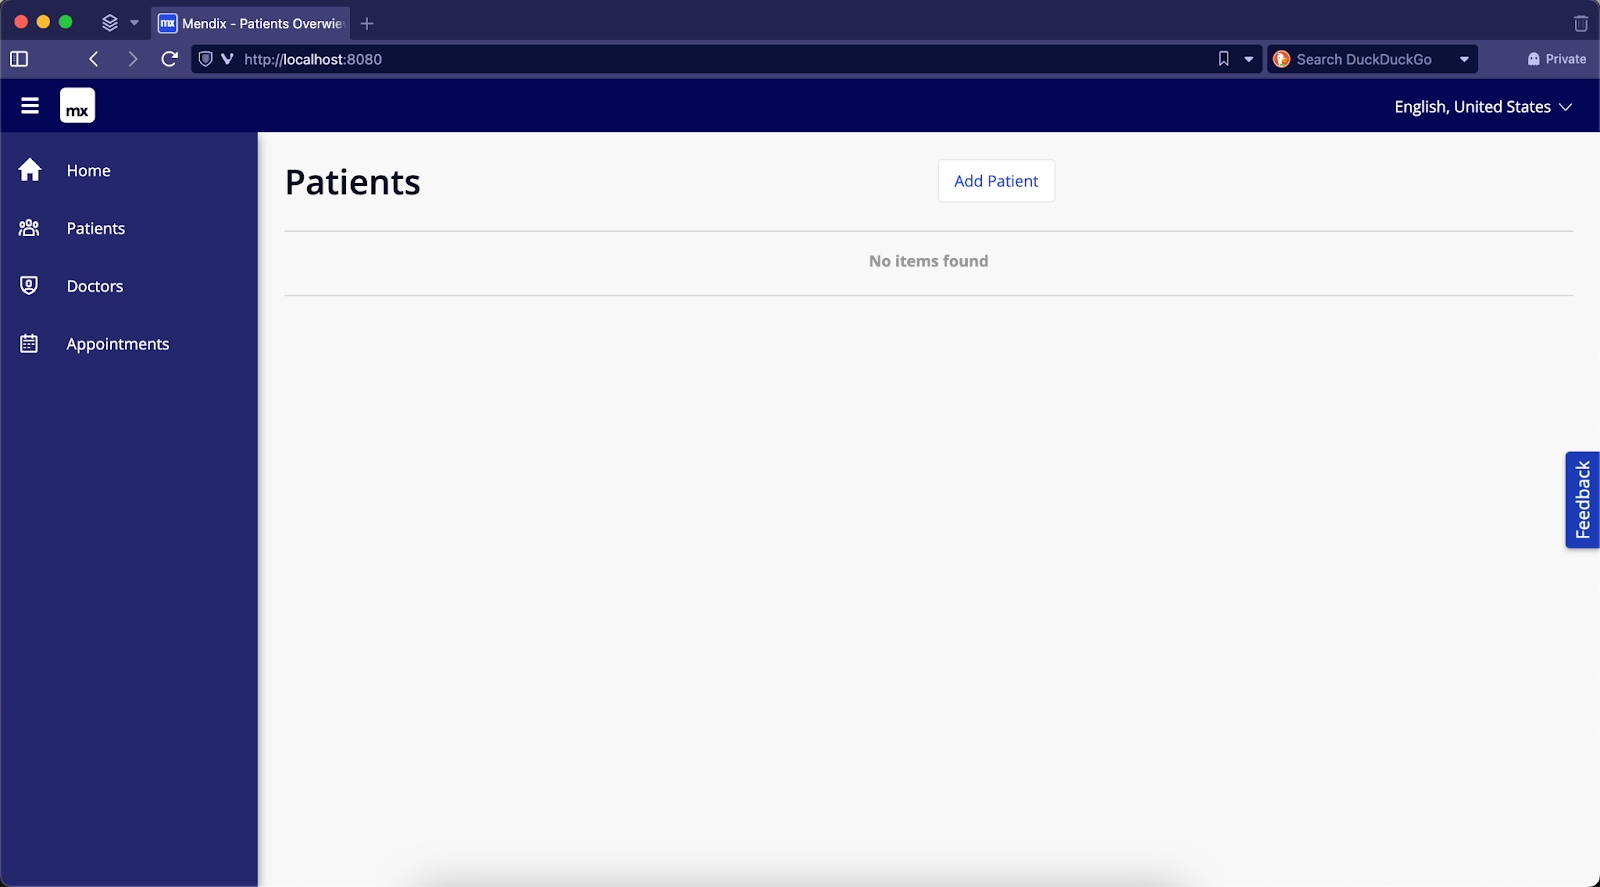
As you can see, this isn’t quite the case, because the list is empty. Let’s add some patients. Press the Add Patient button to display a form. Fill it out to create a new patient, as shown in the example below:
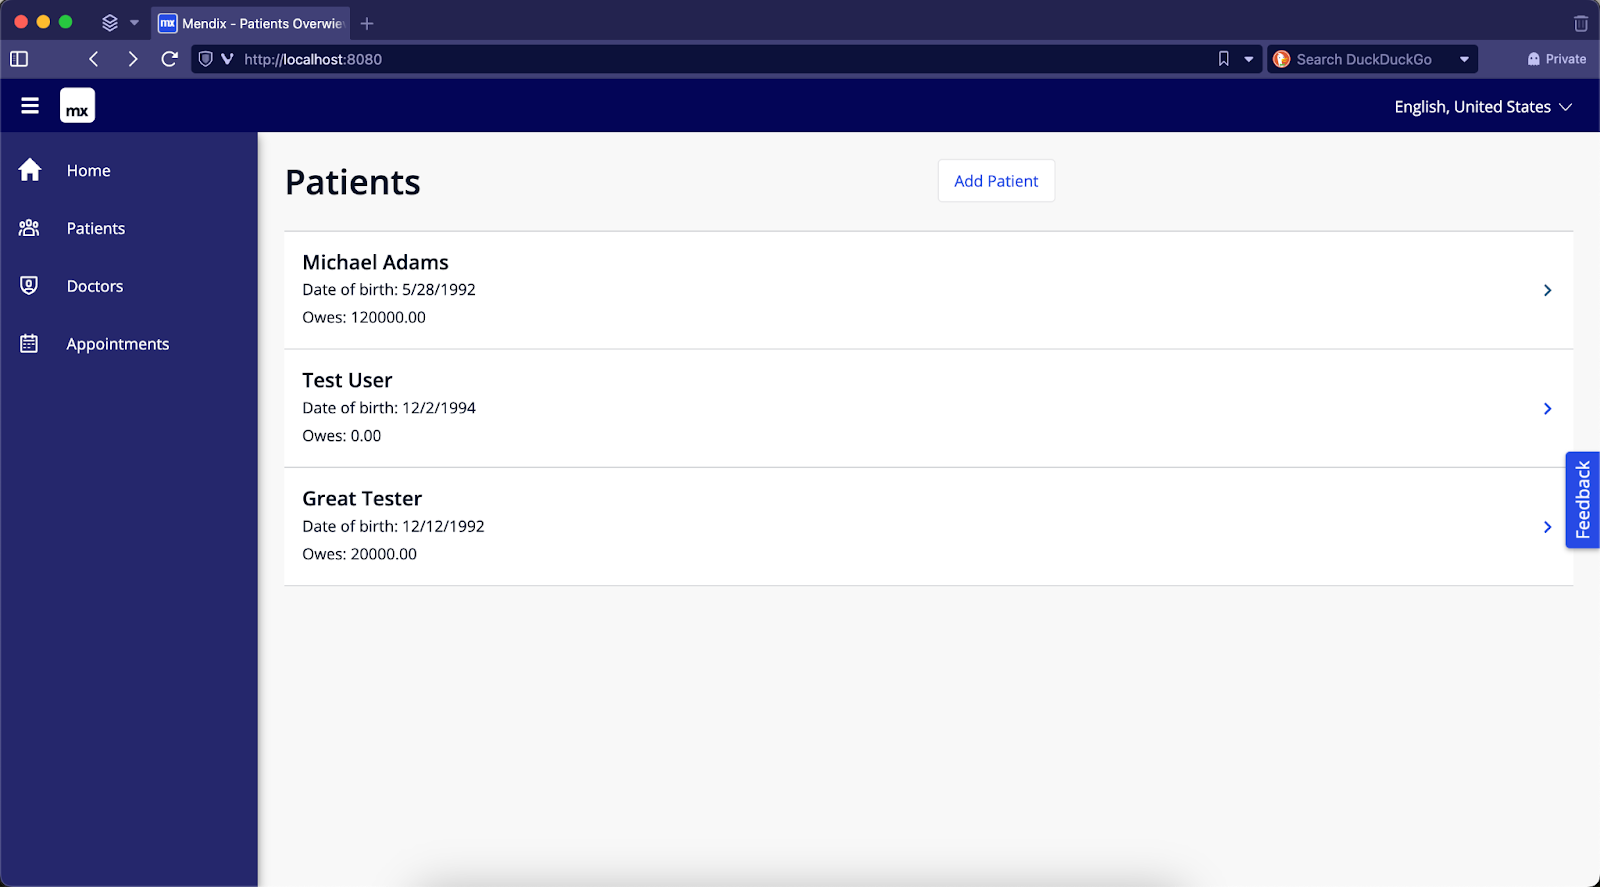
Go ahead and add more patients until you have a list similar to the one below.
While this is great, the app lacks a few key functionalities users probably expect – the Delete and Edit options. You may also want to make the Add Patient button look a bit nicer. Fear not for Mendix also has this covered. We will start by learning how you can style elements of your website.
There are several ways you can go about when working with styling the elements of your application. For styling purposes, Mendix utilizes SASS (Syntactically Awesome Style Sheets), a preprocessor scripting language that is interpreted or compiled into CSS (Cascading Style Sheets). In fact, the Atlas UI design system, which is a default UI framework offered by Mendix, utilizes SASS for styling all of the web components you can use in your application. If you open the Styling directory inside of your app module, you will see that under the web folder, there are several files written in SASS (you know that because of the extension they have – .scss – which is default for SASS).
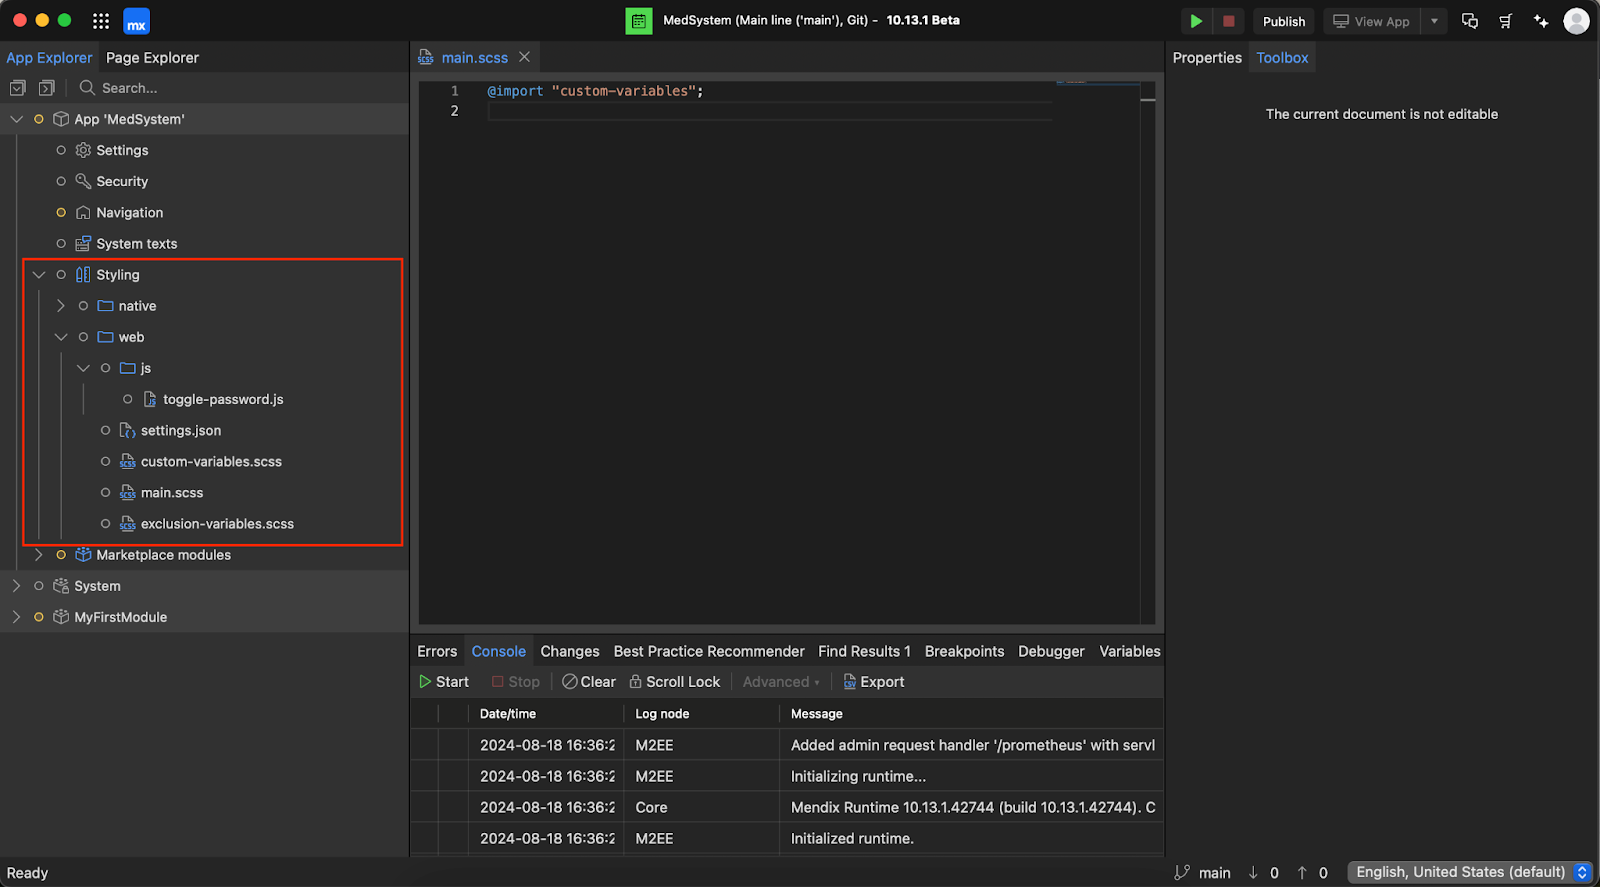
Explore these files to learn what classes are defined by default for you to utilize in your application. You can also create custom classes or modify existing ones, but it’s advised to keep your changes in a different file, which you then import inside main.scss. Otherwise, your changes might get overwritten when an updated version of the platform arrives. However, there are also other, easier ways of modifying your app’s look:
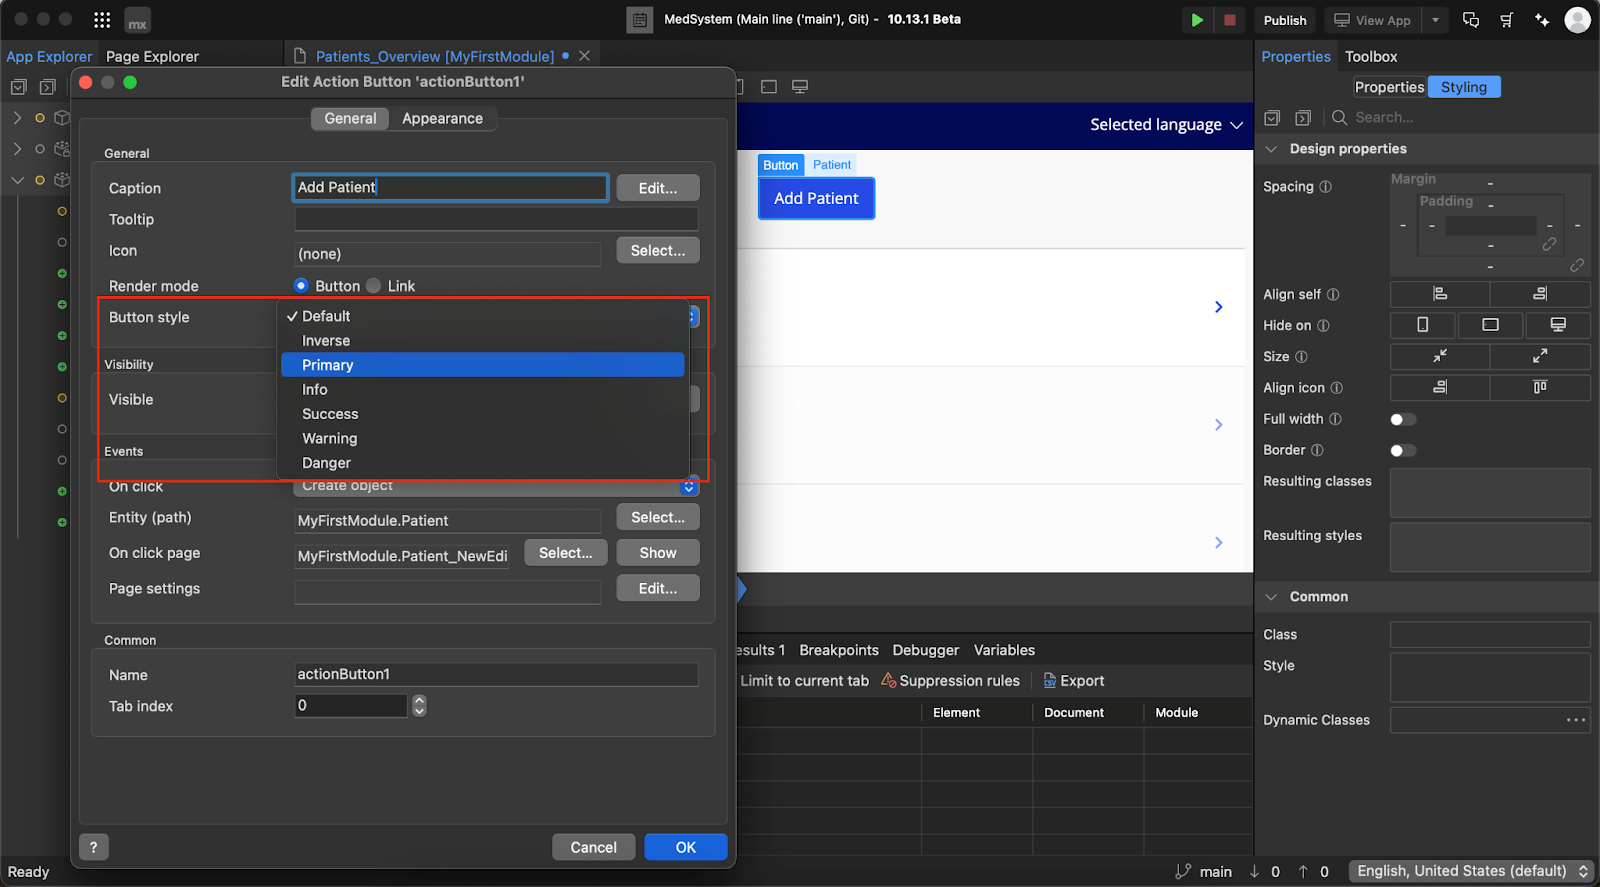
You will now change the styles for the button element responsible for adding new patients on the Patients_Overview page. Before, you have used the default styling of this button (just to see how to add a necessary functionality) but now you can focus on making it nicer for the end-user’s eyes.
Open the Patients_Overview page and the properties of the button. When you click on the Button style select (drop-down list) you will be presented with several options representing preconfigured classes that will be applied to the button if you choose them. We go with the Primary option for our button but feel free to experiment with different options and see which fits your application best.
Next, select the button and open Properties -> Styling in the right sidebar. This is where all of the information about styles applied to the selected element is shown. This is also a place where you can easily apply custom styling through Design Properties or Common options.
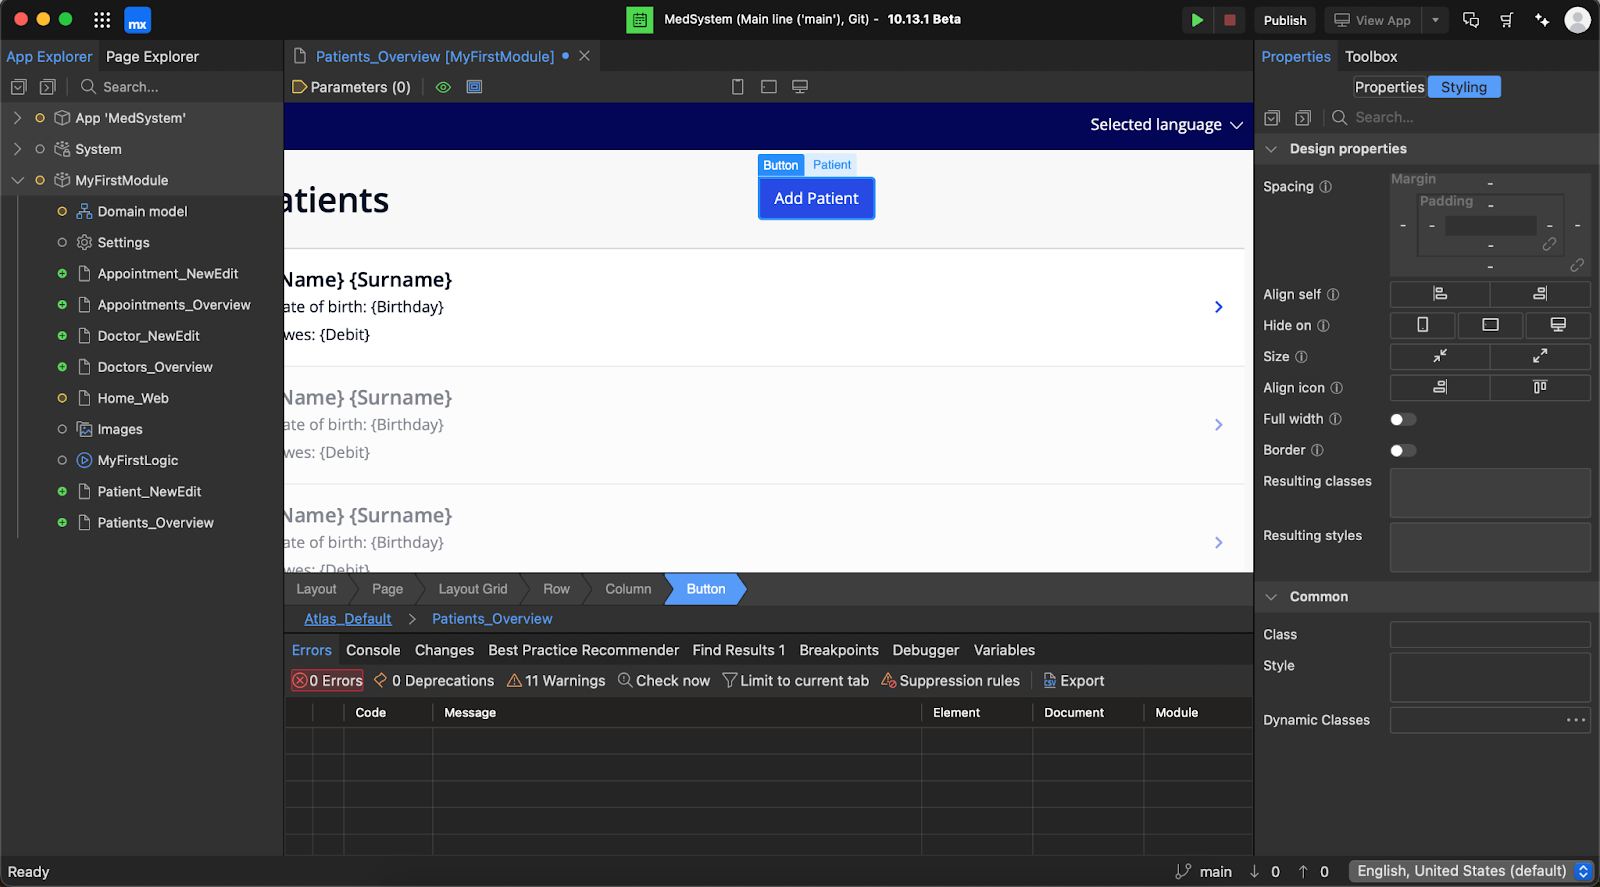
To make your button a bit nicer you should probably:
You can achieve all this with options available in the Styling tab alone (look at the image below for specifics). You will notice that when adding Align self and Size, new classes will appear in the Resulting classes field. These are predefined classes which you can find in the SASS files of your module.
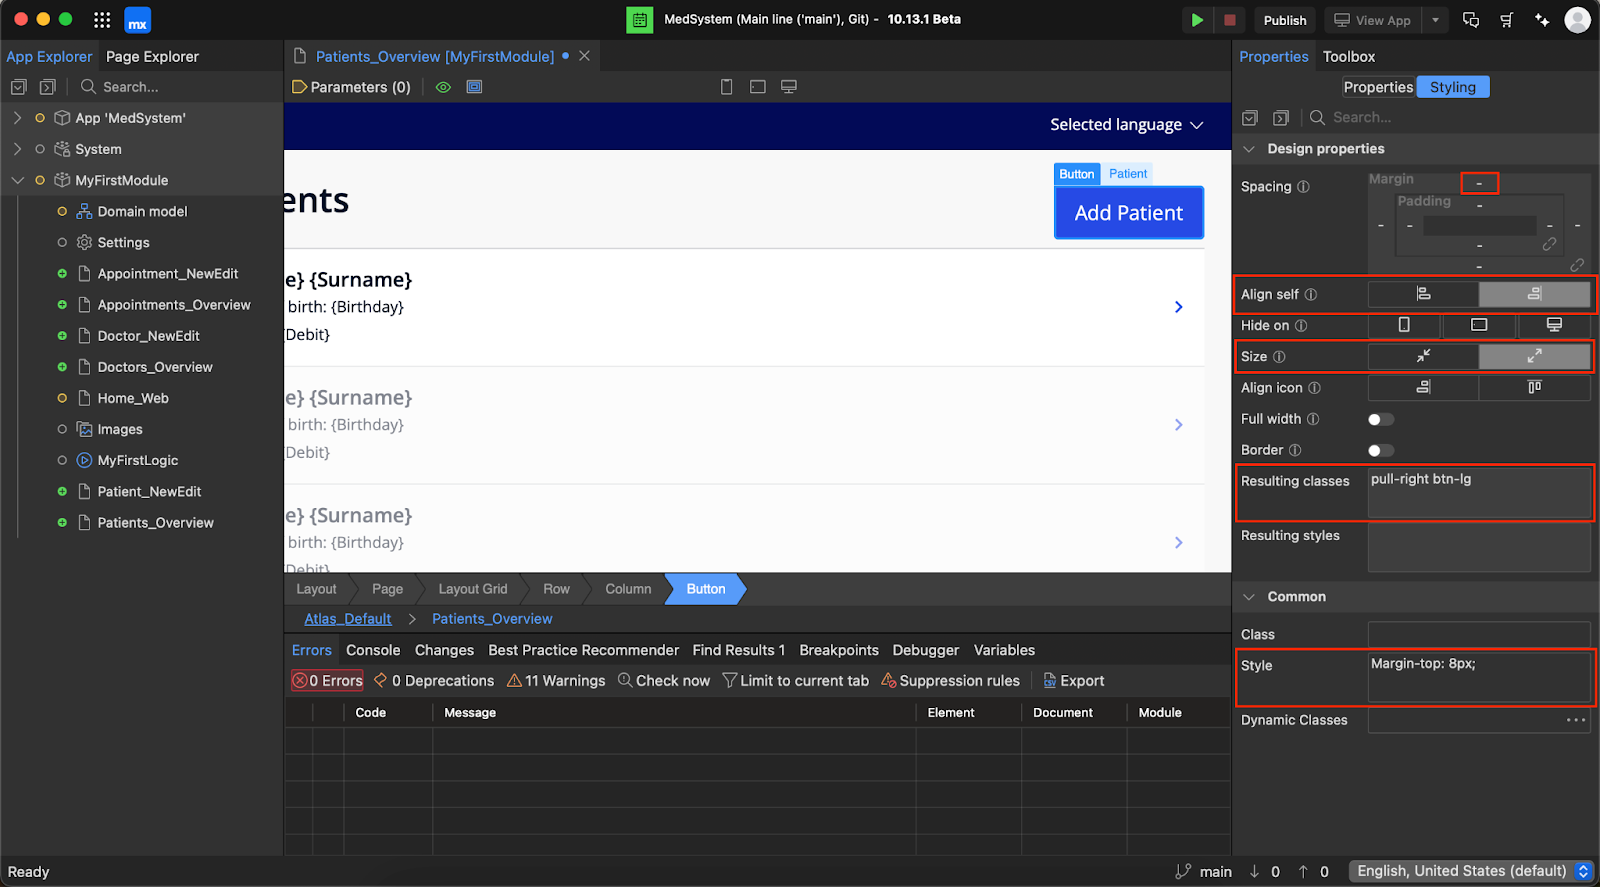
Thanks to the added styles, your button is now correctly positioned and a bit more pleasing to the eye. Note that you’ve added a custom style of margin-top: 8px; but you could achieve the same result using the Spacing option available in the Design properties. If you want to try it, simply click on the top margin and choose S (small margin).
Now you can move on to adding the edit functionality to the List View which displays all of the registered patients. Thanks to the options provided in Mendix Studio Pro, this is a very simple matter. First, select the desired button and open its properties.
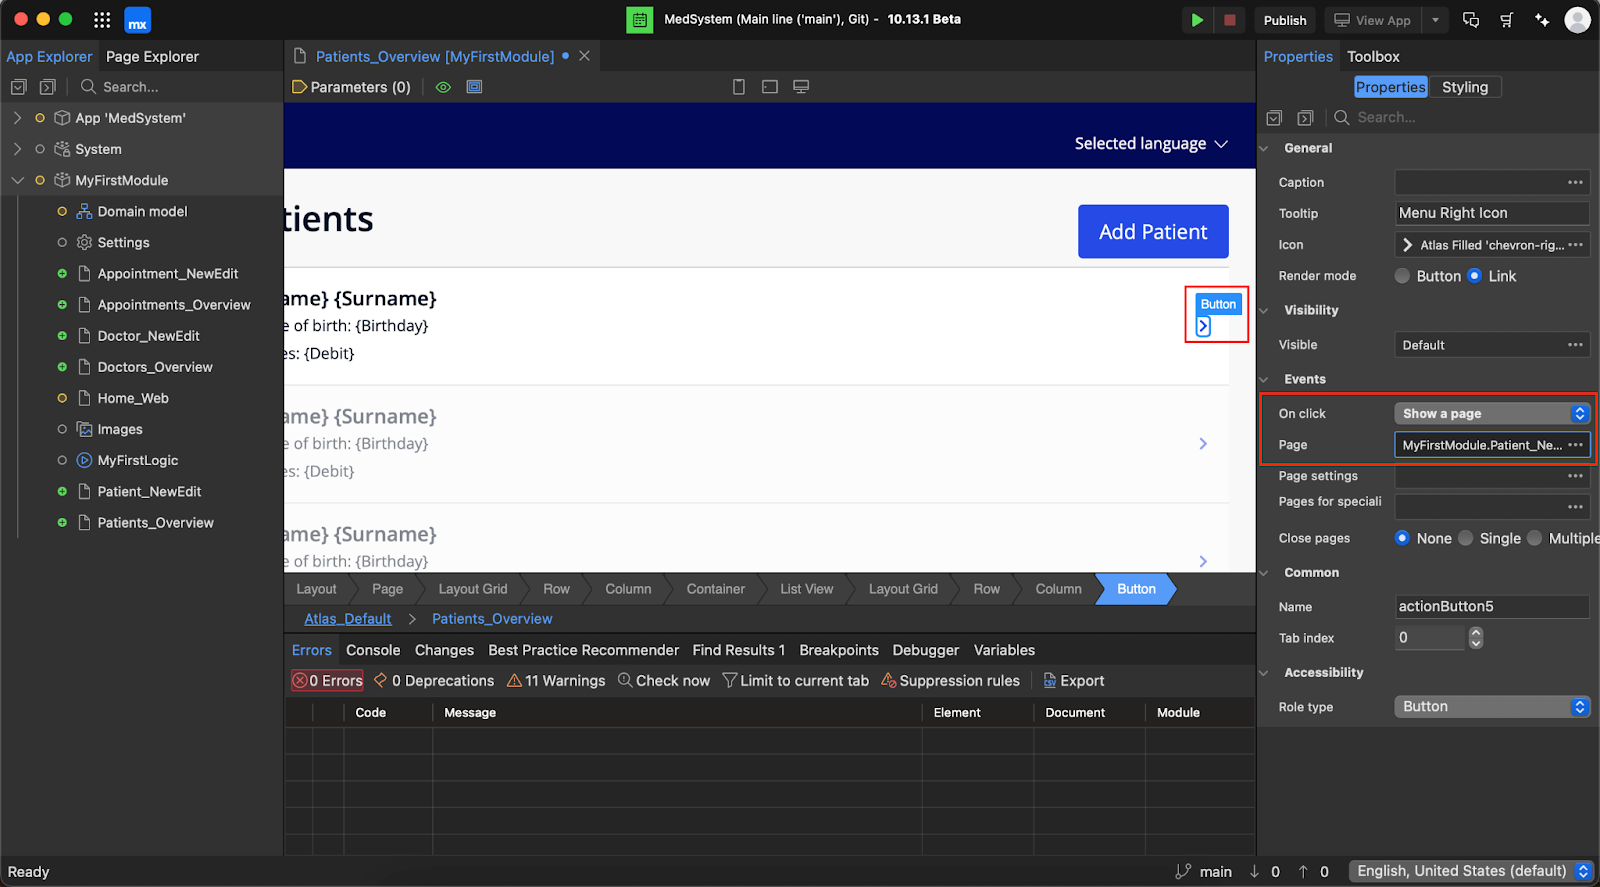
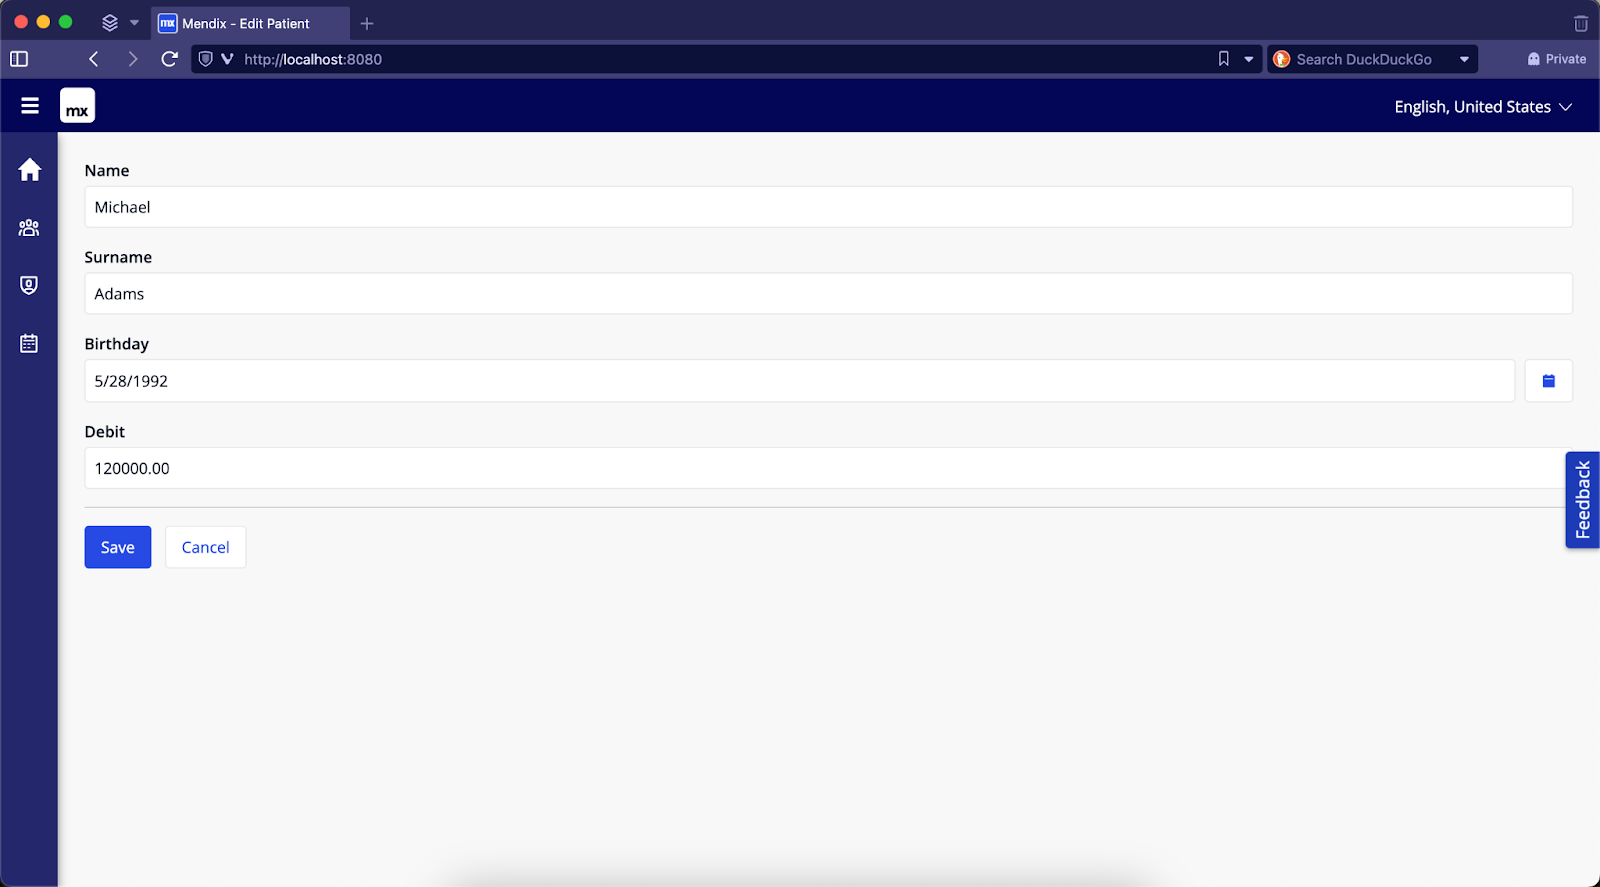
Now, change the On click action to Show a page and select Patient_NewEdit. This will result in a redirect to the edit page when the user clicks this button. The best part is that Mendix handles the transferring of necessary parameters by itself, so you don’t have to think about how to pass the related Patient to the edit page. When you rerun your application and use the new button, you will see an edit page with all data about the Patient filled correctly.
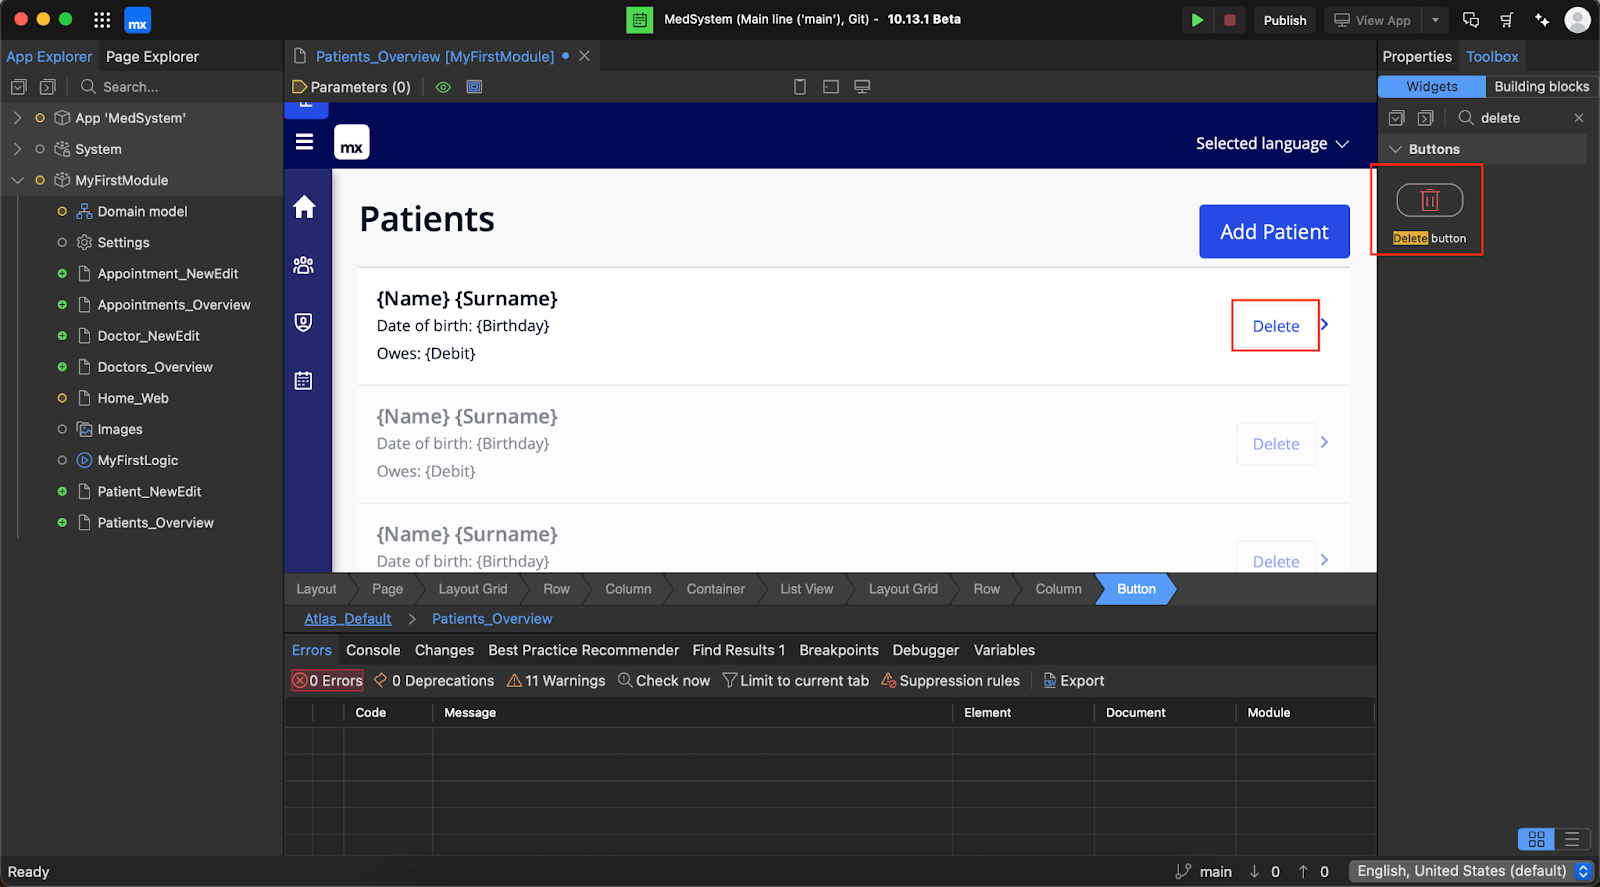
It’s also possible to allow the deletion of a specific object. You can add a Delete Object button and set it up inside of the List View, so that it’s visible next to each object. Mendix provides a simple solution for this with the Delete button widget. When you add it to the row of your List View, it’ll work automatically and won’t require any configuration.
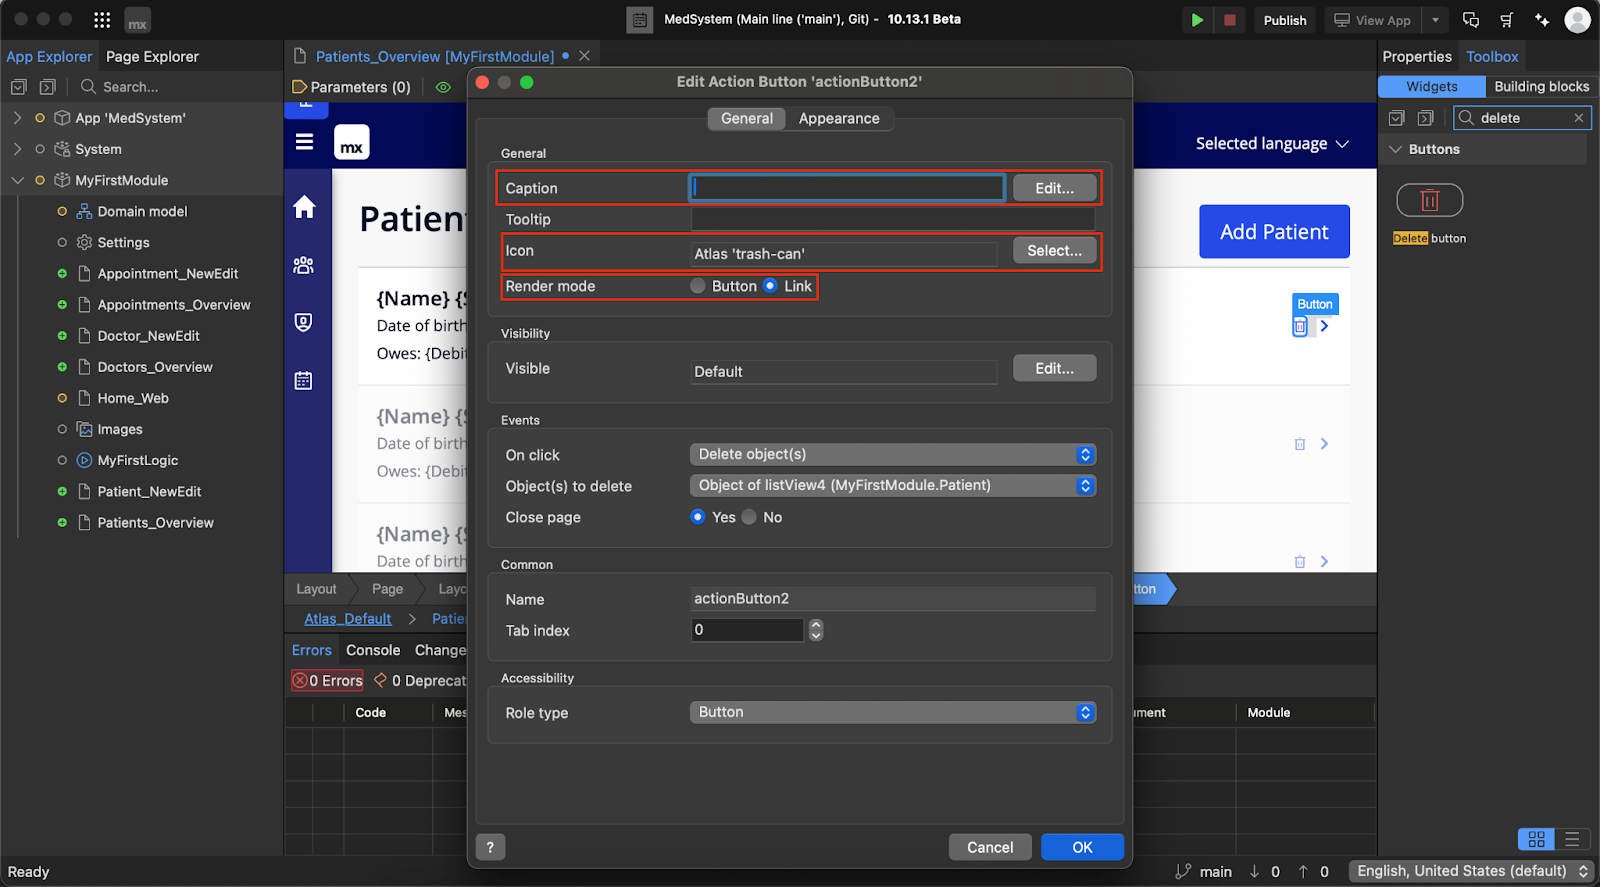
You can also make it look a bit nicer by changing the configuration below:
However, one should bear in mind that giving users the option to delete objects isn’t a good practice – at least not without considering proper settings. For example, you shouldn’t allow removing a patient or a doctor who already has an assigned appointment. You can use processes to prevent the deletion of objects to which something is assigned – but that’s a topic for another time.
There’s one more topic to cover, and it’s a really important one – Microflows. This is a Mendix functionality you can use to set up the logic of your application (often a non-standard one). Microflows can be compared to small scripts that can be used, for example, to calculate parameters, validate data, or create custom objects.
We will concentrate on the last scenario (creating custom objects). You will add a new functionality to the app, one that will allow the user to create an Appointment object from the position of a specific patient. This way an Appointment object can have pre-filled information about the patient who will be attending it.
To do this, look for the Call Microflow widget in the Toolbox and use the mouse to drag it inside the List View, so that it is at the bottom of the row. This widget will create a button that will trigger a microflow when clicked.

After placing the button, you can edit its inscription (for example “Make an Appointment”), and then you’ll need to create the ACT_Patient_MakeAnAppointment microflow itself.

It’s worth noting that in the above screenshot, the Patient object is passed (transfered from one place in the app to another), which allows you to use this object within the Microflow. You can also make it look better (using steps we’ve covered in the previous section). Change properties of this widget accordingly:
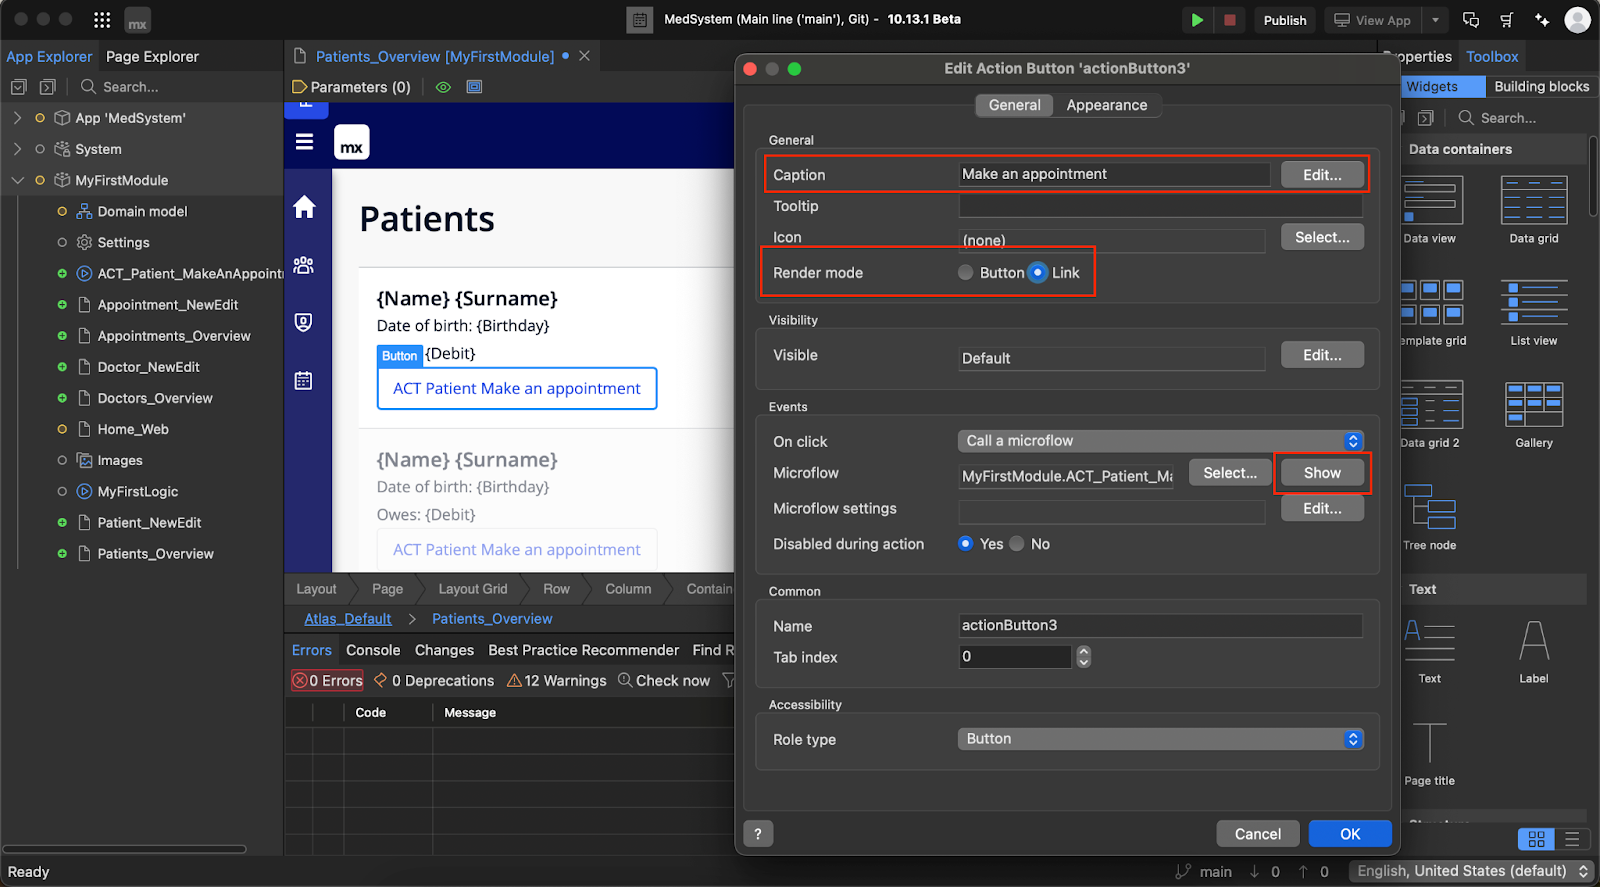
From this view, you can also click the Show Microflow button, you will then be redirected to the used Microflow tab.
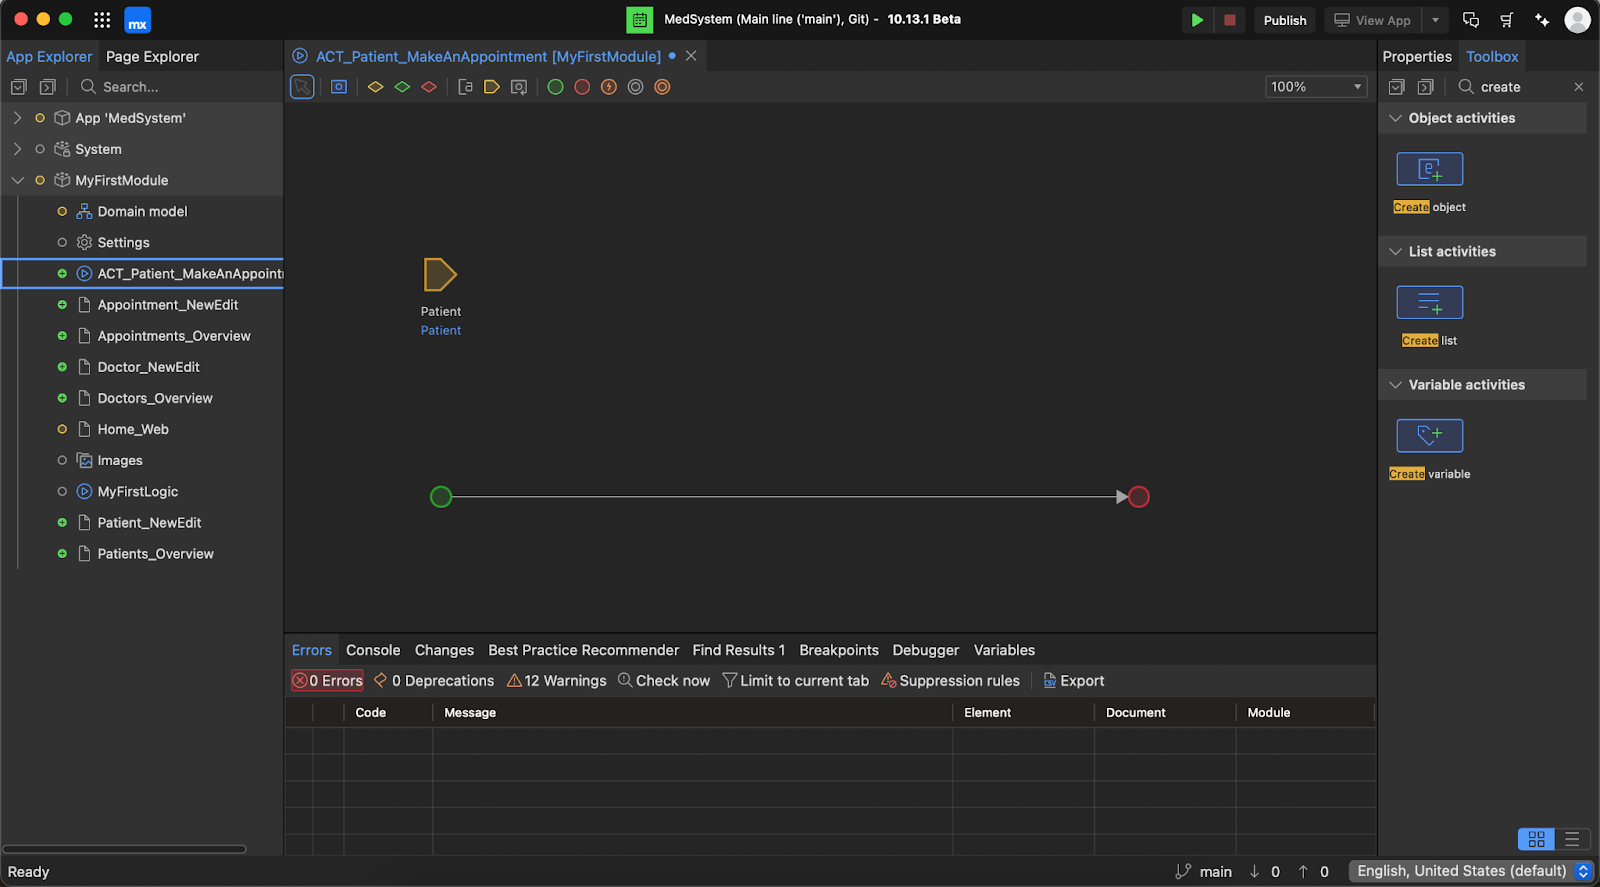
On the right side, you can see widgets available for you to drag into your process. Choose Create Object so that you can later create an Appointment (with patient data included) and then add Show Page to redirect users to the Appointment_NewEdit.

Now, you need to set an Entity that you want to create (in our case it’s Appointment). Since you want to pass an Appointment object to the edit page with pre-filled information about the patient, you need to add a bit of configuration. Open the properties of the Create object and configure it as shown below:
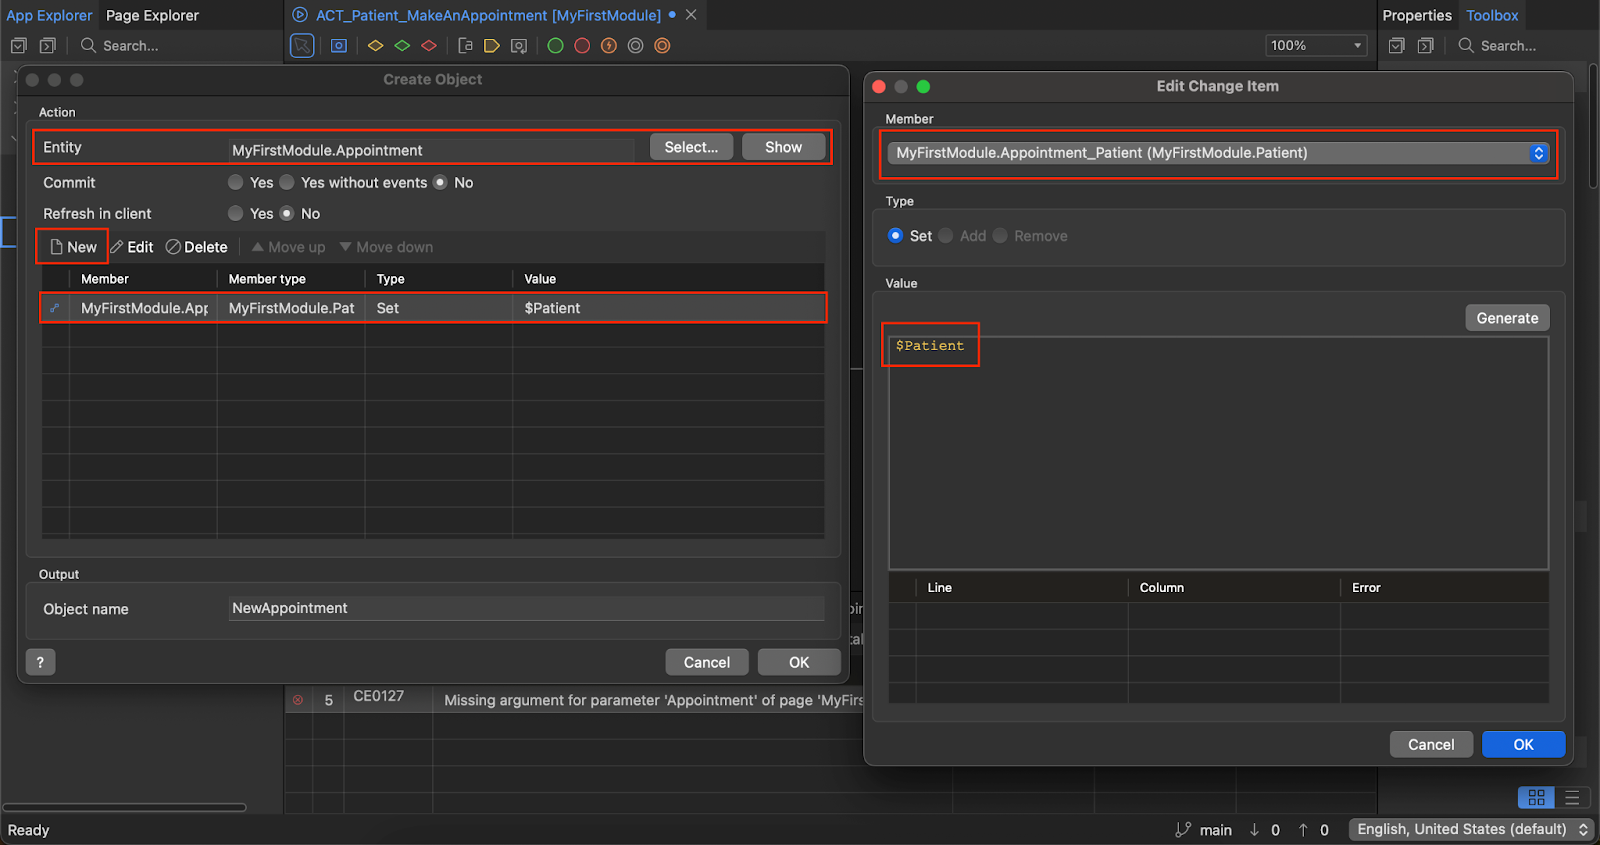
The configuration presented above ensures that you create an object of the Entity type called Appointment and also add a new Member (patient) to connect this data. With this out of the way, you can now pass your object to the Show page action. Also, if you look at your Microflow, you will realize that Mendix will also remind you about this requirement. This is very handy as you don’t need to check if you have configured all of the necessary elements for your application to work.

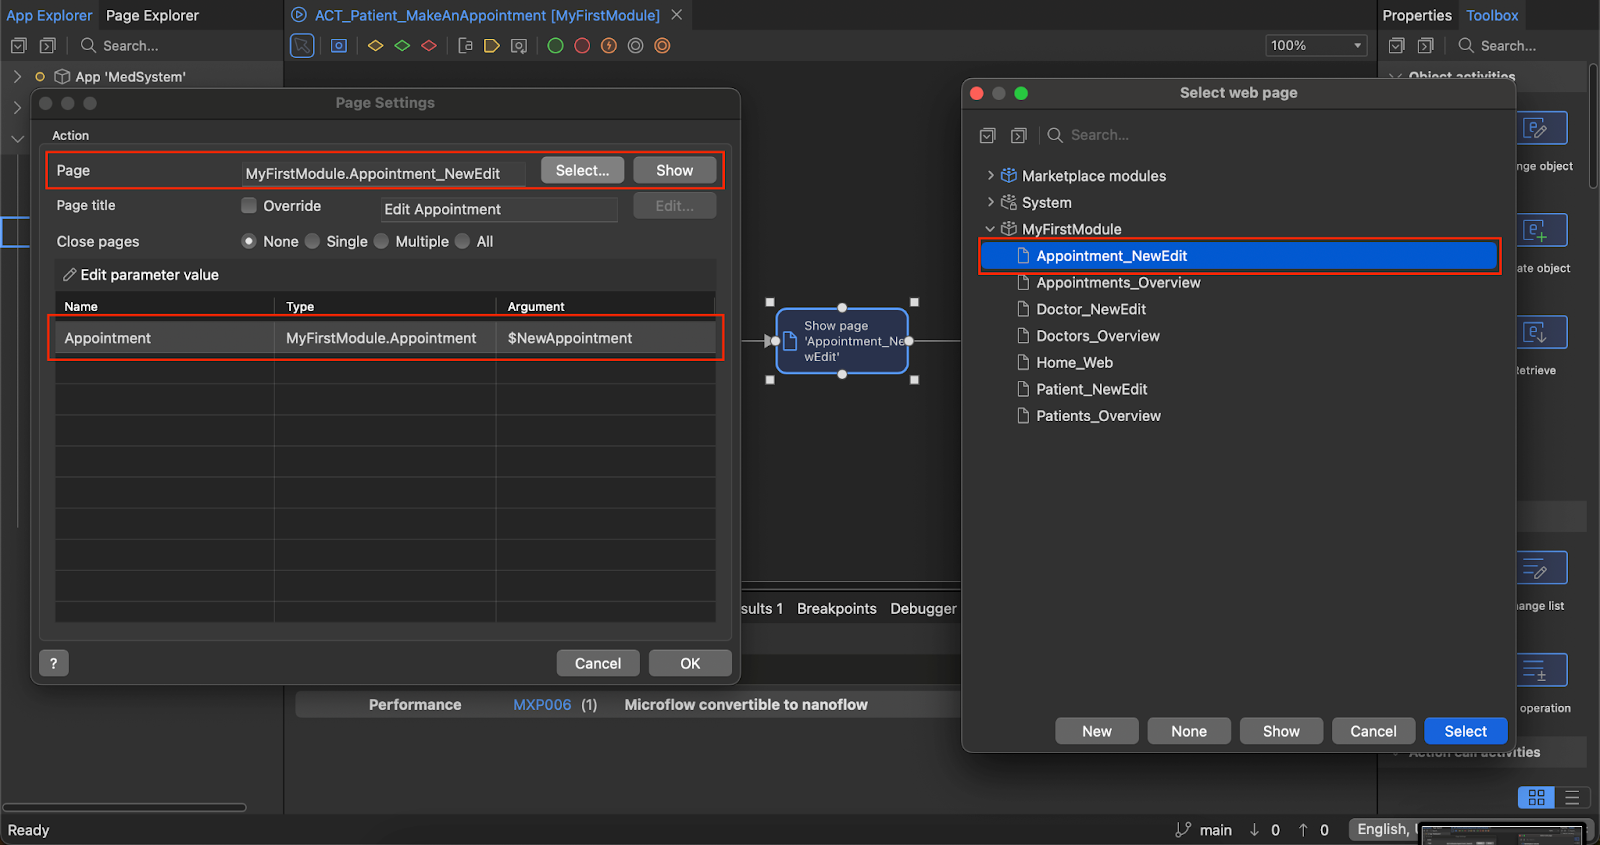
Open the properties of this action and configure it as shown in the image below:
Congratulations, you have successfully built your first Microflow! Now, let us see how well it works. Rebuild your application, head to the patient list page, and click on the Make an appointment link which you have created.
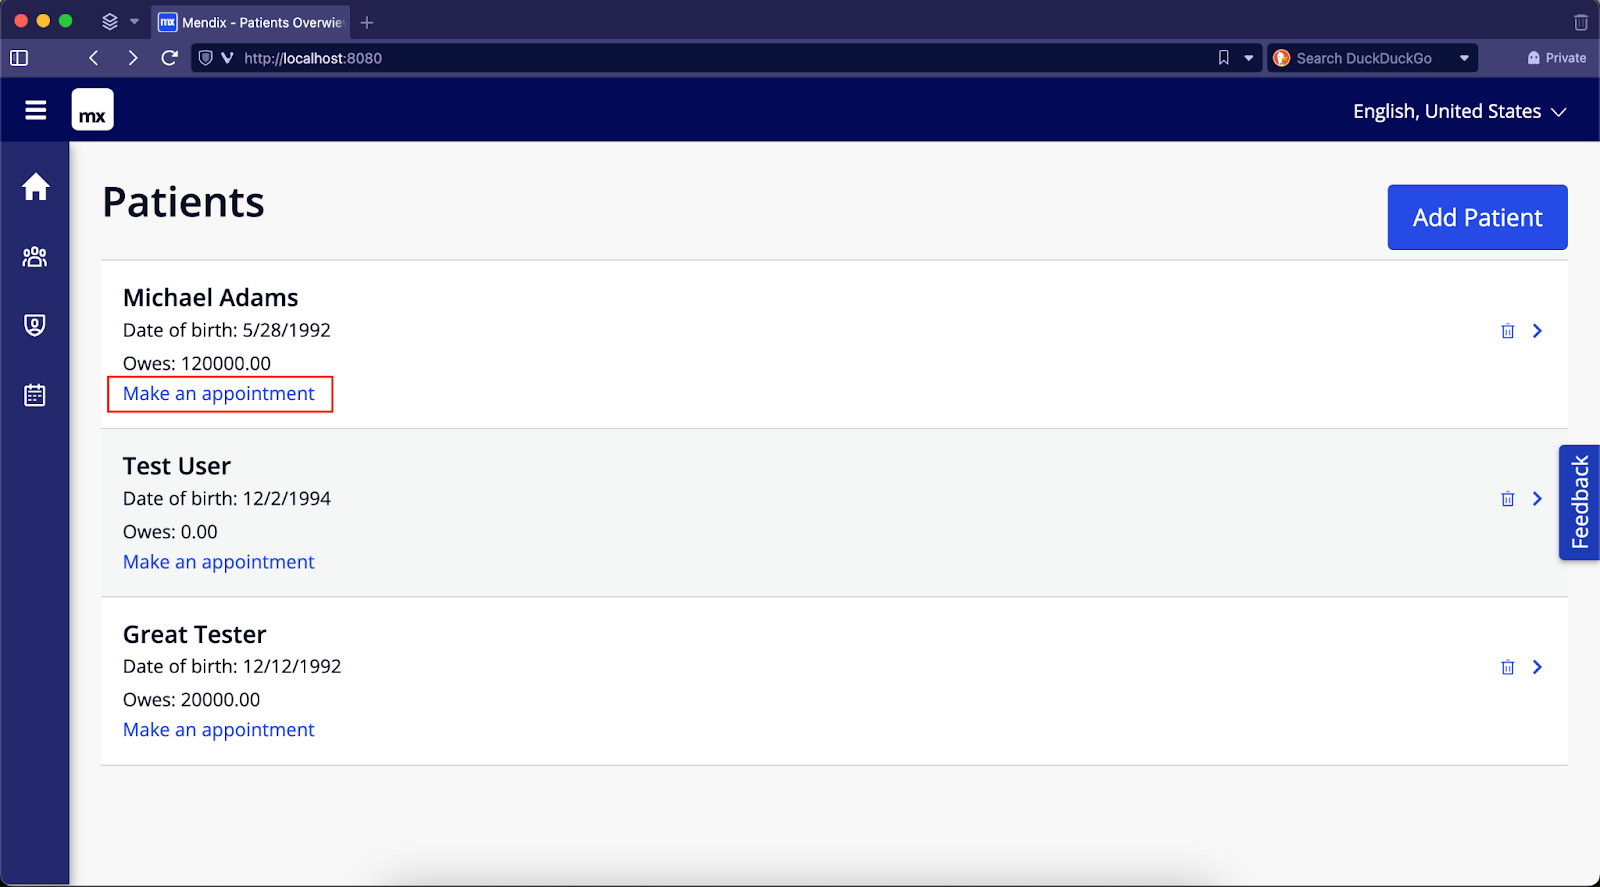
It should redirect you to the appointment creation page and when you look at the patient input, you should see that it was correctly filled with the chosen patient’s data.
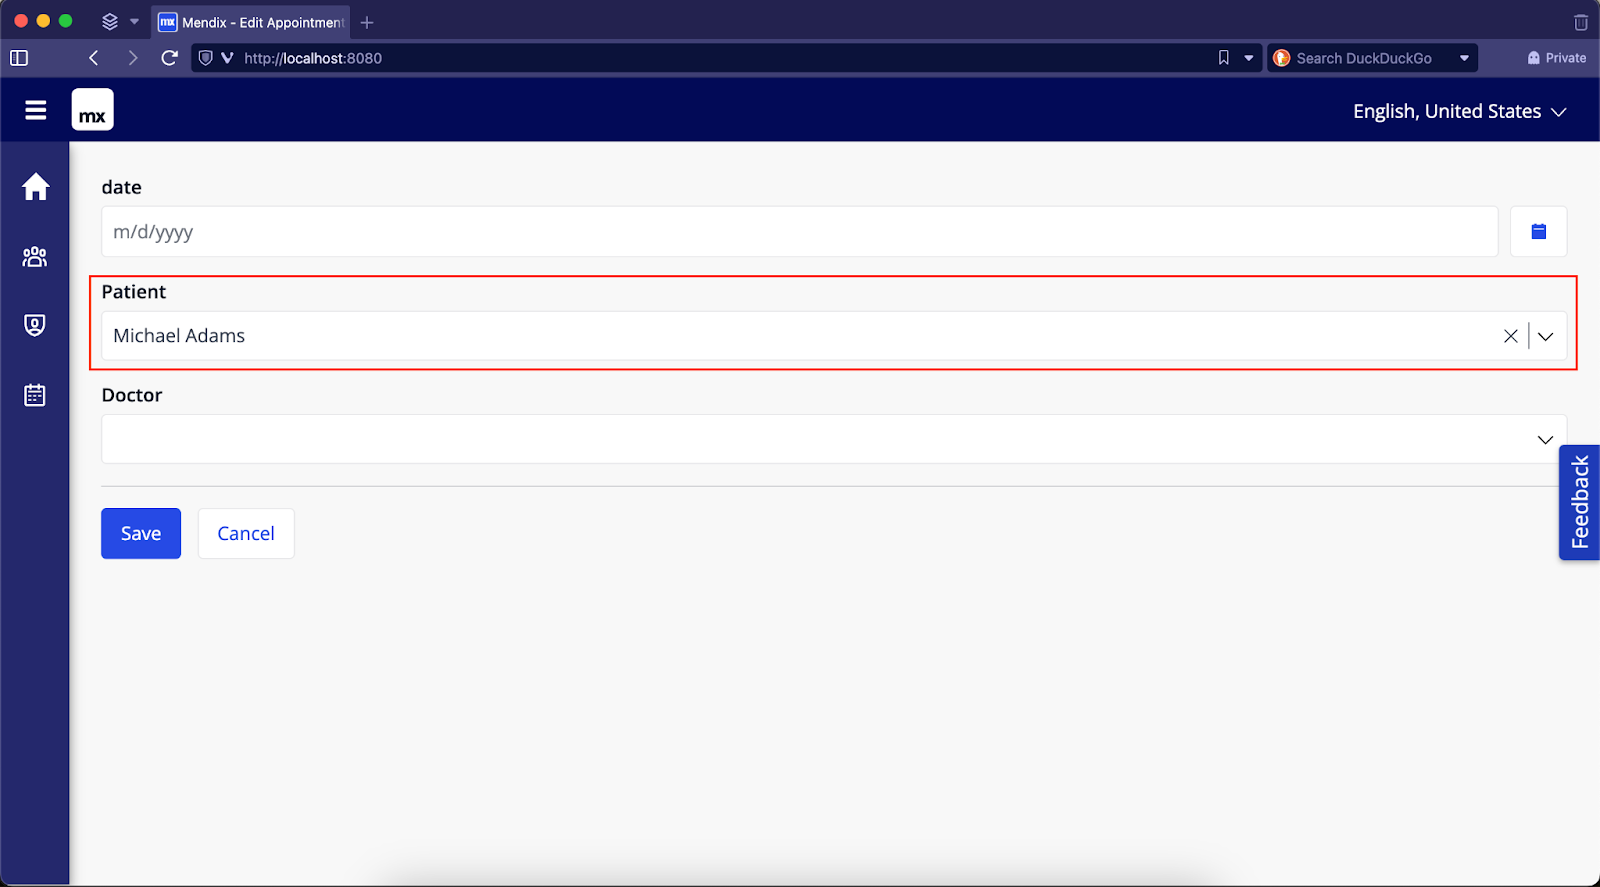
After filling out and saving the form, you can go to the Appointments tab to see your new appointment.
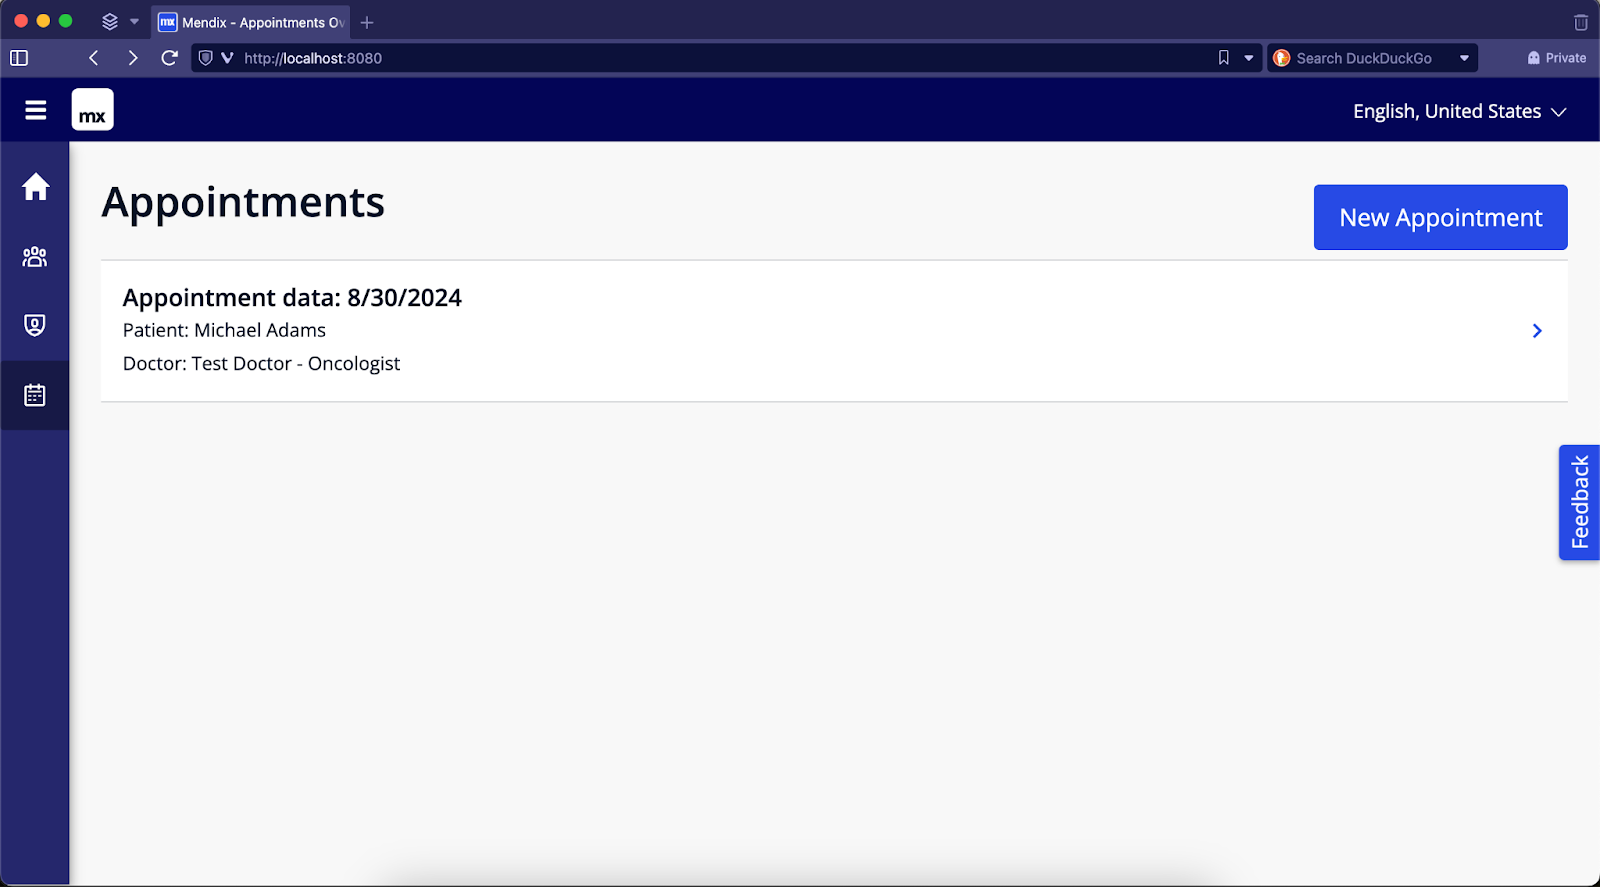
As expected, your newly created appointment is on the list. This means everything works correctly and you have successfully added all of the necessary functionalities. Feel free to expand on this project and add more useful features – such as disallowing users to delete an existing appointment if it’s happening in less than a week.
And that’s it for today. As you can see, creating a simple – but still quite powerful – app with Mendix is a very easy task. Of course, this is just an example – I advise you to check Mendix out and customize some parameters of this application to see what else is possible. There are various learning paths which you can take in order to delve deeper into this topic.
There are still many important topics which we have not touched upon, such as form validation, security, user management, custom widget creation, etc. We may cover some of these subjects in follow-up articles, so be on the lookout for them. But, most of all, remember that the best way to learn is to use the platform yourself. Just jump in and start building your own applications. You can also get a great boost by following Mendix official learning paths which uncover new functionalities of Studio Pro in an organized manner.
If you’re interested in Mendix and low-code in general, there are some other articles on the Pretius blog you might find useful:


