
IntelliJ Idea is a powerful tool, but working it out can be a bit challenging and time-consuming. In this article, I’ll offer you some shortcut tips (for Windows, macOS, and Linux) that should prove very helpful in this regard. Why? Because a well-planned keyboard shortcut or mouse shortcut can make a huge difference – I know this from experience, so I’ve decided to help other people out.
Of course, while shortcuts will certainly make you edit your code like a ninja, it’s worth pointing out there are still some limitations. If you like to work and write code with the help of a mouse or you don’t like vim, this article won’t help you. One thing that may help you, however, is remembering these two shortcuts (of course, type them without the + key) to exit vim:
– : + q <- quit vim when you don’t change anything in the file.
– : + q + ! <- quit vim when you change file, changes won’t be saved.
However, if you made it here, I assume that you want to learn how to develop code fast without a mouse – using the vim extension for IntelliJ. To make this happen, first of all, you must know the basics of vim. So, if you don’t know them, stop here and do your homework (here is a link that might prove helpful).
First of all, this section isn’t mandatory. It’s my personal preference so you may skip it if you don’t like it. If you decide not to, do the following:
Now, let’s install the IdeaVim plugin. To do this, in IntelliJ Idea go to File -> Settings -> Plugins, and in the search box type vim.

Before we go any further, there’s one shortcut we need to set up first. After the plugin is installed open configuration file ~/.ideavimrc and paste:
:imap jk <Esc>
This will remap the Esc key into j + k. If you are in edit mode and want to exit to visual mode now press jk instead of default Esc.
The rule of thumb is to use keys that are quickly available and comfortable to use. In my opinion, a bad keymap is something like ctrl + shift + f12. To press these keys you must take your hand off its natural position. In contrast to this, a good keymap is, for example, Caps Lock + i or Caps Lock + k – you can press these keys while your hands lay comfortably on the keyboard.
Caps Lock is a key that you don’t normally use – and I advise you to change that. The first step here is to make Caps Lock key a Ctrl key, at the operating system level in Windows and Linux. In macOS’s case do this with Command, instead of Ctrl (in other words, if you’re using a Mac, you need to remap Caps Lock to Command).
Now Go to File -> Setting -> Keymap and set:
(Remember that Caps Lock should serve as the Ctrl key in Windows/Linux or Command key under macOS)
OK, you have set the most important and frequently used shortcuts in a way that allows you to use them without lifting your hands off the keyboard.
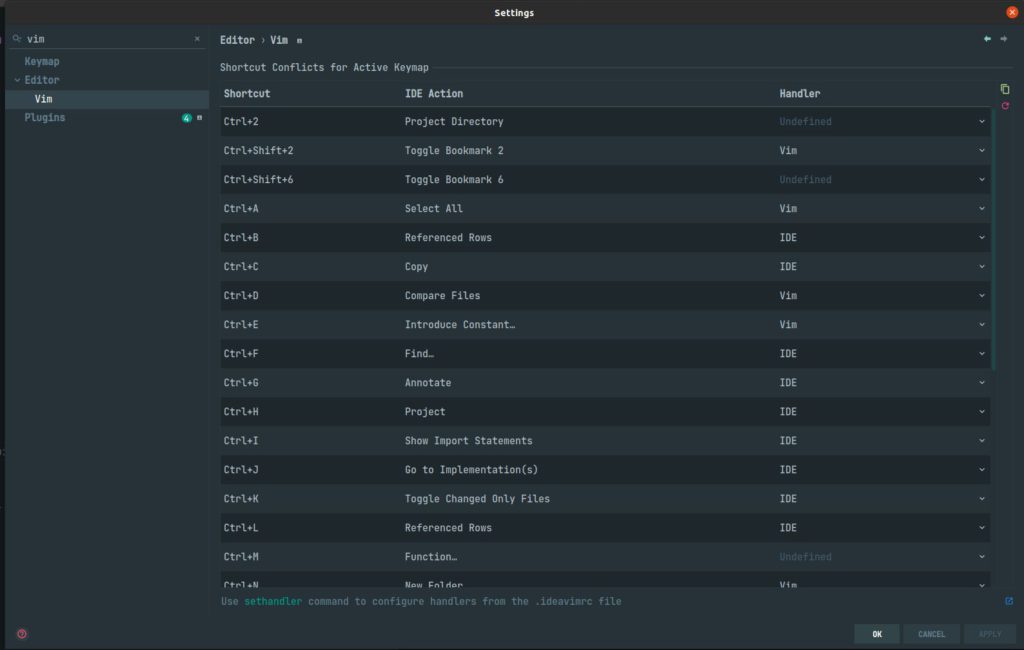
Now, go to File -> Setting -> Editor -> Vim and change all these new shortcuts to use IDE instead of VIM.
And with this, the article is concluded. Of course, this is just a taste of what you can do. Have fun and experiment – see what works best for you personally. It’s a pretty simple yet effective way to boost your productivity. Below, you can find an infographic that summarizes the most important details. I’ve also provided a link to the file in PDF format – easily printable, and ready to be used in your home or office.
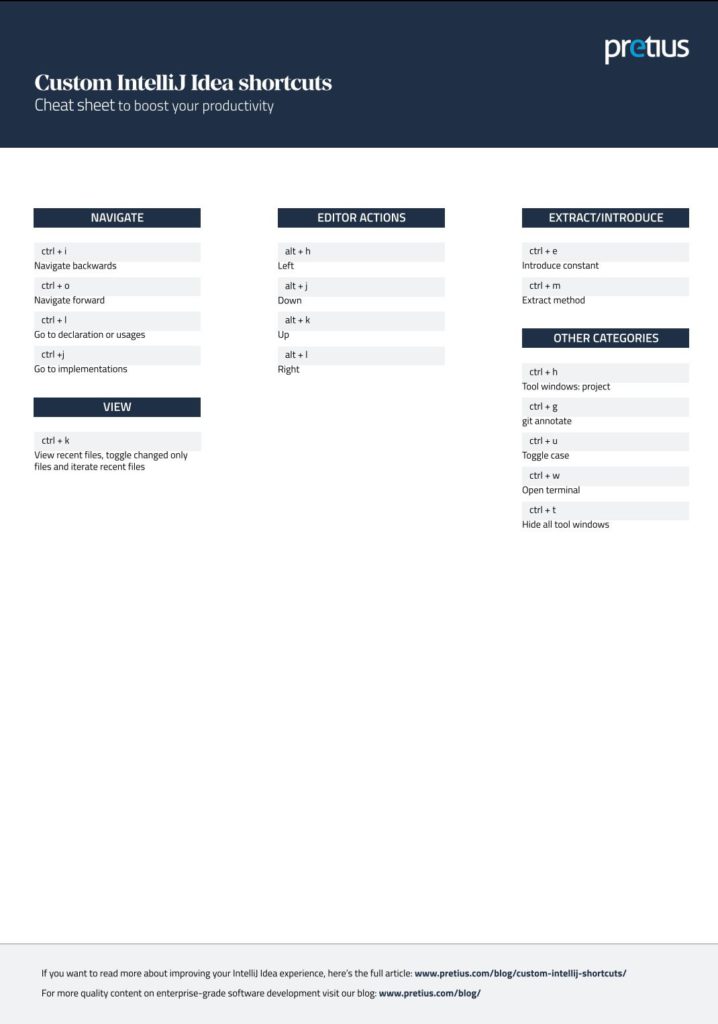
IntelliJ Idea shortcuts – infographic in PDF format
Also, be on the lookout for a continuation of this article – I’ll tackle the topic of the notorious Vim editor, providing you with some tips on how to use it more effectively.


