Over the last few years, optical character recognition (OCR) has become very popular. You can find various OCR engines which help you with the OCR process but you should consider Tesseract to build your own OCR application. It is a very powerful tool and it’s completely free (licensed under the Apache License, Version 2.0). The main advantage of tesseract-ocr is its high accuracy of character recognition. Unfortunately, it is poorly documented so you need to put quite an effort to make use of its all features.
Tesseract is very good at recognizing multiple languages and fonts. It can be used as a command-line program or an embedded library in a custom application. We used it to develop an application that automatically reads data from ID cards. It worked well and we did not spent much time on development. But we had some problems with specific letters recognition (mixing W and H, O and 0 (zero)). So we had to train Tesseract how to read these fonts properly.
Looking for a solution on how to do this, I came across a couple of articles suggesting to use some third-party GUI applications, but I encountered many problems with customizing them and still didn’t meet my goals. Luckily, I found this great article by Cédric Verstraeten which helped me to make it an old-fashioned command-line way. Unfortunately, it’s a little bit outdated and doesn’t include some details. In this article I will try to explain the process step by step.
What do we need before we begin?
First, you need to install tesseract-ocr (this tutorial is based on version 3.02). Do not forget to add the installation directory to your system path (the installer may not do it). You also need these applications:
- Cygwin – if you are using Windows (or you can rewrite the scripts from this article to Windows Batch)
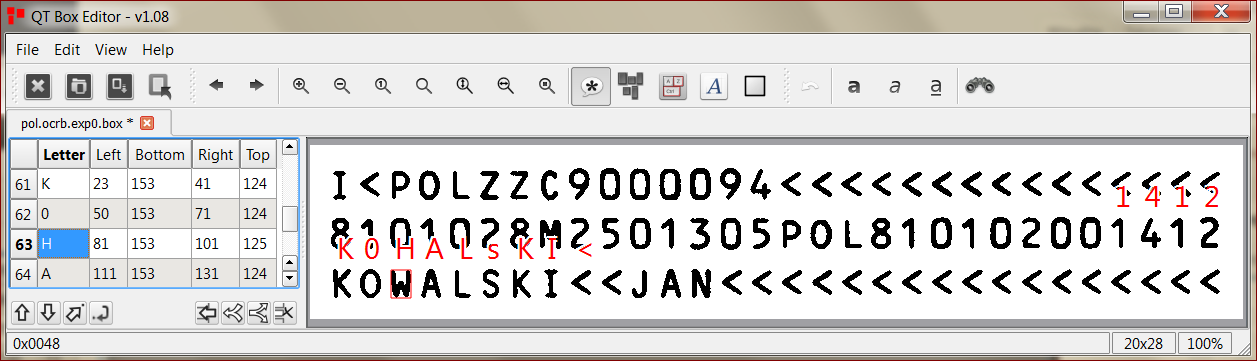
- Qt-box-editor – this is the only GUI program, you’re going to need – to fix the boxes generated by Tesseract, and ensure we feed the right data into it.
- for Windows (I used version 1.08, the newer ones are for some reason not packaged with all needed libraries, what makes the installation more difficult)
- or for Unix (sources)
Let’s move on
First, you must prepare the data which you want to feed into Tesseract. You need one or multiple files that together contain at least 1 (but preferably more) occurrence of each glyph of your font. I decided that to achieve the best accuracy I should train Tesseract with images preprocessed in exactly the same way as they would be in the final application. In my case the font was OCR-B – a font that is used on ID cards in Poland. So one of my files looked like this:

The input files must be named accordingly to the Tesseract convention:
|
1
|
[language name].[font name].exp[number].[file extension]
|
For example, if you had 3 .png files with English text in Arial font, their names would be:
|
1
2
3
|
eng.arial.exp0.png
eng.arial.exp1.png
eng.arial.exp2.png
|
Or in my case (14 .tif files, Polish, OCR-B):
|
1
2
3
4
|
pol.ocrb.exp0.tif
pol.ocrb.exp1.tif
...
pol.ocrb.exp13.tif
|
Once they are all gathered in one place and named correctly, we need to generate the box files for them. These files tell Tesseract where each glyph is located. Just open the bash console (on Windows it would be cygwin) and launch the script:
|
1
2
3
4
|
N=13 # set accordingly to the number of files that you have
for i in `seq 0 $N`; do
tesseract pol.ocrb.exp$i.tif pol.ocrb.exp$i batch.nochop makebox
done
|
The first two parameters of the command are input and output file names (remember to change them accordingly), then there follow config files (“batch.nochop” and “makebox”) which tell Tesseract what to do. You can find them all in $TESSERACT_INSTALATION_DIR/tessdata/configs/ and $TESSERACT_INSTALATION_DIR/tessdata/tessconfigs/ (here you can find the list of parameters you can use in the config files). In this case, we are using two of them:
- makebox – tells Tesseract to (only) generate box files
- batch.nochop – tells Tesseract not to use its fancy algorithms for segmenting the picture. If your files contain letters in a grid, you should use it, but otherwise you may want to remove it from the command.
Now it’s time for some manual work
Open each file (image file, not *.box file that you generated) with qt-box-editor and correct Tesseract if it made any mistakes (if it did not, you probably don’t have to train it 🙂 ).
Time to train Tesseract to recognize letters properly
Now we are going to generate *.traineddata file which can later be loaded to Tesseract, so it can recognize characters the way we want it.
There is yet one important thing to remember before you go further: If you are using windows make sure all of your files that you are using have the UNIX style end-of-line! If you are editing them manually you can do it with notepad++ in Edit -> EOL Conversion.
This is the script I used. Do not run it now, read it carefully. You will need to customize it to meet your needs.
|
1
2
3
4
5
6
7
8
9
10
11
12
13
14
15
16
17
18
19
20
21
22
23
24
|
function wrap {
for i in `seq 0 $1`; do
echo “$2$i$3”
done
}
N=13 # Change this accordingly to number of files, that you want to feed to tesseract or export it as a script parameter.
# Uncomment this line if, you’re rerunning the script
#rm pol.pffmtable pol.shapetable pol.traineddata pol.unicharset unicharset font_properties pol.inttemp pol.normproto *.tr *.txt
for i in `seq 0 $N`; do
tesseract pol.ocrb.exp$i.tif pol.ocrb.exp$i nobatch box.train
done
unicharset_extractor `wrap $N “pol.ocrb.exp” “.box”`
echo “ocrb 0 0 1 0 0” > font_properties # tell Tesseract informations about the font
mftraining –F font_properties –U unicharset –O pol.unicharset `wrap $N “pol.ocrb.exp” “.tr”`
cntraining `wrap $N “pol.ocrb.exp” “.tr”`
# rename all files created by mftraing en cntraining, add the prefix pol.:
mv inttemp pol.inttemp
mv normproto pol.normproto
mv pffmtable pol.pffmtable
mv shapetable pol.shapetable
combine_tessdata pol.
|
The “wrap function” is nothing special. Just a handy method that repeats a string a given number of times with a different number inside it (run wrap 10 “prefix” “suffix” if you are not sure what it does). The most important part of the script begins after that.
Remove the old output
We need to remove all the files generated last time if we run the script again. It’s important because Tesseract sometimes works oddly when the output files are already there (is it a bug or a feature?). Remember to change the “pol” part to “eng” or any other language you are using (here and in every other occurrence that you will find. The same applies to “ocrb”).
|
1
|
rm pol.pffmtable pol.shapetable pol.traineddata pol.unicharset unicharset font_properties pol.inttemp pol.normproto *.tr *.txt
|
Training files
Now it’s time to take the box and image files and compound them into training (*.tr) files.
|
1
2
3
|
for i in `seq 0 $N`; do
tesseract pol.ocrb.exp$i.tif pol.ocrb.exp$i box.train
done
|
This time we’re only using “box.train” config to tell Tesseract to generate *.tr files.
Unicharset
Then we are going to extract the charset from the box files (the command creates a “unicharset” file).
|
1
|
unicharset_extractor `wrap $N “pol.ocrb.exp” “.box”`
|
We use our “wrap” function to do it for all the files at once, no matter how many of them we have (just set the $N variable to the right value).
Font properties
Next we need to create a font_properties file.
|
1
|
echo “ocrb 0 0 1 0 0” > font_properties # tell Tesseract informations about the font
|
The syntax is as follows:
|
1
|
fontname italic bold monospace serif fraktur
|
Do not forget to set the values accordingly to the properties of your font.
The final training
It is the time for what everyone has been waiting for:
|
1
2
|
mftraining –F font_properties –U unicharset –O pol.unicharset `wrap $N “pol.ocrb.exp” “.tr”`
cntraining `wrap $N “pol.ocrb.exp” “.tr”`
|
Rename the files
Now we have to add the language prefix to the generated files, so that they can be nicely consumed in the last step. This part of the script is not very sophisticated:
|
1
2
3
4
5
|
# rename all files created by mftraing and cntraining, add the prefix pol.:
mv inttemp pol.inttemp
mv normproto pol.normproto
mv pffmtable pol.pffmtable
mv shapetable pol.shapetable
|
Combine it all into a traineddata file
And the last step. Take all the files with pol.* (or other) prefix and combine them into pol.traineddata:
|
1
|
combine_tessdata pol.
|
Once the file is ready, you can copy it to $TESSERACT_INSTALATION_DIR/tessdata/ so you can use it from command-line or wherever else you need it (for example in a new application that uses Tesseract as a library).
Happy OCR-ing!
Looking for specialists to support you with enterprise-grade development?
As you can see, Pretius’s developers have a great deal of experience with creating software based on up-to-date technologies. If you’re looking for a team of such professionals, write us at hello@pretius.com or use the contact form below. We’ll see what we can do and get back to you in 48 hours.
Further reading
- How Pieces for Developers built their OCR engine for code


