It’s quite possible that your company is using Atlassian JIRA. And, since you came here, I guess that you’d like to know how to integrate JIRA with Oracle APEX. Well, let’s begin!
Jira is Atlassian’s software for error tracking and project management. Users working with any APEX application often need to report an error regarding the application usage or data they work with. Instead of logging in to Jira, looking for a specified project, using a wizard that will allow to create a new request (name, type, description, request assignment, etc.), the user can easily use a solution implemented fully in Oracle Application Express, which we will introduce step by step in a new Oracle APEX article series – Let’s integrate with Jira!
In the examples below, we will use the Oracle Database 12c Enterprise Edition Release database and the Oracle SQL Developer Version 18.2. tool.
This blog entry consists of three parts describing how to integrate the Oracle APEX application with Jira step by step:
- In the first part, we will present inner workings of OAuth authorization based on the token exchange process commonly known as the “OAuth Dance”. The end result will be generating a token that will allow us to manage Jira’s data using the REST API.
- In the next step, we will focus on using Java in Oracle, which is necessary for the implementation of the encryption used in the “OAuth Dance” process.
- In the last part, we will present an example of using the Jira API to create your own Jira request from the Oracle Apex application.
What is OAuth and how to do the “OAuth Dance”?
Authorization with Jira can be implemented in one of two ways, either through the use of Basic Authentication or via OAuth 1.0 standard. Each approach has its pros and cons. The first method is very simple, but in the request header, we send the user’s encrypted login and password. The second one is more complicated to implement but doesn’t need to send the user’s password or the login information in the request header, protecting the user’s privacy. For this reason, we will focus on the second approach in this article.
OAuth is an authorization standard that allows users to share applications information stored with other service providers without entering a password. The whole process is done by exchanging tokens that are received in response to HTTP requests sent to a specific address (table below). This process is known as “OAuth Dance” and can be described in three steps:
- The user submits a request through the Request Token URL to generate a Request Token.
- The user is redirected to the Authorize Token URL to authorize the previously received Request Token.
- The user submits a request through the Access Token URL to generate an Access token. Using Access Token we can process data provided by Jira (Jira API).
| Request Token URL | /jira/plugins/servlet/oauth/request-token |
| Authorize Token URL | /jira/plugins/servlet/oauth/authorize |
| Access Token URL | /jira/plugins/servlet/oauth/access-token |
To learn more about the “OAuth Dance”, you can read Jira’s documentation: https://developer.atlassian.com/cloud/jira/platform/jira-rest-api-oauth-authentication/
In the next part of the article, we will go from theory to practice and describe specified steps of “OAuth Dance”.
Sending the request and receiving the reply is based on using the HTTP protocol. For their implementation we will use the PL/SQL library utl_http. The most important thing will be to correctly define the headers and the body of the request we generate that will allow us to get the appropriate token.
“OAuth Dance” step 1: Request Token & Redirection to Authorization URL
Obtaining a Token Request is the first step of “OAuth Dance”. We need to define basic headers such as user-agent and Content-Type in the HTTP POST request. The Authorization header should include the parameters shown in the example below:
|
1
2
3
4
5
6
7
8
9
10
11
12
|
v_req := utl_http.begin_request (‘/jira/plugins/servlet/oauth/request-token’, ‘POST’, ‘HTTP/1.1’);
utl_http.set_header(v_req, ‘user-agent’, ‘mozilla/4.0’);
utl_http.set_header(v_req, ‘Content-Type’, ‘application/x-www-form-urlencoded’);
utl_http.set_header(v_req, ‘Authorization’,
‘OAuth
oauth_callback=”URL to be redirected to after authorization”,
oauth_consumer_key=”key value in Jira configuration”,
oauth_nonce=”unique string for request”,
oauth_signature=”signature generated using SHA1RSA method”,
oauth_signature_method=”the method of signature used”,
oauth_timestamp=”number of seconds since January 1, 1970″‘;’
);
|
Let’s stop for a moment to think about the signature. All requests must be signed with a private key (located on the side of our application), and then verified with a public key (located on the side of Jira). OAuth defines three signature methods: HMAC-SHA1, RSA-SHA1 and PLAINTEXT, however, Jira only uses RSA-SHA1. So the signature is nothing but a set of connected parameters (so-called base string) signed with a private key. We can create a base string as shown below, but we’ll write more about implementing the signature in the next article.
|
1
2
3
4
5
6
7
|
po_base_string := ‘POST&’ || UTL_URL.ESCAPE(‘/jira/plugins/servlet/oauth/request-token’, TRUE)||‘&’|| UTL_URL.ESCAPE(
‘oauth_callback=’|| URL to be redirected to after authorization ||‘&’||
‘oauth_consumer_key=’|| key value in Jira configuration ||‘&’||
‘oauth_nonce=’|| unique string for request ||‘&’||
‘oauth_signature_method=’|| the signature method used ||‘&’||
‘oauth_timestamp=’|| the number of seconds since January 1, 1970,
TRUE);
|
After sending the request, we will receive a response containing the Request Token:
|
1
|
oauth_token=DdNCjYhyOfUdHUDXnYqc3RVPN2MqYy3d&oauth_token_secret=JOzgzCQ00MkHO01hL18Om19XMAdtwDIH&oauth_callback_confirmed=true
|
“OAuth Dance” step 2: Authorization
After generating the Request Token, it should be added to the Authorization URL: /jira/plugins/servlet/oauth/authorize?OAuth_token=DdNCjYhyOfUdHUDXnYqc3RVPN2MqYy3d. The described URL redirects to the authorization screen:
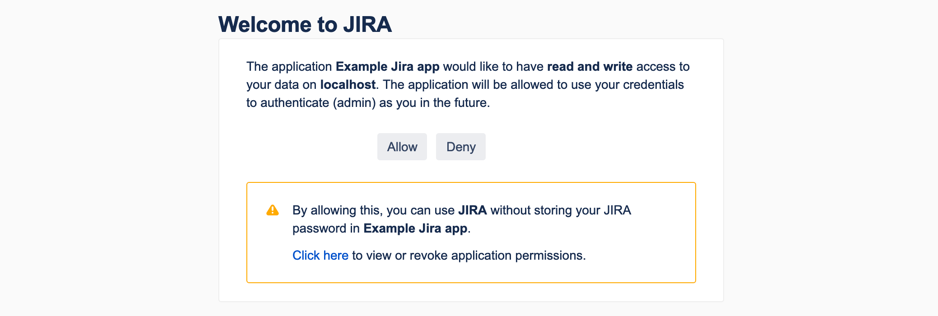
After clicking the Allow button, the user will be redirected to the URL defined by the oauth_callback parameter in step 1. In addition, the oauth_verifier parameter will be added to the URL which will be used to get the Access Token in the next step.
“OAuth Dance” step 3: Access Token
We have already generated a Request Token and we have passed the authorization process, which result is generated oauth_verifier parameter. The only thing left for us is to send a request to generate an Access Token that will allow us to process data in Jira in any way we like. The request should be created according to the example presented in step 1. The only changes that we make are in the URL: /jira/plugins/servlet/oauth/access-token (notice the lack of the “oauth_callback” parameter and two new parameters present in the Authorization request header:
- oauth_token – Request Token returned in response to the request in step 1
- oauth_verifier – the parameter returned after authorization in step 2
We must also remember to modify the parameters used to create the Base String which must be signed with the private key.
As a result of sending the request, we will receive a response containing the Access Token:
|
1
|
oauth_token=TQ8QIYrHkgKbedOSmVCu9btQSYGhVWhE&oauth_token_secret=JOzgzCQ00MkHO01hL18Om19XMAdtwDIH&oauth_expires_in=157680000&oauth_session_handle=RFRmruvUnbkTQIveyqEEGzWhLdYj6gWU&oauth_authorization_expires_in=160272000
|
Ok, we’ve described the OAuth 1.0 authorization standard and presented the process of exchanging tokens via the so_called “OAuth Dance”. We used PL/SQL libraries for the token exchange implementation, which allows us to use the examples in our Oracle Apex processes. In the next part, we will describe in more detail the problem of the required digital signature and the process of signing a request in Oracle.
Java in Oracle
As we mentioned before, Jira imposes upon us the constraint of using solely the SHA1-RSA algorithm for encryption and digital signing. PL/SQL libraries don’t support its implementation, so we had to find another solution. To allow us to use SHA1-RSA in Oracle we will have to turn to Java, another language whose use is supported by Oracle database, and use the available Java implementation of SHA1-RSA. Before we proceed to the implementation of the digital signature using SHA1-RSA we will present a simple example of creating your own Java class in Oracle.
The Oracle database supports Java from version 8i and its use is very simple. One method to create your own class is to use the instructions below:
|
1
2
3
4
5
6
7
|
CREATE OR REPLACE AND COMPILE JAVA SOURCE NAMED “Example” AS
public class Example {
public static String exampleMethod(String testString)
{
return testString;
}
};
|
In this way, we created the Example class containing the exampleMethod method which takes a String object as a parameter and returns it. All Java objects can be found in the side menu of the Oracle SQL Developer tool in the Java tab.
Next, we create a PL/SQL function that will allow us to use the previously created class:
|
1
2
|
CREATE OR REPLACE FUNCTION f_example(p_string VARCHAR2
) RETURN VARCHAR2 AS LANGUAGE JAVA NAME ‘Example.exampleMethod(java.lang.String) return java.lang.String’;
|
The f_example function can be used anywhere in PL/SQL block code:
|
1
2
3
4
5
6
|
DECLARE
v_val VARCHAR2(10) := ‘HelloWorld’;
BEGIN
v_val := f_example(v_val);
dbms_output.put_line(v_val);
END;
|
SHA1-RSA in PL/SQL
Since we now know how easy it is to create a Java classes and methods, and call them from PL/SQL code, we can move on to the more difficult issue of creating a digital signature using the SHA1-RSA algorithm. We wrote more about the digital signature itself and its use in so-called “OAuth Dance” in the previous article in this series.
A small reminder. OAuth 1.0 is an authorization standard that allows you to share information stored with other providers through token exchange. The token request must be signed with the private key (located on the side of our application), and then verified with the public key (located on the side of Jira). And most important, the signature algorithm must be implemented using the SHA1-RSA algorithm.
You can generate private and public keys in many ways. We used OpenSSL for this article. It is an open implementation of SSL protocols and various cryptographic algorithms, available for Linux and Microsoft Windows systems. Key generation and configuration of Atlassian Jira are described in detail on the official Atlassian website: https://developer.atlassian.com/server/jira/platform/oauth/
To use the SHA1-RSA method in PL/SQL we will create our own class “RSASignature” which will use the “java.security.*” library namespace. The class will contain a “sign(String, String)” method which will take the base string and a private key as parameters and which will return an encrypted signature that can be used in “OAuth Dance”.
|
1
2
3
4
5
6
7
8
9
10
11
12
13
14
15
16
17
|
public static String sign(String content, String privateKeyStr) throws GeneralSecurityException, UnsupportedEncodingException {
PrivateKey privateKey = getPrivateKey(privateKeyStr);
Signature signer = Signature.getInstance(SHA1_WITH_RSA_ALGORITHM);
signer.initSign(privateKey);
signer.update(content.getBytes(UTF_8));
// get the signature bytes
byte[] signatureBytes = signer.sign();
// encode the byte array into a String
String signature = Base64.getEncoder().encodeToString(signatureBytes);
// encode URL characters
signature = URLEncoder.encode(signature, UTF_8.name());
return signature;
}
|
In addition, the “RSASignature” class implements the conversion of private and public keys from “String” objects to “PrivateKey” and “PublicKey” objects, and signature verification. All code is available at: https://github.com/Pretius/java-rsa-signature
Having prepared the required Java code, we will create a Java Source object according to the method described earlier. We then define the function wrapper, the method calling our Java functions through PL/SQL code as the “signRSA” function:
|
1
2
3
4
|
create or replace FUNCTION signRSA (p_base_string VARCHAR2, p_private_key VARCHAR2)
RETURN VARCHAR2
AS
LANGUAGE JAVA NAME ‘RSASignature.signBaseString(java.lang.String, java.lang.String) return java.lang.String’;
|
OK, so this part described how to use Java in Oracle, then, we looked at key generation and digital signature implementation using SHA1-RSA algorithm, implemented in Java. The created signature can be used during the authentication process, which was described in the beginning of this article. Now, let’s use the Jira API to create your own Jira request.
Using Jira API to create your own Jira request from the Oracle APEX application
Jira provides a REST API that allows integration of Jira with other applications. Thanks to the API, you can create, update, modify and delete data in Jira using standard HTTP methods such as GET, PUT, POST and DELETE.
We will use a POST HTTP request to create a Jira request. In the headers we will pass parameters such as the format and length of the sent message (Content-Type and Content-Length). However, the content of the Authorization header will be created according to the rules described in previous articles, example:
|
1
2
3
4
5
6
7
8
9
10
11
12
13
14
|
v_req := utl_http.begin_request (‘http://localhost:8081/rest/api/latest/issue’, ‘POST’, ‘HTTP/1.1’);
utl_http.set_header(v_req, ‘Authorization’,
‘
OAuth
oauth_consumer_key=”key value in the Jira configuration”,
oauth_nonce=”unique string for the request”,
oauth_signature=”signature generated using the SHA1RSA method”
oauth_signature_method=”the method of signature used”,
oauth_timestamp=”number of seconds since January 1, 1970″,
oauth_token=”Access Token returned in the third step of OAuth dance”,
oauth_verifier=”Verifier returned after approving user authorization”
‘);
utl_http.set_header(v_req, ‘Content-Type’, ‘application/json;charset=UTF-8’);
utl_http.set_header(v_req, ‘Content-Length’, length(v_content));
|
The content of the request will be saved in JSON format. According to the example below, a new high priority bug report will be added to the TPFAU project:
|
1
2
3
4
5
6
7
8
9
10
11
12
13
14
15
16
17
18
|
v_content := ‘
{
“fields”: {
“project”:
{
“key”: “TPFAU”
},
“priority”: {
“name”: “High”
},
“summary”: “Example Summary”,
“description”: “Example Description”,
“issuetype”: {
“name”: “Bug”
}
}
}
‘;
|
In a series of articles, we described the so-called ‘OAuth Dance’ in detail, creating a signature using Java, and provided examples of using the Jira REST API. Now, we can create a form in the Oracle APEX application that will allow us to create a request in Jira.
We will use a specific business case for the solution presented. The user analyzes the report of the results of scientific experiments. During the analysis, he notices that the results are significantly different from the norm, which may be due to incorrect data. The user wants to create a bug request in Jira. The request should have the appropriate title, description, high priority, and should be assigned to the person indicated by the user.
- We create a link column with the Jira icon on the experiment report.
- We create the process for sending a request to generate a Request Token. In the request header, we define the address of the Oracle APEX form to create a ticket in Jira. Then, add the returned Request Token to the Authorization URL and define the redirection to the URL just created. The process should start after pressing the Jira icon.
- After confirming the identity on the authorization screen, the user will be redirected to the address defined in the request header from point 2.
- Next, we create a ‘Before Header’ process that retrieves the authorized Token and Verifier Request values from the URL using the owa.num_cgi_vars library and writes their values to APEX items.
- We create another ‘Before Header’ process that will send a request to generate an Access Token and save it to the APEX item.
- We create a form that allows you create a request in Jira with all attributes described in the business case.
- We add a process sending a request to create a bug in Jira using the API described in the first part of this article.
Summary
In this article, we have described the integration of the Oracle APEX application with the Jira tool. First, we presented in detail the operation of the “OAuth Dance” process which is based on the exchange of tokens. Then, we described the signature creation using Java. Finally, we provided an example of using the Jira API in order to create an Oracle APEX form which, in turn, allows you to create a new Jira request for a specific business case.
Now, try using these tricks to create your own integration!